一、Elastic基本功能
Elasticsearch 是一个实时分布式搜索和分析引擎,一般用于全文搜索、结构化搜索,分析或者三者混用。
它的底层是基于Apache Lucene(TM)的开源搜索引擎,但是lucene只是一个库,需要java开发然后集成到应用。
Elasticsearch的特性描述:
分布式实时文件存储,每个字段都能被索引并且可以被搜索
分布式的实时分析搜索引擎
可以扩展到上百台服务器,处理PB级结构化或者非结构化数据
二、Elastic安装准备
系统准备:
CentOS 7.2
jdk8
elasticsearch 5.5
1.首先需要java环境,需要安装jdk8,下载对应的tar包
[root@master local]# ls
bin jdk-8u152-linux-x64.tar.gz lib share etc lib64 mysql src games libexec qcloud include
[root@master local]# pwd
/usr/local
[root@master local]# tar zxvf jdk-8u152-linux-x64.tar.gz
#解压完成后,配置JAVA_HOME的环境变量
[root@master ~]# vim /etc/profile
#我一般是习惯放在文件最后
#===============JAVA_HOME======================
#这些环境变量配置的就是刚刚tar包解压之后的目录下
export JAVA_HOME=/usr/local/jdk1.8.0_152
export CLASSPATH=.:$JAVA_HOME/lib/dt.jar:$JAVA_HOME/lib/tools.jar
export PATH=$PATH:$JAVA_HOME/bin
"/etc/profile" 83L, 1972C written
[root@master ~]# source /etc/profile
#查看一下版本是否正确
[root@master ~]# java -version
java version "1.8.0_152"
Java(TM) SE Runtime Environment (build 1.8.0_152-b16)
Java HotSpot(TM) 64-Bit Server VM (build 25.152-b16, mixed mode)
=================================================
到目前为止,jdk8安装完毕
2.安装elastic 下载解压即可
[root@master ~]# wget https://artifacts.elastic.co/downloads/elasticsearch/elasticsearch-5.5.1.zip
--2018-03-27 11:29:36-- https://artifacts.elastic.co/downloads/elasticsearch/elasticsearch-5.5.1.zip
Resolving artifacts.elastic.co (artifacts.elastic.co)... 184.73.245.233, 184.73.156.41, 54.235.82.130, ...
Connecting to artifacts.elastic.co (artifacts.elastic.co)|184.73.245.233|:443... connected.
HTTP request sent, awaiting response... 200 OK
Length: 33511694 (32M) [application/zip]
Saving to: ‘elasticsearch-5.5.1.zip’
100%[===============================================================================>] 33,511,694 2.14MB/s in 36s
2018-03-27 11:30:15 (900 KB/s) - ‘elasticsearch-5.5.1.zip’ saved [33511694/33511694]
[root@master ~]# ls
all.sql anaconda-ks.cfg elasticsearch-5.5.1.zip MHA-Manager.qcow2 zhou
[root@master ~]# mv elasticsearch-5.5.1.zip /usr/local/
[root@master ~]# cd /usr/local/
[root@master local]# ls | egrep ela
elasticsearch-5.5.1.zip
[root@master local]# unzip elasticsearch-5.5.1.zip
[root@master local]# cd elasticsearch-5.5.1/
#=======================================================
#启动过程中出现的错误:
1》errno12 虚拟机内存不足
[root@master elasticsearch-5.5.1]# ./bin/elasticsearch
Java HotSpot(TM) 64-Bit Server VM warning: INFO: os::commit_memory(0x0000000085330000, 2060255232, 0) failed; error='Cannot allocate memory' (errno=12)
#
# There is insufficient memory for the Java Runtime Environment to continue.
# Native memory allocation (mmap) failed to map 2060255232 bytes for committing reserved memory.
# An error report file with more information is saved as:
# /usr/local/elasticsearch-5.5.1/hs_err_pid21903.log
[root@master elasticsearch-5.5.1]# sysctl -w vm.max_map_count=262144
vm.max_map_count = 262144
#解决办法:
由于默认配置是2G内存,虚拟机内存不够,可以更改为1G
[root@master elasticsearch-5.5.1]# cd config/
[root@master config]# ls
elasticsearch.yml jvm.options log4j2.properties
[root@master config]# pwd
/usr/local/elasticsearch-5.5.1/config
可以先free -m查看一下剩余的内存,再设置elastic的内存值
[root@master config]# vim jvm.options
-Xms1g
-Xmx1g
"jvm.options" 111L, 3064C
2》不能用root运行elastic java.lang.RuntimeException: can not run elasticsearch as root
解决方案:新建一个用户elauser,并且将elasticsearch的目录属性全部更改成elauser
(如若目录夹属性未更改,有可能会出现如下错误)
#############################################
3》elasticsearch解压后的目录夹属性需要一起更改
main ERROR Could not register mbeans java.security.AccessControlException: access denied ("javax.management.MBeanTrustPermission" "register")
解决方案:
[root@ELK local]# chown -R elauser:elauser ./elasticsearch-5.5.1
[elauser@ELK local]$ ll | egrep elasticsearch-5.5.1
drwxr-xr-x 7 elauser elauser 4096 Apr 10 15:20 elasticsearch-5.5.1
-rw-r--r-- 1 root root 33511694 Jul 25 2017 elasticsearch-5.5.1.zip
###############################################
切换到elauser,将java环境变量写在~/.bash_profile,如下所示(或者直接在最开始配置环境变量的时候,写在/etc/profile 这样所有的用户都能使用了)
[elauser@master bin]$ vim ~/.bash_profile
#===============JAVA_HOME======================
export JAVA_HOME=/usr/local/jdk1.8.0_152
export CLASSPATH=.:$JAVA_HOME/lib/dt.jar:$JAVA_HOME/lib/tools.jar
#export PATH=$PATH:$JAVA_HOME/bin
#================================================
PATH=$PATH:$HOME/.local/bin:$HOME/bin:$JAVA_HOME/bin
export PATH
"~/.bash_profile" 17L, 447C written
新开一个窗口
[elauser@master root]$ java -version
java version "1.8.0_152"
Java(TM) SE Runtime Environment (build 1.8.0_152-b16)
Java HotSpot(TM) 64-Bit Server VM (build 25.152-b16, mixed mode)
[elauser@master root]$ cd /usr/local/elasticsearch-5.5.1/bin/
[elauser@master bin]$ ./elasticsearch
[2018-03-27T14:04:55,441][INFO ][o.e.n.Node ] [] initializing ...
[2018-03-27T14:04:55,639][INFO ][o.e.e.NodeEnvironment ] [BJ7MQFi] using [1] data paths, mounts [[/ (rootfs)]], net usable_space [38.7gb], net total_space [49gb], spins? [unknown], types [rootfs]
#====================================================================
以上错误是参考该网址:https://blog.csdn.net/qq_21387171/article/details/53577115
似乎启动成功了。
#打开另外一个终端,测试一下
[root@master local]# curl 'http://localhost:9200/?pretty';
{
"name" : "BJ7MQFi",
"cluster_name" : "elasticsearch",
"cluster_uuid" : "p6zkUDhtR26SDfiCKCu5Zg",
"version" : {
"number" : "5.5.1",
"build_hash" : "19c13d0",
"build_date" : "2017-07-18T20:44:24.823Z",
"build_snapshot" : false,
"lucene_version" : "6.6.0"
},
"tagline" : "You Know, for Search"
}
#默认情况下elastic只能本地访问,如需远程访问,则需要修改其配置文件elasticsearch.yml
[elauser@master config]$ pwd
/usr/local/elasticsearch-5.5.1/config
[elauser@master config]$ ls
elasticsearch.yml jvm.options log4j2.properties scripts
[elauser@master config]$ vim elasticsearch.yml
[elauser@master config]$ egrep 'network' elasticsearch.yml
#network.host: 192.168.0.1
network.host: 0.0.0.0
# For more information, consult the network module documentation.
#关闭elastic:
1.可以直接在启动页面Ctrl-C
2.调用shutdown API来关闭
curl -XPOST 'http://localhost:9200/_shutdown' 然而执行失败了,发现shutdown这个api被去掉了。
3.简单粗暴的话,不如杀进程
ps -ef | grep elastic;然后找到进程号,kill -9 进程号
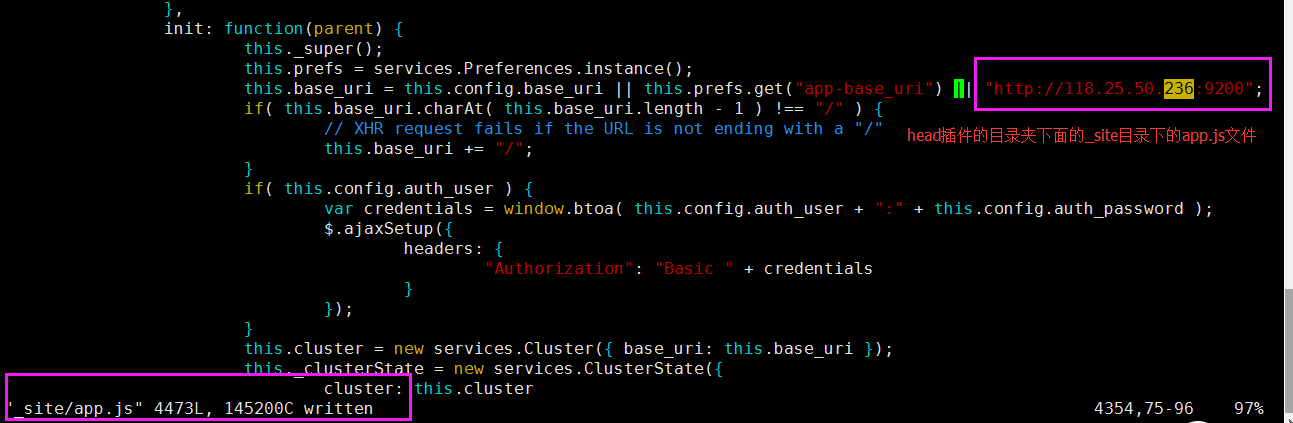
4.网上有介绍head插件,点击动作关停 即可
3.配置elasticsearch
######################## 去掉不必要的注释 ###############################################
[elauser@ELK config]$ pwd
/usr/local/elasticsearch-5.5.1/config
[elauser@ELK config]$ cat elasticsearch.yml
# ======================== Elasticsearch Configuration =========================
# ---------------------------------- Cluster -----------------------------------
# Use a descriptive name for your cluster: 给集群定义一个name
cluster.name: demon
#
# ------------------------------------ Node ------------------------------------
# Use a descriptive name for the node: 给节点定义一个name
#node.name: node-1
node.name: elk-1
# ----------------------------------- Paths ------------------------------------
# Path to directory where to store the data (separate multiple locations by comma): 数据目录夹
#path.data: /path/to/data
path.data: /usr/local/elasticsearch-5.5.1/data
#
# Path to log files: 日志目录夹
path.logs: /usr/local/elasticsearch-5.5.1/logs
#
# ----------------------------------- Memory -----------------------------------
# Lock the memory on startup: 开启时锁定内存
bootstrap.memory_lock: true
# ---------------------------------- Network -----------------------------------
# Set the bind address to a specific IP (IPv4 or IPv6): 绑定ip
network.host: 0.0.0.0
# Set a custom port for HTTP: 设定端口
http.port: 9200
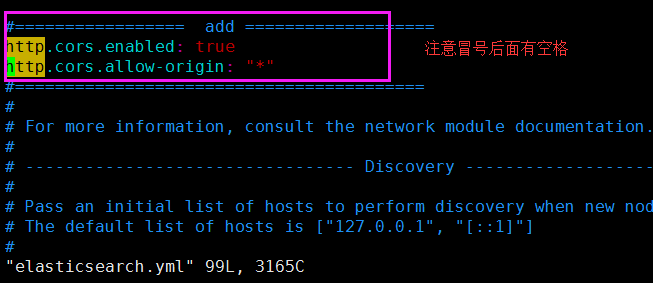
#================= add =================== 这里切记注意冒号后面有空格
http.cors.enabled: true
http.cors.allow-origin: "*"
#=========================================
##################################################################################
出现报错[ERROR][o.e.b.Bootstrap ] [elk-1] node validation exception
[1] bootstrap checks failed
[1]: memory locking requested for elasticsearch process but memory is not locked
#查一下日志文件
[root@ELK logs]# pwd
/usr/local/elasticsearch-5.5.1/logs
[root@ELK logs]# more demon.log
#解决办法:
[root@ELK logs]# egrep 'unlimit' /etc/security/limits.conf
* soft memlock unlimited
* hard memlock unlimited
[root@ELK logs]# ulimit -l unlimited
#然后还需要新开一个窗口才会读取到这个配置文件
#然后看一下9200端口是否启动了,ok就表示启动成功了
[root@ELK logs]# netstat -tplan | grep 9200
tcp 0 0 0.0.0.0:9200 0.0.0.0:* LISTEN 10881/java
#浏览器访问也可以测试一下
[root@ELK ~]# curl http://127.0.0.1:9200
{
"name" : "elk-1",
"cluster_name" : "demon",
"cluster_uuid" : "OCxZx2K5Q_C7u0jPxWvQvw",
"version" : {
"number" : "5.5.1",
"build_hash" : "19c13d0",
"build_date" : "2017-07-18T20:44:24.823Z",
"build_snapshot" : false,
"lucene_version" : "6.6.0"
},
"tagline" : "You Know, for Search"
}
4.与elasticsearch进行交互
#利用API来查看一下状态
[root@ELK ~]# curl -i -XGET 'localhost:9200/_count?pretty'
HTTP/1.1 200 OK
content-type: application/json; charset=UTF-8
content-length: 95
{
"count" : 0,
"_shards" : {
"total" : 0,
"successful" : 0,
"failed" : 0
}
}
5.安装插件
#安装elasticsearch-head插件
[root@ELK ~]# yum install -y npm
[root@ELK ~]# yum install -y git
[root@ELK ~]# git clone git://github.com/mobz/elasticsearch-head.git
Cloning into 'elasticsearch-head'...
remote: Counting objects: 4224, done.
remote: Total 4224 (delta 0), reused 0 (delta 0), pack-reused 4224
Receiving objects: 100% (4224/4224), 2.16 MiB | 88.00 KiB/s, done.
Resolving deltas: 100% (2329/2329), done.
#这个如若服务器的gpgcheck选项没关,是一定要执行的。目的是导入elasticsearch官网的公钥,install package的时候是需要密钥检测的
[root@ELK elasticsearch-head]# rpm --import https://artifacts.elastic.co/GPG-KEY-elasticsearch
[elauser@ELK local]$ ll | egrep ela
drwxr-xr-x 9 elauser elauser 4096 Apr 10 15:39 elasticsearch-5.5.1
-rw-r--r-- 1 root root 33511694 Jul 25 2017 elasticsearch-5.5.1.zip
drwxr-xr-x 7 elauser elauser 4096 Apr 11 11:55 elasticsearch-head
[elauser@ELK local]$ cd elasticsearch-head/
[elauser@ELK elasticsearch-head]$ ls
Dockerfile Gruntfile.js LICENCE proxy src
Dockerfile-alpine grunt_fileSets.js package.json README.textile test
elasticsearch-head.sublime-project index.html plugin-descriptor.properties _site
[elauser@ELK elasticsearch-head]$ pwd
/usr/local/elasticsearch-head
[elauser@ELK elasticsearch-head]$ npm install
#====================================
#出现报错1:
[elauser@ELK elasticsearch-head]$ npm install
npm: relocation error: npm: symbol SSL_set_cert_cb, version libssl.so.10 not defined in file libssl.so.10 with link time reference
#解决方案:
[root@ELK ~]# yum update openssl -y
#出现报错2:
[elauser@ELK elasticsearch-head]$ npm install
> phantomjs-prebuilt@2.1.16 install /usr/local/elasticsearch-head/node_modules/phantomjs-prebuilt
> node install.js
PhantomJS not found on PATH
Downloading https://github.com/Medium/phantomjs/releases/download/v2.1.1/phantomjs-2.1.1-linux-x86_64.tar.bz2
Saving to /tmp/phantomjs/phantomjs-2.1.1-linux-x86_64.tar.bz2
Receiving...
[==--------------------------------------] 5%
Error making request.
Error: read ECONNRESET
at exports._errnoException (util.js:1020:11)
at TLSWrap.onread (net.js:568:26)
#解决方案:
[root@ELK elasticsearch-head]# npm config set registry=http://registry.npmjs.org
#==========================================
启动插件之前,还需要修改一下配置文件(如果那个add部分你之前没添加的话,这里就要加一下)
改完注意重启elasticsearch(如若重启欧报错,记得检查一下配置文件是否正确)
[elauser@ELK elasticsearch-head]$ npm run start
> elasticsearch-head@0.0.0 start /usr/local/elasticsearch-head
> grunt server
Running "connect:server" (connect) task
Waiting forever...
Started connect web server on http://localhost:9100
#检查一下端口,是否正常运行了
[root@ELK ~]# netstat -tplan | grep 9200
tcp 0 0 0.0.0.0:9200 0.0.0.0:* LISTEN 16538/java
[root@ELK ~]# netstat -tplan | grep 9100
tcp 0 0 0.0.0.0:9100 0.0.0.0:* LISTEN 16747/grunt
#有两个配置文件可以参考一下,也可以不更改

#这个不需要更改,但是这里改了之后忘记改回去了
#浏览器访问一下
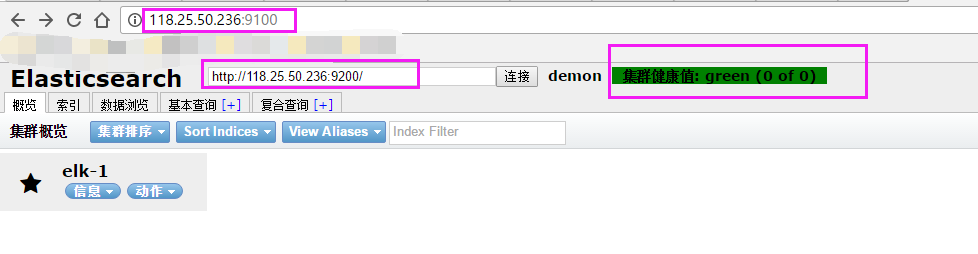
看到如上集群健康就ok了。
三、基本概念
3.1 node、cluster
elastic本质是一个分布式数据库。一个节点node就是运行一个elastic实例,集群cluster就是一组具有相同cluster.name的节点集合,协同工作,共享数据并且提供故障转移和扩展的功能。
3.2 index
elastic会对所有的字段进行索引,处理之后写入一个反向索引(Inverted Index)。查找数据的时候直接查找该索引。elastic数据管理的顶层单位就叫做index(索引),也称作数据库,每个index的名字必须小写。
#查看当前节点的所有index
[elauser@master bin]$ curl -X GET 'http://localhost:9200/_cat/indices?v';
health status index uuid pri rep docs.count docs.deleted store.size pri.store.size
#新建index(向elastic发出一个put请求,新建一个weather的index)
[elauser@master bin]$ curl -X PUT 'localhost:9200/weather'
{"acknowledged":true,"shards_acknowledged":true}
返回的JSON对象中,acknowledged字段表示操作成功
#删除index(把上面新建的weather index 删除掉)
[elauser@master bin]$ curl -X DELETE 'localhost:9200/weather'
{"acknowledged":true}
3.3 document
index里面的单条记录被称为document。同一个index里面的document最好保持相同的schema,利于搜索。
document使用JSON格式表示:
{
“user”:“张三”
“title”:“工程师”
“desc”:“数据库管理”
}
3.4 type
type是一个逻辑分组,用来区分document。不同的type应该有相似的schema。性质完全不同的数据应该存成两个index。
#查看当前每个index所包含的type
[elauser@master bin]$ curl 'localhost:9200/_mapping?pretty=true'
{ }
四、中文分词插件ik (这里选择ik)或者smartcn
[elauser@master bin]$ ./elasticsearch-plugin install https://github.com/medcl/elasticsearch-analysis-ik/releases/download/v5.5.1/elasticsearch-analysis-ik-5.5.1.zip