AsyncLocal 的实现很简单,将AsyncLocal实例和当前线程的值以键值对的形式保存在Thread.CurrentThread.ExecutionContext.m_localValues.中。由于使用[ThreadStatic] 修饰了 Thread.CurrentThread属性对应的字段,所以实现了多个线程之间各自维护不同的一份数据。同时,在每一次修改AsyncLocal的时候,都新建了ExecutionContext和IAsyncLocalValueMap对象并赋值给当前的线程。
以下为AsyncLocal的测试代码
class AsyncLocalTests : Singleton<AsyncLocalTests>,ITestMethod
{
    private readonly AsyncLocal<int> asyncLocalVariable = new AsyncLocal<int>();

    public async Task MethodAsync()
    {
        asyncLocalVariable.Value = 88;
        await Task.Run(() =>
        {
            Console.WriteLine($"进入 Task,值:{asyncLocalVariable.Value};线程Id:{Thread.CurrentThread.ManagedThreadId};ExecutionContext:Hashcode:{Thread.CurrentThread.ExecutionContext.GetHashCode()}");
            asyncLocalVariable.Value = 888;
        });
        Console.WriteLine($"await Task 后,值:{asyncLocalVariable.Value};线程Id:{Thread.CurrentThread.ManagedThreadId};ExecutionContext:Hashcode:{Thread.CurrentThread.ExecutionContext.GetHashCode()}");
    }

    public void RunTest()
    {
        asyncLocalVariable.Value = 1;
        Console.WriteLine($"初始值:{asyncLocalVariable.Value};线程Id:{Thread.CurrentThread.ManagedThreadId};ExecutionContext:Hashcode:{Thread.CurrentThread.ExecutionContext.GetHashCode()}");
        MethodAsync();
        Thread.Sleep(1000);
        Console.WriteLine($"async方法后,值:{asyncLocalVariable.Value};线程Id:{Thread.CurrentThread.ManagedThreadId};ExecutionContext:Hashcode:{Thread.CurrentThread.ExecutionContext.GetHashCode()}");
        Console.ReadKey();
    }
}
测试结果
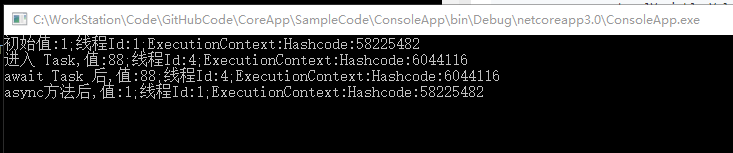
从上面的测试结果我们看出:
- 在
MethodAsync()异步方法前后,AsyncLocal的值相同.Value - 在
await MethodAsync()异步方法前后,AsyncLocal的值相同.Value - 在
await Task.Run()前后代码块中,AsyncLocal的值相同.Value
由于AsyncLocal 是从 Thread.CurrentThread.ExecutionContext 获取实际的值,那么理解ExecutionContext在 async、Task、Thread 的中流动就十分重要。先说结论,并简单描述一下原因:
1、进入Task.Run()前后,ExecutionContext相同(处于不同线程)
原因:这是因为 Task.Run()和Thread.Start() 会捕获当前线程的 ExecutionContext 传递给工作线程,并且在工作线程修改 AsyncLocal 的值, 不会影响原线程的ExecutionContext 。因为每次修改 AsyncLocal 的值,都会新建 ExecutionContext 实例并保存到工作线程
2、 MethodAsync() 前后代码块的 ExecutionContext 相同(不使用await)
原因:在状态机第一次执行前后会备份、恢复ExecutionContext(线程并没有进行切换)
3、await Task.Run() 前后代码块的 ExecutionContext 相同(处于不同线程)
原因:我们知道await Task.Run()肯定位于一个异步方法中,该异步方法会被编译成一个状态机,通过状态的切换,将await前后的代码分成了两步来执行。第一次执行由当前线程执行,在开启新 Task 后、当前线程返回之前,会保存当前线程的 ExecutionContext,供状态机第二次执行使用(工作线程)。从第一点我们知道新建Task实例的时候会捕获一次ExecutionContext给工作线程,碰到await返回之前会捕获一次ExecutionContext给状态机,这两次捕获的实际上是同一个对象。
4、 await MethodAsync() 前后代码块的 ExecutionContext 相同(处于不同线程)
原因:在状态机第一次执行(当前线程)的时候,会捕获当前线程的 ExecutionContext,供状态机第二次执行使用(工作线程)。
2. async关键字对ExecutionContext的影响
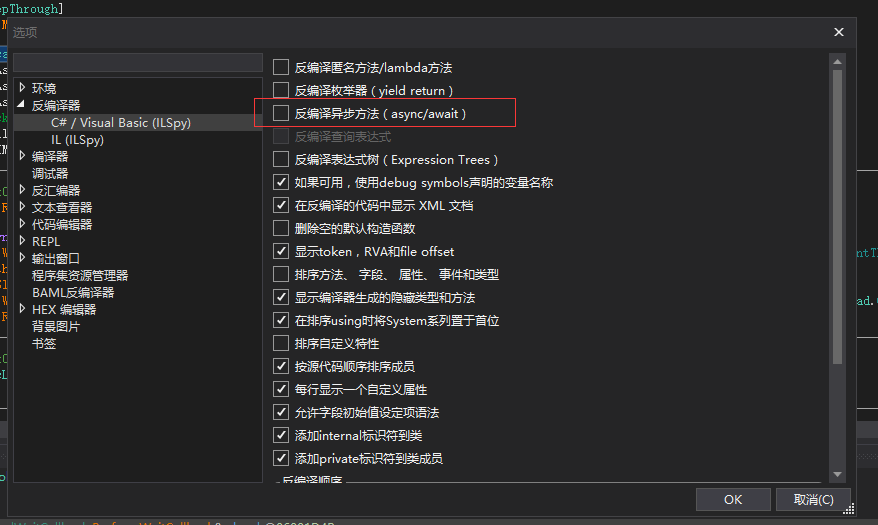
async关键字实际上是编译器的语法糖,可以通过Dnspy 反编译查看去除语法糖的原始代码。
Dnspy配置如下,去除勾选"反编译异步方法(async/await)"
原代码:
public async Task MethodAsyncWithAwait()
{
    asyncLocalVariable.Value = 88;
    await Task.Run(() =>
    {
        asyncLocalVariable.Value = 888;
    });
    asyncLocalVariable.Value = 8888;
}
去除async/await 语法糖代码:
异步方法代码:
可以看到编译器生成了一个实现 IAsyncStateMachine 接口的异步状态机,并生成了一个私有方法,保存了Task.Run()中的的代码块。异步方法中实际上做了以下四个步骤:
- 实例化异步状态机, 将状态置为 -1
- 创建
AsyncTaskMethodBuilder - 通过
AsyncTaskMethodBuilder.Sratr(ref IAsyncStateMachine)启动状态机 - 返回
Task
public Task MethodAsyncWithAwait()
{
	AsyncLocalTests.<MethodAsyncWithAwait>d__1 <MethodAsyncWithAwait>d__ = new AsyncLocalTests.<MethodAsyncWithAwait>d__1();
	<MethodAsyncWithAwait>d__.<>4__this = this;
	<MethodAsyncWithAwait>d__.<>t__builder = AsyncTaskMethodBuilder.Create();
	<MethodAsyncWithAwait>d__.<>1__state = -1;
	AsyncTaskMethodBuilder <>t__builder = <MethodAsyncWithAwait>d__.<>t__builder;
	<>t__builder.Start<AsyncLocalTests.<MethodAsyncWithAwait>d__1>(ref <MethodAsyncWithAwait>d__);
	return <MethodAsyncWithAwait>d__.<>t__builder.Task;
}
状态机启动代码:
可以看到在执行 stateMachine.MoveNext() 之前备份了当前线程的 _executionContext 和 _synchronizationContext,并且在 finally 代码块中恢复了备份的数据。
这样也就解释了:在不使用 await 等待异步方法的情况下,虽然在原线程修改了AsyncLocal的值,但是离开async方法后,我们获取的还是原来的值。值得注意的是,这里的备份恢复针对的都是当前线程,而不涉及到工作线程。
public void Start<[Nullable(0)] TStateMachine>(ref TStateMachine stateMachine) where TStateMachine : IAsyncStateMachine
{
	AsyncMethodBuilderCore.Start<TStateMachine>(ref stateMachine);
}
internal static class AsyncMethodBuilderCore
{
[DebuggerStepThrough]
public static void Start<TStateMachine>(ref TStateMachine stateMachine) where TStateMachine : IAsyncStateMachine
{
	if (stateMachine == null)
	{
		ThrowHelper.ThrowArgumentNullException(ExceptionArgument.stateMachine);
	}
	Thread currentThread = Thread.CurrentThread;
	Thread thread = currentThread;
	ExecutionContext executionContext = currentThread._executionContext;
	ExecutionContext executionContext2 = executionContext;
	SynchronizationContext synchronizationContext = currentThread._synchronizationContext;
	try
	{
		stateMachine.MoveNext();
	}
	finally
	{
		SynchronizationContext synchronizationContext2 = synchronizationContext;
		Thread thread2 = thread;
		if (synchronizationContext2 != thread2._synchronizationContext)
		{
			thread2._synchronizationContext = synchronizationContext2;
		}
		ExecutionContext executionContext3 = executionContext2;
		ExecutionContext executionContext4 = thread2._executionContext;
		if (executionContext3 != executionContext4)
		{
			ExecutionContext.RestoreChangedContextToThread(thread2, executionContext3, executionContext4);
		}
	}
}
状态机代码:
实际上编译器将标记为 async 的方法分成了两部分,一部分是 await 之前的代码(包括新建并启动启动Task部分),另一部分是 await之后的代码。通过状态的改变,这两部分代码分两次执行。如果没有使用await修饰异步方法,那么该状态机没有 else代码块, 只会执行一次stateMachine.MoveNext()。可以看到在第一次执行stateMachine.MoveNext() 之后,当前线程就直接返回了,然后一层层的返回到最外层。这也是为什么说碰到await之后,当前线程就直接返回,当然最内层的返回是在开启新Task之后。
[CompilerGenerated]
private void <MethodAsyncWithAwait>b__1_0()
{
	this.asyncLocalVariable.Value = 888;
}

[CompilerGenerated]
private sealed class <MethodAsyncWithAwait>d__1 : IAsyncStateMachine
{
	void IAsyncStateMachine.MoveNext()
	{
		int num = this.<>1__state;
		try
		{
			TaskAwaiter awaiter;
			if (num != 0)
			{
				this.<>4__this.asyncLocalVariable.Value = 88;
				awaiter = Task.Run(new Action(this.<>4__this.<MethodAsyncWithAwait>b__1_0)).GetAwaiter();
				if (!awaiter.IsCompleted)
				{
					this.<>1__state = 0;
					this.<>u__1 = awaiter;
					AsyncLocalTests.<MethodAsyncWithAwait>d__1 <MethodAsyncWithAwait>d__ = this;
					this.<>t__builder.AwaitUnsafeOnCompleted<TaskAwaiter, AsyncLocalTests.<MethodAsyncWithAwait>d__1>(ref awaiter, ref <MethodAsyncWithAwait>d__);
					return;
				}
			}
			else
			{
				awaiter = this.<>u__1;
				this.<>u__1 = default(TaskAwaiter);
				this.<>1__state = -1;
			}
			awaiter.GetResult();
			this.<>4__this.asyncLocalVariable.Value = 8888;
		}
		catch (Exception exception)
		{
			this.<>1__state = -2;
			this.<>t__builder.SetException(exception);
			return;
		}
		this.<>1__state = -2;
		this.<>t__builder.SetResult();
	}
	[DebuggerHidden]
	void IAsyncStateMachine.SetStateMachine(IAsyncStateMachine stateMachine)
	{
	}

	public int <>1__state;

	public AsyncTaskMethodBuilder <>t__builder;

	public AsyncLocalTests <>4__this;

	private TaskAwaiter <>u__1;
}
我们可以看到在第一次执行stateMachine.MoveNext()的时候,会通过当前线程执行 await 之前的代码块,并通过Task.Run()启用工作线程去完成任务。IAsyncStateMachine.MoveNext() 里面有三句代码比较重要,这里先大概描述一下作用:
1、 Task.Run():
新建Task实例、捕获当前线程的ExecutionContext 保存到Task实例中、启动新任务
2、 AsyncTaskMethodBuilder.AwaitUnsafeOnCompleted(ref awaiter, ref stateMachine):
将状态机和当前线程的上下文包装成 AsyncStateMachineBox:Task 对象,保存到在 Task(第一步新建的 字段中,最后将其传递到 Task实例).m_continuationObjectstateMachine.AsyncTaskMethodBuilder.Task属性中, 这样外层状态机可以通过MethodAsync().GetAwaiter().m_task获取到内层状态机的AsyncStateMachineBox:Task 对象,同样的外层状态机再次执行本步骤,将自身的 AsyncStateMachineBox:Task 对象赋值给内层 AsyncStateMachineBox:Task 对象的 m_continuationObject字段,这样的话,就构建了一个单向链表,该链表保存了每一层异步方法的stateMachine 和 ExecutionContext。
3、 this.<>t__builder.SetResult():
设置异步方法的结果,并检查 Task.m_continuationObject 是否为空,不为空的情况下,执行外层状态机的第二次 stateMachine.MoveNext()。最内层 Task.m_continuationObject的执行会在Task完成之后调用,接下来通过SetResult()一层层调用了外层状态机的第二次 stateMachine.MoveNext()
3. AwaitUnsafeOnCompleted() 代码分析
以下只放出了简化的代码。这里首先构建 IAsyncStateMachineBox实例,并将其赋值给 m_task 供外层状态机使用。IAsyncStateMachineBox实例保存了本层的状态机,并捕获了当前线程的ExecutionContext。awaiter.m_task 是调用内层异步方法返回的 Task实例。最后在 TaskAwaiter.UnsafeOnCompletedInternal() 方法中,将构建的IAsyncStateMachineBox实例保存到 awaiter(内层).m_task.m_continuationObject字段中,使得内层状态机指向本层状态机。因为每一层状态机都会调用AwaitUnsafeOnCompleted 方法,所以一层层构建了 await 后的所有回调,并且每一层回调的 ExecutionContext 都不同。
public void AwaitUnsafeOnCompleted<TAwaiter, TStateMachine>(ref TAwaiter awaiter, ref TStateMachine stateMachine)
    where TAwaiter : ICriticalNotifyCompletion where TStateMachine : IAsyncStateMachine
{
    IAsyncStateMachineBox box = GetStateMachineBox(ref stateMachine);

    if ((null != (object)default(TAwaiter)!) && (awaiter is ITaskAwaiter))
    {
        ref TaskAwaiter ta = ref Unsafe.As<TAwaiter, TaskAwaiter>(ref awaiter);
        TaskAwaiter.UnsafeOnCompletedInternal(ta.m_task, box, continueOnCapturedContext: true);
    }
}
private IAsyncStateMachineBox GetStateMachineBox<TStateMachine>(ref TStateMachine stateMachine) where TStateMachine : IAsyncStateMachine
{
    ExecutionContext? currentContext = ExecutionContext.Capture();

    AsyncStateMachineBox<TStateMachine> box = AsyncMethodBuilderCore.TrackAsyncMethodCompletion ?
        CreateDebugFinalizableAsyncStateMachineBox<TStateMachine>() :
        new AsyncStateMachineBox<TStateMachine>();
    m_task = box;
    box.StateMachine = stateMachine;
    box.Context = currentContext;

    return box;
}
4. SetResult() 代码分析
该方法最后调用了 Task 方法,读取了Task.m_continuationObject 来获取外一层的回调(包括状态机、ExecutionContext),并通过FinishContinuations()执行外层状态机的第二次执行。
internal bool TrySetResult([AllowNull] TResult result)
{
	bool result2 = false;
	if (base.AtomicStateUpdate(67108864, 90177536))
	{
		this.m_result = result;
		Interlocked.Exchange(ref this.m_stateFlags, this.m_stateFlags | 16777216);
		Task.ContingentProperties contingentProperties = this.m_contingentProperties;
		if (contingentProperties != null)
		{
			base.NotifyParentIfPotentiallyAttachedTask();
			contingentProperties.SetCompleted();
		}
		base.FinishContinuations();
		result2 = true;
	}
	return result2;
}
FinishContinuations() 方法接下来的调用在 Task.Run() 部分会有介绍。
internal void FinishContinuations()
{
	object obj = Interlocked.Exchange(ref this.m_continuationObject, Task.s_taskCompletionSentinel);
	if (obj != null)
	{
		this.RunContinuations(obj);
	}
}
5. Task.Run() 代码分析
实际上在Task.Run()内部也是先新建一个Task 实例,然后通过Task.ScheduleAndStart()方法来调度并启动任务。两者的区别在于传入的Options 和scheduler 是不相同的。
var task1 = Task.Run(() => { });
//默认配置无法更改: InternalTaskOptions.QueuedByRuntime, TaskCreationOptions.DenyChildAttach, TaskScheduler.Default
//t.ScheduleAndStart(false);
var task2 = new Task(() => { }, TaskCreationOptions.LongRunning);
//默认配置可以修改: InternalTaskOptions.None, TaskCreationOptions.None, scheduler:null
task2.Start();
//可以传入scheduler
//默认使用TaskScheduler.Current: 先取[ThreadStatic]Task.InternalCurrent,如果为空取 TaskScheduler.Default
//t.ScheduleAndStart(true);
通过在Task的构造函数中调用ExecutionContext.Capture() 方法来保存当前线程的ExecutionContext到Task实例中,这样的话,只要将到Task实例作为参数传入到工作线程中,工作线程就可以获取到ExecutionContext
internal Task(Delegate action, object state, Task parent, CancellationToken cancellationToken, TaskCreationOptions creationOptions, InternalTaskOptions internalOptions, TaskScheduler scheduler)
{
	if (action == null)
	{
		ThrowHelper.ThrowArgumentNullException(ExceptionArgument.action);
	}
	if (parent != null && (creationOptions & TaskCreationOptions.AttachedToParent) != TaskCreationOptions.None)
	{
		this.EnsureContingentPropertiesInitializedUnsafe().m_parent = parent;
	}
	this.TaskConstructorCore(action, state, cancellationToken, creationOptions, internalOptions, scheduler);
	this.CapturedContext = ExecutionContext.Capture();
}
Task.ScheduleAndStart()方法:
Task的调度分两种情况:1、配置了TaskCreationOptions.LongRunning 的Task实例直接新建一个后台 Thread,并将Task实例作为启动参数来启动工作线程;2、对于没有配置TaskCreationOptions.LongRunning 的Task实例,将其加入ThreadPool的线程池,由线程池来调度运行
internal sealed class ThreadPoolTaskScheduler : TaskScheduler
{
    protected internal override void QueueTask(Task task)
    {
        TaskCreationOptions options = task.Options;
        if ((options & TaskCreationOptions.LongRunning) != 0)
        {
            // Run LongRunning tasks on their own dedicated thread.
            Thread thread = new Thread(s_longRunningThreadWork);
            thread.IsBackground = true; // Keep this thread from blocking process shutdown
            thread.Start(task);
        }
        else
        {
            // Normal handling for non-LongRunning tasks.
            bool preferLocal = ((options & TaskCreationOptions.PreferFairness) == 0);
            ThreadPool.UnsafeQueueUserWorkItemInternal(task, preferLocal);
        }
    }
}
虽然已经在Task的构造函数中,捕获了ExecutionContext,但是对于直接新建的Thread实例,启动的时候同样也需要捕获当前线程的ExecutionContext
public void Start()
{
	this.StartupSetApartmentStateInternal();
	if (this._delegate != null)
	{
		ThreadHelper threadHelper = (ThreadHelper)this._delegate.Target;
		ExecutionContext executionContextHelper = ExecutionContext.Capture();
		threadHelper.SetExecutionContextHelper(executionContextHelper);
	}
	this.StartInternal();
}
线程池调度Task、IThreadPoolWorkItem逻辑:
从线程池取出工作线程,工作线程调用Dispatch()方法,对于IThreadPoolWorkItem,直接执行IThreadPoolWorkItem.Execute() 方法,所以线程池处理IThreadPoolWorkItem是不涉及到上下文切换的。对于 Task ,将ExecutionContext赋值给工作线程,调用委托,然后清除工作线程的上下文,最后调用Finish(true) 来执行任务完成的回调方法。调用链路很长,这里直接跳到RunContinuations()方法。
调用链路:
    // 最内层 async 状态机 执行await Task.Run()之后的代码块
    //=>Task.Finish(true);
    //=>FinishStageTwo();
    //===>FinishStageThree();
    //=====>FinishContinuations();
    //=======>RunContinuations(continuationObject);
    //=========>AwaitTaskContinuation.RunOrScheduleAction(asyncStateMachineBox, flag); 状态机的回调执行这个
    //==========>box.ExecuteFromThreadPool(threadPoolThread); 或者 box.MoveNext();
我们知道,异步方法的最内层肯定有一个 await Task。 正是Task.Finish(true)这个方法调用了最内层状态机,去执行第二次stateMachine.MoveNext()方法,并且在MoveNext()方法中都会调用SetResult() 方法,从而触发外层状态机的第二次stateMachine.MoveNext()执行,就这样一层层的调用完成了所有的层次的回调。可以看到,工作线程在执行 await Task.Run()/MethodAsnc() 后代码块时,传入的是在 AwaitUnsafeOnCompleted() 方法中捕获的 ExecutionContext。
s_callback字段保存了状态机的MoveNext()方法。
private class AsyncStateMachineBox<TStateMachine> :Task<TResult>,IAsyncStateMachineBox  where TStateMachine : IAsyncStateMachine
{
    private static readonly ContextCallback s_callback = ExecutionContextCallback;

    private static void ExecutionContextCallback(object? s)
    {
        Unsafe.As<AsyncStateMachineBox<TStateMachine>>(s).StateMachine!.MoveNext();
    }

    public TStateMachine StateMachine = default;

    public ExecutionContext? Context;

    internal sealed override void ExecuteFromThreadPool(Thread threadPoolThread) => MoveNext(threadPoolThread);
    	internal sealed override void ExecuteFromThreadPool(Thread threadPoolThread) => MoveNext(threadPoolThread);

	public void MoveNext() => MoveNext(threadPoolThread: null);

	private void MoveNext(Thread? threadPoolThread)
	{
		bool loggingOn = AsyncCausalityTracer.LoggingOn;
		if (loggingOn)
		{
			AsyncCausalityTracer.TraceSynchronousWorkStart(this, CausalitySynchronousWork.Execution);
		}

		ExecutionContext? context = Context;
		if (context == null)
		{
			Debug.Assert(StateMachine != null);
			StateMachine.MoveNext();
		}
		else
		{
			if (threadPoolThread is null)
			{
				ExecutionContext.RunInternal(context, s_callback, this);
			}
			else
			{
				ExecutionContext.RunFromThreadPoolDispatchLoop(threadPoolThread, context, s_callback, this);
			}
		}

		if (IsCompleted)
		{
			if (System.Threading.Tasks.Task.s_asyncDebuggingEnabled)
			{
				System.Threading.Tasks.Task.RemoveFromActiveTasks(this);
			}
			StateMachine = default;
			Context = default;
		}

		if (loggingOn)
		{
			AsyncCausalityTracer.TraceSynchronousWorkCompletion(CausalitySynchronousWork.Execution);
		}
	}
}
最后在 RunInternal 和 RunFromThreadPoolDispatchLoop 中,都会使用在AwaitUnsafeOnCompleted()方法里面捕获的 ExecutionContext,这也就解释了为什么在 await Task.Run()/MethodAsync() 前后的代码块中,ExecutionContext始终相同。需要注意的一点是,不管在Task 任务执行之后,还是 await 回调执行之后,都会把工作线程的上下文清空。
internal static void RunFromThreadPoolDispatchLoop(Thread threadPoolThread, ExecutionContext executionContext, ContextCallback callback, object state)
{
	if (executionContext != null && !executionContext.m_isDefault)
	{
		ExecutionContext.RestoreChangedContextToThread(threadPoolThread, executionContext, null);
	}
	ExceptionDispatchInfo exceptionDispatchInfo = null;
	try
	{
		callback(state);
	}
	catch (Exception source)
	{
		exceptionDispatchInfo = ExceptionDispatchInfo.Capture(source);
	}
	ExecutionContext executionContext2 = threadPoolThread._executionContext;
	threadPoolThread._synchronizationContext = null;
	if (executionContext2 != null)
	{
		ExecutionContext.RestoreChangedContextToThread(threadPoolThread, null, executionContext2);
	}
	if (exceptionDispatchInfo != null)
	{
		exceptionDispatchInfo.Throw();
	}
}