一:控件到控件的绑定
1:OneWay
Source影响着Target,但是Target却影响不到Source。
2:OneWayToSource
Target影响Source,而Source却影响不到Target。
3:TwoWay
Source与Target相互影响。
4:OneTime
在OneWay的基础上延伸了一个OneTime,仅绑定一次。如果大家属性Jquery中的one函数我想就可以不用表述了。
<Window x:Class="WpfApplication1.Window1"
        xmlns="http://schemas.microsoft.com/winfx/2006/xaml/presentation"
        xmlns:x="http://schemas.microsoft.com/winfx/2006/xaml"
        xmlns:sys="clr-namespace:System;assembly=mscorlib"
        xmlns:src="clr-namespace:WpfApplication1"
        Title="MainWindow" Height="350" Width="525">
    <Canvas>
        <ScrollBar Height="24" Name="scrollBar1" Width="237" Orientation="Horizontal" Canvas.Left="103" Canvas.Top="51"  Minimum="1" Maximum="100" SmallChange="1" />
        <Label Canvas.Left="41" Canvas.Top="121" Content="OneWay" Height="28" Name="label1" />
        <TextBox Canvas.Left="165" Canvas.Top="121" Height="23"
                 Text="{Binding ElementName=scrollBar1, Path=Value, Mode=OneWay}"
                 Name="textBox1" Width="120" />
        <Label Canvas.Left="41" Canvas.Top="160" Content="OneWayToSource" Height="28" Name="label2" />
        <TextBox Canvas.Left="165" Canvas.Top="160" Height="23"
                   Text="{Binding ElementName=scrollBar1, Path=Value, Mode=OneWayToSource}"
                 Name="textBox2" Width="120" />
        <Label Canvas.Left="41" Canvas.Top="202" Content="TwoWay" Height="28" Name="label3" />
        <TextBox Canvas.Left="165" Canvas.Top="202" Height="23"
                   Text="{Binding ElementName=scrollBar1, Path=Value, Mode=TwoWay}"
                 Name="textBox3" Width="120" />
        <Label Canvas.Left="41" Canvas.Top="231" Content="OneTime" Height="28" Name="label4" />
        <TextBox Canvas.Left="165" Canvas.Top="231" Height="23"
                   Text="{Binding ElementName=scrollBar1, Path=Value, Mode=OneTime}"
                 Name="textBox4" Width="120" />
    </Canvas>
</Window>

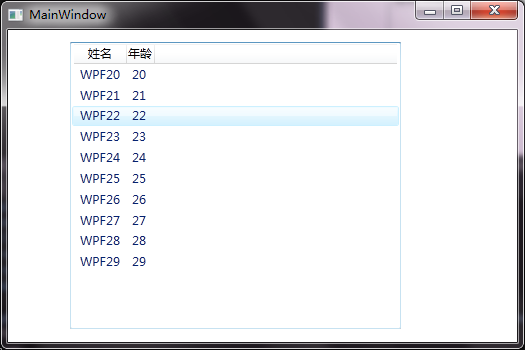
二:.net对象与控件的绑定
<Window x:Class="WpfApplication1.Window1"
        xmlns="http://schemas.microsoft.com/winfx/2006/xaml/presentation"
        xmlns:x="http://schemas.microsoft.com/winfx/2006/xaml"
        xmlns:sys="clr-namespace:System;assembly=mscorlib"
        xmlns:src="clr-namespace:WpfApplication1"
        Title="MainWindow" Height="350" Width="525">
    <Grid>
        <ListView  Height="287" HorizontalAlignment="Left" Margin="62,12,0,0" Name="listView1" VerticalAlignment="Top" Width="331">
            <ListView.View>
                <GridView>
                    <GridView.Columns>
                        <GridViewColumn Header="姓名"  DisplayMemberBinding="{Binding Name}"/>
                        <GridViewColumn Header="年龄" DisplayMemberBinding="{Binding Age}"/>
                    </GridView.Columns>
                </GridView>
            </ListView.View>
        </ListView>
    </Grid>
</Window>

三:.net方法与控件的绑定( 在做wpf时,有时我们需要在xaml中绑定.net中的方法,当然这在实际开发中也是很常用的,不过方法必要由ObjectDataProvider来封装。)
<Window x:Class="WpfApplication1.Window1"
        xmlns="http://schemas.microsoft.com/winfx/2006/xaml/presentation"
        xmlns:x="http://schemas.microsoft.com/winfx/2006/xaml"
        xmlns:sys="clr-namespace:System;assembly=mscorlib"
        xmlns:local="clr-namespace:WpfApplication1"
        Title="MainWindow" Height="350" Width="525">
    <Window.Resources>
        <ObjectDataProvider x:Key="Test" ObjectType="{x:Type local:Student}" MethodName="GetName">
        </ObjectDataProvider>
    </Window.Resources>
    <Grid>
        <TextBlock Text="{Binding Source={StaticResource ResourceKey=Test}, Mode=OneWay}"/>
    </Grid>
</Window>
using System.Windows.Controls;
using System.Windows.Data;
using System.Windows.Documents;
using System.Windows.Input;
using System.Windows.Media;
using System.Windows.Media.Imaging;
using System.Windows.Shapes;

namespace WpfApplication1
{
    /// <summary>
    /// Window1.xaml 的交互逻辑
    /// </summary>
    public partial class Window1 : Window
    {
        public Window1()
        {
            InitializeComponent();
        }
    }

    public class Student
    {
        //前台要引用的方法
        public string GetName()
        {
            return "WPF";
        }
    }
}

四:wpf中的验证
<Window x:Class="WpfApplication1.Window1"
        xmlns="http://schemas.microsoft.com/winfx/2006/xaml/presentation"
        xmlns:x="http://schemas.microsoft.com/winfx/2006/xaml"
        xmlns:sys="clr-namespace:System;assembly=mscorlib"
        xmlns:local="clr-namespace:WpfApplication1"
        Title="MainWindow" Height="350" Width="525">
    <Window.Resources>
        <local:Student x:Key="student"/>
    </Window.Resources>
    <Grid>
        <TextBlock Height="23" HorizontalAlignment="Left" Margin="97,54,0,0" Name="textBlock1" Text="姓名" VerticalAlignment="Top" />
        <TextBox DataContext="{StaticResource ResourceKey=student}" Height="23" HorizontalAlignment="Left" Margin="153,54,0,0" Name="textBox1" VerticalAlignment="Top" Width="120">
            <TextBox.Text>
                <Binding Path="Name" UpdateSourceTrigger="PropertyChanged">
                    <!-- 自定义的验证规格,当然可以是多个Check -->
                    <Binding.ValidationRules>
                        <local:NameCheck />
                    </Binding.ValidationRules>
                </Binding>
            </TextBox.Text>
            <TextBox.ToolTip>
                <!--将当前的错误信息显示在tooltip上-->
                <Binding RelativeSource="{RelativeSource Self}"  Path="(Validation.Errors)[0].ErrorContent"/>
            </TextBox.ToolTip>
        </TextBox>
    </Grid>
</Window>
namespace WpfApplication1
{
    /// <summary>
    /// Window1.xaml 的交互逻辑
    /// </summary>
    public partial class Window1 : Window
    {
        public Window1()
        {
            InitializeComponent();
        }
    }

    public class NameCheck : ValidationRule
    {
        public override ValidationResult Validate(object value, System.Globalization.CultureInfo cultureInfo)
        {
            var name = Convert.ToString(value);
            //如果名字长度大于4则是非法
            if (name.Length > 4)
                return new ValidationResult(false, "名字长度不能大于4个长度!");
            return ValidationResult.ValidResult;
        }
    }

    public class Student
    {
        public string Name { get; set; }

        public int Age { get; set; }
    }
}
