界面实现效果如下:

实现思路:
- 制作一个轮播图的主要容器,所有内容都包括在其中,容器采用了overflow:hidden的样式,为后面的实现隐藏其他不必要显示的图片
- 轮播图图片如何运动?用一个容器高度一样的盒子把所有图片包括在里面,所有图片横向排布,图片样式可以用float:left来实现;然后通过盒子的样式中通过left:? 来改变盒子的位置,从而实现轮播图的运动
- 翻页按钮的实现,两边的翻页的平行四边形的样式是css的伪元素before与after分别利用transform: skew来实现
- 小圆点的不同状态样式的变化,通过增加class来实现
- 利用js实现计时器,翻页的功能
实现方法
1.翻页按钮的实现,以左边的翻页按钮为例
<div class="left-btn"></div>
<style>
    // 左边按钮
        .left-btn{
            35px;
            height: 40px;
            background-color: #000;
            border-radius: 0 40px 40px 0;
            position: absolute;
            top:40px
            display: flex;
            justify-content: center;
            opacity: .4;
            transition: all .3s; //表示所有的css属性都拥有过渡,过渡时间为0.3s
            &::before{
                content: "";
                position: absolute;
                 4px;
                height: 10px;
                background: #fff;
                transform: skew(-35deg);// 倾斜旋转
                top:10px;
            }
            &::after{
                    content: "";
                     4px;
                    height: 10px;
                    position: absolute;
                    background: #fff;
                    transform: skew(35deg);
                    top:20px;
                }

        }

</style>
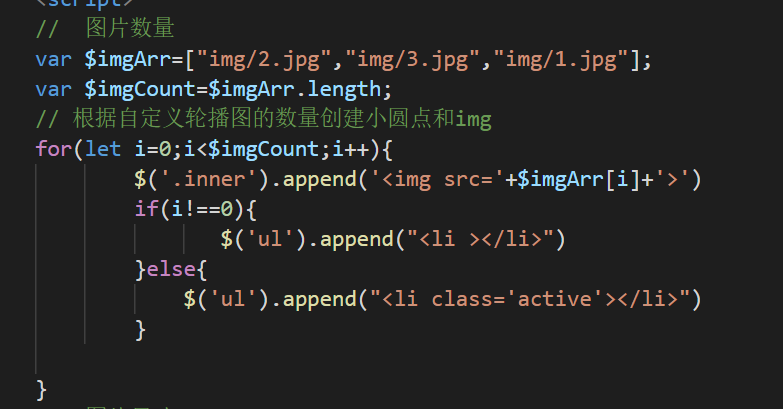
2.轮播图图片与小圆点显示,主要通过javaScript来控制

图片数目变化可通过jquery直接修改,同时会改变小圆点的数量,做到不需要在html代码重新书写
上图中删除图片或者增加,我们只需要对$imgArr进行修改,为了后期扩展的方便。
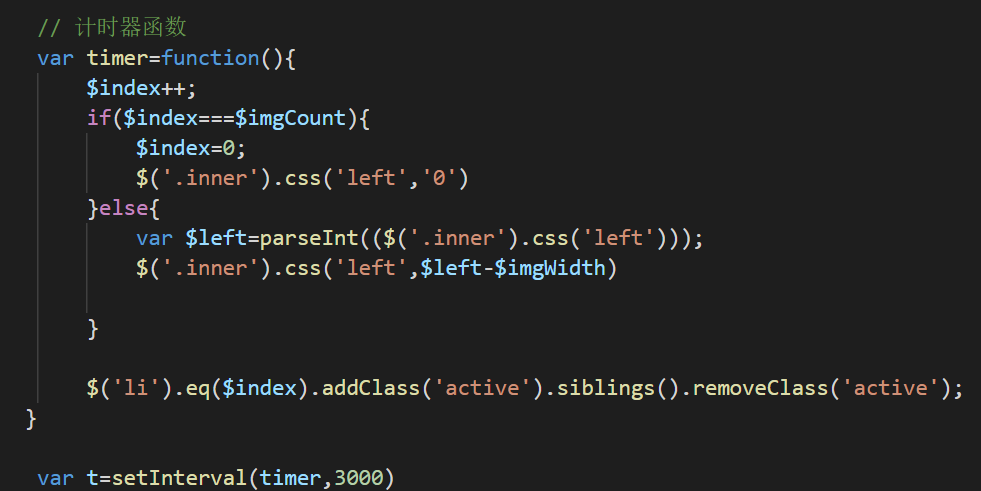
3.计时器

一般来说,只要直接用上图的方式就是实现了计时器,自动轮播的效果
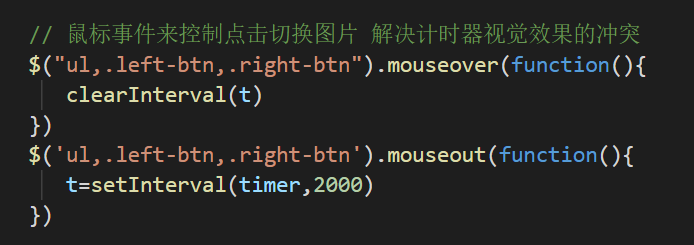
如果计时器时间短的情况下,可能会对我们翻页按钮和小圆点的翻页造成视觉上的冲突,为了解决这个问题,利用了鼠标事件,控制鼠标放与开,对计时器的移除与添加进行了操作

4.其他内容的说明
$('li').eq($index).addClass('active').siblings().removeClass('active');
siblings() 指被选元素的所有同级元素。
5.源代码
html+jquery

  1 <!DOCTYPE html>
  2 <html lang="en">
  3 <head>
  4     <meta charset="UTF-8">
  5     <meta name="viewport" content="width=device-width, initial-scale=1.0">
  6     <meta http-equiv="X-UA-Compatible" content="ie=edge">
  7     <title>轮播图</title>
  8 </head>
  9 <link rel="stylesheet/less" type="text/css" href="/carousel/style/chart.less" />
 10 <script src="/carousel/lib/less-3.9.0.min.js" ></script>
 11 <body>
 12
 13     <div id="chart-container">
 14         <!-- 翻图框框 -->
 15         <div id="chart">
 16             <!-- 切换图片 -->
 17             <div class="left-btn"></div>
 18             <div class="right-btn"> </div>
 19             <ul >
 20                 <!-- <li class="active"></li>
 21                 <li></li>
 22                 <li></li>
 23                 <li></li> -->
 24             </ul>
 25             <!-- 切换图片【完】 -->
 26             <!-- 轮播图片 -->
 27             <div class="inner">
 28                 <!-- <img src="img/2.jpg" >
 29                 <img src="img/295254.jpg">
 30                 <img src="img/1.jpg" > -->
 31                 <!-- <img src="img/3.jpg" > -->
 32             </div>
 33             <!-- 轮播图片【完】 -->
 34         </div>
 35     </div>
 36     <script src="https://cdn.bootcdn.net/ajax/libs/jquery/3.5.0/jquery.min.js"></script>
 37     <script>
 38     //  图片数量
 39     var $imgArr=["img/2.jpg","img/3.jpg","img/1.jpg"];
 40     var $imgCount=$imgArr.length;
 41     //  图片尺寸
 42     var $imgWidth=700;
 43     // 图片的索引值
 44     var $index=0;
 45
 46     // 根据自定义轮播图的数量创建小圆点和img
 47     for(let i=0;i<$imgCount;i++){
 48             $('.inner').append('<img src='+$imgArr[i]+'>')
 49             if(i!==0){
 50                    $('ul').append("<li ></li>")
 51             }else{
 52                 $('ul').append("<li class='active'></li>")
 53             }
 54
 55     }
 56
 57     // 计时器函数
 58     var timer=function(){
 59         $index++;
 60         if($index===$imgCount){
 61             $index=0;
 62             $('.inner').css('left','0')
 63         }else{
 64             var $left=parseInt(($('.inner').css('left')));
 65             $('.inner').css('left',$left-$imgWidth)
 66
 67         }
 68
 69         $('li').eq($index).addClass('active').siblings().removeClass('active');
 70    }
 71
 72     var t=setInterval(timer,3000)
 73
 74    // 鼠标事件来控制点击切换图片 解决计时器视觉效果的冲突
 75    $("ul,.left-btn,.right-btn").mouseover(function(){
 76       clearInterval(t)
 77    })
 78    $('ul,.left-btn,.right-btn').mouseout(function(){
 79       t=setInterval(timer,2000)
 80    })
 81
 82    // 切换上一页
 83     $(".left-btn").click(function(){
 84         var $left=parseInt(($('.inner').css('left')));
 85         console.log(($('.inner').css('left')))
 86         //判断该页是否为第一页
 87           if($index!==0){
 88             $('.inner').css('left',$left+$imgWidth);
 89             $index--;
 90           }else{
 91             $('.inner').css('left',-$imgWidth*($imgCount-1));
 92             $index=$imgCount-1;
 93           }
 94           console.log($left)
 95           $('li').eq($index).addClass('active').siblings().removeClass('active');
 96       });
 97
 98      // 切换下一页
 99       $(".right-btn").click(function(){
100           var $left=parseInt(($('.inner').css('left')));
101           if($index!==($imgCount-1)){
102             $('.inner').css('left',$left-$imgWidth);
103             $index++;
104           }else{
105             $('.inner').css('left','0');
106             $index=0;
107           }
108            $('li').eq($index).addClass('active').siblings().removeClass('active')
109       });
110
111       $('li').hover(function(){
112           $index=$(this).index();
113           $('li').eq($index).addClass('active').siblings().removeClass('active');
114           $('.inner').css('left',-$index*$imgWidth);
115       })
116
117     </script>
118 </body>
119
120 </html>
less样式

  1 // 轮播图 容器的宽度
  2 @chartWidth:700px;
  3 // 轮播图 容器的高度
  4 @chartHeight:350px;
  5 // 图片的数量
  6 @picCount:4;
  7
  8 html,body{
  9     margin:0;
 10      100%;
 11     height:100%;
 12 }
 13 #chart-container{
 14      100%;
 15     height:@chartHeight;
 16     // transform: all 2s;
 17     // border:1px solid black;
 18
 19     #chart{
 20         @chartWidth;
 21         height: 100%;
 22         border: 1px solid #c3c3cc;
 23         margin:0 auto;
 24         background: #fff;
 25         position: relative;
 26         overflow: hidden;
 27
 28         // 左边按钮
 29         .left-btn{
 30             35px;
 31             height: 40px;
 32             background-color: #000;
 33             border-radius: 0 40px 40px 0;
 34             position: absolute;
 35             top:calc(@chartHeight/2 - 20px);
 36             display: flex;
 37             justify-content: center;
 38             opacity: .4;
 39             transition: all .3s;
 40             z-index: 1;
 41             &::before{
 42                 content: "";
 43                 position: absolute;
 44                  4px;
 45                 height: 10px;
 46                 background: #fff;
 47                 transform: skew(-35deg);
 48                 top:10px;
 49             }
 50             &::after{
 51                     content: "";
 52                      4px;
 53                     height: 10px;
 54                     position: absolute;
 55                     background: #fff;
 56                     transform: skew(35deg);
 57                     top:20px;
 58                 }
 59
 60         }
 61         // 右边按钮
 62         .right-btn{
 63             35px;
 64             height: 40px;
 65             background-color: #000;
 66             border-radius: 40px 0 0 40px;
 67             position: absolute;
 68             top:calc(@chartHeight/2 - 20px);
 69             display: flex;
 70             justify-content: center;
 71             opacity: .4;
 72             right:0;
 73             transition: all .3s;
 74             z-index: 1;
 75             &::before{
 76                 content: "";
 77                 position: absolute;
 78                  4px;
 79                 height: 10px;
 80                 background: #fff;
 81                 transform: skew(35deg);
 82                 top:10px;
 83             }
 84             &::after{
 85                     content: "";
 86                      4px;
 87                     height: 10px;
 88                     position: absolute;
 89                     background: #fff;
 90                     transform: skew(-35deg);
 91                     top:20px;
 92                 }
 93         }
 94         .left-btn:hover, .right-btn:hover{
 95             opacity: .8;
 96         }
 97         ul{
 98              100%;
 99             position: absolute;
100             list-style: none;
101             bottom: 10px;
102             margin:0;
103             padding:0;
104             display: flex;
105             flex-direction:row;
106             justify-content: center;
107             cursor: pointer;
108             z-index: 1;
109            li{
110              15px;
111             height: 15px;
112             border-radius: 15px;
113             background: rgba(238, 234, 234,.5);
114             margin-right:10px;
115             transition: all .28s;
116             }
117             .active{
118                     background: #fff;
119                     box-shadow:0 0 5px 4px lighten(#000,50%)
120                 }
121         }
122
123         .inner{
124             position: absolute;
125              @chartWidth*@picCount;
126             height: @chartHeight;
127             top:0;
128             left:0;
129
130             img{
131                  @chartWidth;
132                 height: @chartHeight;
133                 float:left;
134
135             }
136             span{
137                 background: #000;
138                 color:#fff
139             }
140         }
141     }
142 }
