Creating “Login form”
We use here simple form where user can insert his or her preferred nick name for chat. To keep us focused on WebSocket stuff we don’t add any logic or checks in this point. Let’s add view called InsertUserName.cshtml under Home folder.
<form action="@Url.Action("Index")" method="post">
    <input type="text" placeholder="Insert user name" name="userName" />
    <input type="submit" value="Eńter" />
</form>
There will be another view for chat room and we will come back to it later when web sockets related code is done. Index() methods of home controller look like this.
[HttpGet]
public IActionResult Index()
{
    return View("InsertUserName");
}

[HttpPost]
public IActionResult Index(string username)
{
    return View("Index", username);
}
If request method is GET then we show nick name form and if request method is POST we will show chat room view.
WebSockets middleware
Now let’s write ASP.Core middleware for WebSocket. To keep things simple I mixed together custom WebSocket middleware and custom WebSocket connection manager from Radu Matei’s post Creating a WebSockets middleware for ASP .NET Core. I like the work Radu has done but here we will keep things as small as possible. To get better understanding of WebSockets I suggest you to go through Radu’s post.
NB! To use WebSockets in ASP.NET Core project add reference to Microsoft.AspNetCore.WebSockets NuGet package!
In breaf, this is what our WebSocket middleware class does:
- Keep concurrent dictionary with connected WebSockets (this is needed for message broadcast)
- Read messages from WebSocket and broadcast there to all known WebSockets
- Try to keep WebSockets dictionary as clean as possible
Here is the WebSocket middleware class.
public class ChatWebSocketMiddleware
{
    private static ConcurrentDictionary<string, WebSocket> _sockets = new ConcurrentDictionary<string, WebSocket>();

    private readonly RequestDelegate _next;

    public ChatWebSocketMiddleware(RequestDelegate next)
    {
        _next = next;
    }

    public async Task Invoke(HttpContext context)
    {
        if (!context.WebSockets.IsWebSocketRequest)
        {
            await _next.Invoke(context);
            return;
        }

        CancellationToken ct = context.RequestAborted;
        WebSocket currentSocket = await context.WebSockets.AcceptWebSocketAsync();
        var socketId = Guid.NewGuid().ToString();

        _sockets.TryAdd(socketId, currentSocket);

        while (true)
        {
            if (ct.IsCancellationRequested)
            {
                break;
            }

            var response = await ReceiveStringAsync(currentSocket, ct);
            if(string.IsNullOrEmpty(response))
            {
                if(currentSocket.State != WebSocketState.Open)
                {
                    break;
                }

                continue;
            }

            foreach (var socket in _sockets)
            {
                if(socket.Value.State != WebSocketState.Open)
                {
                    continue;
                }

                await SendStringAsync(socket.Value, response, ct);
            }
        }

        WebSocket dummy;
        _sockets.TryRemove(socketId, out dummy);

        await currentSocket.CloseAsync(WebSocketCloseStatus.NormalClosure, "Closing", ct);
        currentSocket.Dispose();
    }

    private static Task SendStringAsync(WebSocket socket, string data, CancellationToken ct = default(CancellationToken))
    {
        var buffer = Encoding.UTF8.GetBytes(data);
        var segment = new ArraySegment<byte>(buffer);
        return socket.SendAsync(segment, WebSocketMessageType.Text, true, ct);
    }

    private static async Task<string> ReceiveStringAsync(WebSocket socket, CancellationToken ct = default(CancellationToken))
    {
        var buffer = new ArraySegment<byte>(new byte[8192]);
        using (var ms = new MemoryStream())
        {
            WebSocketReceiveResult result;
            do
            {
                ct.ThrowIfCancellationRequested();

                result = await socket.ReceiveAsync(buffer, ct);
                ms.Write(buffer.Array, buffer.Offset, result.Count);
            }
            while (!result.EndOfMessage);

            ms.Seek(0, SeekOrigin.Begin);
            if (result.MessageType != WebSocketMessageType.Text)
            {
                return null;
            }

            // Encoding UTF8: https://tools.ietf.org/html/rfc6455#section-5.6
            using (var reader = new StreamReader(ms, Encoding.UTF8))
            {
                return await reader.ReadToEndAsync();
            }
        }
    }
}
Before using middleware we have to introduce it to request pipeline in Startup class of web application. We do it in configure method before initializing MVC.
app.UseWebSockets();
app.UseMiddleware<ChatWebSocketMiddleware>();

app.UseMvc(routes =>
{
    routes.MapRoute(
        name: "default",
        template: "{controller=Home}/{action=Index}/{id?}");
});
NB! It’s very important to add WebSockets before MVC. WebSockets middleware checks in the beginning if request is for WebSocket. If it is WebSocket request then middleware starts handling it. If MVC is added to pipeline before then MVC will handle all the requests and our WebSocket middleware is never used.
Chat room view
Now let’s add chat room view. We will use Index view of home controller for chat room. Chat room view initializes WebSocket connection and starts listening to it. If user writes something to chat box and presses Enter then message is sent to server over WebSocket and WebSocket middleware will broadcast it to all WebSocket clients it knows.
@model string
@{
    ViewData["Title"] = "Home Page";
}
<style>
    body {margin:0px; padding:0px;}
    .msg {
        position: absolute;
        top: 0;
        bottom: 30px;
        border: 1px solid green;
        margin-bottom: auto;
        display:block;
        overflow: scroll;
        width:100%;
        white-space:nowrap;
    }
</style>
<div class="msg">
    <div style="position:absolute; bottom:0;" id="msgs"></div>
</div>

<div style="position:absolute;height:20px;bottom:10px;left:0; display:block;width:100%">
    <input type="text" style="max-width:unset;width:100%;max-width:100%" id="MessageField" placeholder="type message and press enter" />
</div>

@section Scripts {
    <script>
    $(function () {
        var userName = '@Model';

        var protocol = location.protocol === "https:" ? "wss:" : "ws:";
        var wsUri = protocol + "//" + window.location.host;
        var socket = new WebSocket(wsUri);
        socket.onopen = e => {
            console.log("socket opened", e);
        };

        socket.onclose = function (e) {
            console.log("socket closed", e);
        };

        socket.onmessage = function (e) {
            console.log(e);
            $('#msgs').append(e.data + '<br />');
        };

        socket.onerror = function (e) {
            console.error(e.data);
        };

        $('#MessageField').keypress(function (e) {
            if (e.which != 13) {
                return;
            }

            e.preventDefault();

            var message = userName + ": " + $('#MessageField').val();
            socket.send(message);
            $('#MessageField').val('');
        });
    });
    </script>
}
Now let’s build application and run it.
WebSocket chat room in action
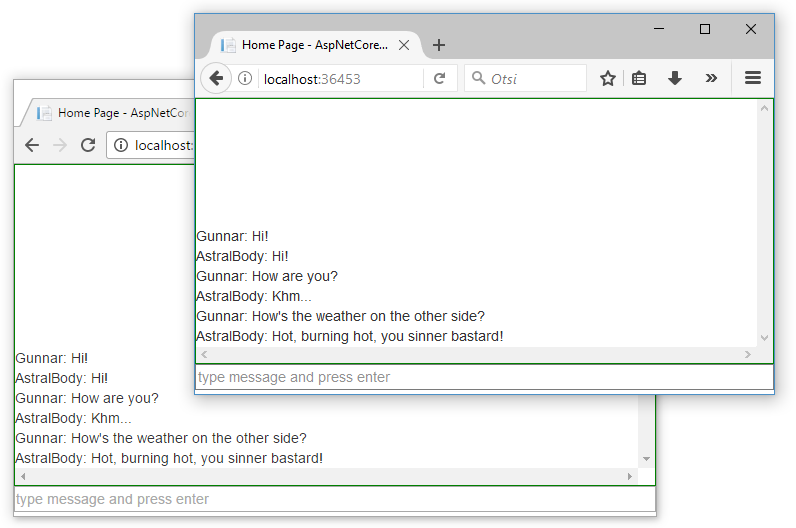
The screenshot below shows how our chat room looks like. It’s extremely primitive and simple but it works. There’s room enough for improvements but this is the fun I leave to all my dear readers.
Wrapping up
Using WebSockets in ASP.NET Core is simple. Without any additional libraries we can use the one by Microsoft. We had to write custom middleware class for WebSocket communication and in our case the class came pretty small. We used concurrent dictionary as a WebSockets cache and this enabled us to broadcast messages over sockets. Our solution is very primitive and simple, there is a lot of room for improvements but as a proof of concept it works well.
