一. 索引
1. HTML
<1> 介绍 & 规范
<2> 文件标签(一)
<html> / <head> / <body>
<br> / <p> / <hr> / <div> / <span>
<font> / <h1> --- <h6>
<b> / <i> / <del> / <u>
<ol> / <ul>
<img src = "" width="" height = "" border = "" alt="" title="" align = "" >
<a href="跳转路径" target = "_blank / _self">
<3> 文件标签(二) - 表格标签
<table border="" width="" align="" cellspacing="">
<tr align="left / right / center">
<td>
<4> 文件标签(三) - 表单标签
<form action="目的地" method = "get / post">
<input type = "text / password / checkbox / radio / file / reset / submit / button">
<select>: 下拉列表/下拉框
<option selected = "selected">
<textarea>
<button>
<5> 文件标签(四) - 框架标签
1. <frameset>和<frame>:用于定制HTML页面布局
2. 可以理解为:用多个页面拼装成一个页面
3. 框架标签和<body>标签不共存
<meta charset="" name="" content="" http-equiv="">
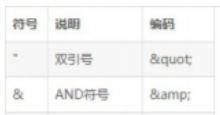
特殊字符:
<7> HTML5新特性
1. 大小写不敏感
2. 引号可省略
3. 省略了结尾标签
4. 新增语义化标签,让<div>“见名知意”
<section> / <article> / <aside> / <header> / <hgroup> /
<nav> / <figure> / <foot>
5. <video src="" controls loop autoplay>
6. 表单的控件更加丰富了
<input type = "color / date / range / search / ...">
<progress/> / <mark> / <datalist>
2. CSS
<2> 选择器
标签选择器 / 类选择器 / id选择器 / 选择器组 / 派生选择器
CSS伪类
<3> 文本属性 & 背景属性
1. 文本属性
{font-family: } {font-size: }
{font-weight: normal / bold; }
{color: } {text-align: left / right / center; }
{text-decoration: none / underline; }
{line-height: } 行高
{text-indent: 2em; } 首行文本缩进
2. 背景属性
{background-color: }
{background-image: url('img/1.jpg'); }
{background-repeat: repeat / repeat-x / repeat-y }
{background-position: 50px 100px;}
{background-attachment: scroll / fixed}
<4> 列表属性 & 边框属性
1. 列表属性
{list-style-type: none / disc / circle / square/ decimal / ...}
2. 边框属性
{border-style: none / dotted / dashed / solid / double / ...}
<5> 轮廓属性 & 盒子模型
1. 轮廓属性
{outline: 5px blue dashed;}
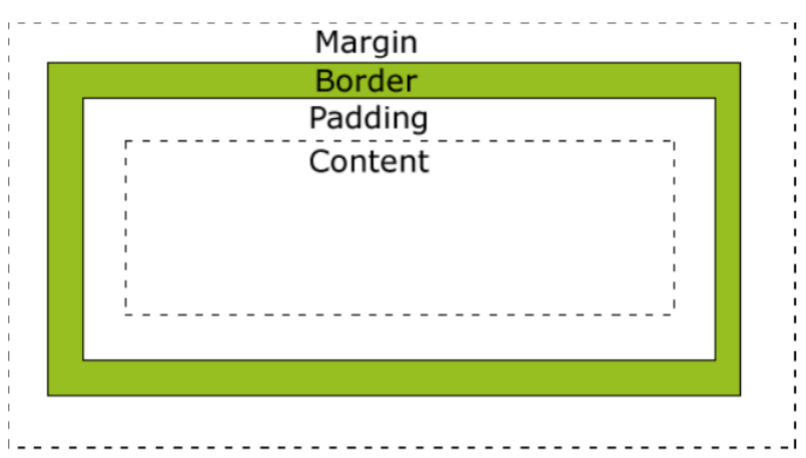
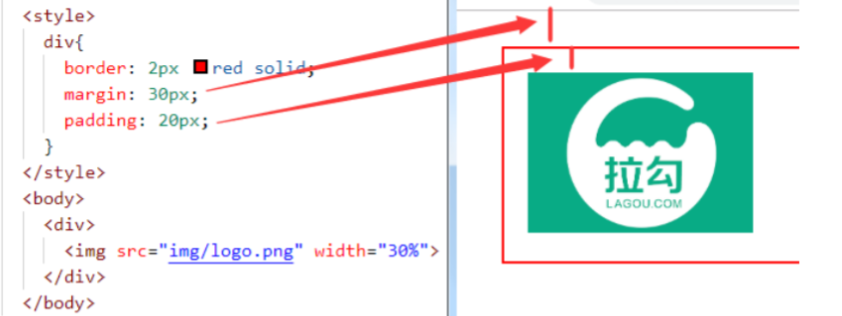
2. 盒子模型
<6> 定位
默认定位
自上而下,自动换行 - <h1>, <p>,<div> (块级元素)
从左向右,不换行 - <a>, <b>, <span> (行内元素)
从左向右,自动换行 - <input> / <img> (自动换行)
浮动定位
{float: none / left / right} (靠左 / 靠右)
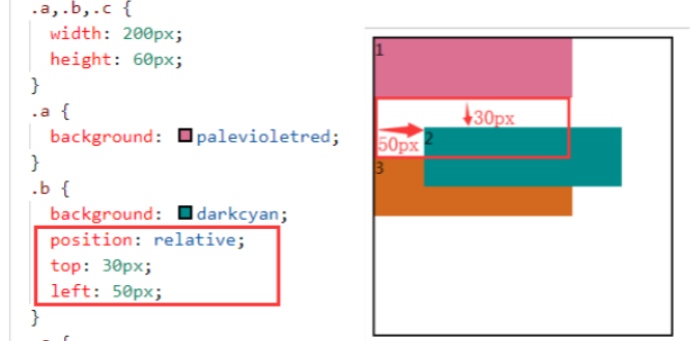
相对定位
和原来的位置进行比较,进行偏移
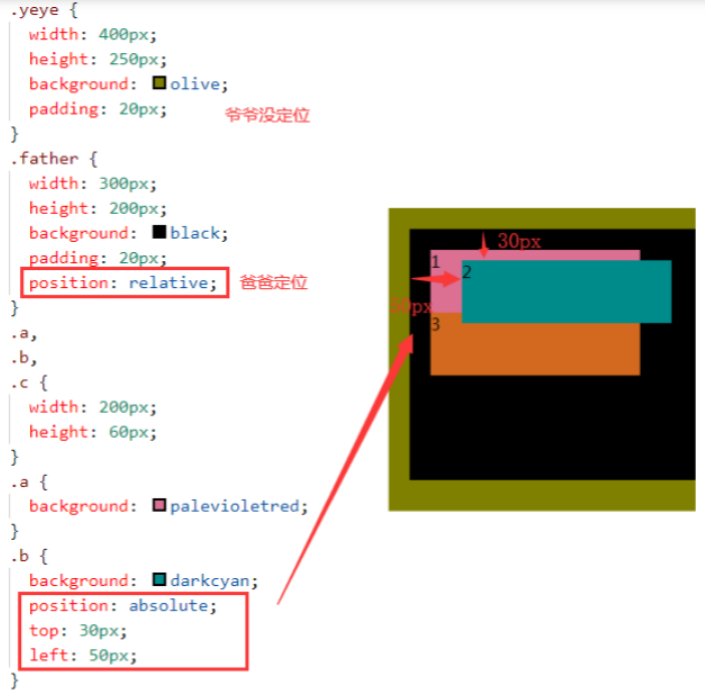
绝对定位
以已定位的祖先元素作为参照物, 进行偏移
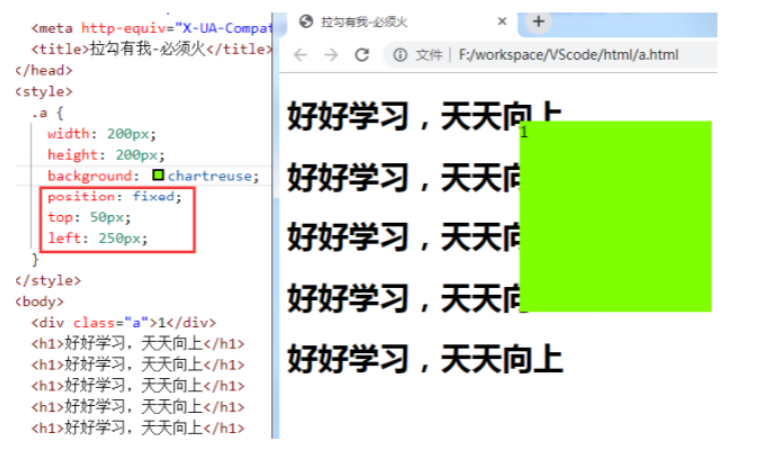
固定定位
将元素的内容固定在页面的某个位置,当用户向下滚动页面时元素框并不随着移动
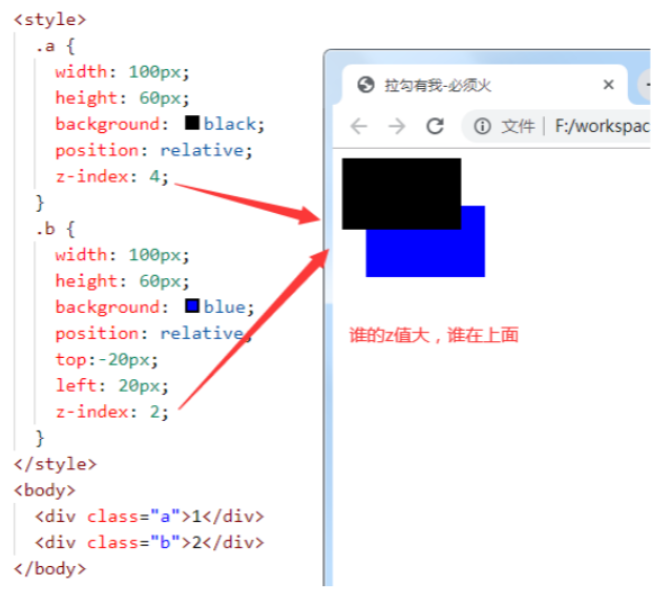
z-index
如果有重叠元素,使用z轴属性,定义上下层次
<7> 圆角 & 盒子阴影 & 渐变
<8> 背景 & 过渡动画
{background-origin: border-box / padding-box / content-box} 背景位置
{background-clip: border-box / padding-box / content-box} 背景裁切
{transition: width 2s linear 1s; }
3. JavaScript
<2> 基本语法
<3> 常用字符串API
<4> 数组
<6> 正则表达式 & 日期对象
<7> 函数
<8> 函数闭包
<9> 弹框输出
<10> DOM操作 - 简介
<11> DOM访问
var 对应id的元素下的内容 = document.getElementById("").value;
var 对应name的元素们 = document.getElementsByName("");
var 对应TagName的元素们 = document.getElementsByTagName("tr");
<12> DOM修改
1. 修改内容
document.getElementById("hello").innerHTML = "Bye~";
document.getElementById("hello").style.color = "red";
2. 添加节点
var img = document.createElement("img");
img.setAttribute("src", "../img/cat.jpg");
var divs = document.getElementByTagName("div");
divs[0].appendChild(img);
3. 删除节点
var img = document.getElementById("cat");
img.parentNode.removeChild(img);
4. 替换节点
var old = document.getElementById("");
var new = document.createElement("img");
new.setAttribute("src", "new.jpg")
old.parentNode.replaceChild(new,old);
<13> 事件
1. 窗口事件 - 仅在 body 和 frameset 元素中有效
onload: 当文档被载入时,执行脚本
<body onload = "test()">
2. 表单元素事件 - 仅在表单元素中有效
onblur: 当元素失去焦点时,执行脚本
onfocus: 当元素获得焦点时,执行脚本
<input onfocus = "test1()" onblur = "test2()">
3. 鼠标事件
onclick :当鼠标被单击时,执行脚本
ondblclick: 当鼠标被双击时,执行脚本
onmouseout: 当鼠标指针移出某元素时,执行脚本
onmouseover :当鼠标指针悬停于某元素之上时,执行脚本
<img src = "公司logo.jpg" onmouseover="加个边框()" onmouseout="去掉边框()">
4. 键盘事件
onkeydown: 键盘按下去
onkeyup: 键盘弹上来
window.onkeydown = function() {
if(event.keyCode == "13"){ // 回车键
alert("登录成功!");
}
}
window.onkeyup = function() {
// 按住按键不松手是不会触发的。当松手时,按键回弹则触发
console.log(event.keyCode);
}
5. 事件冒泡: 事件的触发顺序自内向外(先子后父)
事件捕获: 事件触发顺序变更为自外向内(先父后子)
<14> 面向对象OOP
<15> JSON
JSON是一种轻量级的数据交换格式:
{
属性1:值1,
属性2:值2
}
<16> BOM操作 - window对象
BOM:javascript对浏览器的一些常规操作的方法
1. window.screen.width / window.screen.height
2. location.href 当前页面的URL路径地址
location.reload(); 重新加载当前页面(刷新)
location.href = "新的网址"; 跳转页面
3. history.go(-1); / history.back(); 返回上一级页面
4. window.navigator 对象包含有关访问者浏览器的信息
5. 储存对象 - 本地存储 localStorage / 会话存储 sessionStorage
<17> 计时操作
timer = setInterval(test, 100); 每隔0.1秒,执行一次test函数
clearInterval(timer); 停止定时器
setTimeout(test,3000); 3秒之后调用(一次性定时器)
二. 练习题
1. 编写一个注册用户信息页面,需求如下:
表单中包括:用户名,密码,性别,学历(本科,专科),自我介绍;
输入完用户名后校验只能是"admin",否则弹框提示错误
点击提交执行后执行事件,把自我介绍的内容弹框提示出来
2. 使用html+css完成效果图
