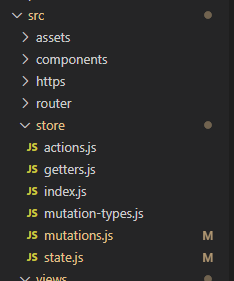
1.新建一个store文件夹,新建index.js文件,内容如下:
import Vue from 'vue'
import Vuex from 'vuex'
import state from './state'
import mutations from './mutations'
import * as getters from './getters'
import * as actions from './actions'

Vue.use(Vuex)
export default new Vuex.Store({
    state,
    mutations,
    actions,
    getters
});
2.新建state.js文件,内容如下:
const  state={
    sysname:{
        name:"张三",
        age:"210",
    },
    /异步请求的数据
    datatest:{

    }
}
export  default state
3.新建mutation-type.js,内容如下:
export const SYSNAME = 'SYSNAME';

export const DATATEST = 'DATATEST';
4.新建mutation.js,内容如下:
import * as type from './mutation-types'
const mutations = {
    [type.SYSNAME](state, value) {
        state.sysname= value;
    },

    //异步
    [type.DATATEST](state, value) {
        state.datatest= value;
    },
};


export default mutations;
5.新建getters.js,内容如下:
vuex 中的getters 想当于vue中的compute
getters是vuex 中的计算属性 ,计算属性写起来是方法,但它是个属性
export const sysname = state => state.sysname;

export const datatest = state => state.datatest;
6.新建actions.js,内容如下:
import * as type from './mutation-types'
import { actionTest } from '../https/api'
// import state from './state'
// 可以通过  state.userInfo.orgId,获取state中的值

export const getTest = function({ commit }) {
	actionTest({
        // key :value,
        // key :value 你携带的参数
	}).then((res) => {
		if(res.success) {
            console.log(res.data );
                        //要去触发mutation,只能够通过commit;
			commit(type.DATATEST, res.data)
		}
	})
}
7.在入口文件main.js中使用:
import store from './store';
window.vm = new Vue({
    el:'#app',
    store,
    router,
    i18n,
    render: c => c(App)
})
8在页面使用
<div> {{sysname}}</div>

<div  @click="change" class="awit-check">
   改变值
</div>

<div  @click="action" class="awit-check">
  异步
</div>
<div   class="awit-check">
  异步的数据{{ datatest  }}
</div>

import { mapMutations, mapGetters }  from "vuex"
//通过mapGetters 辅助函数来取值


methods:{
  change(){
            console.log( this.sysname)
            let sysnameInt= this.sysname;//将不需要修改的数据先取出来,
            this.changesysname({
                name:'数据改为123',  //key是state中的,value是你要保存的值
                age:sysnameInt.age, //取出来后,然后塞进去;
            })
   },
   //发送异步请求,
   action(){
         //要去触发action,只能够通过dispacth去触发的哈~;
         this.$store.dispatch('getTest');//触发action中的方法
   }

      //mapMutations 写在methods的最后面,他是用来修改值的哈~;
      //调用changesysname 方法去修改值;
      //SYSNAME必须跟mutation.js 中的 [type.SYSNAME]这里的(SYSNAME)的保持一致;

       ...mapMutations({
              changesysname:'SYSNAME',
        })
},

 computed:{
         //mapGetters来取值
          ...mapGetters(['sysname','datatest'])
},