二、 Spring
1. Spring 简介
1. Spring 框架是开源的、轻量级的、最受欢迎的企业级 Java 应用程序开发框架,它最初是由 Rod Johnson 编写的,并且于 2003 年 6 月首次在 Apache 2.0 许可下发布
2. Spring 框架的目标是使 J2EE 开发变得更容易
3. Spring 框架的几大核心功能:
   1)IoC/DI
      a. 控制反转(IoC,即 Inversion of Control)是一个通用的概念,依赖注入(DI,即 Dependency Injection)仅仅是控制反转的一个具体的例子
      b. 当类 A 中需要依赖另一个类对象 B 时,将类 B 通过 IoC 注入到类 A 中的过程就叫依赖注入
   2)AOP(Aspect Oriented Programming)
   3)Spring 事务管理:编程式和声明式事务管理

4. Spring 环境搭建
   1)导入 jar 包:四个核心包(beans/context/core/expression),一个日志包(commons-logging)
      a. 下载地址:https://repo.spring.io/release/org/springframework/spring/
      b. 将 spring-beans.jar、spring-context.jar、spring-core.jar、spring-expression.jar、commons-logging.jar 拷贝到 WEB-INF/lib

   2)在 src 下新建 applicationContext.xml
      a. 文件名称和路径自定义
      b. applicationContext.xml 配置的信息最终存储到 ApplicationContext 容器中
      c. Spring 对于基于 XML 的配置,Spring 2.0 以后使用 Schema 的格式,使得不同类型的配置拥有了自己的命名空间,使配置文件更具扩展性
      d. Schema 文件扩展名为 *.xsd,每次引入一个 *.xsd 文件都对应一个 namespace(xmlns)
      e. 通过 <bean> 标签创建对象,默认配置文件被加载时就创建对象

   3)配置 web.xml,Tomcat 启动时加载 Spring 配置文件:
      <web-app>
        <context-param>
           <param-name>contextConfigLocation</param-name>
           <param-value>classpath:applicationContext.xml</param-value>
        </context-param>
        <listener>
           <listener-class>org.springframework.web.context.ContextLoaderListener</listener-class>
        </listener>
      </web-app>

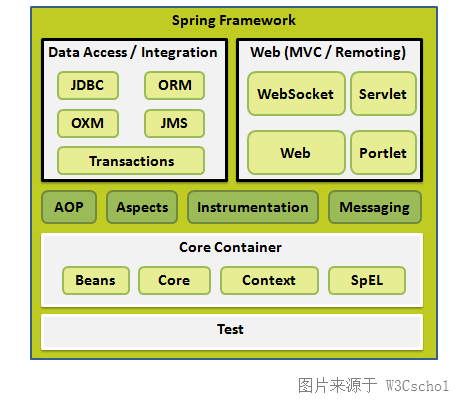
5. Spring 框架体系结构如下图所示
   1)Test:支持对具有 JUnit 或 TestNG 框架的 Spring 组件的测试
   2)Core Container:核心容器,是 Spring 启动的最基本条件
      a. Beans:提供了 BeanFactory
      b. Core:提供了框架的基本组成部分,包括 IoC 和依赖注入功能
      c. Context:获取外部资源和管理注解等。ApplicationContext 接口是 Context 模块的焦点
      d. SpEl(Spring Expression Language):提供了强大的表达式语言
   3)AOP:提供了面向切面的编程实现
   4)Aspects:提供了与 AspectJ 的集成
   5)Data Access/Integration:Spring 封装数据访问层相关内容
      a. JDBC:Spring 对 JDBC 封装后的代码
      b. ORM(Object Relational Mapping):封装了持久层框架的代码,例如 Hibernate
      c. OXM(Object XML Mapping):提供了对 OXM 实现的支持,比如 XML Beans 等
      d. JMS(Java Message Service):包含生产(produce)和消费(consume)消息的功能
      e. Transactions:对特殊接口实现类及所有的 POJO 支持编程式和声明式事务管理。(注:编程式事务需要自己写 beginTransaction()、commit()、rollback()等事务管理方法,声明式事务是通过注解或配置由 Spring 自动处理,编程式事务粒度更细)
   6)Web:提供面向 Web 的基本功能和面向 Web 的应用上下文,比如多部分(multipart)文件上传功能、使用 Servlet 监听器初始化 IoC 容器等。它还包括 HTTP 客户端以及 Spring 远程调用中与 Web 相关的部分

2. Spring XML 配置文件


<?xml version="1.0" encoding="UTF-8"?>
<beans xmlns="http://www.springframework.org/schema/beans"
    xmlns:xsi="http://www.w3.org/2001/XMLSchema-instance"
    xmlns:aop="http://www.springframework.org/schema/aop"
    xmlns:context="http://www.springframework.org/schema/context"
    xmlns:tx="http://www.springframework.org/schema/tx"
    xsi:schemaLocation="http://www.springframework.org/schema/beans
        http://www.springframework.org/schema/beans/spring-beans.xsd
        http://www.springframework.org/schema/aop
        http://www.springframework.org/schema/aop/spring-aop.xsd
        http://www.springframework.org/schema/context
        http://www.springframework.org/schema/context/spring-context.xsd
        http://www.springframework.org/schema/tx
        http://www.springframework.org/schema/tx/spring-tx.xsd"
        default-autowire="byName">
        <!-- 注解扫描 -->
        <context:component-scan base-package="com.ncdx.service.impl"></context:component-scan>
        <!-- 加载属性文件 -->
        <context:property-placeholder location="classpath:db.properties"></context:property-placeholder>
        <!-- 数据源 -->
        <bean id="dataSource" class="org.springframework.jdbc.datasource.DriverManagerDataSource">
          <property name="driverClassName" value="${mysqlDriver}"></property>
          <property name="url" value="${mysqlURL}"></property>
          <property name="username" value="${mysqlUser}"></property>
          <property name="password" value="${mysqlPwd}"></property>
        </bean>
        <!-- SqlSessionFactory创建 -->
        <bean id="factory" class="org.mybatis.spring.SqlSessionFactoryBean">
          <property name="dataSource" ref="dataSource"></property>
          <property name="typeAliasesPackage" value="com.ncdx.pojo"></property>
        </bean>
        <!-- Mapper扫描器 -->
        <bean class="org.mybatis.spring.mapper.MapperScannerConfigurer">
          <property name="basePackage" value="com.ncdx.mapper"></property>
          <property name="sqlSessionFactoryBeanName" value="factory"></property>
        </bean>
        <!-- 事务管理器 -->
        <bean id="txManager" class="org.springframework.jdbc.datasource.DataSourceTransactionManager">
          <property name="dataSource" ref="dataSource"></property>
        </bean>
        <tx:advice id="txAdvice" transaction-manager="txManager">
          <tx:attributes>
            <tx:method name="ins*"/>
            <tx:method name="del*"/>
            <tx:method name="upd*"/>
            <tx:method name="*" read-only="true"/>
          </tx:attributes>
        </tx:advice>
        <!-- 配置aop -->
        <aop:config>
          <aop:pointcut expression="execution(* com.ncdx.service.impl.*.*(..))" id="mypoint"/>
          <aop:advisor advice-ref="txAdvice" pointcut-ref="mypoint"/>
        </aop:config>
</beans>
applicationContext.xml3. Spring 容器
 1. Spring IoC 容器是具有依赖注入功能的容器,它负责实例化、定位、配置应用程序中的对象及建立这些对象间的依赖,并管理它们的整个生命周期从创建到销毁。这些对象被称为 Spring Beans
 2. 通常 new 一个实例,控制权由程序员控制,而"控制反转"是指 new 实例工作不由程序员来做而是交给 Spring 容器来做。在 Spring 中 BeanFactory 是 IOC 容器的实际代表者
 3. Spring 提供了以下两种不同类型的容器:
    1)BeanFactory 容器
       a. 它是最简单的容器,给 DI 提供了基本的支持。该容器由 org.springframework.beans.factory.BeanFactory 接口定义
       b. 在 Spring 中,有大量对 BeanFactory 接口的实现。其中,最常被使用的是 XmlBeanFactory 类
          XmlBeanFactory factory = new XmlBeanFactory(new ClassPathResourc("beans.xml"));
          People peo = (People) factory.getBean("peo");
    2)ApplicationContext 容器
       a. ApplicationContext 是 BeanFactory 的子接口,也被称为 Spring 上下文。该容器由 org.springframework.context.ApplicationContext 接口定义
       b. 它包含了 BeanFactory 所有的功能,增加了企业所需要的功能,比如,从属性文件中解析文本信息和将事件传递给所指定的监听器。一般情况下,相对于 BeanFactory,ApplicationContext 会更加优秀
       c. 当然,BeanFactory 仍可以在轻量级应用中使用,比如在资源宝贵的移动设备或者基于 applet 的应用程序中
       d. 最常被使用的 ApplicationContext 接口实现:
          ① ApplicationContext ac = new ClassPathXmlApplicationContext("applicationContext.xml");
             从 XML 文件中加载已被定义的 bean。不需要提供 XML 文件的完整路径,只需正确配置 CLASSPATH 环境变量即可
          ② ApplicationContext ac = new FileSystemXmlApplicationContext("D:/workSpace/spring/src/applicationContext.xml");
             从 XML 文件中加载已被定义的 bean。需要提供给 XML 文件的完整路径
          ③ ApplicationContext ac = new XmlWebApplicationContext();
             无参数,在一个 web 应用程序的范围内加载在 XML 文件中已被定义的 bean
4. Spring Bean
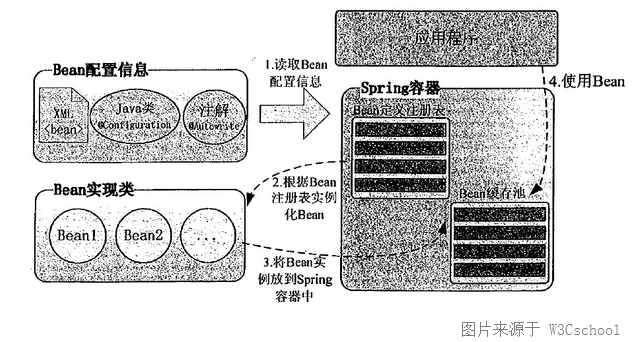
1. Bean 是一个被实例化,组装,并通过 Spring IoC 容器所管理的对象。这些 bean 是由配置元数据创建的
2. Bean 的生命周期可以表达为:Bean的定义 —— Bean的初始化 —— Bean的使用 —— Bean的销毁
2. 每个 bean 都有如下属性:
   1)id:在命名空间中唯一的标识符
   2)class:这个属性是强制性的,指定创建该 bean 的 Java 类
   3)autowire="default/no/byName/byType":自动装配,默认为 default
   4)scope:指定由该 bean 定义创建的对象的作用域
      a. singleton:默认值,在 spring IoC 容器仅存在一个 Bean 实例,Bean 以单例方式存在
         单例类型,在创建启动容器时就同时自动创建了一个 bean 的对象,不管你是否使用,它都存在了,每次获取到的对象都是同一个对象
      b. prototype:每次从容器中调用 Bean 时,都返回一个新的实例,即每次调用 getBean()时,相当于执行 new
         原型类型,它在我们创建容器的时候并没有实例化,而是当我们获取 bean 的时候才会去创建一个对象,而且我们每次获取到的对象都不是同一个对象
      c. request:每次 HTTP 请求都会创建一个新的 Bean,该作用域仅适用于 WebApplicationContext 环境
      d. session:同一个 HTTP Session 共享一个Bean,不同 Session 使用不同的 Bean,仅适用于 WebApplicationContext 环境
      e. global-session:一般用于 Portlet 应用环境,该运用域仅适用于 WebApplicationContext 环境

   5)factory-bean="beanId":工厂模式,用来注入依赖关系
   6)factory-method:工厂方法,属性值必须与 Java 中定义的方法名一致
      如:实例工厂模式
      <bean id="factory" class="com.ncdx.pojo.PeopleFactory"></bean>
      <bean id="create" factory-bean="factory" factory-method="createPeople"></bean>
      静态工厂模式:方法是静态的
      <bean id="newPeo" class="com.ncdx.pojo.PeopleStaticFactory" factory-method="newInstance"></bean>

   7)init-method:在 bean 的所有必需属性被容器初始化之后,调用回调方法。属性值必须与 Java 中定义的方法名一致
   8)destroy-method:当包含该 bean 的容器被销毁时,使用回调方法。属性值必须与 Java 中定义的方法名一致
   9)parent="beanId":继承。Spring Bean 定义的继承与 Java 类的继承无关,但是继承的概念是一样的

4. 下图表达了 Bean 与 Spring 容器之间的关系:

5. DI
1. Spring 框架的核心功能之一就是通过依赖注入的方式来管理 Bean 之间的依赖关系
2. 当类 A 中需要依赖另一个类对象 B 时,将类 B 通过 IoC 注入到类 A 中的过程就叫依赖注入
3. DI 主要有两种:
   1)基于构造函数的 DI
      a. 当容器调用带有多个参数的构造函数的类时,实现基于构造函数的 DI
   2)基于 setter 方法的 DI
      b. 基于 setter 方法的 DI 是通过在调用无参数的构造函数或无参数的静态工厂方法实例化 bean 之后,容器调用 bean 的 setter 方法来实现的
4. 给 Bean 的属性赋值(注入):
   1)通过构造方法设置属性值
      <constructor-arg index="0" type="" value=""/>
      <constructor-arg ref="beanId"/>
      如:
      <bean id="exampleBean" class="examples.ExampleBean">
        <constructor-arg type="int" value="2001"/>
        <constructor-arg type="java.lang.String" value="Zara"/>
      </bean>
      <bean id="foo" class="x.y.Foo">
        <constructor-arg ref="bar"/>
        <constructor-arg ref="baz"/>
      </bean>
      <bean id="bar" class="x.y.Bar"/>
      <bean id="baz" class="x.y.Baz"/>

   2)如果属性类型是基本数据类型或 String 等简单类型或简单对象类型
      <property name="" value=""/>
      <property name="" ref=""/>
      如:
      <bean id="john" class="com.example.Person">
        <property name="name" value="John"/>
        <property name="friends" ref="mary"/>
      </bean>
      <bean id="mary" class="com.example.Person">
        <property name="name" value="Mary"/>
      </bean>
      可写成:
      <bean id="john" class="com.example.Person"
        p:name="John"
        p:friends-ref="mary"/>
      </bean>
      <bean id="mary" class="com.example.Person"
        p:name="mary"/>
      </bean>
      还可写成:
      <bean id="john" class="com.example.Person">
        <property name="name">
          <value>John</value>
        </property>
        <property name="friends">
          <ref>mary</ref>
        </property>
      </bean>
      <bean id="mary" class="com.example.Person">
        <property name="name" value="Mary"/>
      </bean>

   3)注入内部 Bean,如:
      <bean id="outerBean" class="...">
        <property name="target">
          <bean id="innerBean" class="..."/>
        </property>
      </bean>

   4)如果属性类型是数组
      <property name="">
        <array>
          <value>...</value>
          <value>...</value>
          ....
        </array>
      </property>

   5)如果属性类型是 Set<?>
      <property name="">
        <set>
          <value>...</value>
          <value>...</value>
          <ref bean="beanId"/>
          <ref bean="beanId"/>
          ....
        </set>
      </property>

   6)如果属性类型是 List<?>
      <property name="">
        <list>
          <value>...</value>
          <value>...</value>
          <ref bean="beanId"/>
          <ref bean="beanId"/>
          ....
        </list>
      </property>

   7)如果属性类型是 Map<?, ?>
      <property name="">
        <map>
          <entry key="" value="" />
          <entry key="" value="" />
          <entry key="" value-ref="beanId"/>
          <entry key="" value-ref="beanId"/>
          ....
        </map>
      </property>

   8)如果属性类型是 Properties
      <property name="">
        <props>
          <prop key="">...</prop>
          <prop key="">...</prop>
          ....
        </props>
      </property>
6. Spring 自动装配
1. 在 Spring 配置文件中,Spring 容器可以使用自动装配进行依赖注入,即可以不配置符合自动装配条件的 <property name="" ref=""/>。
   1)自动注入只会影响 ref,不会影响 value 赋值
   2)自动装配可以显著减少需要指定的属性或构造器参数

2. 两种自动装配方法:
   1)<bean/> 中的 autowire 属性,只对这个 <bean/> 生效
   2)<beans/> 中的 default-autowire 属性,全局配置,即对该文件中所有 <bean/> 生效

3. 自动装配属性可取值:
   1)default:默认值,取决于全局 default-autowire="" 的值。默认全局和局部都没有配置的情况下,相当于 no
   2)no:不自动装配
   3)byName:通过名称自动装配,即尝试将它的属性名与配置文件中定义为相同名称的 beans 进行匹配和连接
      a. 如果找到匹配项,它将注入这些 beans,否则,它将抛出异常
      b. 例如,在配置文件中,如果一个 bean 定义设置为自动装配 byName,并且它包含 factory 属性(即,它有一个 setFactory(...) 方法),那么 Spring 就会查找 id 为 "factory" 的 bean,并用它来设置这个属性。你仍然可以使用 <property/> 标签连接其余的属性
      <bean id="builder" class="com.ncdx.Builder>
        <property name="factory" ref="factory" />
        <property name="name" value="Sun" />
      </bean>
      <bean id="factory" class="com.ncdx.Factory" />
      简写为:
      <bean id="builder" class="com.ncdx.Builder" autowire="byName">
        <property name="name" value="Sun" />
      </bean>
      <bean id="factory" class="com.ncdx.Factory" />

   4)byType:根据类型自动装配,即在 spring 容器中匹配 bean 的 class
      a. 如果存在多个相同 class 的 bean,会抛出一个致命的异常:expected single matching bean but found 2
      b. 例如,在配置文件中,如果一个 bean 定义设置为自动装配 byType,并且它包含 Student 类型的 student 属性,那么 Spring 就会查找 class 为 "com.ncdx.Student" 的 bean,并用它来设置这个属性。你仍然可以使用 <property/> 标签连接其余的属性
      <bean id="teacher" class="com.ncdx.Teacher>
        <property name="stu" ref="student" />
        <property name="name" value="LiMing" />
      </bean>
      <bean id="student" class="com.ncdx.Student" />
      简写为:
      <bean id="teacher" class="com.ncdx.Teacher" autowire="byType">
        <property name="name" value="LiMing" />
      </bean>
      <bean id="student" class="com.ncdx.Student" />

   5)constructor:类似于 byType,适用于构造函数参数类型
      a. 如果在容器中没有一个构造函数参数类型的 bean,会抛出一个致命错误
      b. 例如,在配置文件中,如果一个 bean 定义设置为通过构造函数自动装配,而且它有一个带有 Student 类型的参数之一的构造函数,那么 Spring 就会查找 class 为 "com.ncdx.Student" 的 bean,并用它来设置构造函数的参数。你仍然可以使用 <constructor-arg/> 标签连接其余属性
      <bean id="teacher" class="com.ncdx.Teacher>
        <constructor-arg  ref="student" />
        <constructor-arg  value="LiMing"/>
      </bean>
      <bean id="student" class="com.ncdx.Student" />
      简写为:
      <bean id="teacher" class="com.ncdx.Teacher" autowire="constructor">
        <constructor-arg  value="LiMing"/>
      </bean>
      <bean id="student" class="com.ncdx.Student" />

4. 自动装配的局限性:
   1)不能自动装配简单类型包括基本类型,字符串等
   2)自动装配不如显式装配精确
7. AOP
1. Spring 框架的一个关键组件是面向切面编程(AOP),正常程序执行流程都是纵向执行流程,面向切面编程,就是在程序原有纵向执行流程中,针对某一个或某一些方法添加通知,形成横切面的过程
2. AOP 应用场景:日志记录、审计、声明式事务、安全性和缓存等
3. AOP 的优势:不需要修改原有程序代码,体现出程序高扩展性;原有功能相当于释放了部分逻辑,让职责更加明确
4. AOP 术语:
   1)原有功能:切点(Pointcut)
   2)通知(Advice),这是实际行动之前或之后执行的方法
      a. before:前置通知
      b. after:后置通知,是否出现异常都执行
      c. after-returning:返回后置通知,只有当切点正确执行时执行
      d. after-throwing:异常通知,在切点方法退出抛出异常时执行
      e. around:环绕通知,在切点方法调用之前和之后执行
   3)所有功能的总称叫做切面(Aspect),即切面具有一组提供横切需求的 APIs
   4)把切面嵌入原有功能的过程叫做织入(Weaving),可以在编译时,类加载时和运行时完成
   5)目标对象(Target object):被一个或者多个方面(Aspect)所通知的对象,这个对象永远是一个被代理对象。也叫被通知对象
   6)引用(Introduction):允许你添加新方法或属性到现有的类中

5. Spring 提供了 3 种 AOP 实现方式
   1)基于 XML Schema :基于配置的 XML 来实现 AOP
      a. 每个通知都需要实现接口或类
      b. 在 <aop:config> 配置
   2)基于 AspectJ
      a. 每个通知不需要实现接口或类
      b. 在 <aop:config> 的子标签 <aop:aspect> 中配置
   3)基于 @AspectJ 注解

6. 使用 AOP 需要导入额外 Jar 包:spring-aop.jar、spring-aspects.jar、aopalliance.jar、aspectjweaver.jar

7. 基于 XML Schema 方式实现 AOP 步骤
   1)新建通知类
      a. 前置通知,实现 MethodBeforeAdvice 接口,重写方法 before(Method 切点方法对象, Object[] 切点方法参数, Object 切点方法所在类的引用)
      b. 后置通知,实现 AfterReturningAdvice 接口,重写方法 afterReturning(Object 切点方法返回值, Method 切点方法对象, Object[] 切点方法参数, Object 切点方法所在类的引用)
      c. 异常通知,实现 ThrowsAdvice 接口,必须自己写方法,且必须为 afterThrowing(),支持一个或四个参数,异常类型要和切点声明的异常类型一致
      d. 环绕通知,实现 MethodInterceptor 接口,重写方法 invoke(MeehodInvocation invocation)
      public class MyAspect implements MethodBeforeAdvice, AfterReturningAdvice, ThrowsAdvice, MethodInterceptor{
           @Ovrride
           public void afterReturning(Object arg0, Method arg1, Object[] arg2, Object arg3) throws Throwable{
                 Logger logger = Logger.getLogger(MyAfter.class);
                 Users users = (Users) arg2[0];
                 if(arg0!=null){
                   logger.info(users.getUsername()+"登录成功!");
                 }else{
                 logger.info(users.getUsername()+"登录失败!"); } }

           @Ovrride
           public void before(Method arg0, Object[] arg1, Object arg2) throws Throwable {
                 Users users = (Users) arg1[0];
                 Logger logger = Logger.getLogger(MyBefore.class);
                 logger.info(users.getUsername()+"在"+new Date().toLocaleString()+"正在进行登录"); } }

           @Ovrride
           public Object invoke(MeehodInvocation arg0)throws Throwable{
                 System.out.println("环绕-前置");
                 Object result = arg0.proceed(); //放行,调用切点方法
                 System.out.println("环绕-后置");
                 return result; }
      }
   2)在 Spring 配置文件中添加:
        <!-- 声明切面 -->
        <aop:config>
          <!-- 声明切入点 -->
          // 匹配任意一级包名,任意类名,任意方法名,任意方法参数
          <aop:pointcut id="mypoint" expression="execution(* com.ncdx.*.service.impl.*.*(..))" />
          <!-- 声明通知 -->
          <aop:advisor advice-ref="mybefore" pointcut-ref="mypoint"/>
          <aop:advisor advice-ref="myafter" pointcut-ref="mypoint"/>
          <aop:advisor advice-ref="mythrow" pointcut-ref="mypoint"/>
          <aop:advisor advice-ref="myarround" pointcut-ref="mypoint" />
        </aop:config>
        <!-- 定义目标对象(被通知对象或被代理对象) -->
        <bean id="demo" class="com.ncdx.test.service.impl.Demo"></bean>
        <!-- 定义通知类对象 -->
        <bean id="mybefore" class="com.ncdx.advice.MyBefore"></bean>
        <bean id="myafter" class="com.ncdx.advice.MyAfter"></bean>
        <bean id="mythrow" class="com.ncdx.advice.MyThrow"></bean>
        <bean id="myaround" class="com.ncdx.advice.MyAround"></bean>

8. 基于 AspectJ 方式实现 AOP 步骤
   1)新建类
     a. 不需要实现接口,方法名任意
     b. 环绕通知
     public class Logging {
         public void beforeAdvice(){
             System.out.println("");
         }
         public void afterAdvice(){
             System.out.println("");
         }
         public void afterReturningAdvice(Object retVal){
             System.out.println("Returning:" + retVal.toString() );
         }
         public void AfterThrowingAdvice(IllegalArgumentException ex){
             System.out.println("There has been an exception: " + ex.toString());
         }
         public Object myAround(proceedingJoinPoint p){
             System.out.println("环绕-前置");
             Object result = p.proceed();//放行,调用切点方法
             System.out.println("环绕-后置");
             return result;
         }
     }
   2)在 Spring 配置文件中添加:
      <!--声明切面 -->
      <aop:config>
        <aop:aspect id="log" ref="logging">
          <!-- 声明切入点 -->
          <aop:pointcut id="mypoint" expression="execution(* com.ncdx.*.service.impl.*.*(..))" />
          <!-- 声明通知方法 -->
          <aop:before pointcut-ref="mypoint" method="beforeAdvice" />
          <aop:after  pointcut-ref="mypoint" method="afterAdvice" />
          <aop:after-returning pointcut-ref="mypoint" method="afterReturningAdvice" returning="retVal" />
          <aop:after-throwing pointcut-ref="mypoint" method="AfterThrowingAdvice" throwing="ex" />
          <aop:around pointcut-ref="mypoint" method="myAround" />
        </aop:aspect>
      </aop:config>
      <!-- 定义目标对象(被通知对象或被代理对象) -->
      <bean id="demo" class="com.ncdx.test.service.impl.Demo"></bean>
      <!-- 定义 Logging 方面 -->
      <bean id="logging" class="com.ncdx.advice.Logging"></bean>

9. 基于 @AspectJ 注解方式实现 AOP 步骤
   1)在 XML 配置文件中添加:<aop:aspectj-autoproxy />
      a. 自动代理
      b. 含有属性 proxy-target-class="boolean":
         默认值为 false:使用 JDK 动态代理,不需要额外导入 jar 包;
         true:使用 cglib 动态代理,需要额外导入 cglib.jar 和 asm.jar

   2)Spring 不会自动去寻找注解,必须告诉 Spring 哪些包下的类中可能有注解
      <context:component-scan base-package="com.ncdx.advice" />

   3)在切点所在的类上添加 @Component
      a. 相当于 <bean id="" /> 的作用
      b. 如果没有参数,把类名首字母变小写,作为 bean 的 id 值

   4)声明切入点的方式有两种:
      a. 某个范围内的方法会被执行,一般声明在 Aspect 类中的一个空方法上面:@Pointcut("execution(* com.ncdx.*.service.impl.*.*(..))")
      b. 具体到哪个方法会真正被执行,声明在切点方法上面:@Pointcut("execution(* com.ncdx.service.impl.Student.getName())")

   5)声明一个 Aspect 类,在切面类上添加 @Component 和 @Aspect
      a. @Aspect ,相当于 <aop:aspect/>
      b. 如:
      @Component
      @Aspect
      public class AspectModule {
          // 声明某个范围的方法会被执行
          @Pointcut("execution(* com.ncdx.*.service.impl.*.*(..))")
          public void selectAll(){}

          6)声明通知
          @Before("execution(* com.ncdx.*.service.impl.*.*(..)")
          或
          @Before("selectAll()")
          或
          @Before(pointcut="selectAll()")
          public void doBeforeTask() {....}

          @After("execution(* com.ncdx.service.impl.Student.getName())")
          或
          @After("getName()")
          public void doAfterTask() {....}

          @AfterReturning(pointcut = "selectAll()", returning="retVal")
          public void doAfterReturnningTask(Object retVal) {....}

          @AfterThrowing(pointcut = "selectAll()", throwing="ex")
          public void doAfterThrowingTask(Exception ex) {....}

          @Around("selectAll()")
          public void doAroundTask() {....}
      }
8. MyBatis 与 Spring 的整合
1. MyBatis 与 Spring 的整合步骤:
   1)导入额外 jar 包:spring-jdbc.jar、mybatis.jar、mybatis-spring.jar、mysql-connector-java.jar
   2)在 Spring 配置文件添加:
      <!-- 注解扫描 -->
      <context:component-scan base-package="com.ncdx.*"></context:component-scan>
      <!-- 加载属性文件,如果需要加载多个配置文件用逗号分割,在被 Spring 管理的类中通过 @Value{"${}"} 取出 xxx.properties 中的内容 -->
      <context:property-placeholder location="classpath:db.properties"></context:property-placeholder>
      <!-- 数据源 -->
      <bean id="dataSource" class="org.springframework.jdbc.datasource.DriverManagerDataSource">
          <property name="driverClassName" value="${mysqlDriver}"></property>
          <property name="url" value="${mysqlURL}"></property>
          <property name="username" value="${mysqlUser}"></property>
          <property name="password" value="${mysqlPwd}"></property>
      </bean>
      <!-- SqlSessionFactory创建 -->
      <bean id="factory" class="org.mybatis.spring.SqlSessionFactoryBean">
          <property name="dataSource" ref="dataSource"></property>
          <property name="typeAliasesPackage" value="com.ncdx.pojo"></property>
      </bean>
      <!-- Mapper扫描器 -->
      <bean class="org.mybatis.spring.mapper.MapperScannerConfigurer">
          <property name="basePackage" value="com.ncdx.mapper"></property>
          <property name="sqlSessionFactoryBeanName" value="factory"></property>
      </bean>
      <!-- 由 Spring 管理 serviceImpl 实现类 -->
      <bean id="userService" class="com.ncdx.service.impl.UserServiceImpl">
          <property name="userMapper" ref="userMapper"></property>
      </bean>

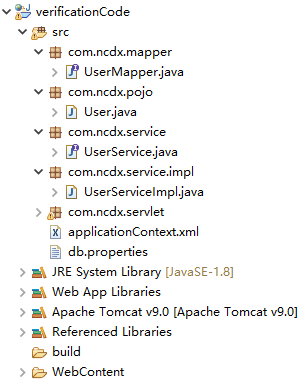
   3)编写代码,项目层次结构如下图所示
      a. 正常编写 Pojo 类
      b. 编写 mapper 包下文件时必须使用接口绑定方案或注解方案(必须有接口)。图给出的是注解方案,接口绑定方案是带有对应的 UserMapper.xml 文件的
      c. 正常编写 service 接口和 serviceImpl 实现类,需要在 serviceImpl 实现类中声明 Mapper 接口对象,并生成 getter/setter 方法,如:
      public class UserServiceImpl implements UserService{
          private UserMapper userMapper;
          public UserMapper getUserMapper() {
              return userMapper;
          }
          public void setUserMapper(UserMapper userMapper) {
              this.userMapper = userMapper;
          }
          @Override
          public User login(User user) {
              return userMapper.selByUserPwd(user);
          }
      }

9. Spring 事务管理
1. 事务:从数据库角度出发,完成业务时需要执行的 SQL 集合,统称一个事务
2. 事务具有以下四个关键属性(ACID):
   1)原子性:事务应该当作一个单独单元的操作,这意味着整个序列操作要么是成功,要么是失败的
   2)一致性:这表示数据库的引用完整性的一致性,表中唯一的主键等
   3)隔离性:可能同时处理很多有相同的数据集的事务,每个事务应该与其他事务隔离,以防止数据损坏
   4)持久性:一个事务一旦完成全部操作后,这个事务的结果必须是永久性的,不能因系统故障而从数据库中删除

3. 一个真正的关系型数据库管理系统(RDBMS)将为每个事务保证所有的四个属性。使用 SQL 发布到数据库中的事务的简单过程如下:
   1)使用 begin transaction 命令开始事务
   2)使用 SQL 语句执行各种查询、删除、更新或插入操作
   3)如果所有的操作都成功,则执行提交操作,否则回滚所有操作

4. Spring 支持两种类型的事务管理:
   1)编程式事务管理:这意味着你在业务代码中有管理事务。这给了你极大的灵活性,但却很难维护
   2)声明式事务管理:这意味着你从业务代码中分离事务管理。你仅仅使用注释或 XML 配置来管理事务

5. 声明式事务管理比编程式事务管理更可取,尽管它不如编程式事务管理灵活,但它实现了代码分离
6. 作为一种横切关注点,声明式事务管理可以使用 AOP 方法进行模块化,即 Spring 支持使用 Spring AOP 框架的声明式事务管理

7. 声明式事务管理的使用:
   1)导入额外 jar 包:spring-tx.jar
   2)在 Spring 配置文件添加:
      <!-- 事务管理器 -->
      <bean id="txManager" class="org.springframework.jdbc.datasource.DataSourceTransactionManager">
          <property name="dataSource" ref="dataSource"></property>
      </bean>
      <tx:advice id="txAdvice" transaction-manager="txManager">
         <tx:attributes>
            <tx:method name="ins*"/>
            <tx:method name="del*"/>
            <tx:method name="upd*"/>
            <tx:method name="*" read-only="true"/>
         </tx:attributes>
      </tx:advice>
      <!-- 配置 aop -->
      <aop:config>
          <aop:pointcut expression="execution(* com.ncdx.service.impl.*.*(..))" id="mypoint"/>
          <!-- 声明式事务管理是基于通知的(advice) -->
          <aop:advisor advice-ref="txAdvice" pointcut-ref="mypoint"/>
      </aop:config>

8. <tx:method /> 中的属性解释
   1)name="*" ,指定哪些方法需要事务控制
   2)read-only="boolean" ,指定该事务是否是只读的
      a. true,告诉数据库此事务为只读事务,对数据库有一定的优化作用。适用于有关 select 操作的方法
      b. false,告诉数据库此事务需要提交,对数据库有一定的优化作用。适用于有关 delete、update、insert 操作的方法

   3)rollback-for="异常类型全限定路径",当出现指定异常时需要进行回滚
   4)no-rollback-for="异常类型全限定路径",当出现指定异常时不回滚事务

   5)propagation="" ,控制事务的传播行为,当一个具有事务控制的方法被另一个有事务控制的方法调用后,需要如何管理事务(新建事务?在事务中执行?把事务挂起?报异常?)
      a. REQUIRED,默认值,支持在当前事务中执行;如果不存在事务,则创建一个新的事务
      b. SUPPORTS,支持在当前事务中执行;如果不存在,则在非事务状态下执行
      c. MANDATORY,支持在当前事务中执行;如果不存在当前事务,则抛出一个异常
      d. NESTED,如果存在当前事务,则在一个嵌套的事务中执行
      e. NEVER,不支持当前事务;如果存在当前事务,则抛出一个异常
      f. NOT_SUPPORTED,不支持当前事务;而总是执行非事务性
      g. REQUIRES_NEW,创建一个新事务,如果存在一个事务,则把当前事务挂起

   6)isolation="" ,指定隔离级别
      a. DEFAULT,默认的隔离级别
      b. READ_COMMITTED,表明能够阻止脏读;可以发生不可重复读和幻读
      c. READ_UNCOMMITTED,表明可以发生脏读、不可重复读和幻读
      d. REPEATABLE_READ,表明能够阻止脏读和不可重复读;可以发生幻读
      e. SERIALIZABLE,表明能够阻止脏读、不可重复读和幻读
      脏读:指一个事务中访问到了另外一个事务未提交的数据
      不可重复读:指在一个事务内根据同一个条件对行记录进行多次查询,但是搜出来的结果却不一致。发生不可重复读的原因是在多次搜索期间查询条件覆盖的数据被其他事务修改了
      幻读:指同一个事务内多次查询返回的结果集不一样。比如同一个事务 A 内第一次查询时候有 n 条记录,但是第二次同等条件下查询却有 n+1 条记录,这就好像产生了幻觉
      注意,发生幻读的原因也是另外一个事务新增或者删除或者修改了当前事务结果集里面的数据。不同在于不可重复读是同一个记录的数据内容被修改了,幻读是数据行记录变多了或者少了

   7)timeout="-1" ,以秒为单位的时间间隔,事务必须在该时间间隔内完成
10. 常用注解
1. @Component 相当于 <bean/>
2. @Service 与 @Component 功能相同
   1)通常使用在 ServiceImpl 类上
3. @Repository 与 @Component 功能相同
   1)通常使用在数据访问层类上
4. @Controller 与 @Component 功能相同
   1)通常使用在控制器类上
5. @Resource 注入,不需要写对象的 getter/setter 方法
   1)Java 中的注解
   2)默认按照 byName 注入,如果没有名称对象,按照 byType 注入
6. @Autowired 注入,不需要写对象的 getter/setter 方法)
   1)Spring 中的注解
   2)默认按照 byType 注入
7. @Value("${}") 获取 xxx.properties 文件中的内容
8. @Pointcut 定义切点
9. @Aspect 定义切面
10. @Before 定义前置通知
11. @After  定义后置通知
12. @AfterReturning 返回后置通知,切点必须正常执行
13. @AfterThrowing 异常通知
14. @Arround 环绕通知
开启注解:<context:annotation-config />


