环境配置
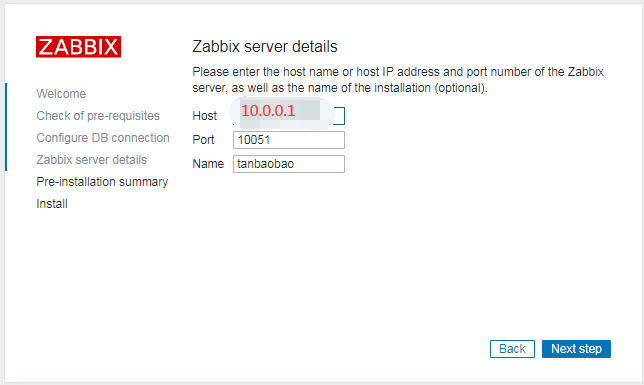
zabbix_server:10.0.0.1
zabbix_agentd:10.0.0.1,10.0.0.2(暂定)
操作系统:centos7.6
安装环境配置
1. LNMP环境
zabbix监控管理基于web页面展示出来的,并且需要使用mysql来存储数据,需先配置好LNMP环境
# 安装环境包
[root@tanbaobao ~]# yum -y install gcc pcre-devel openssl-devel

# 安装nginx,这里我之前安装好了(https://www.cnblogs.com/HeiDi-BoKe/p/11417155.html)
[root@VM_0_10_centos tmp]# tar -zxf nginx-1.16.1.tar.gz
# 切换到解压目录
[root@VM_0_10_centos nginx-1.16.1]# mkdir -p /var/tmp/nginx
# 配置
./configure
--prefix=/usr/local/nginx
--pid-path=/var/run/nginx/nginx.pid
--lock-path=/var/lock/nginx.lock
--error-log-path=/var/log/nginx/error.log
--http-log-path=/var/log/nginx/access.log
--with-http_gzip_static_module
--http-client-body-temp-path=/var/tmp/nginx/client
--http-proxy-temp-path=/var/tmp/nginx/proxy
--http-fastcgi-temp-path=/var/tmp/nginx/fastcgi
--http-uwsgi-temp-path=/var/tmp/nginx/uwsgi
--http-scgi-temp-path=/var/tmp/nginx/scgi
--with-http_stub_status_module
--with-http_ssl_module
--with-http_realip_module
# 编译安装
[root@VM_0_10_centos nginx-1.16.1]# make
[root@VM_0_10_centos nginx-1.16.1]# make install
# 启动服务
[root@VM_0_10_centos nginx]# cd sbin/
[root@VM_0_10_centos sbin]# pwd
/usr/local/nginx/sbin
[root@VM_0_10_centos sbin]# ./nginx -c /usr/local/nginx/conf/nginx.conf
[root@VM_0_10_centos sbin]# ./nginx -s reload

# 安装php
[root@tanbaobao ~]# yum -y install php php-mysql mariadb mariadb-devel mariadb-server php-fpm
2. 修改nginx配置文件
1)主配置文件
[root@tanbaobao zabbix-3.4.4]# cat /usr/local/nginx/conf/nginx.conf
#user  nobody;
worker_processes  1;
#error_log  logs/error.log;
#error_log  logs/error.log  notice;
#error_log  logs/error.log  info;
#pid        logs/nginx.pid;
events {
    worker_connections  1024;
}

http {
    include       mime.types;
    default_type  application/octet-stream;
    log_format  main  '$remote_addr - $remote_user [$time_local] "$request" '
                      '$status $body_bytes_sent "$http_referer" '
                      '"$http_user_agent" "$http_x_forwarded_for"';
    sendfile        on;
    keepalive_timeout  65;
   # 缓存php生成页面内容,8个16k
   # fastcgi_buffers 8 16k;
   # 缓存php生成的头部信息
   # fastcgi_buffers_size 32k;
   # 连接php的超时时间
   # fastcgi_connect_timeout 300;
   # 发送请求的超时时间
   # fastcgi_send_timeout 300;
   # 读取请求的超时时间
   # fastcgi_read_timeout 300;
   # 连接外部conf文件
   include /usr/local/nginx/conf/thy/*.conf;
}
2)外部文件
[root@tanbaobao zabbix-3.4.4]# cat /usr/local/nginx/conf/thy/other.conf
server{
        listen 80;
        server_name 10.0.0.1;
        location / {
                root html;
                # Turn on nginx state
#        stub_status on;
        index index.html index.htm index.php;
        }
    location /nginx_status {
                stub_status on;
                access_log   off;
            allow 10.0.0.1;
        allow 10.0.0.2;
        deny all;
    }

   # 缓存php生成页面内容,8个16k
   # fastcgi_buffers 8 16k;
   # 缓存php生成的头部信息
   # fastcgi_buffers_size 32k;
   # 连接php的超时时间
   # fastcgi_connect_timeout 300;
   # 发送请求的超时时间
   # fastcgi_send_timeout 300;
   # 读取请求的超时时间
   # fastcgi_read_timeout 300;

      location ~ .php$ {
          root           html;
          fastcgi_pass   127.0.0.1:9000;
          fastcgi_index  index.php;
          #fastcgi_param  SCRIPT_FILENAME  /scripts$fastcgi_script_name;
          fastcgi_param  SCRIPT_FILENAME  $document_root$fastcgi_script_name;
          include        fastcgi_params;
      }
}
3)启动服务
# 确保防火墙已关闭,selinux为disabled
[root@tanbaobao zabbix-3.4.4]# /usr/local/nginx/sbin/nginx -s reload
[root@tanbaobao zabbix-3.4.4]# systemctl restart mariadb
[root@tanbaobao zabbix-3.4.4]# systemctl restart php-fpm
4)测试PHP页面网页连通性
# 编写test测试页面
[root@tanbaobao zabbix-3.4.4]# cat /usr/local/nginx/html/test.php
<?php
 phpinfo();
?>

# 通过浏览器或curl访问
[root@tanbaobao zabbix-3.4.4]# curl http://10.0.0.1/test.php
部署监控服务zabbix_server
1. 源码安装zabbix server
1)安装依赖包
[root@tanbaobao zabbix-3.4.4]# yum -y install net-snmp-devel curl-devel libevent-devel
# 将下载好的zabbix源码包解压编译安装zabbix_server
[root@tanbaobao zabbix-3.4.4]# tar -zxvf zabbix-3.4.4.tar.gz
[root@tanbaobao zabbix-3.4.4]# cd zabbix-3.4.4/
[root@tanbaobao zabbix-3.4.4]# ./configure --enable-server
> --enable-proxy
> --enable-agent
> --with-mysql=/usr/bin/mysql_config
> --with-netsnmp
> --with-libcurl
[root@tanbaobao zabbix-3.4.4]# make && make install

2)初始化zabbix
创建数据库,上线zabbix web页面
创建数据库:
# 创建zabbix数据库,支持中文集,并授予相应权限
[root@tanbaobao zabbix-3.4.4]# mysql
MariaDB [(none)]> create database zabbix character set utf8;
Query OK, 1 row affected (0.00 sec)

MariaDB [(none)]> grant all privileges on zabbix.* to zabbix@'localhost' identified by '密码';
Query OK, 0 rows affected (0.00 sec)

MariaDB [(none)]> flush privileges;
Query OK, 0 rows affected (0.00 sec)

# 上面创建的是空数据库,数据在/usr/local/src/zabbix-3.4.4/database/mysql目录下,导入数据注意顺序
[root@tanbaobao zabbix-3.4.4]# cd /usr/local/src/zabbix-3.4.4/database/mysql/
[root@tanbaobao mysql]# ls
data.sql  images.sql  schema.sql
[root@tanbaobao mysql]# mysql -uzabbix -p数据库密码 zabbix < schema.sql
[root@tanbaobao mysql]# mysql -uzabbix -p数据库密码 zabbix < images.sql
[root@tanbaobao mysql]# mysql -uzabbix -p数据库密码 zabbix < data.sql
上线的web页面:
# 将zabbix的php页面代码复制到nginx发布目录下
[root@tanbaobao src]# cd /usr/local/src/zabbix-3.4.4/frontends/php/
[root@tanbaobao php]# cp -r * /usr/local/nginx/html/
[root@tanbaobao php]# chmod -R 777 /usr/local/nginx/html/
修改zabbix_server配置文件相关参数:
[root@tanbaobao php]# cat /usr/local/etc/zabbix_server.conf | grep -v '^$' | grep -v "^#"
LogFile=/tmp/zabbix_server.log    # 日志设置
DBHost=localhost    # 数据库主机,默认注释
DBName=zabbix    # 数据库名称
DBUser=zabbix    # 数据库用户
DBPassword=密码    # 数据库密码,默认注释
Timeout=4
LogSlowQueries=3000

# 创建zabbix用户
[root@tanbaobao php]# useradd -s /sbin/nologin zabbix

# 启动zabbix_server服务
[root@tanbaobao php]# zabbix_server
# 查看服务是否正常启动,如果没有启动,先用killall 服务名之后再重新启动服务
[root@tanbaobao php]# ss -ntulp | grep zabbix_server
tcp    LISTEN     0      128       *:10051                 *:*                   users:(("zabbix_server"......
修改zabbix_agentd配置文件:
[root@tanbaobao php]# cat /usr/local/etc/zabbix_agentd.conf | grep -v '^$' | grep -v "^#"
LogFile=/tmp/zabbix_agentd.log    # 日志设置
Server=127.0.0.1,10.0.0.1    # 允许哪些主机可以监控本机
ServerActive=127.0.0.1,10.0.0.1    # 允许哪些主机通过主动模式监控本机
Hostname=tanbaobao    # 设置本机主机名
UnsafeUserParameters=1    # 开启允许自定义key

# 启动agentd服务
[root@tanbaobao php]# zabbix_agentd
[root@tanbaobao php]# ss -ntulp | grep zabbix_agentd
tcp    LISTEN     0      128       *:10050                 *:*                   users:(("zabbix_agentd"........
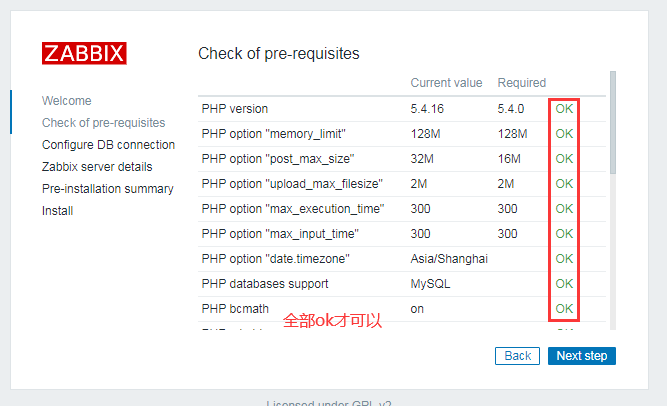
浏览器访问页面:http://ip/index.php


点击下一步根据错误提示:


[root@tanbaobao html]# yum -y install php-gd php-xml php-bcmath php-mbstring
修改/etc/php.ini文件如下内容:

# 重启php-fpm服务
[root@tanbaobao html]# systemctl restart php-fpm
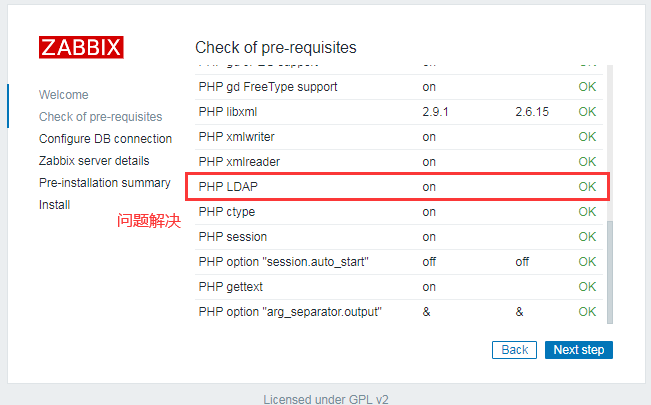
发现有个警告:(当然这个warning不解决也没关系,但是我这边还是解决比较好点)

解决:
# 查看是否有该模块(发现并没有该模块)
[root@tanbaobao html]# find / -name "ldap.so"

# 安装ldap模块(参考https://www.cnblogs.com/bigdevilking/p/9440098.html)
[root@tanbaobao html]# yum -y install php-ldap

# 再次查看发现ldap模块已经存在了
[root@tanbaobao html]# find / -name "ldap.so"
/usr/lib64/php/modules/ldap.so

# 重启服务
[root@tanbaobao html]# systemctl restart php-fpm
初始化数据库页面:

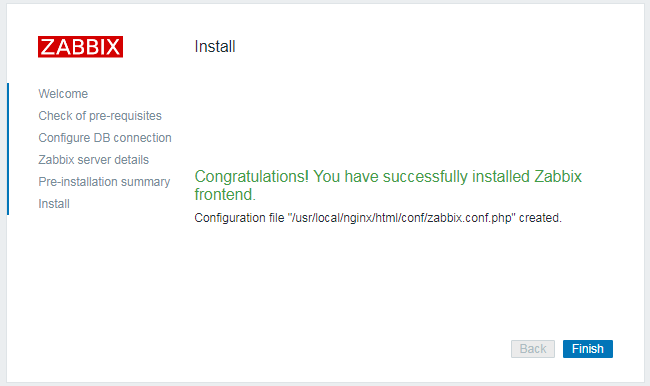
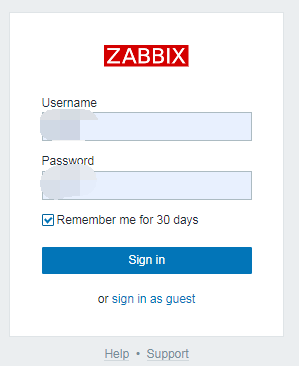
使用用户名和密码登录zabbix(登录之后可以设置界面语言环境为中文):
2. 搭建被监控端zabbix_agentd
[root@VM_0_16_centos zabbix-3.4.4]# useradd -s /sbin/nologin zabbix
[root@VM_0_16_centos zabbix-3.4.4]# tar -zxvf zabbix-3.4.4.tar.gz
[root@VM_0_16_centos src]# cd zabbix-3.4.4/

[root@VM_0_16_centos zabbix-3.4.4]# ./configure --enable-agent
[root@VM_0_16_centos zabbix-3.4.4]# make && make install

[root@VM_0_16_centos zabbix-3.4.4]# cat /usr/local/etc/zabbix_agentd.conf
Server=监控服务ip    # 被动模式
ServerActive=监控服务ip    # 主动模式
Hostname=VM_0_16_centos    # 被监控主机自己主机名
EnableRemoteCommands=1    # 监控异常后,允许远程登录执行命令
3.配置使用zabbix监控系统
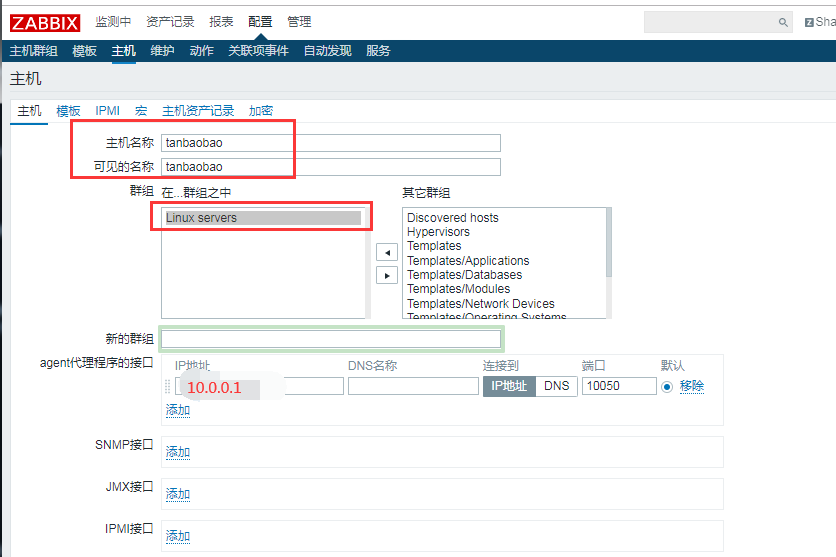
1)添加监控主机
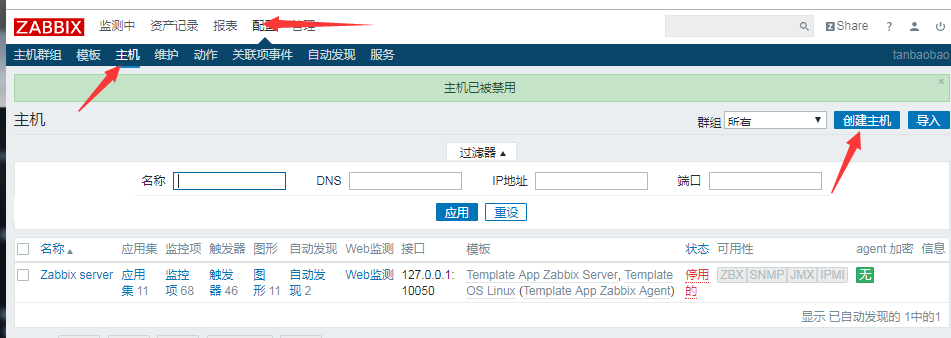
添加监控主机,名称建议和主机名一致,也可以不一致
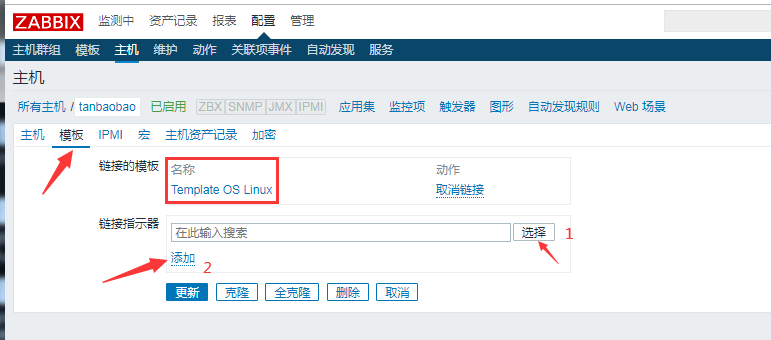
2)为被监控主机添加模板
选择模板并连接到主机
到此,监控端主机添加完成