vue3.0从零开始到实战项目
vue3.0中文官网连接:https://v3.cn.vuejs.org/
一、安装node.js
1. 官方文档:https://nodejs.org/en/
安装版本必须大于12.0,建议直接安装最新稳定版本
2. 安装 node.js 的同时,一般会自动安装 npm 的,所以不用单独安装 npm 了(如有需要,也可以命令行安装:npm install -g)
3. 查看版本命令行:node -v 、 npm -v

二、全局安装vue脚手架
npm install @vue-cli -g
官方文档:https://cli.vuejs.org/zh/guide/
如果你安装的是旧版的vue-cli,需要提前卸载之后再重新安装 @vue-cli,卸载:
npm uninstall vue-cli -g
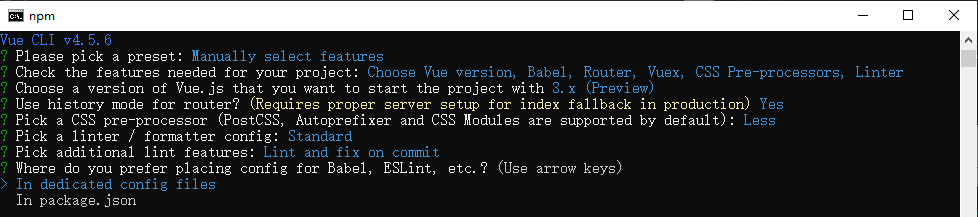
三、初始化项目
版本查看:vue -V
版本升级:npm update -g @vue-cli
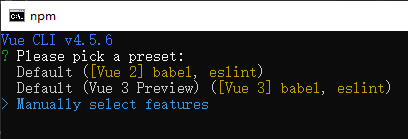
创建项目:vue create projectname
注意:项目名称不能大写有字母
进入项目目录:cd projecname
运行项目:npm run serve
项目目录结构:
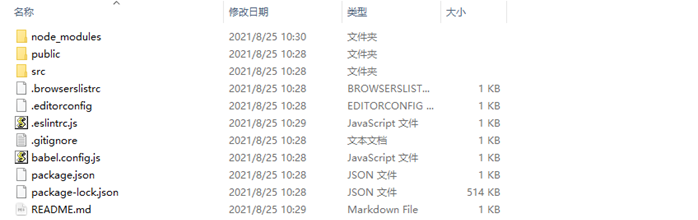
1. node_modules 依赖包,如果删除了,可以使用命令:npm install 安装
2. public 存放整个项目默认的 HTML 模板
3. src 源代码目录(入口文件:main.js)
4. .browserslistrc
5. .editorconfig 编辑器的默认配置
6. .eslintrc.js
7. .gitignore
8. babel.config.js 配置 babel
9. package.json
10. package-lock.json
11. README.md
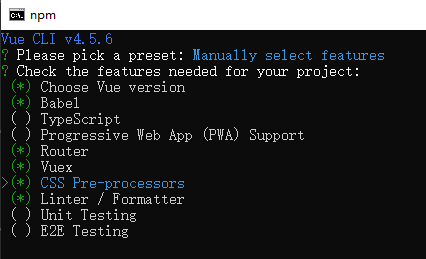
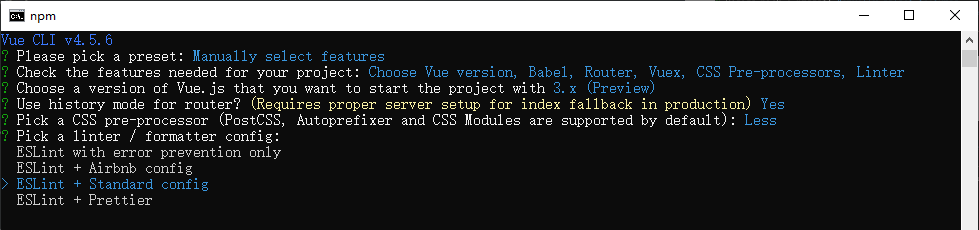
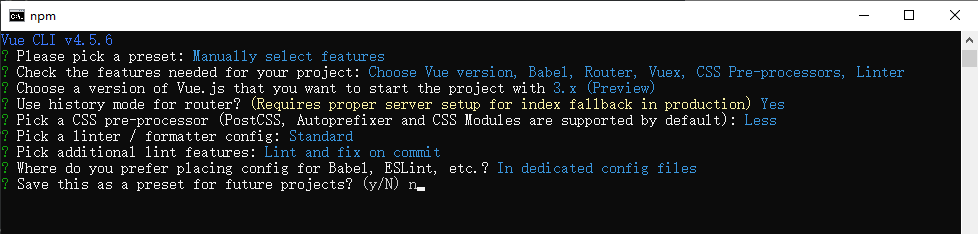
以下是手动选择依赖初始化:


运行项目:
cd projectname
npm run serve

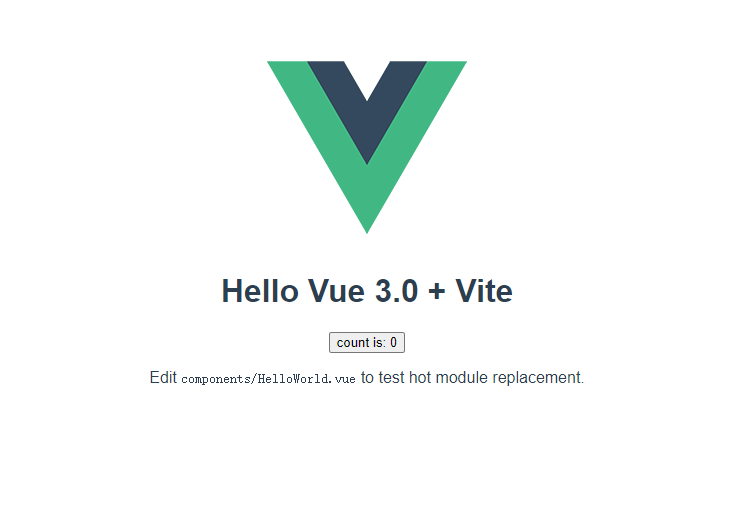
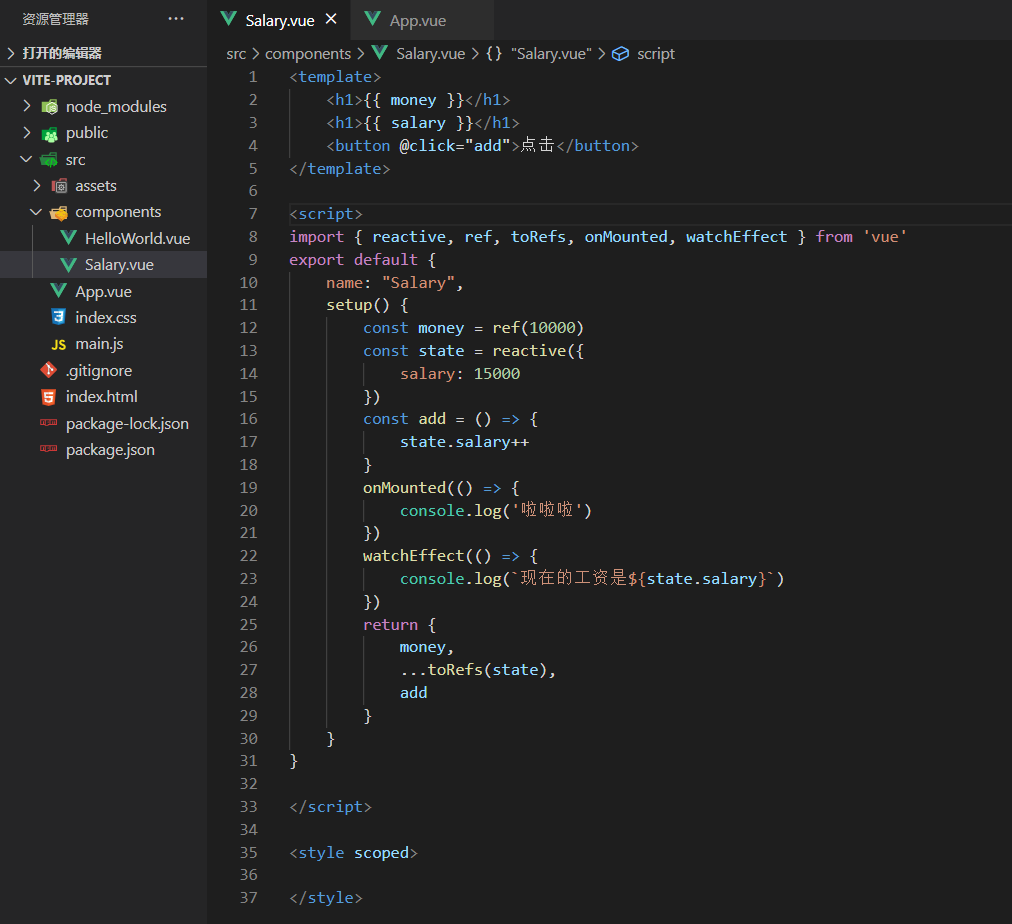
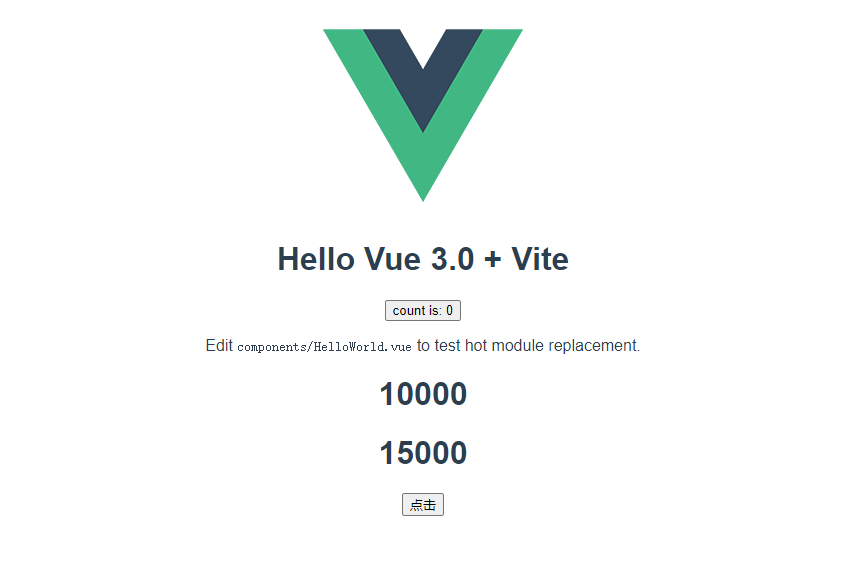
四、vue 3.0 + vite 篇
Vite 是一个 web 开发构建工具,由于其原生 ES 模块导入方法,它允许快速提供代码。
通过在终端中运行以下命令,可以使用 Vite 快速构建 Vue 项目。
$ npm init vite-app <project-name>
$ cd <project-name>
$ npm install
$ npm run dev
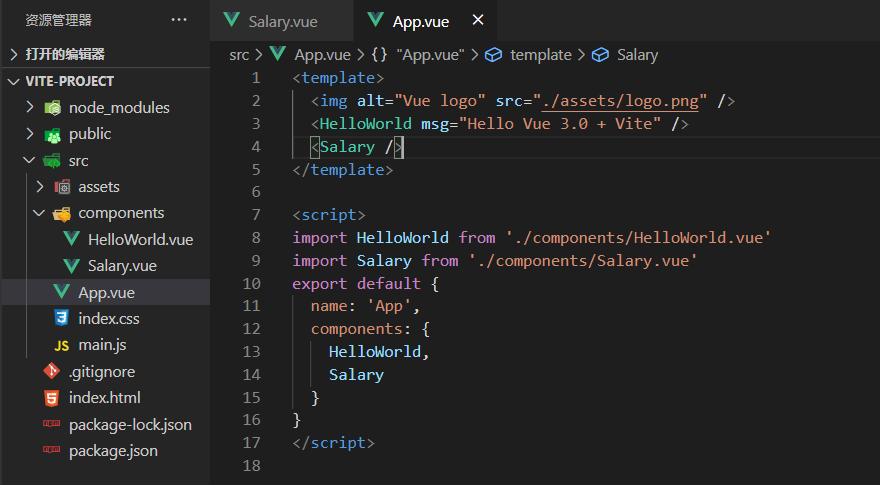
安装项目所需插件,比如:
安装项目生产依赖:npm vie vue-router@next vuex@next element-plus axios -D
安装项目开发依赖:npm i sass -S
element-plus文档:https://element-plus.gitee.io/#/zh-CN
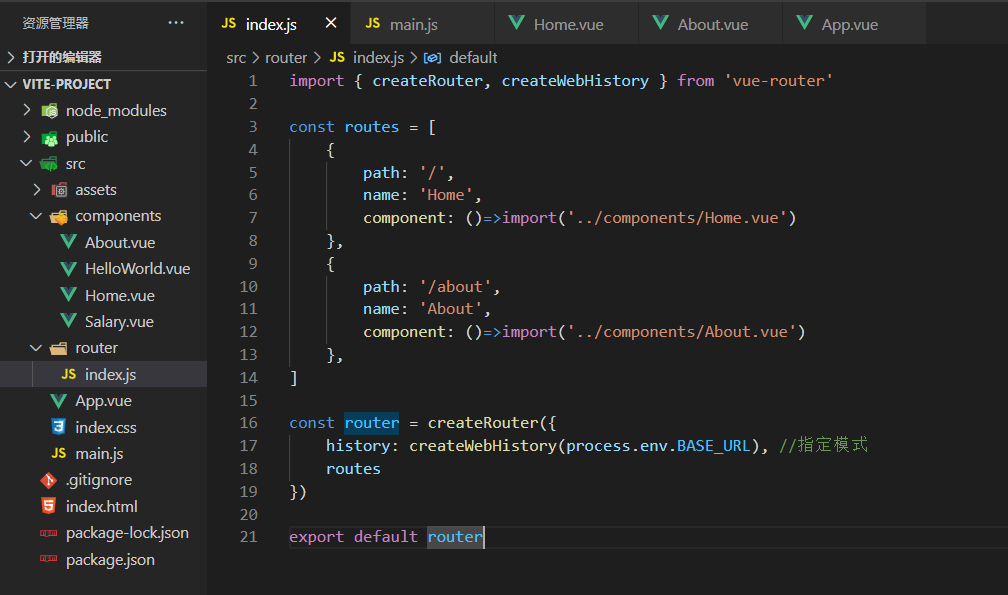
安装路由 Router
# 查看 vue-router 版本
$ npm vie vue-router versions
# 指定版本下载
$ npm i -D vue-router@4.0.0-beta.11
以下是vue3.0的知识点:
Object.defineProperty => Proxy
重构了虚拟DOM
OptionApi => Composition API
setup 是什么?
setup 实际上是一个组件的入口,它运行在组件被实例化的时候,props 属性被定义之后,实际上等价于 vue2.x 版本的 beforeCreate 和 Created 这两个生命周期。
setup 接受两个参数,第一个是 props ,第二个是 context
setup(props, ctx) {
    console.log(props, ctx)
}
let Child = {
    template: `<div>{{title}}</div>`,
    setup(props, context) {
        console.log(props)
    }
}

let App = {
    template: `<div class="container"><Child title="test props"/></div>`,
    components: {
        Child
    }
}

Vue.createApp().mount(App, '#app')
reactive
const { reactive, toRefs } = Vue
let App = {
    template: `<div class="container">count: {{count}}<button @click="handlerCountAdd"> Click ++ </button></div>`,
    setup() {
        const state = reactive({ count: 0 })
        const handlerCountAdd = () => {
            state.count++
        }
        return {
            ...toRefs(state),
            handlerCountAdd
        }
    }
}
Vue.createApp().mount(App, '#app')
toRefs
vue3 提供的 ref 让我们有机会创建单个的响应式的对象,在 setup 函数中 return 出去之后,在模板中可直接访问
const App = {
      template: `<div class="container">{{value}}</div>`,
      setup() {
            const value = ref(1)
            return { value }
      }
}
Vue.createApp().mount(App, '#app')
const App = {
      template: `<div class="container">{{state.value}}</div>`,
      setup() {
            const state = reactive({ value: 'reactive' })
            return { state }
      }
}
Vue.createApp().mount(App, '#app')
const App = {
      template: `<div class="container">{{value}}</div>`,
      setup() {
            const state = reactive({ value: 'reactive' })
            return toRefs(state)
      }
}
Vue.createApp().mount(App, '#app')
反转字符串 demo
let App = {
    template: `<div class="container">value: <input v-model="value"/><br/>rvalue: {{rvalue}}</div>`,
    setup() {
        const state = reactive({
            value: '',
            rvalue: computed(() => state.value.split('').reverse().join(''))
        })
        return toRefs(state)
    }
}
Vue.createApp().mount(App, '#app')
数据响应式
在 Vue3 中实现数据响应式的方案由 Vue2 中的 Object.defineProperty 换成了 Proxy,关于数据响应式的Api上边说到了一些,还剩下 effect 和 watch 没有提及到,effect 是数据响应式中重要的一部分,watch 和 computed 都是基于 effect 的。
let App = {
    template: `<div class="container"> count: {{count}} <button @click="handlerCountAdd"> Click ++ </button></div>`,
    setup() {
        const state = reactive({ count: 0, value: 1 })
        const handlerCountAdd = () => {
            state.count++
        }
        watch(
            () => state.count,
            val => {
                console.log('watch', state.count)
                console.log('watch', state.value)
            }
        )
        effect(() => {
            console.log('effect', state.count)
            console.log('effect', state.value)
        })
        return { ...toRefs(state), handlerCountAdd }
    }
}
Vue.createApp().mount(App, '#app')
effect 在响应式数据变化的时候就会执行,执行次数根据响应式数据的个数来决定
let App = {
    template: `<div class="container"><button @click="handlerCountAdd"> Click ++ </button></div>`,
    setup() {
        const r = ref(1)
        const s = ref(1)
        const t = ref(1)
        const handlerCountAdd = () => {
            r.value *= 1
            s.value *= 2
            t.value *= 3
        }
        effect(() => {
            console.log('effect', [r.value, s.value, t.value])
        })
        return { handlerCountAdd }
    }
}
Vue.createApp().mount(App, '#app')
而 watch 则点击一次 ,只会触发执行一次
let App = {
    template: `<div class="container"><button @click="handlerCountAdd"> Click ++ </button></div>`,
    setup() {
        const state = reactive({ count: 0, value: 1 })
        const r = ref(1)
        const s = ref(1)
        const t = ref(1)
        const handlerCountAdd = () => {
            r.value *= 1
            s.value *= 2
            t.value *= 3
        }
        watch([r, s, t], val => {
            console.log('watch', val)
        })
        return { handlerCountAdd }
    }
}
Vue.createApp().mount(App, '#app')
生命周期
beforeCreate => setup(替代)

created => setup(替代)

beforeMount => onBeforeMount

mounted => onMounted

beforeUpdate => onBeforeUpdate

updated => onUpdated

beforeDestroy => onBeforeUnmount

destroyed => onUnmounted

errorCaptured => onErrorCaptured
全局配置
Vue2.x 创建实例并且挂载 DOM 上
import Vue from "vue";
import App from './App.vue'

new Vue({
  render: (h) => h(App)
}).$mount("#app");
Vue3.0 新增 api ===> createApp 创建实例
createApp 会产生一个 app 实例,该实例拥有全局的可配置上下文

import { createApp } from 'vue'
import App from './App.vue'

createApp(App).mount('#app')
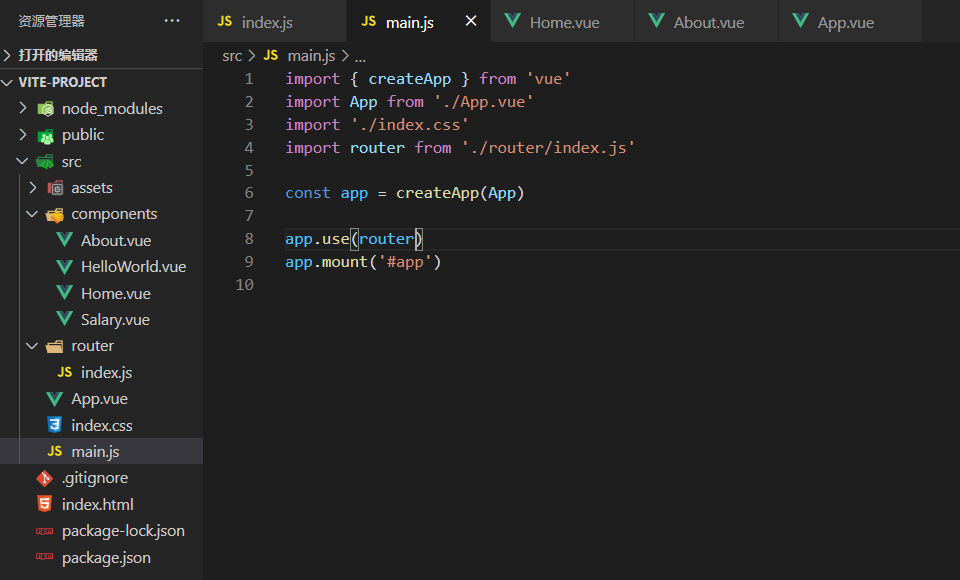
vue 函数
createApp

const app = createApp(App)
app.use(store)
app.use(router)
app.mount('#app')
传了两个属性
v-model:selectKeys = "selectKeys"
import {reactive,toRef } from 'vue
export default{
    setup(props,ctx){
    //默认执行一次

    //页面使用 state.selectKeys
        const state  = reactive({ //attr slots emit
            selectKeys:0
        })
    //1.直接使用
        return {
            selectKeys:state.selectKeys
        }

    //2.导出,页面上直接使用,数据响应式还带解构
        return {
            ...toRefs(state)
        }

        onMounted(()=>{

        })
    }
}
监听路由变化
import {reactive,toRef,watch } from 'vue
import {useRoute} from 'vue-router'
export default{
    setup(props,ctx){
        const state  = reactive({ //attr slots emit
            selectKeys:0
        })
        //1.watch监控路由变化
        watch(()=>route.path,(newValue)=>{
            state.selectKeys = [newValue]
        })
        //2.computed监控路由变化
        const selectKeys = computed(()=>{
            return [route.path]
        })
        return {
            selectKeys
        }
    }
}
vuex
import {reactive,toRef,watch ,computed} from 'vue'
import {useRoute} from 'vue-router'
export default{
    setup(props,ctx){
        const route = userRoute()
        const store  = useStore()
        const state  = reactive({ //attr slots emit
            selectKeys:0
        })
        //1.watch监控路由变化
        watch(()=>route.path,(newValue)=>{
            state.selectKeys = [newValue]
        })
        //2.computed监控路由变化
        const selectKeys = computed(()=>{
            return [route.path]
        })

        //ref 把普通值变成包装后的结构,将属性变成响应式
        // ref(store.getters.allTime)

        return {
            selectKeys,
            allTime:ref(store.getters.allTime)
        }
    }
}

//store.js
import {createStore} from 'vuex
export default {
    state:{

    },
    getters:{
        allTime:()=>{
            return 0
        }
    },
    mutations:{

    },
    actions:{

    },
    modules:{

    }

}
组件通信
import {reactive,toRef,watch ,computed} from 'vue'
import {useRoute} from 'vue-router'
import moment from 'moment'
export default{
    setup(props,ctx){
        const state = reactive({
            form:{
                date:moment(Date.now()).format('YYYY-MM-DD')
            }
        })

        //方法函数
        const onSubmit =()=>{
            //传给父组件
            this.$emit('handlePlan',state.form)
        }
        return {
            ...toRefs(state),
            onSubmit
        }
    }
}

//父组件
<Child @handlePlan="handlePlan" />

import {reactive,toRef,watch ,computed} from 'vue'
import {useRoute} from 'vue-router'
import moment from 'moment'
export default{
    setup(props,ctx){
        const state = reactive({
            form:{
                date:moment(Date.now()).format('YYYY-MM-DD')
            }
        })

        const handlePlan = (plan)=>{
            console.log(plan)
        }

        return {
            handlePlan
        }
    }
}
封装 API
// 环境变量
VUE_APP_URL = 'http://www.xxx.com:3000'
import axios from 'axios
 const instance  = axios.create({
     baseURL:process.env.VUE_APP_URL,
     timeout:3000
 })

instance.interceptors.request.use((config)=>{
    return config
})

instance.interceptors.response.use((res)=>{
    return res.data.data
},err=>{
    return Promise.reject(err)
})

export function request(opts){
    return instance(opts)
}
//request.js
import {request } from '../utils/axios'

export function getPlanList(){
    return request({url:'/plan',method:'get'})
}

export function addPlan(data){
    return request({url:'/plan',method:'post',data})
}

export function deletePlan(){
    return request({url:'/plan',method:'delete',params:{id}})
}


//action_type.js
export const SET_PLAN_LIST = 'SET_PLAN_LIST'
export const ADD_PLAN = 'ADD_PLAN'
export const DELETE_PLAN = 'DELETE_PLAN'

//store.js
import {createStore} from 'vuex'
export * as types from './action_type'
import * as api from './request'
export default {
    state:{

    },
    getters:{
        allTime:()=>{
            return 0
        }
    },
    mutations:{
        [type.ADD_PLAN](state,payload){
           state.planList = [...state.planList,payload]
        },
        [type.DELETE_PLAN](state,payload){
            state.planList.filter(item=>{
                return item._id !=payload._id
            })
        },
        [type.SET_PLAN_LIST](state,payload){

        },
    },
    actions:{
        //restful api根据不同方法返回不同的资源
        async [type.ADD_PLAN]({commit},payload){
            let plan = await api.addPlan(payload)
            commit(type.ADD_PLAN,plan)
        },
        async [type.DELETE_PLAN]({commit},payload){
            let plan = await api.deletePlan(payload)
            commit(type.DELETE_PLAN,plan)
        },
        async [type.SET_PLAN_LIST]({commit},payload){
            let plan = await api.getPlanList(payload)
            commit(type.SET_PLAN_LIST,plan)
        },
    },
    modules:{

    }

}
使用数据
import {reactive,toRef,watch ,onMounted,onUpdated,compile,computed} from 'vue'
import {useStore} from 'vuex'
import moment from 'moment'
import * as types from '@/store/action_types'
export default{
    setup(props,ctx){
        const store = useStore()
        // const state = reactive({
        //     planList:store.state.planList //这样取的是默认值
        // })
        onMounted(()){
            store.dispatch(types.SET_PLAN_LIST)
        }
        //时间格式化方法
        const formatDate = (value)=>{
            return moment(value).format('YYYY-MM-DD')
        }
        return {
            ...toRefs(state.store),
            formatDate
        }
    }
}
简版 vue
//1.创建虚拟节点,将虚拟节点转化为真实节点
//2.组件的实现 setup
//3.reactive api实现effect
//4.diff算法
//5.vite

let { render} = Vue
const state = {
    count:0
}
    const vnode  = {
        tag:'div',
        props:{color:'red'},
        children:[
            {
                tag:'p',
                props:{color:'blue},
                children:[
                    'vue@3-计数器'
                ]
            },
            {
                tag:'p',
                props:{
                    onClick:()=>{
                        alert(state.count)
                    }
                }
                children:[
                    'vue@3-计数器'
                ]
            }
        ]
    }
    render(vnode,app)

export function render(vnode,container){
    // 渲染页面的方法叫patch

    //1.第一次渲染 2.dom-diff
    patch(null,vnode,container)
}
/**
* n1 老的虚拟节点
* n2 新的虚拟节点
* container 容器
*/
function patch(n1,n2,container){
    //组件的虚拟节点是一个对象,tag是一个对象
    //如果是组件,tag可能是个对象
    //后续diff可以执行这个方法
    if(typeof n2.tag ==='string'){
        //标签
        mountElement(n2,container)
    }else if(typeof n2.tag==='object'){

    }
}

function mountElement(vnode,container){
    const  { tag,children,props }  = vnode
    //虚拟节点和真实节点做映射关系
    let el = (vnode.el =  nodeOps.createElement(tag))

    if(Array.isArray(children)){
        mountChild(children,el)
    }else{
        nodeOps.hostSetElementText(el,children)
    }
    container.insert(el,container)
}

function mountChild(children,container){
    for(var i=0;i<children.length;i++){
        let child = children[i]
        patch(null,child,container)
    }
}


//节点操作方法
exoprt const nodeOps = {
    //插入元素节点
    insert(child,parent,anchor){
        if(anchor){
            parent.insertBefore(child,anchor)
        }else{
            parent.appendChild(child)
        }
    },
    //移除节点
    remove(child){
        const parent  = child.parentNode;
        parent && parent.removeChild(child)
    },
    //创建节点
    createElement(tag){
        return document.createElement(tag)
    },
    //设置文本内容
    hostSetElementText(el,text){
        el.textContent = text
    }
}
未完待续。。。