ThinkPHP是一个免费开源的,快速、简单的面向对象的轻量级PHP开发框架。
严格来说,ThinkPHP无需安装过程,这里所说的安装其实就是把ThinkPHP框架放入WEB运行环境(前提是你的WEB运行环境已经OK),可以通过两种方式获取和安装ThinkPHP。
下载ThinkPHP安装
获取ThinkPHP的方式很多,官方网站(http://thinkphp.cn)是最好的下载和文档获取来源。
官网提供了稳定版本的下载:http://thinkphp.cn/down/framework.html
由于ThinkPHP5.0还在测试阶段,所以需要通过Git服务器下载,Git服务地址:https://github.com/top-think/think
下载或者使用GIT克隆到本地后,请(解压缩后)放置于你的WEB根目录下面的tp5子目录。
还有一种方式,就是通过Composer进行安装,这里不再介绍了,传送门:https://www.kancloud.cn/thinkphp/thinkphp5-guide/30549。
无论你采用什么方式获取的ThinkPHP框架,现在只需要做最后一步来验证是否正常运行。
在浏览器中输入地址:
http://localhost/tp5/public/
如果浏览器输出如图所示:
现在已经完成了ThinkPHP的安装!
接下来进一步分析一下ThinkPHP5.0的框架结构:
首先是浏览一下ThinkPHP5.0的目录结构
tp5 WEB部署目录(或者子目录)
├─application 应用目录
│ ├─common 公共模块目录(可以更改)
│ ├─module_name 模块目录
│ │ ├─config.php 模块配置文件
│ │ ├─common.php 模块函数文件
│ │ ├─controller 控制器目录
│ │ ├─model 模型目录
│ │ ├─view 视图目录
│ │ └─ ... 更多类库目录
│ │
│ ├─command.php 命令行工具配置文件
│ ├─common.php 公共函数文件
│ ├─config.php 公共配置文件
│ ├─route.php 路由配置文件
│ ├─tags.php 应用行为扩展定义文件
│ └─database.php 数据库配置文件
│
├─public WEB目录(对外访问目录)
│ ├─index.php 入口文件
│ ├─router.php 快速测试文件
│ └─.htaccess 用于apache的重写
│
├─thinkphp 框架系统目录
│ ├─lang 语言文件目录
│ ├─library 框架类库目录
│ │ ├─think Think类库包目录
│ │ └─traits 系统Trait目录
│ │
│ ├─tpl 系统模板目录
│ ├─base.php 基础定义文件
│ ├─console.php 控制台入口文件
│ ├─convention.php 框架惯例配置文件
│ ├─helper.php 助手函数文件
│ ├─phpunit.xml phpunit配置文件
│ └─start.php 框架入口文件
│
├─extend 扩展类库目录
├─runtime 应用的运行时目录(可写,可定制)
├─vendor 第三方类库目录(Composer依赖库)
├─build.php 自动生成定义文件(参考)
├─composer.json composer 定义文件
├─LICENSE.txt 授权说明文件
├─README.md README 文件
├─think 命令行入口文件
~~~
其中入口文件就是 tp5publicindex.php,上面使用的http://localhost/tp5/public/地址,最开始加载的文件就是tp5publicindex.php文件,因为index.php是默认被加载的,所以完整的路径是http://localhost/tp5/public/index.php。
上面的应用(application)目录,就是我们写逻辑代码的地方。
ThinkPHP5.0是基于MVC(模型-视图-控制器)的方式来组织的。
ThinkPHP5.0的URL访问受路由决定,如果关闭路由或者没有匹配路由的情况下,则是基于:
http://serverName/index.php(或者其它应用入口文件)/模块/控制器/操作/参数/值…
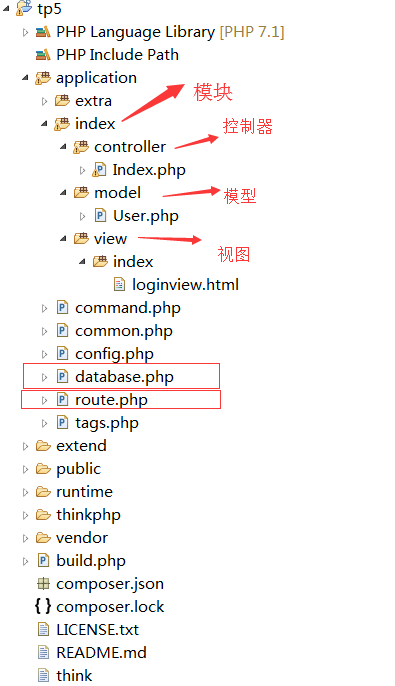
然后我们来看看实际的文件:
这是ThinkPHP5.0的默认目录文件,我们可以看到模块为index,控制器也是index,操作也是index。
模块文件夹下面除了有controller文件夹外,还可以新增model文件夹(模型),view文件夹(视图),这些文件夹就是ThinkPHP5中MVC架构的体现。
知道这些后,再结合上面URL的完整路径规则,那么可以知道访问“index操作”的完整路径是:
http://localhost/tp5/public/index.php/index/index/index
其中最右边的index代表操作,右边第二个index代表控制器,右边第三个index代码模块。
接下来笔者用一个登录功能来串联一下这些知识点:
项目结构
数据库
index.php文件

<?php
namespace appindexcontroller;
use appindexmodelUser;
use thinkDb;

class Index
{
    public function index()
    {
        return 'hello thinkphp5';
    }

    public function loginview(){
        return view();
    }

    public function login(){
        $name = $_GET["name"];
        $pass = $_GET["password"];

        $user = new User($name,$pass);

        //查询数据库
        $val = Db::table('userinfo')
            ->where('name',$user->GetName())
            ->where('pass',$user->GetPass())
            ->find();

        $res = "";
        if($val){//有该用户
            $_SESSION["user"] = $user->GetName();
            $res = "login successed";
        }else{//没有该用户
            $res = "login failed";
        }
        return $res;
    }
}
User.php文件

<?php
namespace appindexmodel;
class User{
    private $name;
    private $pass;

    public function __construct($name,$pass){
        $this->name = $name;
        $this->pass = $pass;
    }

    public function GetName(){
        return $this->name;
    }

    public function GetPass(){
        return $this->pass;
    }
}
loginview.html文件

<form action = "login">

<div><span>用户名:</span><input type="text" name="name" /></div>

<div><span>密码:</span><input type="password" name="password"/></div>

<div><input type="submit" value="登录" /></div>
</form>
database.php文件

<?php
// +----------------------------------------------------------------------
// | ThinkPHP [ WE CAN DO IT JUST THINK ]
// +----------------------------------------------------------------------
// | Copyright (c) 2006~2018 http://thinkphp.cn All rights reserved.
// +----------------------------------------------------------------------
// | Licensed ( http://www.apache.org/licenses/LICENSE-2.0 )
// +----------------------------------------------------------------------
// | Author: liu21st <liu21st@gmail.com>
// +----------------------------------------------------------------------

return [
    // 数据库类型
    'type'            => 'mysql',
    // 服务器地址
    'hostname'        => '127.0.0.1',
    // 数据库名
    'database'        => 'test',
    // 用户名
    'username'        => 'root',
    // 密码
    'password'        => '',
    // 端口
    'hostport'        => '3306',
    // 连接dsn
    'dsn'             => '',
    // 数据库连接参数
    'params'          => [],
    // 数据库编码默认采用utf8
    'charset'         => 'utf8',
    // 数据库表前缀
    'prefix'          => '',
    // 数据库调试模式
    'debug'           => true,
    // 数据库部署方式:0 集中式(单一服务器),1 分布式(主从服务器)
    'deploy'          => 0,
    // 数据库读写是否分离 主从式有效
    'rw_separate'     => false,
    // 读写分离后 主服务器数量
    'master_num'      => 1,
    // 指定从服务器序号
    'slave_no'        => '',
    // 是否严格检查字段是否存在
    'fields_strict'   => true,
    // 数据集返回类型
    'resultset_type'  => 'array',
    // 自动写入时间戳字段
    'auto_timestamp'  => false,
    // 时间字段取出后的默认时间格式
    'datetime_format' => 'Y-m-d H:i:s',
    // 是否需要进行SQL性能分析
    'sql_explain'     => false,
];
然后使用 http://localhost/tp5/public/index.php/index/index/loginview 访问登录
效果图:

