信号和槽作为QT的最大特点,因为有了信号与槽的编程机制,在 Qt 中处理界面各个组件的交互操作时变得更加直观和简单。
举例来说明 信号和槽(传智播客经典举例)
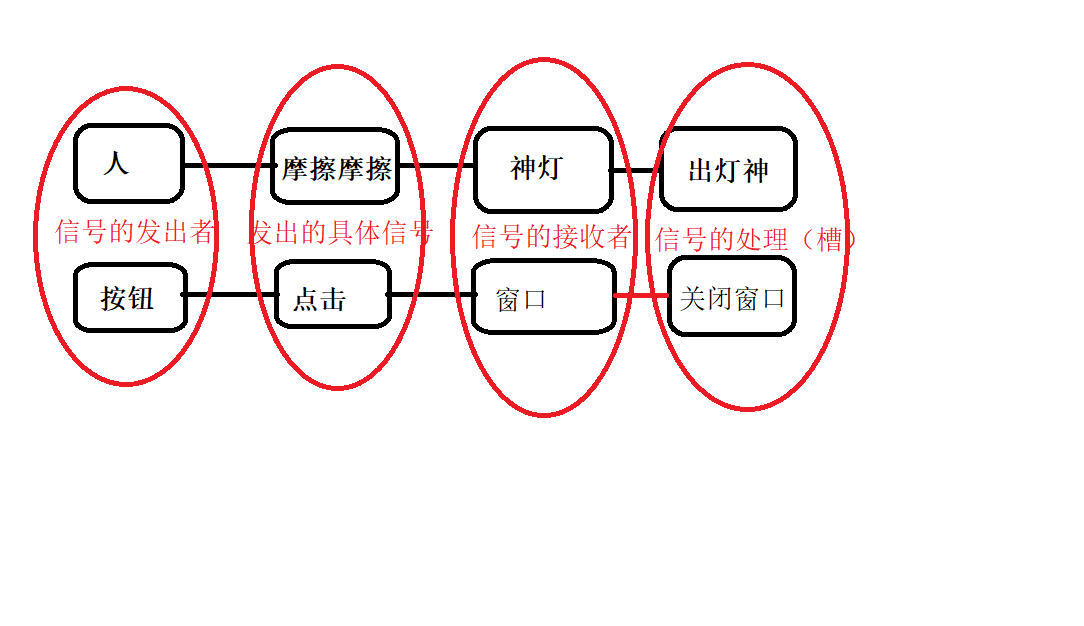
伪代码说明
connect(信号的发送者,发送的具体信号,信号的接收者,信号的处理);
信号和槽的优点: 松散耦合,信号的发送端 和 接收端 本身没有关联,而是通过connect函数连接,将两端耦合在一起。
代码示例
 1 #include "widget.h"
 2 #include <QPushButton>  //按钮控件的头文件
 3 Widget::Widget(QWidget *parent)
 4     : QWidget(parent)
 5 {
 6     //创建一个按钮
 7     QPushButton * btn2=new QPushButton("点击我关闭",this);
 8     //需求 点击按钮  关闭窗口
 9     //参数1 信号发送者  参数2 具体的信号  参数3  信号的接收者  参数4 槽
10     connect(btn2,&QPushButton::clicked,this,&Widget::close);
11 }
12
13 Widget::~Widget()
14 {
15 }
自定义信号和槽
举例:铃声响了,老师发出下课信号,学生接收信号做出离开教室的反应
在工程下新建两个类 : 老师类 / 学生类

在teacher.h里自定义信号
 1 #ifndef TEACHER_H
 2 #define TEACHER_H
 3
 4 #include <QObject>
 5
 6 class teacher : public QObject
 7 {
 8     Q_OBJECT
 9 public:
10     explicit teacher(QObject *parent = nullptr);
11
12 signals:
13     //自定义信号 写到 signals下
14     //返回值是void 只需要声明,不需要实现
15     //可以有参数,可以重载
16     void classover();
17 };
18
19 #endif // TEACHER_H
在student.h里定义信号处理函数
 1 #ifndef STUDENT_H
 2 #define STUDENT_H
 3
 4 #include <QObject>
 5
 6 class student : public QObject
 7 {
 8     Q_OBJECT
 9 public:
10     explicit student(QObject *parent = nullptr);
11
12 signals:
13
14 public slots:
15     //早期QT版本 必须写到public slots下面,高级版本可以写到public或者全局下
16     //返回值是void 需要声明,也需要实现
17     //可以有参数,可以发送重载
18     void leaveclass();
19
20 };
21
22 #endif // STUDENT_H
在student.cpp里实现 离开教室反应 的功能
 1 #include "student.h"
 2 #include <QDebug>
 3 student::student(QObject *parent) : QObject(parent)
 4 {
 5
 6 }
 7
 8 void student::leaveclass(){
 9     qDebug()<<"离开教室咯";
10 }
在widget.h中声明 老师 对象 以及 学生对象 ,并且声明 响铃函数
 1 #define WIDGET_H
 2
 3 #include <QWidget>
 4 #include "teacher.h"
 5 #include "student.h"
 6 class Widget : public QWidget
 7 {
 8     Q_OBJECT
 9
10 public:
11     Widget(QWidget *parent = nullptr);
12     ~Widget();
13 private:
14     teacher *zt;
15     student *st;
16     void classringing();
17 };
18 #endif // WIDGET_H
在widget.cpp中创建 老师对象和学生对象 ,并通过connect连接,最后调用响铃函数 使得老师发出下课信号
 1 #include "widget.h"
 2
 3 //Teacher类
 4 //Student类
 5 //铃声响了,老师发出下课的信号,学生接收信号做出离开教室的反应
 6
 7 Widget::Widget(QWidget *parent)
 8     : QWidget(parent)
 9 {
10     //创建 老师对象
11     this->zt=new teacher(this);
12     //创建 学生对象
13     this->st=new student(this);
14     //老师说下课了,学生齐刷刷离开教室
15     connect(zt,&teacher::classover,st,&student::leaveclass);
16     //调用响铃函数
17     classringing()
18 }
19
20 void Widget::classringing()
21 {
22     emit zt->classover();
23 }
24
25 Widget::~Widget()
26 {
27 }
成果展示
