Eureke
Eureka是Netflix开源的一款提供服务注册和发现的产品,它提供了完整的Service Registry(注册登记)和Service Discovery(发现)实现。也是springcloud体系中最重要最核心的组件之一。
服务中心:
服务中心又称注册中心,管理各种服务功能包括服务的注册、发现、熔断、负载、降级等。
有了服务中心调用关系会有什么变化,画几个简图来帮忙理解
项目A调用项目B
正常调用项目A请求项目B

有了服务中心之后,任何一个服务都不能直接去掉用,都需要通过服务中心来调用

项目A调用项目B,项目B在调用项目C

这时候调用的步骤就会为两步:第一步,项目A首先从服务中心请求项目B服务器,然后项目B在从服务中心请求项目C服务。

上面的项目只是两三个相互之间的简单调用,但是如果项目超过20个30个呢,画一张图来描述几十个项目之间的相互调用关系全是线条,任何其中的一个项目改动,就会牵连好几个项目跟着重启,巨麻烦而且容易出错。通过服务中心来获取服务你不需要关注你调用的项目IP地址,由几台服务器组成,每次直接去服务中心获取可以使用的服务去调用既可。
由于各种服务都注册到了服务中心,就有了去做很多高级功能条件。比如几台服务提供相同服务来做均衡负载;监控服务器调用成功率来做熔断,移除服务列表中的故障点;监控服务调用时间来对不同的服务器设置不同的权重等等。
Eureka由两个组件组成:Eureka服务器和Eureka客户端。Eureka服务器用作服务注册服务器。Eureka客户端是一个java客户端,用来简化与服务器的交互、作为轮询负载均衡器,并提供服务的故障切换支持。Netflix在其生产环境中使用的是另外的客户端,它提供基于流量、资源利用率以及出错状态的加权负载均衡。
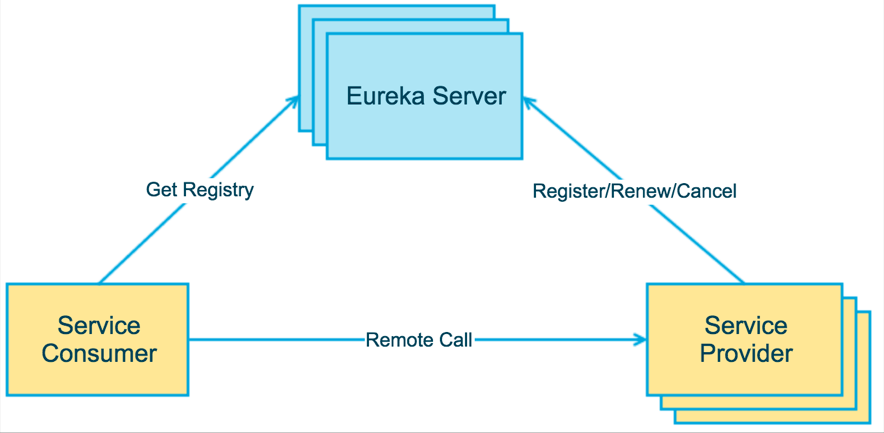
上图简要描述了Eureka的基本架构,由3个角色组成:
1、Eureka Server
- 提供服务注册和发现
2、Service Provider
- 服务提供方
- 将自身服务注册到Eureka,从而使服务消费方能够找到
3、Service Consumer
- 服务消费方
- 从Eureka获取注册服务列表,从而能够消费服务
创建注册中心 Eureka Server
创建一个简单的maven springboot项目
pom里面添加如下依赖:
 1 <parent>
 2     <groupId>org.springframework.boot</groupId>
 3     <artifactId>spring-boot-starter-parent</artifactId>
 4     <version>1.3.5.RELEASE</version>
 5     <relativePath/> <!-- lookup parent from repository -->
 6 </parent>
 7
 8 <dependencies>
 9     <dependency>
10         <groupId>org.springframework.boot</groupId>
11     <artifactId>spring-boot-starter-test</artifactId>
12     <scope>test</scope>
13     </dependency>
14
15     <dependency>
16         <groupId>org.springframework.cloud</groupId>
17     <artifactId>spring-cloud-starter-eureka-server</artifactId>
18     </dependency>
19 </dependencies>
20
21 <dependencyManagement>
22     <dependencies>
23         <dependency>
24         <groupId>org.springframework.cloud</groupId>
25         <artifactId>spring-cloud-dependencies</artifactId>
26         <version>Brixton.RELEASE</version>
27         <type>pom</type>
28         <scope>import</scope>
29     </dependency>
30     </dependencies>
31 </dependencyManagement>
通过@EnableEurekaServer注解启动一个服务注册中心提供给其他应用进行对话。这一步非常的简单,只需要在一个普通的Spring Boot应用中添加这个注解就能开启此功能,比如下面的例子:
 1 package com;
 2
 3 import org.springframework.boot.autoconfigure.SpringBootApplication;
 4 import org.springframework.boot.builder.SpringApplicationBuilder;
 5 import org.springframework.cloud.netflix.eureka.server.EnableEurekaServer;
 6
 7 @EnableEurekaServer//服务注册中心开启注解
 8 @SpringBootApplication
 9 public class Application {
10
11     public static void main(String[] args) {
12         new SpringApplicationBuilder(Application.class).web(true).run(args);
13     }
14
15 }
在默认设置下,该服务注册中心也会将自己作为客户端来尝试注册它自己,所以我们需要禁用它的客户端注册行为,只需要在application.properties中问增加如下配置:
1 #启动端口
2 server.port=1111
3
4 #关闭掉自己往服务中心注册的机制
5 eureka.client.register-with-eureka=false
6 #是否检索服务
7 eureka.client.fetch-registry=false
8 #服务中心地址
9 eureka.client.serviceUrl.defaultZone=http://localhost:${server.port}/eureka/
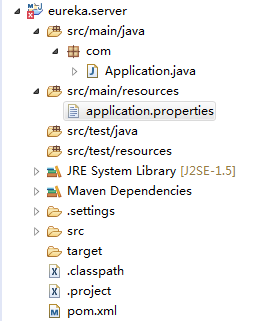
项目结构:
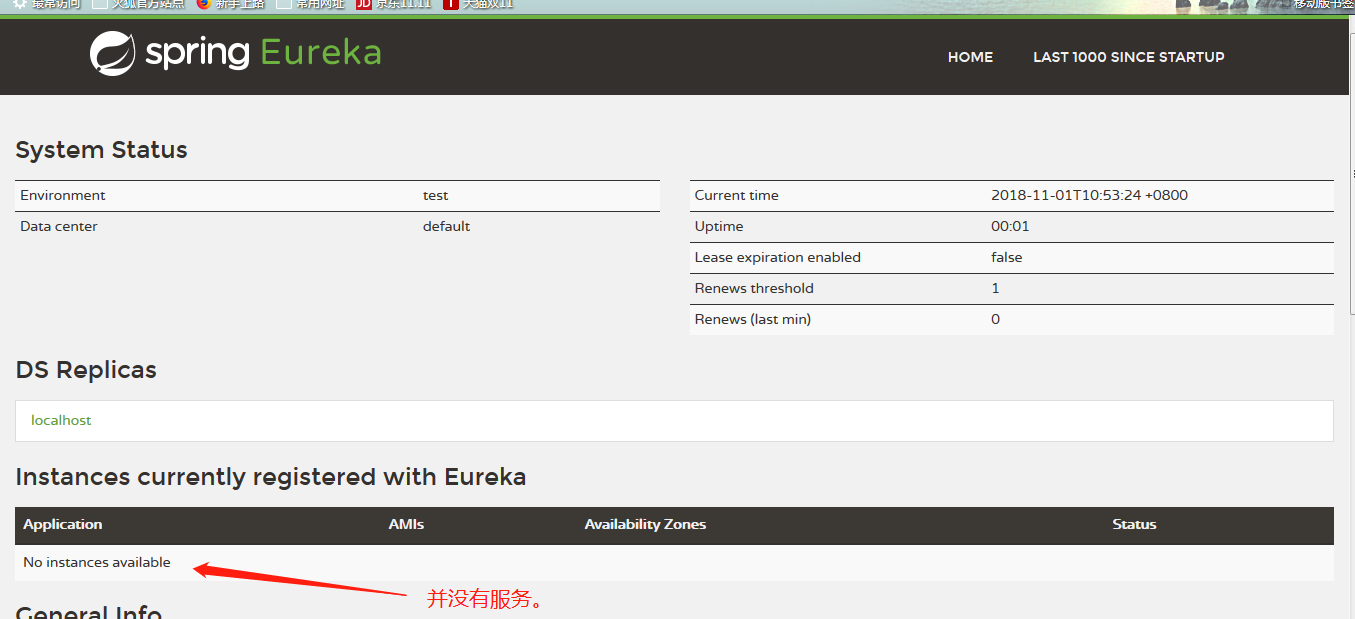
启动项目访问 http://localhost:1111/
界面如下
创建服务提供者
下面我们创建提供服务的客户端,并向服务注册中心注册自己。
假设我们有一个提供计算功能的微服务模块,我们实现一个RESTful API,通过传入两个参数a和b,最后返回a + b的结果。
首先,创建一个基本的Spring Boot应用,在pom.xml中,加入如下配置:
 1 <parent>
 2     <groupId>org.springframework.boot</groupId>
 3     <artifactId>spring-boot-starter-parent</artifactId>
 4     <version>1.3.5.RELEASE</version>
 5     <relativePath/> <!-- lookup parent from repository -->
 6 </parent>
 7
 8 <dependencies>
 9     <dependency>
10         <groupId>org.springframework.boot</groupId>
11     <artifactId>spring-boot-starter-test</artifactId>
12     <scope>test</scope>
13     </dependency>
14
15     <dependency>
16         <groupId>org.springframework.cloud</groupId>
17     <artifactId>spring-cloud-starter-eureka</artifactId>
18     </dependency>
19 </dependencies>
20
21 <dependencyManagement>
22     <dependencies>
23         <dependency>
24         <groupId>org.springframework.cloud</groupId>
25         <artifactId>spring-cloud-dependencies</artifactId>
26         <version>Brixton.RELEASE</version>
27         <type>pom</type>
28         <scope>import</scope>
29     </dependency>
30     </dependencies>
31 </dependencyManagement>
创建我们的业务访问控制器
 1 package com;
 2
 3 import org.apache.log4j.Logger;
 4 import org.springframework.beans.factory.annotation.Autowired;
 5 import org.springframework.cloud.client.ServiceInstance;
 6 import org.springframework.cloud.client.discovery.DiscoveryClient;
 7 import org.springframework.web.bind.annotation.RequestMapping;
 8 import org.springframework.web.bind.annotation.RequestMethod;
 9 import org.springframework.web.bind.annotation.RequestParam;
10 import org.springframework.web.bind.annotation.RestController;
11
12 @RestController
13 public class ComputeController {
14
15     private final Logger logger = Logger.getLogger(getClass());
16
17     @Autowired
18     private DiscoveryClient client;
19
20     @RequestMapping(value = "/add" ,method = RequestMethod.GET)
21     public Integer add(@RequestParam Integer a, @RequestParam Integer b) {
22         ServiceInstance instance = client.getLocalServiceInstance();
23         Integer r = a + b;
24         logger.info("/add, host:" + instance.getHost() + ", service_id:" + instance.getServiceId() + ", result:" + r);
25         return r;
26     }
27
28 }
创建启动器
EnableDiscoveryClient注解,该注解能激活Eureka中的DiscoveryClient实现,才能实现Controller中对服务信息的输出。
package com;

import org.springframework.boot.autoconfigure.SpringBootApplication;
import org.springframework.boot.builder.SpringApplicationBuilder;
import org.springframework.cloud.client.discovery.EnableDiscoveryClient;

@EnableDiscoveryClient//标识客户端,并扫描控制器里面的DiscoveryClient
@SpringBootApplication
public class ComputeServiceApplication {

    public static void main(String[] args) {
        new SpringApplicationBuilder(ComputeServiceApplication.class).web(true).run(args);
    }

}
application.properties
1 #指定微服务的名称后续在调用的时候只需要使用该名称就可以进行服务的访问。
2 spring.application.name=compute-service
3 server.port=2222
4 #属性对应服务注册中心的配置内容,指定服务注册中心的位置。
5 eureka.client.serviceUrl.defaultZone=http://localhost:1111/eureka/
启动本项目,然后再访问http://localhost:1111/ 就可以看到服务已经注册到服务中心
创建服务的消费者
使用ribbon实现负载均衡的消费者,构建一个基本Spring Boot项目,并在pom.xml中加入如下内容:
 1 <parent>
 2     <groupId>org.springframework.boot</groupId>
 3     <artifactId>spring-boot-starter-parent</artifactId>
 4     <version>1.3.5.RELEASE</version>
 5     <relativePath/> <!-- lookup parent from repository -->
 6 </parent>
 7
 8 <dependencies>
 9     <dependency>
10         <groupId>org.springframework.cloud</groupId>
11         <artifactId>spring-cloud-starter-ribbon</artifactId>
12     </dependency>
13     <dependency>
14         <groupId>org.springframework.cloud</groupId>
15         <artifactId>spring-cloud-starter-eureka</artifactId>
16     </dependency>
17     <dependency>
18         <groupId>org.springframework.boot</groupId>
19         <artifactId>spring-boot-starter-web</artifactId>
20     </dependency>
21     <dependency>
22         <groupId>org.springframework.boot</groupId>
23         <artifactId>spring-boot-starter-test</artifactId>
24         <scope>test</scope>
25     </dependency>
26 </dependencies>
27
28 <dependencyManagement>
29     <dependencies>
30         <dependency>
31         <groupId>org.springframework.cloud</groupId>
32         <artifactId>spring-cloud-dependencies</artifactId>
33         <version>Brixton.RELEASE</version>
34         <type>pom</type>
35         <scope>import</scope>
36     </dependency>
37     </dependencies>
38 </dependencyManagement>
通过@LoadBalanced注解实现负载均衡的开启
 1 package com;
 2
 3 import org.springframework.boot.SpringApplication;
 4 import org.springframework.boot.autoconfigure.SpringBootApplication;
 5 import org.springframework.cloud.client.discovery.EnableDiscoveryClient;
 6 import org.springframework.cloud.client.loadbalancer.LoadBalanced;
 7 import org.springframework.context.annotation.Bean;
 8 import org.springframework.web.client.RestTemplate;
 9
10 @SpringBootApplication
11 @EnableDiscoveryClient
12 public class RibbonApplication {
13
14     @Bean
15     @LoadBalanced//负载均衡的开启
16     RestTemplate restTemplate() {
17         return new RestTemplate();
18     }
19
20     public static void main(String[] args) {
21         SpringApplication.run(RibbonApplication.class, args);
22     }
23
24 }
创建ConsumerController来消费COMPUTE-SERVICE的add服务。通过直接RestTemplate来调用服务,计算10 + 20的值。
 1 package com;
 2
 3 import org.springframework.beans.factory.annotation.Autowired;
 4 import org.springframework.web.bind.annotation.RequestMapping;
 5 import org.springframework.web.bind.annotation.RequestMethod;
 6 import org.springframework.web.bind.annotation.RestController;
 7 import org.springframework.web.client.RestTemplate;
 8
 9 @RestController
10 public class ConsumerController {
11
12     @Autowired
13     RestTemplate restTemplate;
14
15     @RequestMapping(value = "/add", method = RequestMethod.GET)
16     public String add() {
17         return restTemplate.getForEntity("http://COMPUTE-SERVICE/add?a=10&b=20", String.class).getBody();
18     }
19 //
20 }
application.properties中配置eureka服务注册中心
1 spring.application.name=ribbon-consumer
2 server.port=3333
3 eureka.client.serviceUrl.defaultZone=http://localhost:1111/eureka/
这个时候修改服务提供方把端口改为2223,再启动一个服务提供
可一看到服务中心已经被注册了两个服务。

启动服务消费方,并访问五次:http://localhost:3333/add
然后,打开compute-service的两个服务提供方,分别输出了类似下面的日志内容:
端口2222的 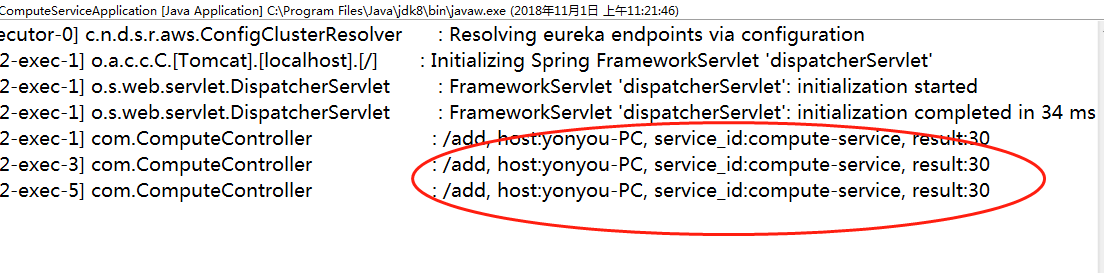
端口2223的

可以看到,之前启动的两个compute-service服务端分别被调用了三次,两次。到这里,我们已经通过Ribbon在客户端已经实现了对服务调用的均衡负载。
项目源码 1--spingCloud_服务注册与发现Eureka
参考:http://www.ityouknow.com/springcloud/2017/05/10/springcloud-eureka.html