假如要渲染一个纯色矩形在窗口上,应该怎么做?
先确定顶点的格式,一个顶点应该包含位置信息 vec3 以及颜色信息 vec4,所以顶点的结构体定义可以这样:
struct Vertex
{
     Vec3 position;
     Vec4 color;
};
然后填充矩形四个顶点是数据信息:
        Vertex* data = ( Vertex* ) malloc(sizeof( Vertex ) * 4);
        data[0].position.set(0, 0, 0);
        data[1].position.set(0, 0, 0);
        data[2].position.set(0, 0, 0);
        data[3].position.set(0, 0, 0);

        data[0].color.set(1, 1, 1, 1);
        data[1].color.set(1, 1, 1, 1);
        data[2].color.set(1, 1, 1, 1);
        data[3].color.set(1, 1, 1, 1);
分配一块内存,将内存类型转换为 Vertex,最后设置数据。上面只是用了4个顶点,显然还要设置索引数据:
        int* indices = ( int* ) malloc(sizeof( int ) * 6);
        indices[0] = 0;
        indices[1] = 2;
        indices[2] = 1;
        indices[3] = 0;
        indices[4] = 3;
        indices[5] = 2;
有了数据之后,需要设置顶点属性指针(这里没有使用 VBO 和 VAO):
        glVertexAttribPointer(0, 3, GL_FLOAT, GL_FALSE, sizeof(Vertex), ( char* ) data + sizeof( float ) * 0);
        glVertexAttribPointer(1, 4, GL_FLOAT, GL_FALSE, sizeof(Vertex), ( char* ) data + sizeof( float ) * 3);
        glEnableVertexAttribArray(0);
        glEnableVertexAttribArray(1);
最后,使用着色程序,调用 glDrawElements 函数进行绘制:
        glUseProgram(shaderProgram);
        glDrawElements(GL_TRIANGLES, 6, GL_UNSIGNED_INT, indices);
就这样,一次绘制的流程就结束了,这次渲染器就是按照上面的步骤展开。上面只是绘制了一个矩形,如果要绘制上百个矩形和上千张图片,并且它们的渲染管线的状态各不相同,还要保持一定的效率,管理这些顶点可不是一个简单的问题。
其中的一个难点就是如何分配顶点的内存,如果每渲染一个图元就要调用一次 malloc 和 free 函数,这样会带来很大的开销。或许我们可以在开始的时候就分配一大块内存,绘制时统统把顶点数据复制到这块内存,然后通过起始索引来绘制指定范围内的顶点,前面的第一种渲染器的设计方式用的就是这种。
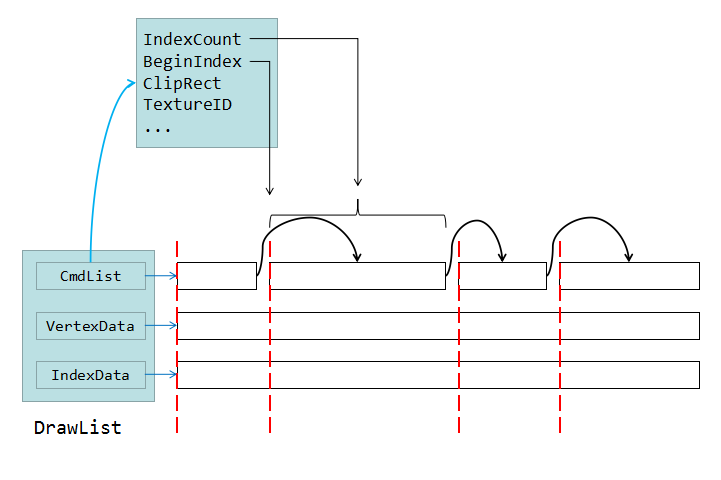
这样做就会带来大量的 drawcall(对 OpenGL 来说绘制参数(状态值)的变更要比绘制大量的顶点更耗费 CPU),绘制效率有所下降。想要更高的性能,通过批次合并(即将合理的方式将渲染状态相同多个可渲染物的 draw 绘制数据合并到一批绘制)可以降低开销,但这样批次合并的顶点数据必须连续储存在一起。那么这样就不能简单的分配一大块内存来储存这些顶点数据了。
那么有没有好的方法合理管理顶点内存?我给出的一个答案是 BlockAllocator(来自于 Box2D 库的 SOA 内存管理方案),它的原理是分配一大块内存 chunk,然后将 chunk 切割成许多的小块内存 block(block 的大小根据需要合理设置),block 通过链表连接起来。但申请一块内存的时候不再使用 malloc 函数,而是 BlockAllocator 直接返回一块合适大小的 block,用完后返还给 BlockAllocator 即可,这个过程只有非常少量的 malloc,可以说效率很高。关于 BlockAllocator 的详细解析,将在下一篇文章中给出。
Renderer 的实现
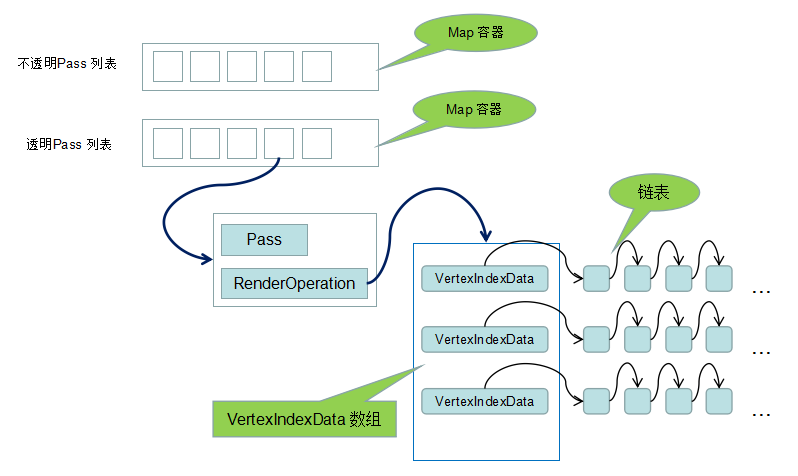
Renderer 有两个 Pass 列表,分别是不透明 Pass 列表和半透明 Pass 列表:
typedef std::map<Pass*, RenderOperation, PassSort> PassVertexIndexMap;
/* 不透明列表 */
PassVertexIndexMap solidVertexIndexMap;

/* 透明列表 */
PassVertexIndexMap transparentVertexIndexMap;
在渲染器中,在插入 Pass 时可以对 Pass 进行排序,定义 Map 容器时设置了一个规定排序规则的仿函数 PassSort:
        struct PassSort
        {
            bool operator()(Pass* a, Pass* b) const
            {
                if ( (*a) < (*b) ) return true;
                return false;
            }
        };
每个 Pass 对象都有一个对应的渲染操作:
    struct RenderOperation
    {
        int    stride;

        int vertexCount;
        int indexCount;
        std::vector<VertexIndexData*>* vidVector;
    };
Pass 所对应的绘制数据都储存在 vidVector 数组中,对于半透明图元的渲染,会经过这个数组的排序,就能确保安顺序渲染这些半透明的图元了。实际上,使用 VertexIndexData 数组储存顶点数据就可以了。但是,VertexIndexData 也被定义为链表的一个结点,VertexIndexData 之间可以通过链表链接起来,用链表链接起来的 VertexIndexData 间不会进行排序,这是为粒子系统的渲染做的特别优化。
VertexIndexData 是一个存储顶点数据的结构:
    struct VertexIndexData
    {
        char* vertexData;            /* 顶点数据指针 */
        unsigned int*  indexData;    /* 顶点索引数据指针 */
        int vertexCount;             /* 顶点数量 */
        int indexCount;              /* 顶点索引数量 */

        int index;                   /* 渲染排序索引 */
        VertexIndexData* next;
    };
这里只有一个指向顶点数据内存的指针,渲染器并不知道顶点数据的格式是怎样的,只需知道每一个顶点数据的跨度(RenderOperation 的 stride)即可。
如何通过渲染器渲染渲染顶点数据呢?首先设置渲染器当前的 Pass:
    void Renderer::setPass(Pass* pass, bool transparent)
    {
        if ( pCurrentPass != nullptr && pCurrentPass->equal(pass) ) return;
        pCurrentPass = pass;

        PassVertexIndexMap& map = transparent ? transparentVertexIndexMap : solidVertexIndexMap;
        auto it = map.find(pCurrentPass);
        if ( it == map.end() ) {
            it = map.insert(PassVertexIndexMap::value_type(pCurrentPass, RenderOperation())).first;
            it->second.vidVector = new std::vector<VertexIndexData*>();
            it->second.vertexCount = 0;
            it->second.indexCount = 0;
        }
        pCurrentRenderOperation = &it->second;
    }
渲染器会根据 transparent 这个变量确定 Pass 是被添加到不透明表 solidVertexIndexMap 还是半透明表 transparentVertexIndexMap,然后查找 Pass 表,存在 Pass 的话就记录下 Pass 对应的 RenderOperation。渲染器是通过 Pass 对象合并顶点数据的,所以在开发游戏的时候可以把许多小图合并成一张大图,一张纹理对着一个 Pass,也就意味着一个 drawcall,这样会减低开销。
设置好渲染器的 Pass 后,就可以设置顶点数据到渲染器,渲染器会管理这些数据:
    void Renderer::addVertexIndexData(VertexIndexData* viData, int stride, int depth)
    {
        VertexIndexData* sp = viData;
        while ( sp ) {

            /* 顶点变换 */
            for ( int i = 0; i < sp->vertexCount; i++ ) {
                Vec3* pos = ( Vec3* ) (( char* ) sp->vertexData + i * stride);
                *pos = mTransformMatrix * (*pos);
            }
            pCurrentRenderOperation->vertexCount += sp->vertexCount;
            pCurrentRenderOperation->indexCount += sp->indexCount;

            sp = sp->next;
        }

        /* 设置排序索引 */
        int size = pCurrentRenderOperation->vidVector->size();
        viData->index = (depth == -1) ? -size : depth;

        /* 添加顶点数据 */
        pCurrentRenderOperation->vidVector->push_back(viData);
        pCurrentRenderOperation->stride = stride;
    }
这里,我把顶点变换的操作放在了这里,而不是放到顶点着色器中。传进来的顶点数据会添加到 RenderOperation 的 VertexIndexData 数组中,并记录当前 RenderOperation 的顶点数量的索引数量。
渲染器的渲染
调用 render 函数即可完成渲染操作:
    void Renderer::render()
    {
        if ( solidVertexIndexMap.empty() == false ) {
            this->renderPassVertexIndexMap(solidVertexIndexMap);
        }
        if ( transparentVertexIndexMap.empty() == false ) {
            this->renderPassVertexIndexMap(transparentVertexIndexMap);
        }
    }
先渲染不透明的 Pass 列表,再渲染半透明的 Pass 列表。
    void Renderer::renderPassVertexIndexMap(PassVertexIndexMap& map)
    {
        for ( PassVertexIndexMap::iterator pass_it = map.begin(); pass_it != map.end(); ++pass_it ) {
            Pass* pass = pass_it->first;
            pass->setOpenGLState();

            RenderOperation* ro = &pass_it->second;

            std::sort(ro->vidVector->begin(), ro->vidVector->end(), compare);
            this->doRenderOperation(&pass_it->second, pass);

            delete ro->vidVector;
        }
        map.clear();
    }
函数中,迭代 Pass 列表,先调用 Pass 的 setOpenGLState 函数实现 OpenGL 状态的设置。然后会顶点数据进行排序(这里不透明列表本不需要排序的,这里设计成了不透明列表也进行排序),这里使用 std::sort 函数对 std::vector 的数据排序,最后一个参数是自定义的排序函数:
        static bool compare(VertexIndexData* a, VertexIndexData* b)
        {
            return a->index < b->index;
        }
最后在函数 doRenderOperation 中完成顶点数据的绘制。
    void Renderer::doRenderOperation(RenderOperation* ro, Pass* pass)
    {
        int vertexBytes = ro->vertexCount * ro->stride;
        int indexBytes = ro->indexCount * sizeof(int);

        assert(vertexBytes <= 512000 && indexBytes <= 102400);

        int vertexIndex = 0, indexIndex = 0;
        for ( auto& ele : *(ro->vidVector) ) {
            VertexIndexData* sp = ele;

            while ( sp ) {
                /* 拷贝顶点索引数据 */
                for ( int i = 0; i < sp->indexCount; i++ ) {
                    indexBuffer[indexIndex++] = vertexIndex + sp->indexData[i];
                }
                /* 拷贝顶点数据 */
                memcpy(vertexBuffer + vertexIndex * ro->stride, sp->vertexData, sp->vertexCount * ro->stride);
                vertexIndex += sp->vertexCount;

                /* 释放资源 */
                pBlockAllocator->free(sp->vertexData);
                pBlockAllocator->free(sp->indexData);
                pBlockAllocator->free(sp);
                sp = sp->next;
            }
        }

        Shader* shader = pass->getShader();
        shader->bindProgram();
        shader->bindVertexDataToGPU(vertexBuffer);

        /* 绘制 */
        glDrawElements(pass->getPrimType(), ro->indexCount, GL_UNSIGNED_INT, indexBuffer);
        nDrawcall++;
    }
函数中对 VertexIndexData 数组的数据进行一次合并,储存在一块内存中:
        char vertexBuffer[1024 * 500];      /* 用于合并顶点的缓冲区 */
        unsigned indexBuffer[25600];        /* 用于合并索引的缓冲区 */
在绑定好着色程序(同时绑定 Uniform 数据)和设置顶点属性指针后,调用 glDrawElements 函数进行绘制,完成一次渲染通路的渲染。整个渲染器的设计就结束了,和前一个渲染器相比,代码结构清晰了许多。后续会使用 Simple2D 开发一个游戏,并逐步完善渲染器。