ASP.NET Core Identity 是一个身份验证的框架,本篇文章根据官方文档的介绍,进行初步的实践,为一个ASP.NET Core Web应用添加一个默认的实现。并尝试分别使用SQLite,Sql Server和Mysql作为持久化的数据库。具体的Identity术语可以参考官方文档,本文章便不再过多阐述。
文档参考:
Specified key was too long; max key length is 767 bytes #1526
Specified key was too long; max key length is 767 bytes #81
ASP.NET Identity:将 MySQL 存储用于 EntityFramework MySQL 提供程序(C#)
一、新建一个ASP.NET Core Web应用程序
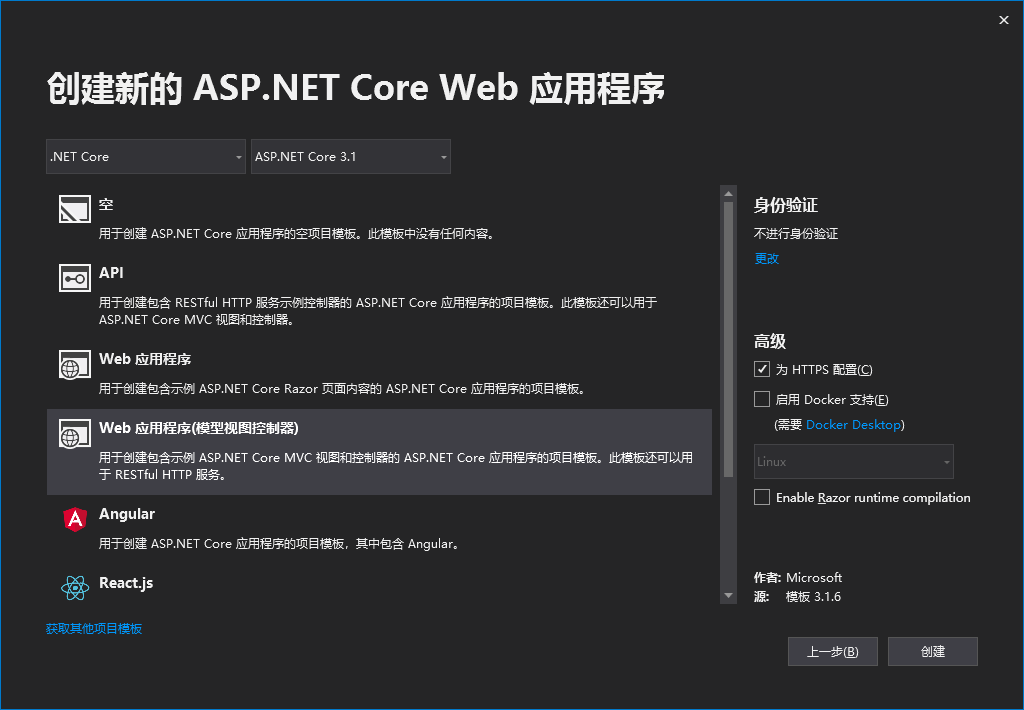
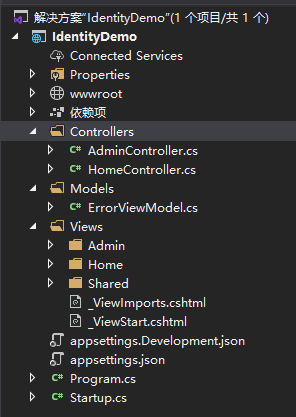
身份验证选择不进行身份验证,这个我们后面进行添加。项目类型选择了Web应用程序(模型视图控制器),也就是MVC项目。创建完成后的文件结构如图所示。

创建完成之后是一个普通的web项目,没有身份验证,只有几个简单的页面,添加一个控制器及视图来设置为需要经过身份验证才能访问的。
AdminController.cs
using Microsoft.AspNetCore.Authorization;
using Microsoft.AspNetCore.Mvc;

namespace IdentityDemo.Controllers
{
    [Authorize]
    public class AdminController : Controller
    {
        public IActionResult Index()
        {
            return View();
        }
    }
}
/Views/Admin/Index.cshtml
@{
    ViewData["Title"] = "Index";
}

<h1>Admin Index</h1>
在AdminController上添加[Authorize]注解表示访问这个控制器的所有方法需要身份验证。添加了控制器的文件结构如下所示:
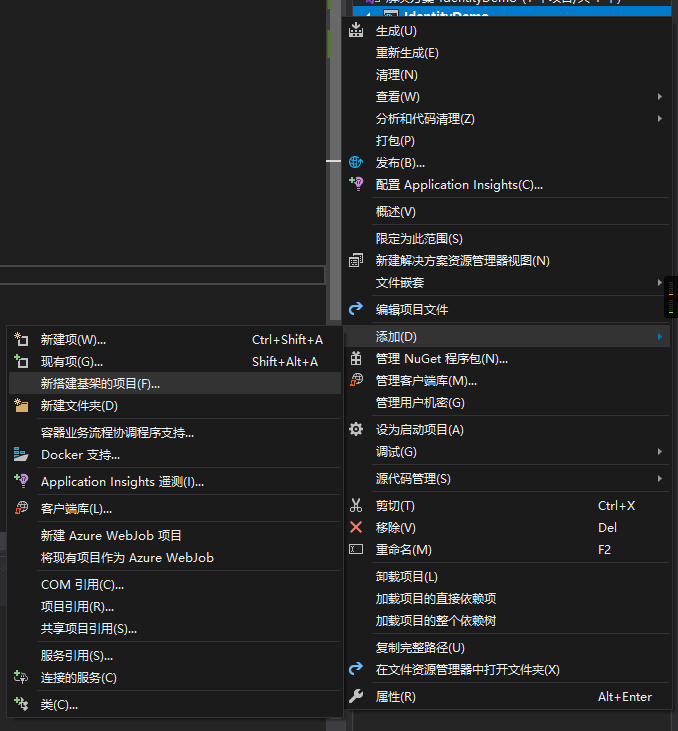
二、添加Identity基架(SQLite/Sql Server/MySQL)
在项目上右击选择 添加-新搭建基架的项目
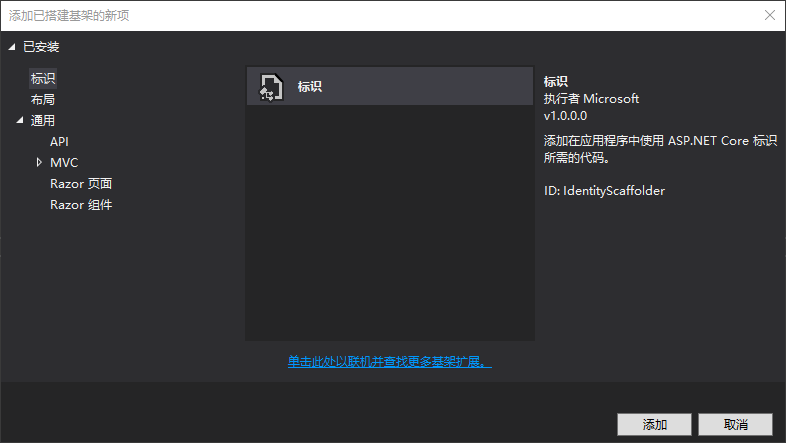
选择标识(Identity),点击添加。
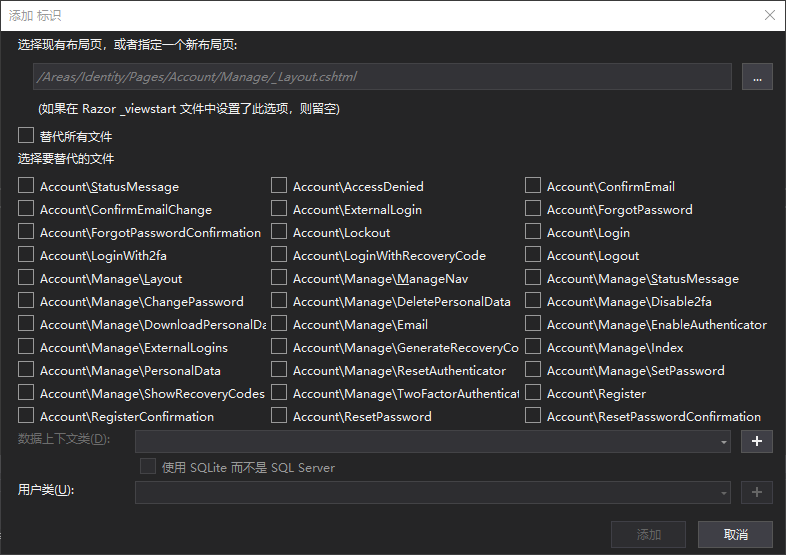
选择布局页,这个是MVC项目,则我选择/Views/Shared/_Layout.cshtml。

勾选上替代所有文件,这会帮助我们创建所有关于Identity会用到的页面。
数据上下类,点击右面的加号,新创建一个。当勾选“使用SQLite而不是SQL Server”时,会使用SQLite作为持久化数据库,否则默认使用SQL Server作为持久化数据库。
用户类,这边选择新建一个,点击右侧加号新建。
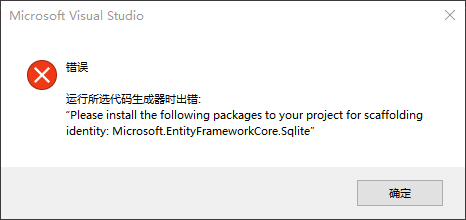
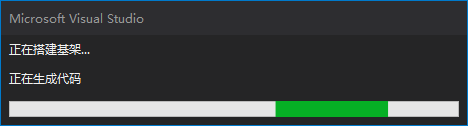
然后点击添加。如果在添加的途中发生如下报错的时候,点击确定,然后重新点击添加完成操作。
完成以后的项目结构大致如图所示

三、对代码做几处修改
/Views/Shared/_Layout.cshtml
<!DOCTYPE html>
<html lang="en">
<head>
    <meta charset="utf-8" />
    <meta name="viewport" content="width=device-width, initial-scale=1.0" />
    <title>@ViewData["Title"] - IdentityDemo</title>
    <link rel="stylesheet" href="~/lib/bootstrap/dist/css/bootstrap.min.css" />
    <link rel="stylesheet" href="~/css/site.css" />
</head>
<body>
    <header>
        <nav class="navbar navbar-expand-sm navbar-toggleable-sm navbar-light bg-white border-bottom box-shadow mb-3">
            <div class="container">
                <a class="navbar-brand" asp-area="" asp-controller="Home" asp-action="Index">IdentityDemo</a>
                <button class="navbar-toggler" type="button" data-toggle="collapse" data-target=".navbar-collapse" aria-controls="navbarSupportedContent"
                        aria-expanded="false" aria-label="Toggle navigation">
                    <span class="navbar-toggler-icon"></span>
                </button>
                <div class="navbar-collapse collapse d-sm-inline-flex flex-sm-row-reverse">
                    <ul class="navbar-nav flex-grow-1">
                        <li class="nav-item">
                            <a class="nav-link text-dark" asp-area="" asp-controller="Home" asp-action="Index">Home</a>
                        </li>
                        <li class="nav-item">
                            <a class="nav-link text-dark" asp-area="" asp-controller="Home" asp-action="Privacy">Privacy</a>
                        </li>
+                       <li class="nav-item">
+                           <a class="nav-link text-dark" asp-area="" asp-controller="Admin" asp-action="Index">Admin</a>
+                       </li>
+                       <partial name="_LoginPartial.cshtml" />
                    </ul>
                </div>
            </div>
        </nav>
    </header>
    <div class="container">
        <main role="main" class="pb-3">
            @RenderBody()
        </main>
    </div>

    <footer class="border-top footer text-muted">
        <div class="container">
            © 2020 - IdentityDemo - <a asp-area="" asp-controller="Home" asp-action="Privacy">Privacy</a>
        </div>
    </footer>
    <script src="~/lib/jquery/dist/jquery.min.js"></script>
    <script src="~/lib/bootstrap/dist/js/bootstrap.bundle.min.js"></script>
    <script src="~/js/site.js" asp-append-version="true"></script>
    @RenderSection("Scripts", required: false)
</body>
</html>
Startup.cs
using Microsoft.AspNetCore.Builder;
using Microsoft.AspNetCore.Hosting;
using Microsoft.Extensions.Configuration;
using Microsoft.Extensions.DependencyInjection;
using Microsoft.Extensions.Hosting;

namespace IdentityDemo
{
    public class Startup
    {
        public Startup(IConfiguration configuration)
        {
            Configuration = configuration;
        }

        public IConfiguration Configuration { get; }

        // This method gets called by the runtime. Use this method to add services to the container.
        public void ConfigureServices(IServiceCollection services)
        {
            services.AddControllersWithViews();
+           services.AddRazorPages();
        }

        // This method gets called by the runtime. Use this method to configure the HTTP request pipeline.
        public void Configure(IApplicationBuilder app, IWebHostEnvironment env)
        {
            if (env.IsDevelopment())
            {
                app.UseDeveloperExceptionPage();
            }
            else
            {
                app.UseExceptionHandler("/Home/Error");
                // The default HSTS value is 30 days. You may want to change this for production scenarios, see https://aka.ms/aspnetcore-hsts.
                app.UseHsts();
            }
            app.UseHttpsRedirection();
            app.UseStaticFiles();

            app.UseRouting();

+           app.UseAuthentication();
            app.UseAuthorization();

            app.UseEndpoints(endpoints =>
            {
                endpoints.MapControllerRoute(
                    name: "default",
                    pattern: "{controller=Home}/{action=Index}/{id?}");
+               endpoints.MapRazorPages();
            });
        }
    }
}
四、初始化数据库
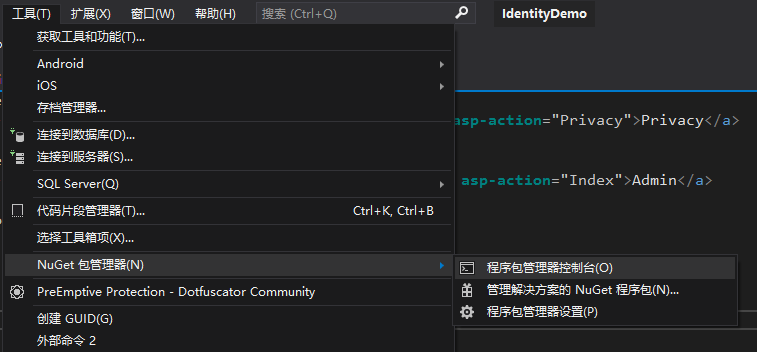
修改配置文件appsettings.json中的连接字符串到自己的数据库。然后打开 工具-NuGet包管理器-程序包管理器控制台。
执行以下三条命令
Install-Package Microsoft.AspNetCore.Diagnostics.EntityFrameworkCore
Add-Migration CreateIdentitySchema
Update-Database
执行完成之后可以看到数据库里的表已经创建好了。
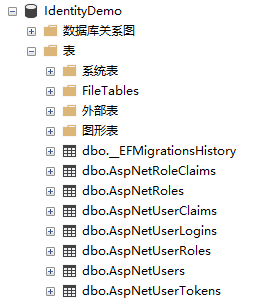
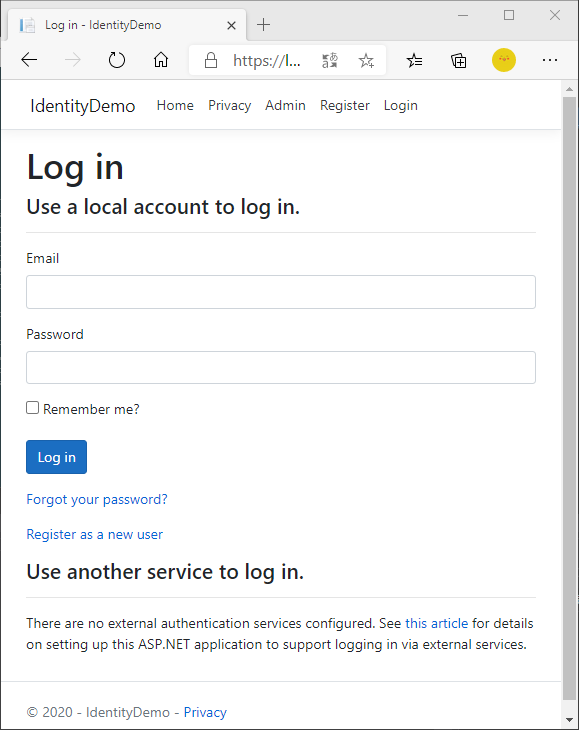
此时可以调试运行项目欣赏一下成果。
注册页面

登录界面
没有登录的时候点击Admin也会跳转到登录界面
五、使用Mysql数据库
使用mysql数据库时在以上基础上要对代码做一些修改
修改数据库连接字符串为连接Mysql的连接字符串
修改使用的连接字符串
使用NuGet安装包MySql.Data.EntityFrameworkCore
Install-Package MySql.Data.EntityFrameworkCore
IdentityHostingStartup.cs
using Microsoft.EntityFrameworkCore;
using Microsoft.Extensions.Configuration;
using Microsoft.Extensions.DependencyInjection;
using WebAdmin.Areas.Identity.Data;
using WebAdmin.Data;

[assembly: HostingStartup(typeof(WebAdmin.Areas.Identity.IdentityHostingStartup))]
namespace WebAdmin.Areas.Identity
{
    public class IdentityHostingStartup : IHostingStartup
    {
        public void Configure(IWebHostBuilder builder)
        {
            builder.ConfigureServices((context, services) => {
                services.AddDbContext<WebAdminContext>(options =>
+                   options.UseMySQL(
+                       context.Configuration.GetConnectionString("WebAdminMysqlContextConnection")));

                services.AddDefaultIdentity<WebAdminUser>(options => options.SignIn.RequireConfirmedAccount = true)
                    .AddEntityFrameworkStores<WebAdminContext>();
            });
        }
    }
}
手动创建数据库,字符集CharSet选择utf8mb4
还需要手动创建表__EFMigrationsHistory。如果不做这一步,有可能不会自动创建数据表,提示表不存在。
CREATE TABLE `__EFMigrationsHistory`
(
    `MigrationId` nvarchar(150) NOT NULL,
    `ProductVersion` nvarchar(32) NOT NULL,
    PRIMARY KEY(`MigrationId`)
);
修改一下数据库表模型的索引的长度。如果不做这一步,可能会导致以下报错:Specified key was too long; max key length is 3072 bytes,如果数据选的utf8字符集,则会是 767 bytes。
/Areas/Identity/Data/xxxContext.cs
using IdentityDemo.Areas.Identity.Data;
using Microsoft.AspNetCore.Identity;
using Microsoft.AspNetCore.Identity.EntityFrameworkCore;
using Microsoft.EntityFrameworkCore;

namespace IdentityDemo.Data
{
    public class IdentityDemoContext : IdentityDbContext<IdentityDemoUser>
    {
        public IdentityDemoContext(DbContextOptions<IdentityDemoContext> options)
            : base(options)
        {
        }

        protected override void OnModelCreating(ModelBuilder builder)
        {
+           builder.Entity<IdentityDemoUser>(entity => entity.Property(m => m.Id).HasMaxLength(127));
+           builder.Entity<IdentityRole>(entity => entity.Property(m => m.Id).HasMaxLength(127));
+           builder.Entity<IdentityUserLogin<string>>(entity => entity.Property(m => m.LoginProvider).HasMaxLength(127));
+           builder.Entity<IdentityUserLogin<string>>(entity => entity.Property(m => m.ProviderKey).HasMaxLength(127));
+           builder.Entity<IdentityUserRole<string>>(entity => entity.Property(m => m.UserId).HasMaxLength(127));
+           builder.Entity<IdentityUserRole<string>>(entity => entity.Property(m => m.RoleId).HasMaxLength(127));
+           builder.Entity<IdentityUserToken<string>>(entity => entity.Property(m => m.UserId).HasMaxLength(127));
+           builder.Entity<IdentityUserToken<string>>(entity => entity.Property(m => m.LoginProvider).HasMaxLength(127));
+           builder.Entity<IdentityUserToken<string>>(entity => entity.Property(m => m.Name).HasMaxLength(127));
            base.OnModelCreating(builder);
        }
    }
}
删除在上面生成的Migrations文件夹,重新执行一下迁移的步骤
Add-Migration CreateIdentitySchema
Update-Database
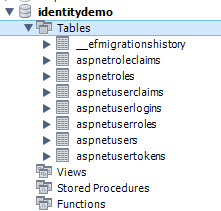
执行完以上的步骤后,则可以看到数据库中Identity相关的表已经建好了
以上就是使用不同的数据库来开始使用Identity。
后面会持续更新Identity的学习笔记。
