以下内容翻译自:https://www.tutorialspoint.com/springmvc/springmvc_json.htm
说明:示例基于Spring MVC 4.1.6。
以下示例显示如何使用Spring Web MVC框架生成JSON。首先,让我们使用Eclipse IDE,并按照以下步骤使用Spring Web Framework开发基于动态窗体的Web应用程序:
| 步 | 描述 |
|---|---|
| 1 | 创建一个名为TestWeb的项目,在一个包com.tutorialspoint下,如Spring MVC - Hello World Example章节所述。 |
| 2 | 在com.tutorialspoint包下创建一个Java类User,UserController。 |
| 3 | 从maven存储库页面下载Jackson图书馆Jackson Core,Jackson Databind和Jackson Annotations。把它们放在你的CLASSPATH中。 |
| 4 | 最后一步是创建所有源和配置文件的内容并导出应用程序,如下所述。 |
User.java
package com.tutorialspoint;

public class User {
   private String name;
   private int id;
   public String getName() {
      return name;
   }
   public void setName(String name) {
      this.name = name;
   }
   public int getId() {
      return id;
   }
   public void setId(int id) {
      this.id = id;
   }
}
UserController.java
package com.tutorialspoint;

import org.springframework.stereotype.Controller;
import org.springframework.web.bind.annotation.PathVariable;
import org.springframework.web.bind.annotation.RequestMapping;
import org.springframework.web.bind.annotation.RequestMethod;
import org.springframework.web.bind.annotation.ResponseBody;

@Controller
@RequestMapping("/user")
public class UserController {

   @RequestMapping(value="{name}", method = RequestMethod.GET)
   public @ResponseBody User getUser(@PathVariable String name) {

      User user = new User();

      user.setName(name);
      user.setId(1);
      return user;
   }
}
TestWeb-servlet.xml
<beans xmlns="http://www.springframework.org/schema/beans"
   xmlns:context="http://www.springframework.org/schema/context"
   xmlns:xsi="http://www.w3.org/2001/XMLSchema-instance"
   xmlns:mvc="http://www.springframework.org/schema/mvc"
   xsi:schemaLocation="
   http://www.springframework.org/schema/beans
   http://www.springframework.org/schema/beans/spring-beans-3.0.xsd
   http://www.springframework.org/schema/context
   http://www.springframework.org/schema/context/spring-context-3.0.xsd
   http://www.springframework.org/schema/mvc
   http://www.springframework.org/schema/mvc/spring-mvc-3.0.xsd">
   <context:component-scan base-package="com.tutorialspoint" />
   <mvc:annotation-driven />
</beans>
在这里,我们创建了一个简单的POJO用户,在UserController中,我们返回了用户。Spring根据类路径中存在的RequestMapping和Jackson jar自动处理JSON转换。
完成创建源文件和配置文件后,导出应用程序。右键单击应用程序并使用Export > WAR File选项,并将您的TestWeb.war文件保存在Tomcat的webapps文件夹中。
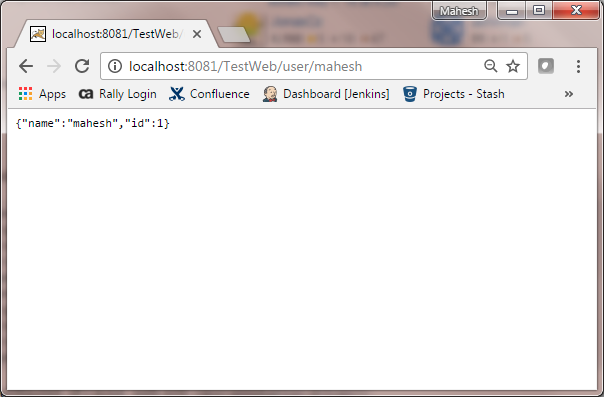
现在启动您的Tomcat服务器,并确保您可以使用标准浏览器从webapps文件夹访问其他网页。现在尝试URL http://localhost:8080/TestWeb/user/mahesh,您应该看到以下结果。

Maven示例:
https://github.com/easonjim/5_java_example/tree/master/springmvc/tutorialspoint/test29