写在前面的话
Nginx 在安装完成后自动为我们生成了一个展示欢迎页的虚拟主机,除此之外,还附带了很多基础的配置,我们先来看看这些配置有什么用,顺便添加一些常用但是配置文件中并未初始化进去的配置来专门谈谈。
基础配置
以下是默认配置文件中的内容,并做了简单的调整:
# Nginx 默认运行 worker 的用户为 nobody,而 Master 用户为 root
user  nobody;

#工作进程,也就是 worker 数量,一般为 CPU 核数,可以写 auto
worker_processes  1;

# 默认错误日志路径,级别
error_log  logs/error.log  info;

# 默认 PID 文件保存位置
pid        logs/nginx.pid;

# 一个进程打开的最大文件数,建议与 ulimit -n 一致
worker_rlimit_nofile 65535;

events {
    # epoll 为一种多路复用 IO 模式,可以提升性能
    use  epoll;

    # 单个进程最大连接数
    worker_connections  65535;
}

http {
    # 文件扩展名与文件类型映射表和默认文件类型
    include       mime.types;
    default_type  application/octet-stream;

    # 日志格式
    # log_format  main  '$remote_addr - $remote_user [$time_local] "$request" '
    #                  '$status $body_bytes_sent "$http_referer" '
    #                  '"$http_user_agent" "$http_x_forwarded_for"';

    # 正常访问日志
    access_log  logs/access.log  main;

    # 高效文件传输,普通设置为 on,下载服务或者高 IO 服务设置为 off
    sendfile        on;

    # 长连接超时时间,单位是秒
    keepalive_timeout  65;

    # gzip 压缩输出
    # gzip  on;

    # 虚拟主机
    server {
        # 监听端口
        listen       80;

        # 域名,多个空格隔开
        server_name  localhost;

        # 单独的日志
        # access_log  logs/host.access.log  main;
        # error_log   logs/error.log;

        # 匹配规则
        location / {
            # 项目目录和索引文件
            root   html;
            index  index.html index.htm;
        }

        # 404 返回页面
        # error_page  404              /404.html;

        # 其他错误代码返回页面
        error_page   500 502 503 504  /50x.html;
        location = /50x.html {
            root   html;
        }
    }
}
从上面的配置中我们需要知道:
1. nginx 进程由 master / worker 组成,master 通过 root 用户运行,worker 通过配置中用户运行,默认 nobody。
2. 并发总数 = worker_processes * worker_connections,但如果是反向代理需要除以 4。
3. worker_connections 受制于内存和 IO,也就是机器的性能。
4. 通过 cat /proc/sys/fs/file-max 查看服务器可以打开文件句柄数,一般 1G 内存为 10 万左右。
5. worker_rlimit_nofile 需要大于等于 worker_connections,而且在系统优化时应该调大 ulimit 的值。
6. error log 可以在 http 外层配置,因为启动 nginx 也会报错写日志,但 access 日志只能在 http 的下级配置中。
7. http 端口为 80,https 端口为 443。
实现基本的 WEB 服务
我们这里以单纯的 HTML 文件来实现 nginx 作为轻量级 WEB 服务器的基本功能。
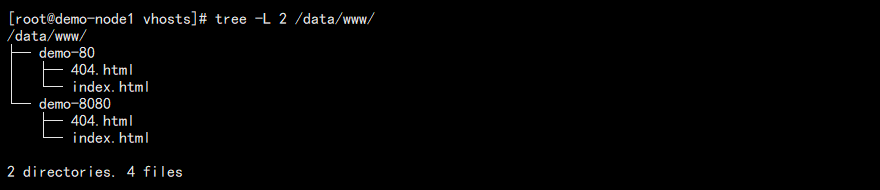
1. 创建相关目录和页面:
mkdir -p /data/www/demo-80
mkdir -p /data/www/demo-8080
echo '<h1>NGINX SERVER PORT 80</h1>' >/data/www/demo-80/index.html
echo '<h1>NGINX SERVER PORT 80 404 NOT FOUND</h1>' >/data/www/demo-80/404.html
echo '<h1>NGINX SERVER PORT 8080</h1>' >/data/www/demo-8080/index.html
echo '<h1>NGINX SERVER PORT 8080 404 NOT FOUND</h1>' >/data/www/demo-8080/404.html
目录结构如下:
2. 为了增强配置,我们将虚拟主机抽离到单独的配置中,并删除掉原本的 server 段:
user  nginx;
worker_processes  auto;
error_log  /data/logs/nginx/error.log  info;
pid        /data/logs/nginx/nginx.pid;

events {
    worker_connections  65535;
}

http {
    include       mime.types;
    default_type  application/octet-stream;
    sendfile      on;
    log_format  main  '$remote_addr - $remote_user [$time_local] "$request" '
                      '$status $body_bytes_sent "$http_referer" '
                      '"$http_user_agent" "$http_x_forwarded_for"';
    access_log  /data/logs/nginx/access.log  main;
    include    vhosts/*.conf;
}
该配置作用在于,在 http 段下面增加 /data/services/nginx/conf/vhosts 目录下以 .conf 结尾的所有文件!
新建相关目录:
cd /data/services/nginx/conf
mkdir vhosts
3. 去 vhosts 目录下添加本次测试的配置:demo.conf
# 80 端口测试
server {
    listen       80;
    server_name  localhost;

    location / {
        root   /data/www/demo-80;
        index  index.html index.htm;
    }
    error_page  404     /404.html;
}

# 8080 端口测试
server {
    listen       8080;
    server_name  localhost;

    location / {
        root   /data/www/demo-8080;
        index  index.html index.htm;
    }
    error_page  404     /404.html;
}
4. 重载配置生效:
/data/services/nginx/sbin/nginx -t
/data/services/nginx/sbin/nginx -s reload
我们要养成每次重载配置之前 -t 检查配置的习惯。
另外 -s reload 可以平滑重启 nginx,不会造成业务中断,同理 -s stop 就是停止 nginx。
5. 查看端口,访问测试:

访问 80:

访问 80 端口不存在的页面:

访问 8080:

访问 8080 端口不存在的页面:

日志配置
nginx 日志配置不同位置的不同含义:
1. 在 nginx 配置文件的最外层,我们可以配置 error_log,这个 error_log 能够记录 nginx 启动过程中的异常,也能记录日常访问过程中遇到的错误。
2. 在 http 段中可以配置 error_log 和 access_log,可以用于记录整个访问过程中成功的,失败的,错误的访问。
3. 在 server 内部配置属于专门 server 的 error_log 和 access_log,这是我们常用的,不同业务日志分开。
最后我们需要知道的,越往配置里层,优先级越高,意味着 server 的日志记录以后并不会因为你在外层写了日志而再次记录。
在日志配置中,有如下关键字:
| 关键字 | 说明 |
|---|---|
| error_log | 错误日志,级别:debug/info/notice/warn/error/crit/alert/emerg |
| error_log logs/error.log error; | |
| access_log | 正常访问日志,可以关闭:access_log off |
| access_log logs/access.log main; | |
| open_log_file_cache | 日志写入都是经过打开,写入,关闭文件。该参数用于设置日志文件的缓存,默认 off |
| open_log_file_cache max=1000 inactive=20s valid=1m min_uses=2; | |
| log_not_found | 是否在 error_log 中记录不存在的错误,默认 on |
| log_not_found on | off; | |
| log_subrequest | 是否在 access_log 中记录子请求的记录,默认 off |
| log_subrequest on | off; | |
| rewrite_log | 重写的日志,该日志只有在 rewrite 时候起作用,一般用于调试,默认 off |
| rewrite_log on | off; | |
另外我们需要单独拿出来谈谈的是日志格式关键字:log_format
我们需要先知道的是,在 nginx 中内置了很多变量,我们都可以直接拿来使用,在日志这里我们常用的变量:
| 变量 | 含义 |
|---|---|
| $remote_addr | 客户端的 IP 地址 |
| $remote_user | 客户端用户名称 |
| $time_local | 当前时区时间 |
| $time_iso8601 | ISO8601 标准格式下的本地时间 |
| $request | 请求的 URL 与 HTTP 协议 |
| $status | 请求状态,成功 200 |
| $body_bytes_sent | 发送给客户端的主体文件大小 |
| $http_referer | 从哪个页面来的 |
| $http_user_agent | 客户端浏览器信息 |
| $http_x_forwarded_for | 客户端真实 IP |
| $connection | 连接的序列号 |
| $connection_requests | 当前通过一个连接获取的请求数量 |
| $msec | 日志写入时间 |
| $pipe | pipeline 标识 |
| $request_length | 请求长度 |
| $request_time | 请求处理时间 |
我们先看下默认的配置:
log_format  main  '$remote_addr - $remote_user [$time_local] "$request" '
                  '$status $body_bytes_sent "$http_referer" '
                  '"$http_user_agent" "$http_x_forwarded_for"';
我们可以进行简单的改写,便于查看:
log_format  mylog '$remote_addr - $status $remote_user [$time_local] "$request" '
                  '[Bytes: $body_bytes_sent - Time: $request_time] "$http_referer" '
                  '"$http_user_agent" "$http_x_forwarded_for"';
此时我们删除配置中原来的日志配置,修改为我们新的:
...
http {
    ...
    log_format  mylog '$remote_addr - $status $remote_user [$time_local] "$request" '
                      '[Bytes: $body_bytes_sent - Time: $request_time] "$http_referer" '
                      '"$http_user_agent" "$http_x_forwarded_for"';

    access_log  /data/logs/nginx/access.log  mylog;
    ...
}
红色部分需要特别注意,我们改了这个格式的名字,自然使用的时候也要换成这个名字。
重载 nginx 后访问查看日志 /data/logs/nginx/access.log:

至于为啥状态码是 304 而不是 200,原因在于对于这种静态文件,nginx 在第一次访问的时候状态码 200,再次访问就是 304 了。
如果你还想 200,可以 ctrl + F5 强制刷新浏览器就是 200 了。 而且 304 可以发现其实服务器发送大小是 0 的。
至于针对单个 server(虚拟主机) 增加专门的日志,我们可以修改 demo.conf:
# 80 端口测试
server {
    listen       80;
    ...
    error_log   /data/logs/nginx/demo-error.log   info;
    access_log  /data/logs/nginx/demo-access.log  mylog;
}
...
重载配置访问测试我们可以发现:
1. 原本的 access.log 无论专门刷新也没有日志写入了。
2. 在 /data/logs/nginx 目录下生成了我们刚刚配置的日志:

日志已经写到了新的文件里面!
小结
本节都是 nginx 的基础,谈了一下简单的虚拟主机的配置,但是这些都是最简单的实现。至于新日志的格式,更加有利于我们对日志进行处理和查看。