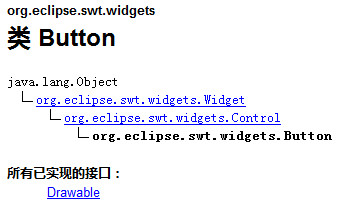
Button是SWT中最常用的组件.Button类的继承关系图:
Button类的构造方法是newe Button(Composite parent,int style)它有两个参数:
第一个参数:是Button创建在哪个容器上.Composite是最常用的容器,而Shell是
Composite的子类.所以此参数也能接受Shell和任何继承自Composite的子类.
第二个参数用来指定Button应用哪种式样,SWT.NONE是保持Button组件的默认式样.
式样其实是一个常量,如SWT.NONE的值是0,查看SWT.class的源代码可以发现很多这种常量.
SWT组件的式样是比较有特点的.和new Button(Composite parent,int style)一样,大都在
构造函数中使用式样(style)来定义组件外观形态.例如:Button就可以通过式样的定义而成为
复选框,单选框,或者通过式样来设置按钮文字的排放和按钮外观.
如果要生成一个文字靠左的,深陷型的复选框,只要用符号"|"将各个式样连起来即可.
如下所示:new Button(shell,SWT.LEFT|SWT.BORDER|SWT.CHECK)
Button是SWT中最常用的组件.而且使用也比较简单.
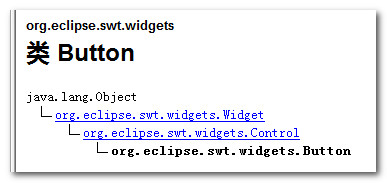
Button类的式样表
SWT组件的式样是比较有特点的,和new Button(Composite arent,int style)一样,大都在构造函数中使用式样(style)来定义组件外观形态,例如:Button就可以通过式样的定义而成为复选框,单选框或者通过式样来设置按钮文字的排放和按钮外观.
如果要生成一个文字靠左的,深陷型的复选框,只要用符号"|"将各个样式连起来,既可以了.
例如:new Button(shell,SWT.LEFT|SWT.BORDER|SWT.CHECK)
组件的常用方法
SWT/JFace中的每一个组件都有很多的同名的方法,这些同名方法在各个组件的作用和用法都是相同或者相似的,这就为我们节省了很多的学习精力.在此将一些常用的方法总结如下:
setText(String string)
说明:设置组件的标签文字.
例子:button.setText("确定").
setToolTipText(String string)
说明:设置鼠标停留在组件上时,出现的黄色提示条中的文字.
例子:button.setToolTipText("单击确定按钮,结束设置")
setBounds(int x,int y,int width,int height)
说明:设置组件的坐标位置和大小,(x轴坐标,y轴坐标,按钮宽度,按钮长度)
例子:button.setBounds(45,45,56,13)
setEnabled(boolean enabled)
说明:设置组件是否可用,false不可用,true(默认值)可用
例子:button.setEnable(false)
setFont(Font font)
说明:设置文字的字体
例子:button.setFont(ResourceManager.getFont("",14,SWT.BOLD|SWT.ITALIC)
setSelection(boolean selected)
说明:设置是否选上,true为选上,false(默认)为不选上.当Button是复选框或者单选框的时候此方法才有效
例子:button.setSelection(false)
setForeground(Color color)
说明:设置前景色
例子:button.setForeground()
setBackground(Color color)
说明:设置背景色
例子:label.setBackground()
setAlignment(int alignment)
说明:设置标签文字的对齐方式
例子:label.setAlignment(SWT.RIGHT)
setImage(Image image)
说明:设置显示的图片.
例子:button.setImage(new Image(display,"icons/selectAll.gif")) 把图片selectAll.gif设置在按钮上.
例子代码:
Button1.java (注意这个地方Button是一个类名,关键字,这个地方不能用Button.java命名类名,否则出现冲突)
 1 public class Button1 {
 2     public static void main(String[] args) {
 3
 4         Display display = Display.getDefault();
 5         Shell shell = new Shell();
 6         shell.setSize(450, 300);
 7         shell.setText("SWT Application");
 8
 9         //事件代码里要访问button,所以加上一个final
10         final Button btnNewButton = new Button(shell,SWT.NONE);
11         btnNewButton.addSelectionListener(new SelectionAdapter() {
12             @Override
13             public void widgetSelected(SelectionEvent e) {
14                 MessageDialog.openInformation(null, "","你单击了 "+ btnNewButton.getText()+" 按钮");
15             }
16         });
17         btnNewButton.setBounds(78, 51, 80, 27);
18         btnNewButton.setText("确定");
19
20         shell.open();
21         shell.layout();
22         while (!shell.isDisposed()) {
23             if (!display.readAndDispatch()) {
24                 display.sleep();
25             }
26         }
27     }
28 }
运行结果:
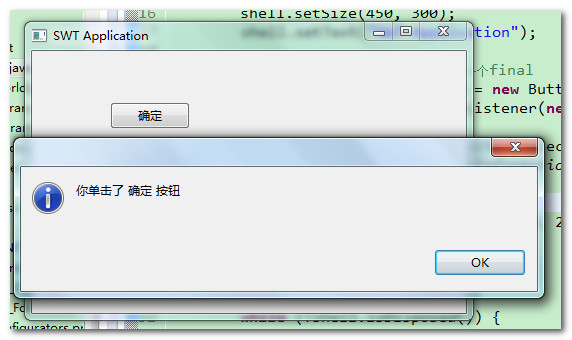
程序说明:
Button类的造成方法是new Button(Composite parent,int style),它有两个参数:
第一个参数是指Button创建在哪一个容器上.Composite是最常用的容器,而Shell是Composite的子类,所以此参数也能接受Shell和任何继承自Composite的类.
第二个参数用来指定Button应用哪种(或几种)式样,SWT.NONE是保持Button组件的默认式样.式样其实是一个常量,如SWT.NONE的值是0,查看SWT.class的源代码可以发现很多这种常量.
Button1.java
 1 public class Button1 {
 2     public static void main(String[] args) {
 3         final Display display = Display.getDefault();
 4         final Shell shell = new Shell();
 5         shell.setSize(327, 253);
 6         // ---------创建窗口中的其他界面组件-------------
 7         final Button radio1 = new Button(shell, SWT.RADIO);// 事件代码里要访问radio1,所以加一个final
 8         radio1.setText("男");// 设置按钮上的文字
 9         radio1.setSelection(true);// 设置按钮处于选择状态
10         radio1.setBounds(10, 10, 40, 25); // 设置按钮位置
11
12         final Button radio2 = new Button(shell, SWT.RADIO);
13         radio2.setText("女");
14         radio2.setBounds(10, 30, 40, 25);
15
16         final Button check1 = new Button(shell, SWT.CHECK);
17         check1.setText("旅游");
18         check1.setBounds(70, 10, 40, 25);
19
20         final Button check2 = new Button(shell, SWT.CHECK);
21         check2.setText("篮球");
22         check2.setBounds(70, 30, 40, 25);
23
24         Button okButton = new Button(shell, SWT.NONE);
25         okButton.setText("确定");
26         okButton.setBounds(10, 70, 100, 25);
27         okButton.addSelectionListener(new SelectionAdapter() {
28             public void widgetSelected(SelectionEvent e) {
29                 String str = "小明,";
30                 if (radio1.getSelection())// 判断按钮是否被选
31                     str += radio1.getText();// 取得按钮上的文字
32                 if (radio2.getSelection())
33                     str += radio2.getText();
34                 str += "。爱好:";
35                 if (check1.getSelection())
36                     str += check1.getText();
37                 if (check2.getSelection())
38                     str += check2.getText();
39                 // 信息提示框的第一、二个参数为空值也是可以的
40                 MessageDialog.openInformation(null, null, str);
41             }
42         });
43         // -----------------END------------------------
44         shell.layout();
45         shell.open();
46         while (!shell.isDisposed()) {
47             if (!display.readAndDispatch())
48                 display.sleep();
49         }
50         display.dispose();
51     }
52 }
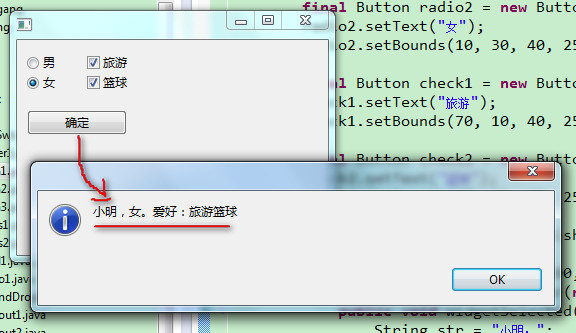
程序说明:
Button类的构造方法是new Button(Composite parent,int style),它有两个参数:
第一个参数指定Button创建在哪个容器上.Composite是最常用的容器,而Shell是Composite的子类,所以此参数也能接受Shell.
第二个参数指定Button所用的式样:SWT.RaDIO 是单选按钮;SWT.CHECK是复选框,SWT.NONE是普通按钮(默认式样)
Button类的式样表.
SWT组件的创建格式和Button一样,一般都是构造函数的第一个参数指定父容器,第二个参数指定式样,不过各组件所支持的式样各有不同.SWT通过式样来定义组件的外观形态;


式样其实是一个常量,SWT.NONE的对应值是0,查看SWT.class的源代码能发现很多这种常量.多个式样可以用符号"|"组合在一起,比如生成一个文字靠左的,深陷型的复选框:new Button(shell,SWT.LEFT|SWT.BORDER|SWT.CHECK).
使用事件参数SelectionEvent
事件方法一般都带有一个参数,比如Button的选择事件widgetSelected(SelectionEvent e)的参数SelectionEvent.事件参数一般会包含一些事件触发者(如Button)的信息.
举个实例:一窗口中0~9依次排列着十个数字按钮,单击这些按钮后弹出提示框显示相应的数值,实现这个例子的关键是获得数字按钮对象的引用,有两种方式,第一种是惯用做法:
Button2.java
 1 public class Button2 {
 2     public static void main(String[] args) {
 3         final Display display = Display.getDefault();
 4         final Shell shell = new Shell();
 5         shell.setSize(327, 253);
 6         // ---------创建窗口中的其他界面组件-------------
 7         for (int i = 0; i < 10; i++) {
 8             final Button button = new Button(shell, SWT.NONE);
 9             button.setText(i + "");
10             button.setBounds(i * 20, 10, 20, 20); // 设置按钮位置
11             button.addSelectionListener(new SelectionAdapter() {
12                 public void widgetSelected(SelectionEvent e) {
13                     MessageDialog.openInformation(null, null, button.getText());
14                 }
15             });
16         }
17         // -----------------END------------------------
18         shell.layout();
19         shell.open();
20         while (!shell.isDisposed()) {
21             if (!display.readAndDispatch())
22                 display.sleep();
23         }
24         display.dispose();
25     }
26 }
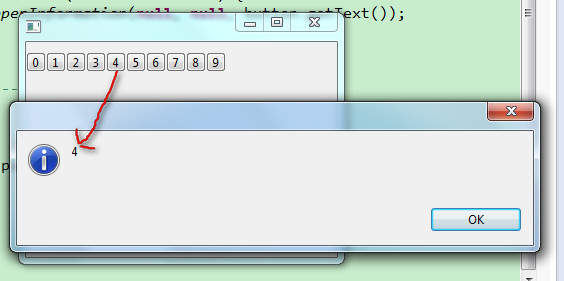
第二种是通过事件参数SelectionEvent的getSource方法得到按钮对象的引用,另外,由于事件代码中不必直接引用button变量,所以第二句前面不用加final前缀.
Button3.java
 1 public class Button3 {
 2     public static void main(String[] args) {
 3         final Display display = Display.getDefault();
 4         final Shell shell = new Shell();
 5         shell.setSize(327, 253);
 6         // ---------创建窗口中的其他界面组件-------------
 7         for (int i = 0; i < 10; i++) {
 8             Button button = new Button(shell, SWT.NONE);
 9             button.setText(i + "");
10             button.setBounds(i * 20, 10, 20, 20); // 设置按钮位置
11             button.addSelectionListener(new SelectionAdapter() {
12                 public void widgetSelected(SelectionEvent e) {
13                     Button b = (Button) e.getSource();
14                     MessageDialog.openInformation(null, null, b.getText());
15                 }
16             });
17         }
18         // -----------------END------------------------
19         shell.layout();
20         shell.open();
21         while (!shell.isDisposed()) {
22             if (!display.readAndDispatch())
23                 display.sleep();
24         }
25         display.dispose();
26     }
27 }