我们采用实战教学模式并结合 ElementUI 组件库,将所需知识点应用到实际中,以最快速度带领大家掌握 Vue 的使用;
一、创建工程
注意: 命令行都要使用管理员模式运行
1. 创建一个名为 hello-vue 的工程 vue init webpack hello-vue
2. 安装依赖,我们需要安装 vue-router、element-ui、sass-loader 和 node-sass 四个插件
# 进入工程目录
cd hello-vue
# 安装 vue-router
npm install vue-router --save-dev
# 安装 element-ui
npm i element-ui -S
# 安装依赖
npm install
# 安装 SASS 加载器
cnpm install sass-loader node-sass --save-dev
# 启动测试
npm run dev
3. Npm 命令解释
- npm install moduleName:安装模块到项目目录下
- npm install -g moduleName:-g 的意思是将模块安装到全局,具体安装到磁盘哪个位置,要看 npm config prefix 的位置
- npm install -save moduleName:–save 的意思是将模块安装到项目目录下,并在 package 文件的 dependencies 节点写入依赖,-S 为该命令的缩写
- npm install -save-dev moduleName:–save-dev 的意思是将模块安装到项目目录下,并在 package 文件的 devDependencies 节点写入依赖,-D 为该命令的缩写
二、创建登录页面
把没有用的初始化东西删掉!
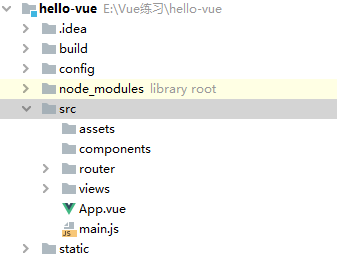
1)在源码目录中创建如下结构
- assets:用于存放资源文件
- components:用于存放 Vue 功能组件
- views:用于存放 Vue 视图组件
- router:用于存放 vue-router 配置
2)创建首页视图:在 views 目录下创建一个名为 Main.vue 的视图组件
<template>
  <div>
    <h1>首页</h1>
  </div>
</template>

<script>
  export default {
    name: "Main"
</script>

<style scoped>

</style>
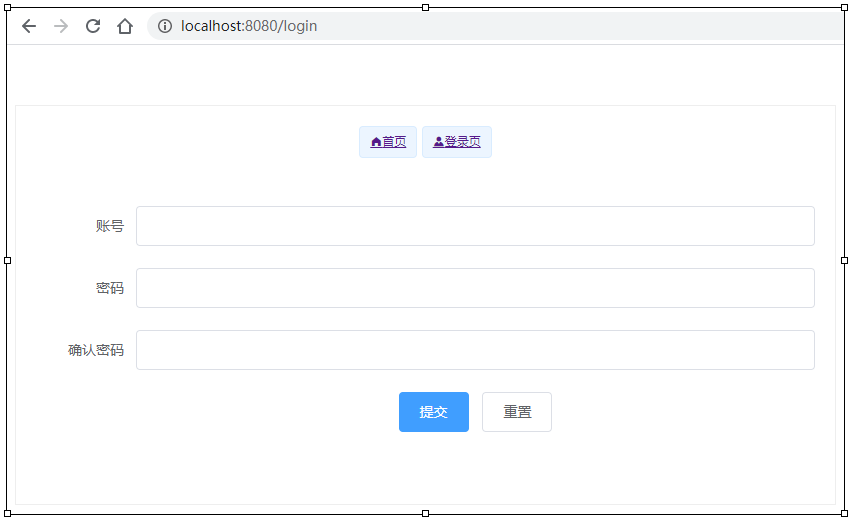
3)创建登录页视图:在 views 目录下创建一个名为 Login.vue 的视图组件,其中 el-… 的元素为 ElementUI 组件;
<template>
  <el-form :model="ruleForm" status-icon :rules="rules" ref="ruleForm" label-width="100px" class="demo-ruleForm">
    <el-form-item label="账号" prop="username">
      <el-input v-model.username="ruleForm.username"></el-input>
    </el-form-item>
    <el-form-item label="密码" prop="pass">
      <el-input type="password" v-model="ruleForm.pass" autocomplete="off"></el-input>
    </el-form-item>
    <el-form-item label="确认密码" prop="checkPass">
      <el-input type="password" v-model="ruleForm.checkPass" autocomplete="off"></el-input>
    </el-form-item>
    <el-form-item>
      <el-button type="primary" @click="submitForm('ruleForm')">提交</el-button>
      <el-button @click="resetForm('ruleForm')">重置</el-button>
    </el-form-item>
  </el-form>
</template>

<script>
  export default {
    name: "Login",
    data() {
      var validatePass = (rule, value, callback) => {
        if (value === '') {
          callback(new Error('请输入密码'));
        } else {
          if (this.ruleForm.checkPass !== '') {
            this.$refs.ruleForm.validateField('checkPass');
          }
          callback();
        }
      };
      var validatePass2 = (rule, value, callback) => {
        if (value === '') {
          callback(new Error('请再次输入密码'));
        } else if (value !== this.ruleForm.pass) {
          callback(new Error('两次输入密码不一致!'));
        } else {
          callback();
        }
      };
      return {
        /* 默认数据 */
        ruleForm: {
          pass: '',
          checkPass: ''
        },
        /* 校验数据 */
        rules: {
          pass: [
            {validator: validatePass, trigger: 'blur'}
          ],
          checkPass: [
            {validator: validatePass2, trigger: 'blur'}
          ]
        }
      };
    },
    methods: {
      /* 登录校验 */
      submitForm(formName) {
        this.$refs[formName].validate((valid) => {
          if (valid) {
            alert('submit!');
            this.$router.push({path: '/main'}); // 页面跳转
          } else {
            console.log('error submit!!');
            return false;
          }
        });
      },
      /* 重置输入 */
      resetForm(formName) {
        this.$refs[formName].resetFields();
      }
    }
  }
</script>

<style scoped>

</style>
4)创建路由:在 router 目录下创建一个名为 index.js 的 vue-router 路由配置文件
import Vue from 'vue' // 导入Vue
import VueRouter from 'vue-router' // 导入路由
// 导入组件
import Main from "../views/Main"
import Login from "../views/Login"

// 安装路由
Vue.use(VueRouter);

// 配置路由插件
export default new VueRouter({

  /* mode - 路由模式
      1)hash:路径带#号 http://localhost/main#/
      2)history:路径没有# http://localhost/main
  */
  mode: 'history',
  routes: [
    {
      /*首页*/
      path: '/main',
      name: 'main',
      component: Main,
    },
    {
      /*登录页*/
      path: '/login',
      name: 'login',
      component: Login
    }
  ]
})
5)配置路由:修改入口代码,修改 main.js 入口代码
import Vue from 'vue' //Vue组件
import App from './App' //App组件
import VueRouter from 'vue-router' // 路由组件
import router from './router' // 自动扫描配置里面的路由

// 引入 ElementUI 与其 CSS
import ElementUI from 'element-ui';
import 'element-ui/lib/theme-chalk/index.css';

// 安装路由
Vue.use(VueRouter)
Vue.use(ElementUI);

new Vue({
  el: '#app',
  router, // 配置路由
  render: h => h(App) // 启用ElementUI
});
6)修改 App.vue 组件代码
<template>
  <div id="app">
    <el-container style="height: 400px; border: 1px solid #eee; padding-top: 20px;">
      <!--顶栏容器-->
      <el-header>
        <el-tag>
          <router-link to="/main" class="el-icon-s-home">首页</router-link>
        </el-tag>
        <el-tag>
          <router-link to="/login" class="el-icon-s-custom">登录页</router-link>
        </el-tag>
      </el-header>
      <!--主要区域容器-->
      <el-main>
        <router-view/>
      </el-main>
    </el-container>
  </div>
</template>

<script>

  export default {
    name: 'App'
  }
</script>

<style>
  #app {
    font-family: 'Avenir', Helvetica, Arial, sans-serif;
    -webkit-font-smoothing: antialiased;
    -moz-osx-font-smoothing: grayscale;
    text-align: center;
    color: #2c3e50;
    margin-top: 60px;
  }

  .el-row {
    margin-bottom: 20px;

  &
  :last-child {
    margin-bottom: 0;
  }

  }
  .el-col {
    border-radius: 4px;
  }

  .bg-purple-dark {
    background: #99a9bf;
  }

  .bg-purple {
    background: #d3dce6;
  }

  .bg-purple-light {
    background: #e5e9f2;
  }

  .grid-content {
    border-radius: 4px;
    min-height: 36px;
  }

  .row-bg {
    padding: 10px 0;
    background-color: #f9fafc;
  }
</style>
7)测试:在浏览器打开 http://localhost:8080/#/login
如果出现错误: 可能是因为sass-loader的版本过高导致的编译错误,当前最高版本是8.x,需要退回到7.3.1 ;
去package.json文件里面的 "sass-loader"的版本更换成7.3.1,然后重新cnpm install就可以了;
三、路由嵌套
嵌套路由又称子路由,在实际应用中,通常由多层嵌套的组件组合而成。同样地,URL 中各段动态路径也按某种结构对应嵌套的各层组件,例如:
/user/foo/profile                     /user/foo/list
+------------------+                  +-----------------+
| User             |                  | User            |
| +--------------+ |                  | +-------------+ |
| | Profile      | |  +------------>  | | list       | |
| |              | |                  | |             | |
| +--------------+ |                  | +-------------+ |
+------------------+                  +-----------------+
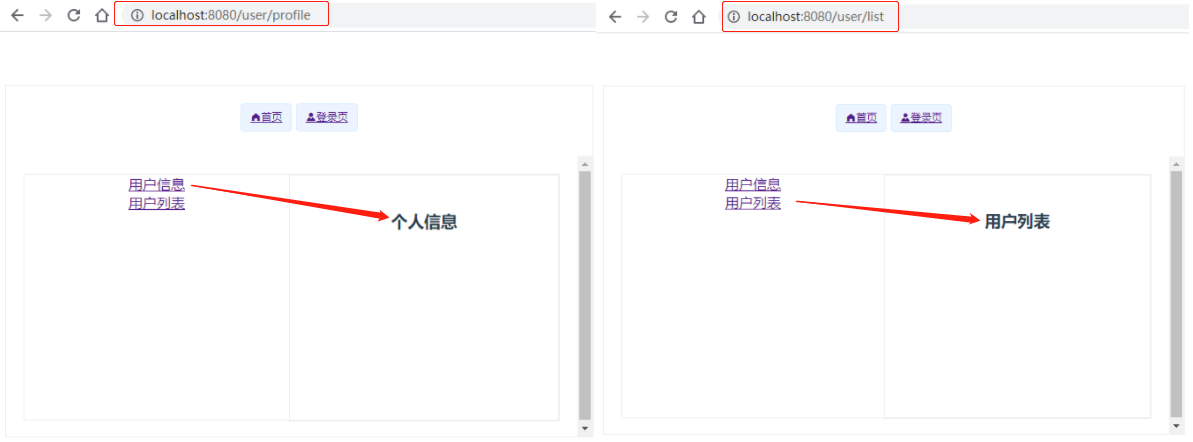
1)用户信息组件,在 views/user 目录下创建一个名为 Profile.vue 的视图组件;
<template>
  <h1>个人信息</h1></template>

<script>
  export default {
    name: "UserProfile"</script>

<style scoped>

</style>
2)用户列表组件,在 views/user 目录下创建一个名为 List.vue 的视图组件;
<template>
  <h1>用户列表</h1>
</template>

<script>
  export default {
    name: "UserList"
  }
</script>

<style scoped>

</style>
3)配置嵌套路由修改 router 目录下的 index.js 路由配置文件,代码如
import Vue from 'vue' // 导入Vue
import VueRouter from 'vue-router' // 导入路由
// 导入组件
import Main from "../views/Main"
import Login from "../views/Login"
import UserList from "../views/user/List"
import UserProfile from "../views/user/Profile"

// 安装路由
Vue.use(VueRouter);

// 配置路由插件
export default new VueRouter({
  mode: 'history',  // mode:路由模式
  routes: [
    {
      /*主页*/
      path: '/main',
      name: 'main',
      component: Main,
      children: [
        /*用户列表*/
        {path: '/user/list', component: UserList},
        /*用户信息*/
        {path: '/user/profile', component: UserProfile}
      ]
    },
    {
      /*登录页*/
      path: '/login',
      name: 'login',
      component: Login
    }
  ]
})
说明:主要在路由配置中增加了 children 数组配置,用于在该组件下设置嵌套路由
4)修改首页视图,我们修改 Main.vue 视图组件,此处使用了 ElementUI 布局容器组件,代码如下:
<template>
  <el-container style="height: 280px; border: 1px solid #eee">
    <!--侧边栏-->
    <el-aside>
      <router-link to="/user/profile">用户信息</router-link><br/>
      <router-link to="/user/list">用户列表</router-link>
    </el-aside>
    <!--内容页-->
    <el-main style="height: 280px; border: 1px solid #eee">
      <router-view/><!--路由显示-->
    </el-main>
  </el-container>
</template>

<script>
  export default {
    name: "Main",
    data() {
      return {
        activeNames: ['1']
      };
    },
    methods: {
      handleChange(val) {
        console.log(val);
      }
    }
  }
</script>

<style scoped>

</style>
说明:在 <el-main> 元素中配置了 <router-view /> 用于展示嵌套路由,主要使用 <router-link to="/user/profile">个人信息</router-link>展示嵌套路由内容
四、参数传递
我们经常需要把某种模式匹配到的所有路由,全都映射到同个组件。例如,我们有一个 User 组件,对于所有 ID 各不相同的用户,都要使用这个组件来渲染。此时我们就需要传递参数了;
1. 修改路由配置,主要是在 path 属性中增加了 :id 这样的占位符
/*用户信息*/
{path: '/user/profile/:id', name: 'user_profile', component: UserProfile}
2. 传递参数
将 to 改为了 :to,是为了将这一属性当成对象使用,注意 router-link 中的 name 属性名称 一定要和路由中的 name 属性名称匹配,因为这样 Vue 才能找到对应的路由路径;
<!-- name:组件名 params:参数 -->
<router-link :to="{name:'user_profile',params:{id:888888}}">用户信息</router-link>
3. 接收参数,在目标组件中
用户ID-1: {{$route.params.id }}
1)使用 props 方式
1. 修改路由配置,主要增加了 props:true 属性
{path: '/user/profile/:id', name: 'user_profile', component: UserProfile, props: true }
2. 传递参数和之前一样
3. 接收参数为目标组件增加 props 属性
<template>
  <div>
    <h1>个人信息</h1>
    用户ID: {{id }}
  </div>
</template>

<script>
  export default {
    props: ['id'],/*获取参数*/
    name: "UserProfile"
  }
</script>

<style scoped>

</style>
2)组件重定向
重定向的意思大家都明白,但 Vue 中的重定向是作用在路径不同但组件相同的情况下,比如:
routes: [
  {
    /*首页*/
    path: '/main',
    name: 'main',
    component: Main,
  },
  {
    /*回到首页*/
    path: '/goHome',
    redirect: '/main'
  },
]
说明:这里定义了两个路径,一个是 /main ,一个是 /goHome,其中 /goHome 重定向到了 /main 路径,由此可以看出重定向不需要定义组件;
使用的话,只需要设置对应路径即可;
<router-link to="/goHome">重定向->首页</router-link>
五、路由模式与404
1)路由模式
路由模式有两种
- hash:路径带 # 符号,如 http://localhost/#/login
- history:路径不带 # 符号,如 http://localhost/login
修改路由配置,代码如下:index.js
export default new Router({
  mode: 'history',
  routes: [
  ]
});
2)处理 404
处理 404 创建一个名为 NotFound.vue 的视图组件,代码如下:
<template>
  <h1 style="color: red">404 >>> 你的页面失踪了 ┗( T﹏T )┛</h1>
</template>

<script>
  export default {
    name: "NotFound"
  }
</script>

<style scoped>

</style>
修改路由配置,代码如下:
import NotFound from '../views/NotFound'
{
  path: '*',
  component: NotFound
}
六、路由钩子与异步请求
1)钩子函数
- beforeRouteEnter:在进入路由前执行
- beforeRouteLeave:在离开路由前执行
上代码:
export default {
  props: ['id'],
  name: "UserProfile",
  /* 进入路由之前 */
  beforeRouteEnter: (to, from, next) => {
    console.log("beforeRouteEnter 11111");
    next();
  },
  /* 进入路由之后*/
  beforeRouteLeave: (to, from, next) => {
    console.log("beforeRouteLeave 22222");
    next();
  }
}
参数说明:
- to:路由将要跳转的路径信息
- from:路径跳转前的路径信息
- next:路由的控制参数
- next() 跳入下一个页面
- next(’/path’) 改变路由的跳转方向,使其跳到另一个路由
- next(false) 返回原来的页面
- next((vm)=>{}) 仅在 beforeRouteEnter 中可用,vm 是组件实例
2)异步请求:在钩子函数中使用异步请求
1. 安装 Axios cnpm install axios -s
2. main.js引用 Axios
// 导入Axios
import axios from "axios";
import VueAxios from "vue-axios";

/* Vue结合Axios */
Vue.use(VueAxios, axios)
3. 准备数据 : 只有我们的 static 目录下的文件是可以被访问到的,所以我们就把静态文件放入该目录下。
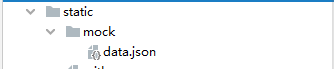
// 静态数据存放的位置
static/mock/data.json
4. 在 beforeRouteEnter 中进行异步请求
export default {
  props: ['id'],/*获取参数 方式2*/
  name: "UserProfile",
  /* 进入路由之前 */
  beforeRouteEnter: (to, from, next) => {
    console.log("beforeRouteEnter 11111");
    next(vm => vm.getData()); //注意,一定要在 next 中请求,因为该方法调用时 Vue 实例还没有创建,此时无法获取到 this 对象,在这里使用官方提供的回调函数拿到当前实例
  },
  /* 进入路由之后*/
  beforeRouteLeave: (to, from, next) => {
    console.log("beforeRouteLeave 22222");
    next();
  },
  methods: {
    getData: function () {
      /* axios请求 */
      this.axios({
        method: 'get',
        url: 'http://localhost:8080/static/mock/data.json'
      }).then(function (response) {
        console.log(response.data)
      });
    }
  }
}