Spring Cloud 多环境配置Eureka Server高可用
上一章讲了配置一个环境的不同节点,最终打包成不同的jar包,从而实现eureka-server高可用。
本章内容将讲解在一个文件中配置多个节点环境,并通过多个配置文件实现不同环境的配置,如开发环境dev,测试环境test,生产环境prod等
本项目中的配置可以直接拷贝用于开发框架的搭建,以及学习等使用。
1. 创建项目
1.1 创建maven项目,并删除src目录
1.2 创建eureka-server项目
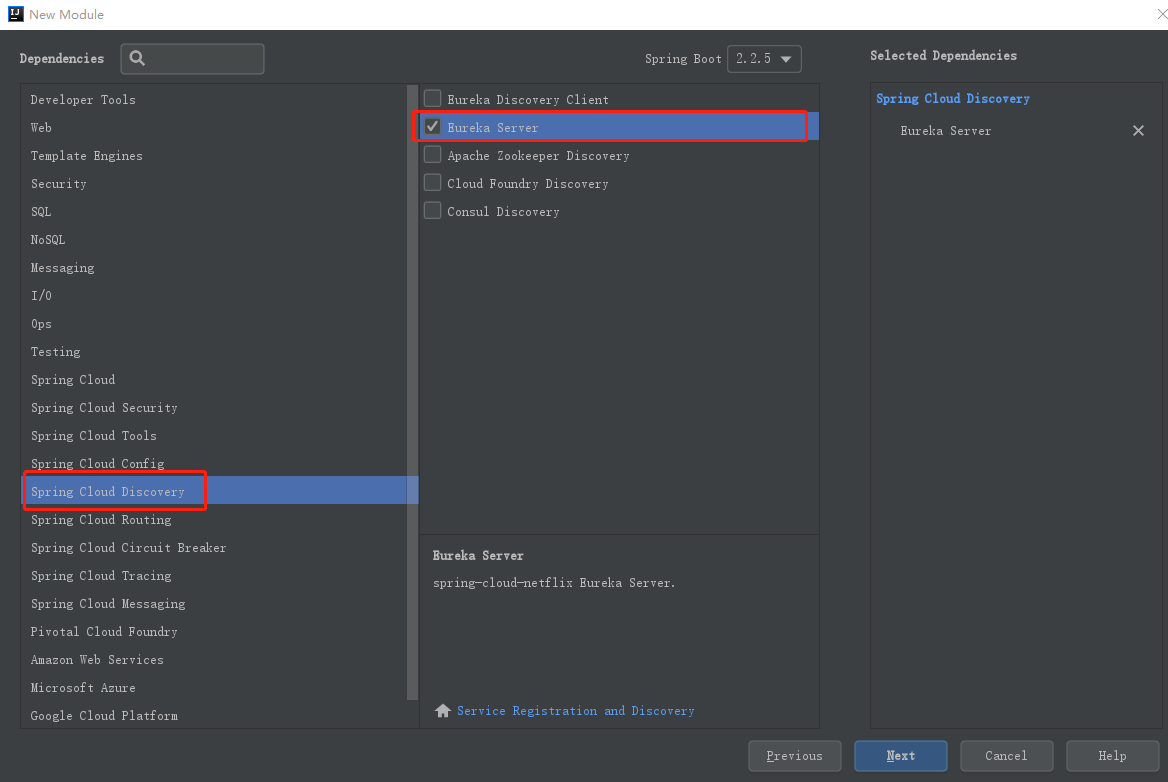
1.2.1 在pom文件中添加如下依赖
       <dependency>
            <groupId>org.springframework.boot</groupId>
            <artifactId>spring-boot-starter-security</artifactId>
            <scope>compile</scope>
        </dependency>

        <dependency>
            <groupId>org.springframework.boot</groupId>
            <artifactId>spring-boot-starter-actuator</artifactId>
        </dependency>

        <dependency>
            <groupId>org.springframework.cloud</groupId>
            <artifactId>spring-cloud-starter-sleuth</artifactId>
        </dependency>
1.2.2 在启动类上加上 @EnableEurekaServer
package com.devin.eurekaserver;

import org.springframework.boot.SpringApplication;
import org.springframework.boot.autoconfigure.SpringBootApplication;
import org.springframework.cloud.netflix.eureka.server.EnableEurekaServer;

@EnableEurekaServer
@SpringBootApplication
public class EurekaServerApplication {

    public static void main(String[] args) {
        SpringApplication.run(EurekaServerApplication.class, args);
    }

}
1.2.3 创建安全校验的Config配置类
package com.devin.eurekaserver.config;

import org.springframework.security.config.annotation.web.builders.HttpSecurity;
import org.springframework.security.config.annotation.web.configuration.EnableWebSecurity;
import org.springframework.security.config.annotation.web.configuration.WebSecurityConfigurerAdapter;

@EnableWebSecurity
public class WebSecurityConfig extends WebSecurityConfigurerAdapter {

    @Override
    protected void configure(HttpSecurity http) throws Exception {
        // 加这句是为了访问eureka控制台和/actuator时能做安全控制
        super.configure(http);
        http.csrf().disable();
    }
}
2. 配置eureka-server
新建一个application.yml 用于一些公共的配置,application-dev.yml 用于开发环境的配置,application-test.yml 用于测试环境的配置
2.1 application.yml 配置内容
spring:
  profiles:
    active: dev
  #应用名称
  application:
    name: eureka-server

#eureka配置
eureka:
  server:
    #设置扫描失效服务的间隔时间
    eviction-interval-timer-in-ms: 20000
    enable-self-preservation: true
  instance:
    leaseRenewalIntervalInSeconds: 10
    health-check-url-path: /actuator/health

# health endpoint是否必须显示全部细节。默认情况下, /actuator/health 是公开的,并且不显示细节。
# 设置actuator开关
management:
  security:
    enabled: false
  endpoints:
    web:
      exposure:
        include: "*"
  endpoint:
    health:
      show-details: ALWAYS
2.2 开发环境多节点的配置 application-dev.yml
在配置文件中配置了两个节点node1和node2 ,两个节点互相注册,以实现高可用,并且启用了spring security对服务做安全拦截
开发环境配置人如下:
| 节点 | IP | 端口 | 访问账号服务密码 |
| node1 |
localhost |
7001 | dev/123456 |
| node2 |
localhost |
7002 | dev/123456 |
#默认启动节点
---
server:
  port: 7001 #启动端口
eureka:
  instance:
    hostname: localhost
  server:
    enable-self-preservation: false
  client:
    register-with-eureka: false  #false:不作为一个客户端注册到注册中心
    fetch-registry: false        #为true时,可以启动,但报异常:Cannot execute request on any known server
    service-url:
      defaultZone: http://${eureka.instance.hostname}:${server.port}/eureka/

#安全配置
spring:
  security:
    basic:
      enabled: true
    user:
      name: dev
      password: 123456

management:
  endpoints:
    web:
      exposure:
        include: "*"
  endpoint:
    health:
      show-details: always

#node1 server
---
spring:
  profiles: node1
  #安全配置
  security:
    basic:
      enabled: true
    user:
      name: dev
      password: 123456

server:
  port: 7001
eureka:
  instance:
    hostname: localhost
    prefer-ip-address: true
    instance-id: ${spring.cloud.client.ip-address}:${server.port}
    lease-renewal-interval-in-seconds: 5
    lease-expiration-duration-in-seconds: 10
  client:
    register-with-eureka: true
    fetch-registry: true        #为true时,可以启动,但报异常:Cannot execute request on any known server
    service-url:
      defaultZone: http://${spring.security.user.name}:${spring.security.user.password}@localhost:7002/eureka/


#node2 server
---
spring:
  profiles: node2
  #安全配置
  security:
    basic:
      enabled: true
    user:
      name: dev
      password: 123456

server:
  port: 7002
eureka:
  instance:
    hostname: localhost
    prefer-ip-address: true
    instance-id: ${spring.cloud.client.ip-address}:${server.port}
    lease-renewal-interval-in-seconds: 5
    lease-expiration-duration-in-seconds: 10
  client:
    register-with-eureka: true
    fetch-registry: true        #为true时,可以启动,但报异常:Cannot execute request on any known server
    service-url:
      defaultZone: http://${spring.security.user.name}:${spring.security.user.password}@localhost:7001/eureka/
直接启动的话,会默认运行7001端口,如果要本机验证两个节点互相注册,则需要打包成一个jar包,并分别用如下命令启动
启用node1
java -jar eureka-server-0.0.1-SNAPSHOT.jar --spring.profiles.active=dev,node1
启动node2
java -jar eureka-server-0.0.1-SNAPSHOT.jar --spring.profiles.active=dev,node2
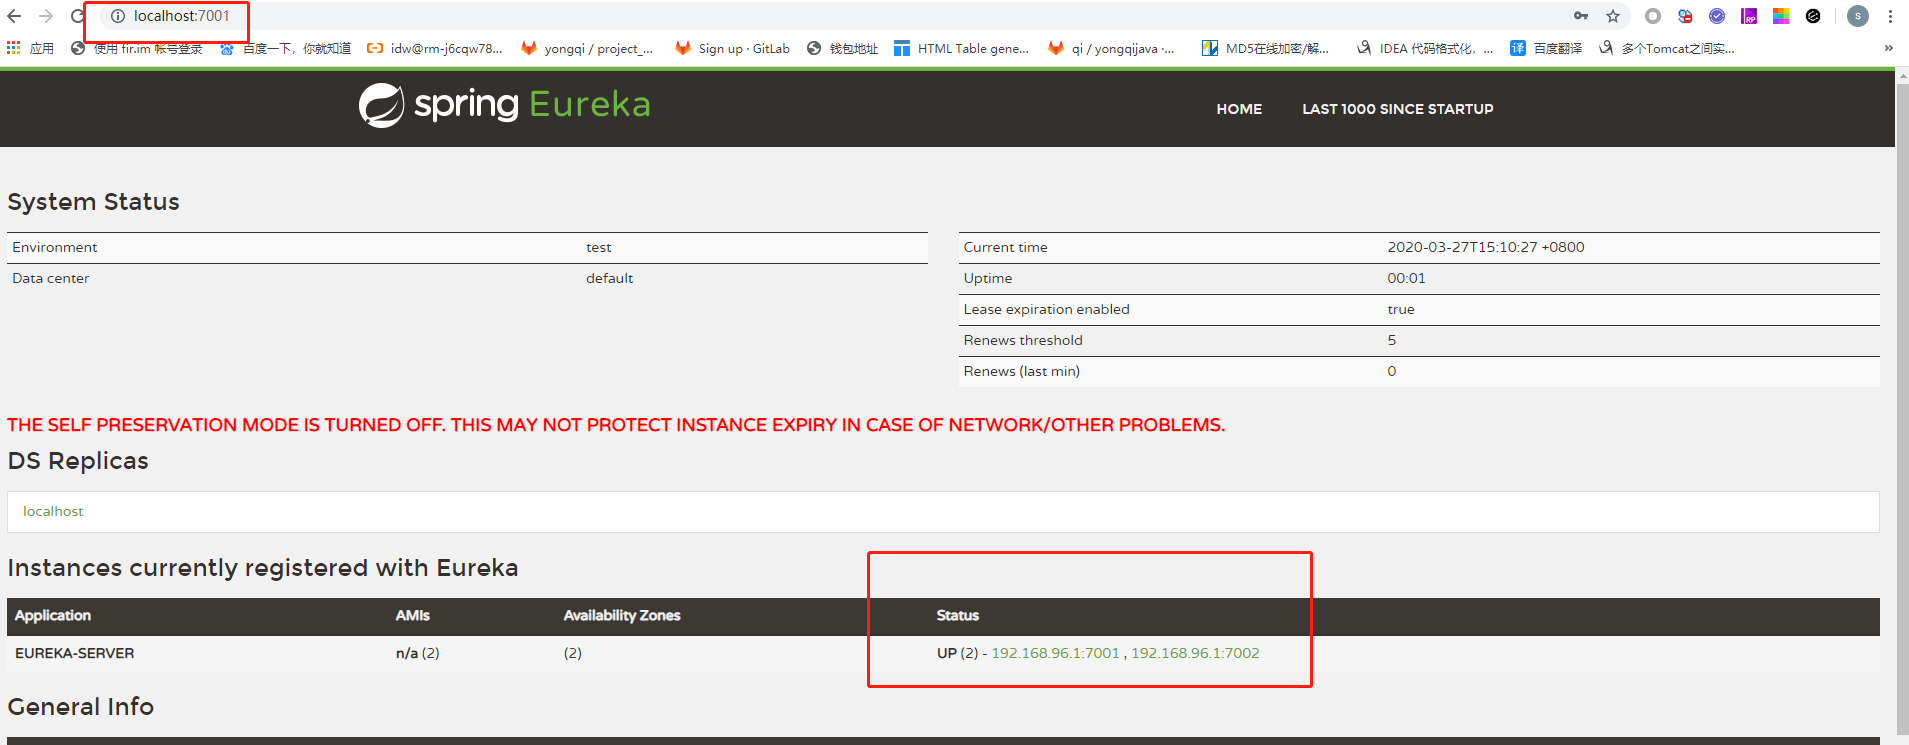
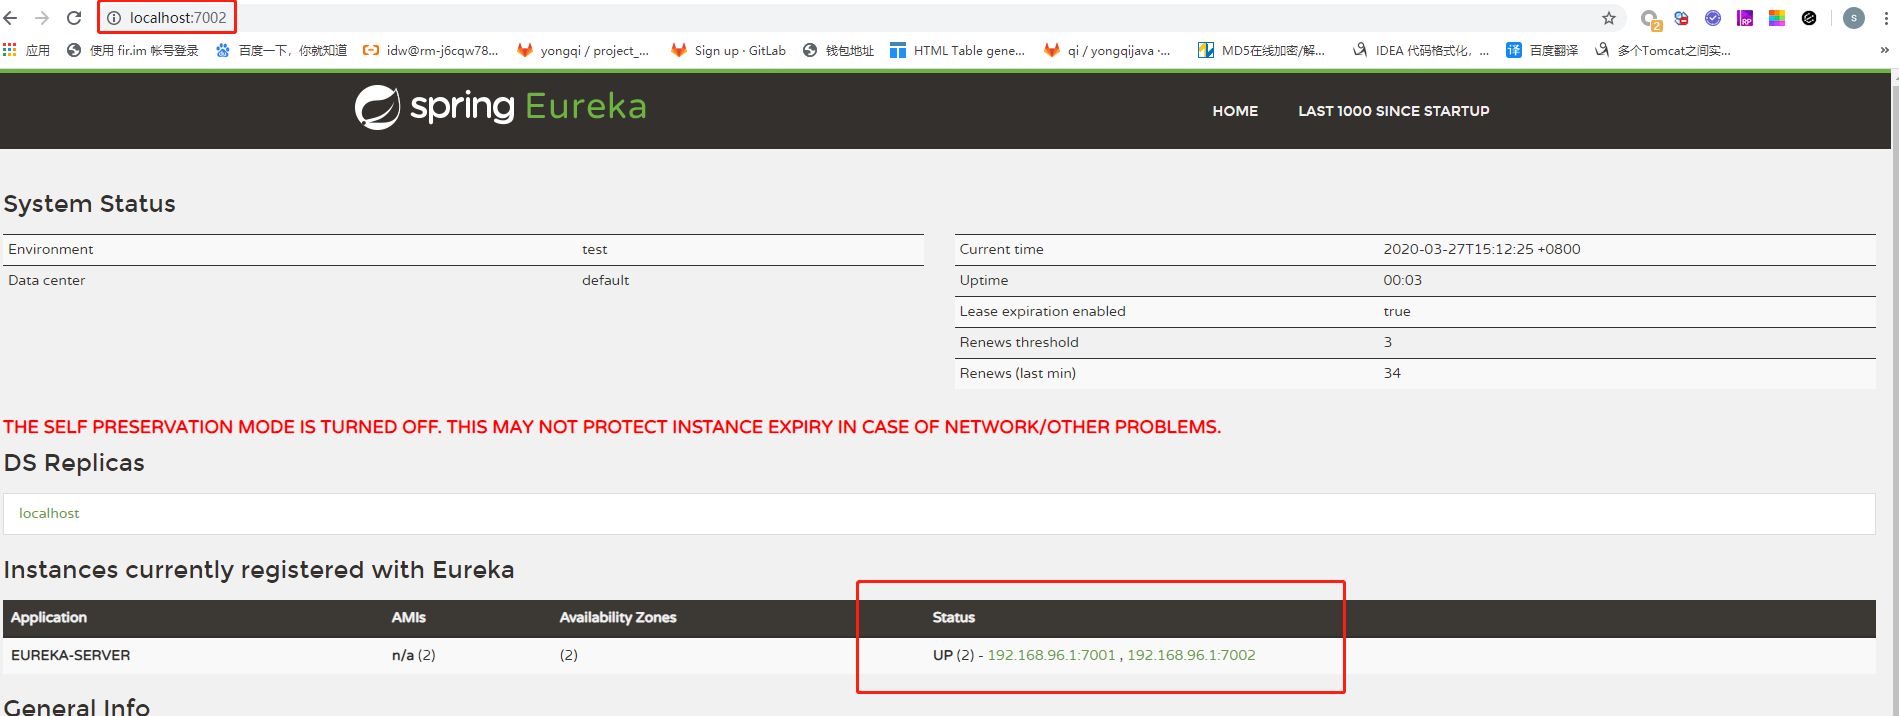
启动后,分别访问 localhost:7001/ 和 localhost:7002 ,输入用户名密码 dev/123456,即可看到node1和node2已经相互注册
2.3 测试环境多节点的配置 application-test.yml
在2.2中我们对开发环境进行了配置,接下来我们对测试环境进行配置,配置的内容基本和开发环境的配置类似,只是测试环境的节点的hostname为具体的IP地址,并且测试环境的访问的spring security账号密码也有变化
测试环境的配置如下
| 节点 | IP | 端口 | 访问账号服务密码 |
| node1 |
192.168.0.163/192.168.96.1
|
7001 | dev-test/test123456 |
| node2 |
192.168.0.223
|
7001 | dev-test/test123456 |
#node1 server
---
spring:
  profiles: node1
  #安全配置
  security:
    basic:
      enabled: true
    user:
      name: dev-test
      password: test123456

server:
  port: 7001
eureka:
  instance:
    hostname: 192.168.0.163
    prefer-ip-address: true
    instance-id: ${spring.cloud.client.ip-address}:${server.port}
    lease-renewal-interval-in-seconds: 5
    lease-expiration-duration-in-seconds: 10
  client:
    register-with-eureka: true
    fetch-registry: true        #为true时,可以启动,但报异常:Cannot execute request on any known server
    service-url:
      defaultZone: http://${spring.security.user.name}:${spring.security.user.password}@192.168.0.223:7001/eureka/


#node2 server
---
spring:
  profiles: node2
  #安全配置
  security:
    basic:
      enabled: true
    user:
      name: dev-test
      password: test123456

server:
  port: 7001
eureka:
  instance:
    hostname: 192.168.0.223
    prefer-ip-address: true
    instance-id: ${spring.cloud.client.ip-address}:${server.port}
    lease-renewal-interval-in-seconds: 5
    lease-expiration-duration-in-seconds: 10
  client:
    register-with-eureka: true
    fetch-registry: true        #为true时,可以启动,但报异常:Cannot execute request on any known server
    service-url:
      defaultZone: http://${spring.security.user.name}:${spring.security.user.password}@192.168.0.163:7001/eureka/
启动节点

在IP为 192.168.0.163 的环境启动node1,启动命令如下:

java -jar eureka-server-0.0.1-SNAPSHOT.jar --spring.profiles.active=test,node1
在IP为 192.168.0.223 的环境启动node2,启动命令如下:

java -jar eureka-server-0.0.1-SNAPSHOT.jar --spring.profiles.active=test,node2
启动后,可以通过 http://192.168.0.163:7001 和 http://192.168.0.223:7001 输入用户名密码 dev-test/test123456 查看两台已经互相注册
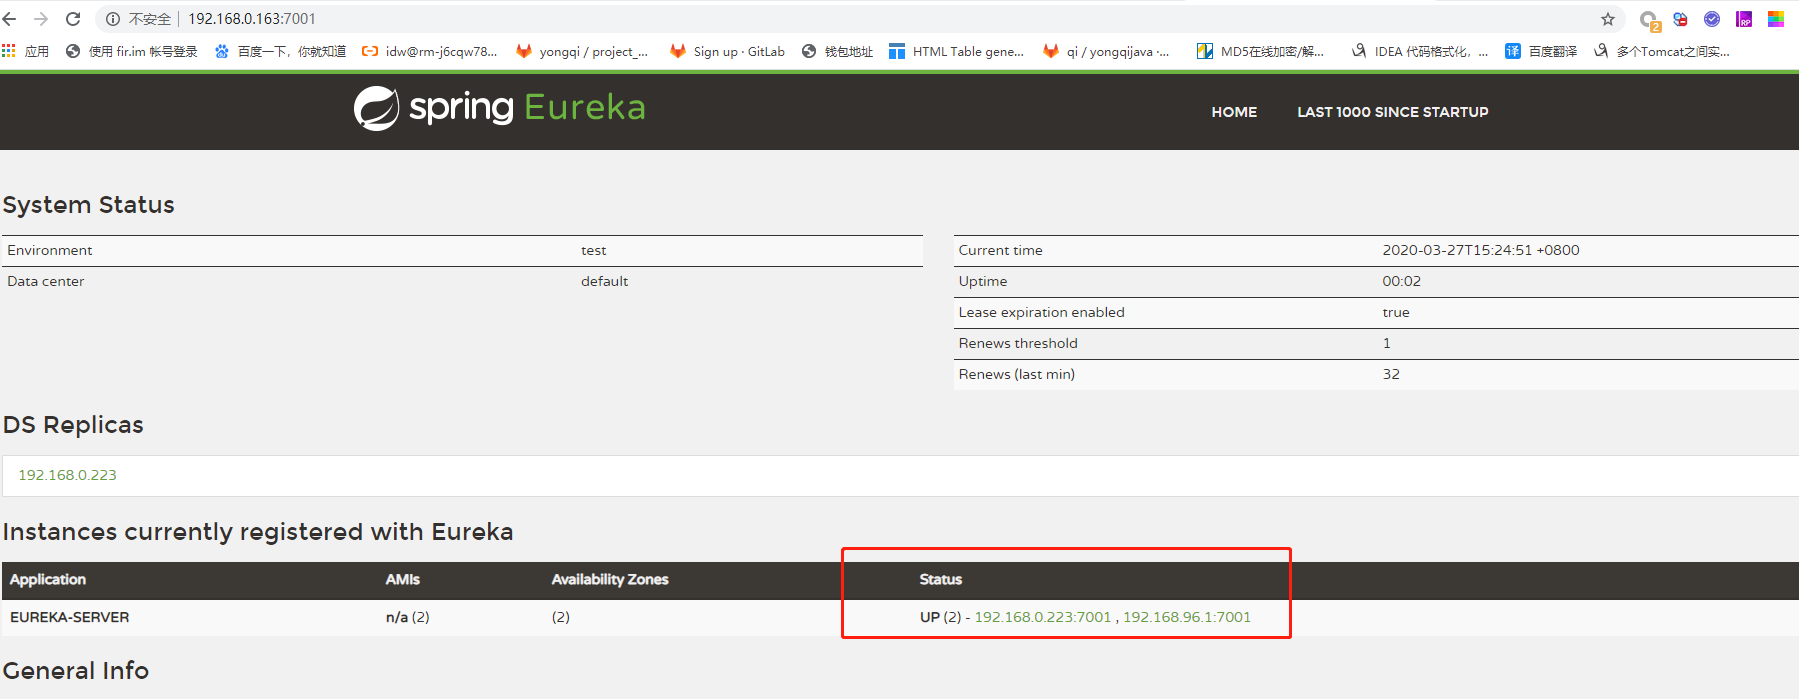
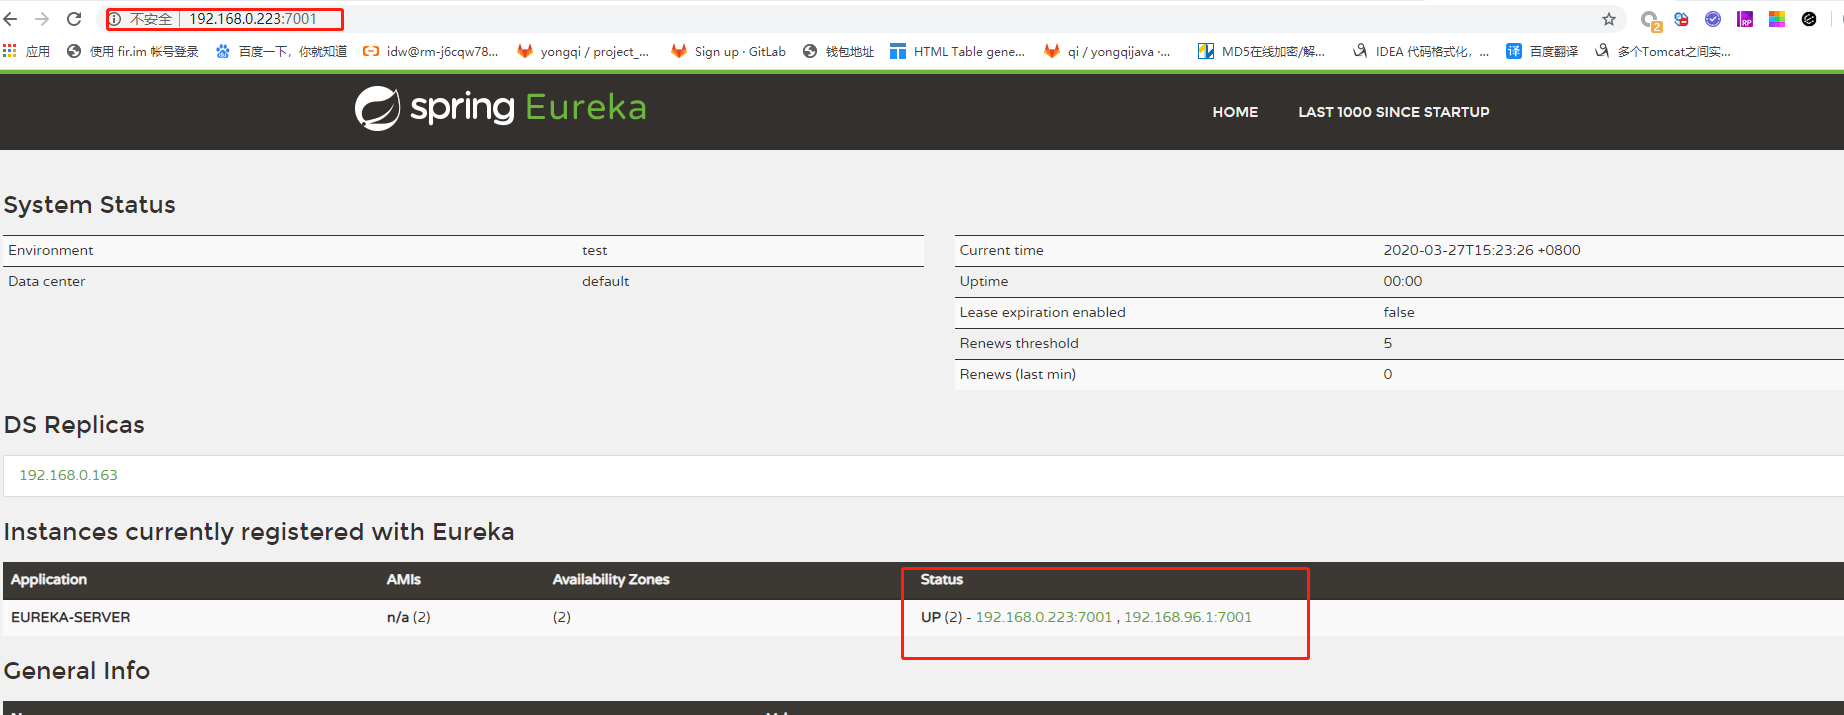
ps: 根据对开发环境和测试环境的配置,我们后续也可以配置出更多环境配置文件,如仿真环境,生产环境等,配置时我们只需要拷贝一个测试环境的配置文件并将环境的IP地址进行替换即可完成新环境的配置。


3. Eureka Client注册

新建一个Eureka Client ,并只向 192.168.0.163:7001/eureka/ 注册,注册完成后,另外一台 注册中心 192.168.0.223:7001/eureka/ 会自动同步客户端的注册信息
3.1 Eureke Client pom配置
       <dependency>
            <groupId>org.springframework.cloud</groupId>
            <artifactId>spring-cloud-starter-netflix-eureka-client</artifactId>
        </dependency>

        <dependency>
            <groupId>org.springframework.boot</groupId>
            <artifactId>spring-boot-starter-web</artifactId>
            <version>2.1.8.RELEASE</version>
        </dependency>
3.2 Eureke Client 启动类
package com.devin.eurekaclient;

import org.springframework.boot.SpringApplication;
import org.springframework.boot.autoconfigure.SpringBootApplication;
import org.springframework.cloud.netflix.eureka.EnableEurekaClient;

@EnableEurekaClient
@SpringBootApplication
public class EurekaClientApplication {

    public static void main(String[] args) {
        SpringApplication.run(EurekaClientApplication.class, args);
    }

}
3.3 Eureka Client application.yml 配置文件
eureka:
  auth:
    user: dev-test
    password: test123456
  client:
    serviceUrl:
      defaultZone: http://${eureka.auth.user}:${eureka.auth.password}@192.168.0.163:7001/eureka/
  instance:
    #使用IP进行注册
    prefer-ip-address: true
    #配置实例的注册ID
    instance-id: ${spring.cloud.client.ip-address}:${server.port}
    #心跳时间,即服务续约间隔时间(缺省为30s)
    lease-renewal-interval-in-seconds: 5
    #发呆时间,即服务续约到期时间(缺省为90s)
    lease-expiration-duration-in-seconds: 10
    health-check-url-path: /actuator/health
server:
  port: 7003
spring:
  application:
    name: eureka-client
启动 Eureka-Client ,可以看到 Eureka-client 已经在两台Eureka-Server 进行了注册
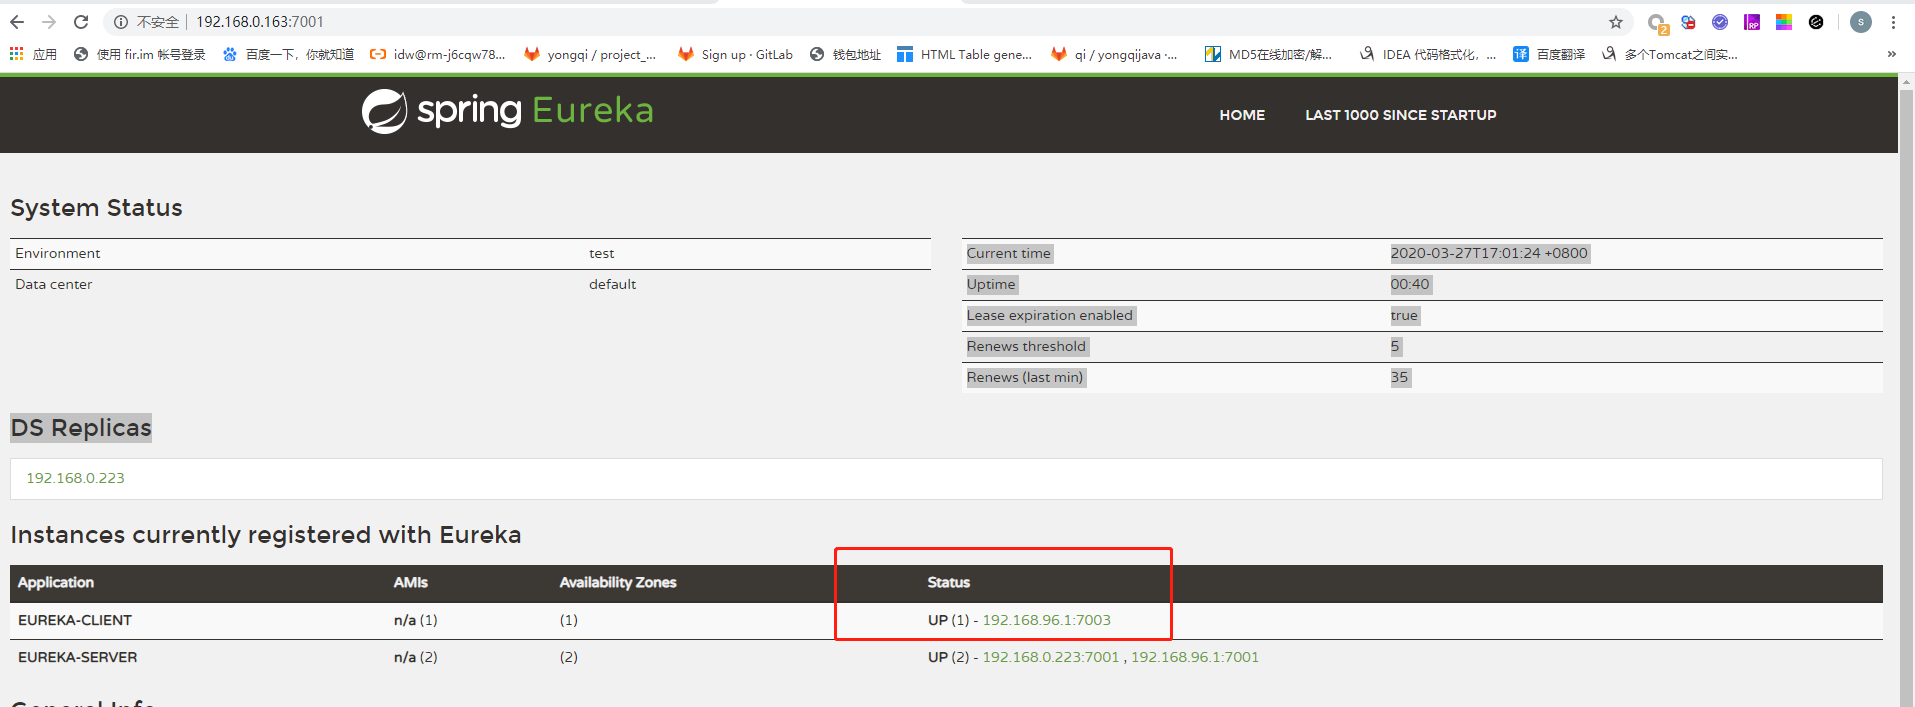
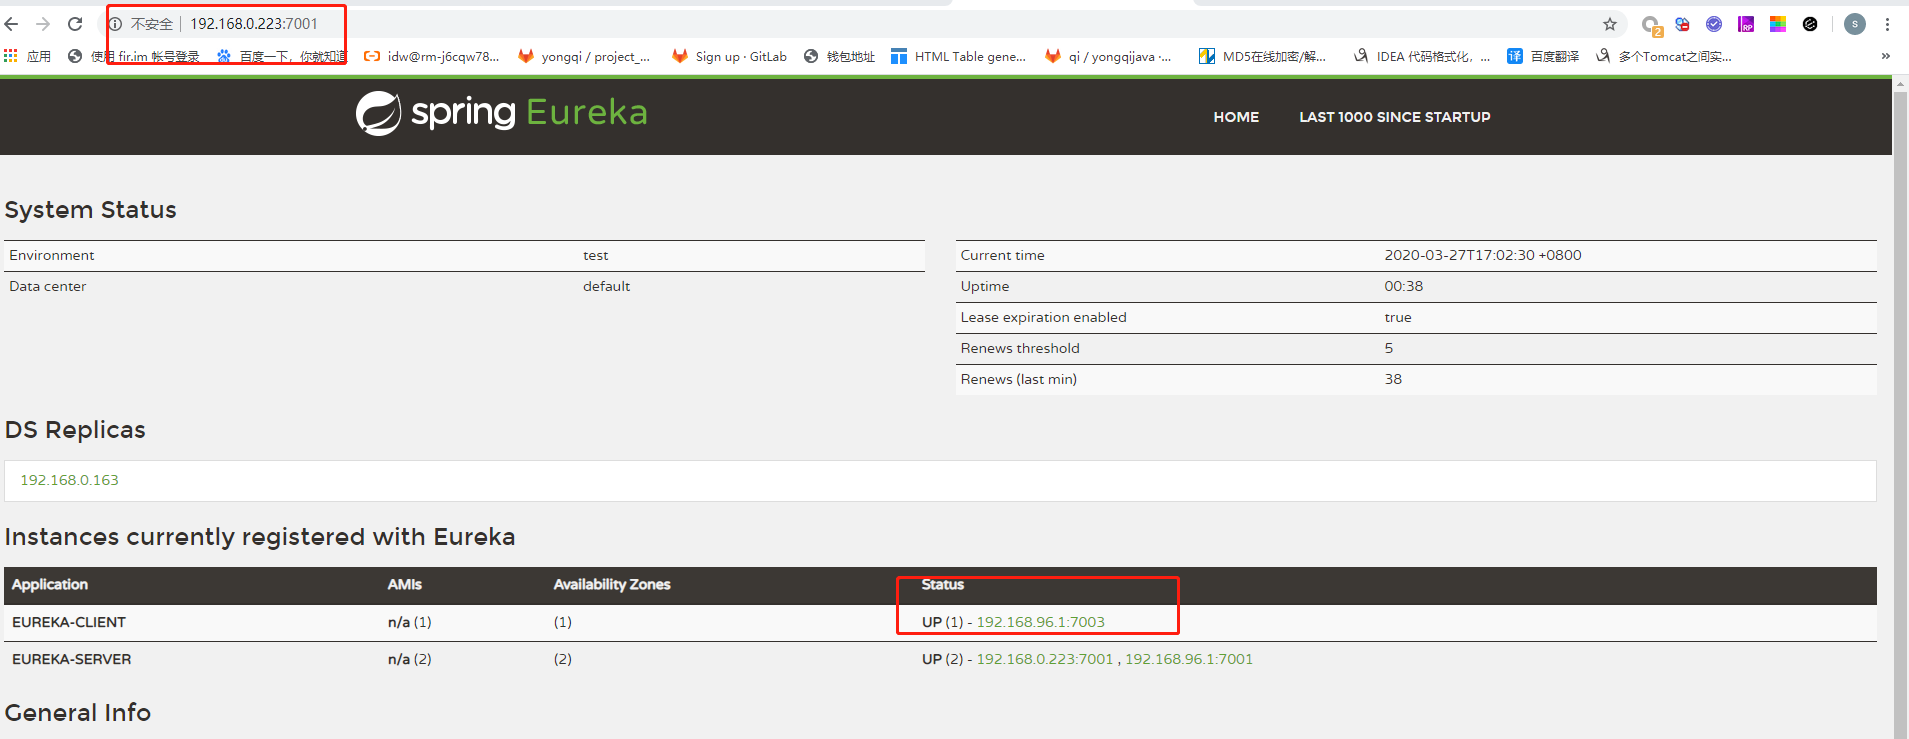
至此,测试环境的配置完毕。


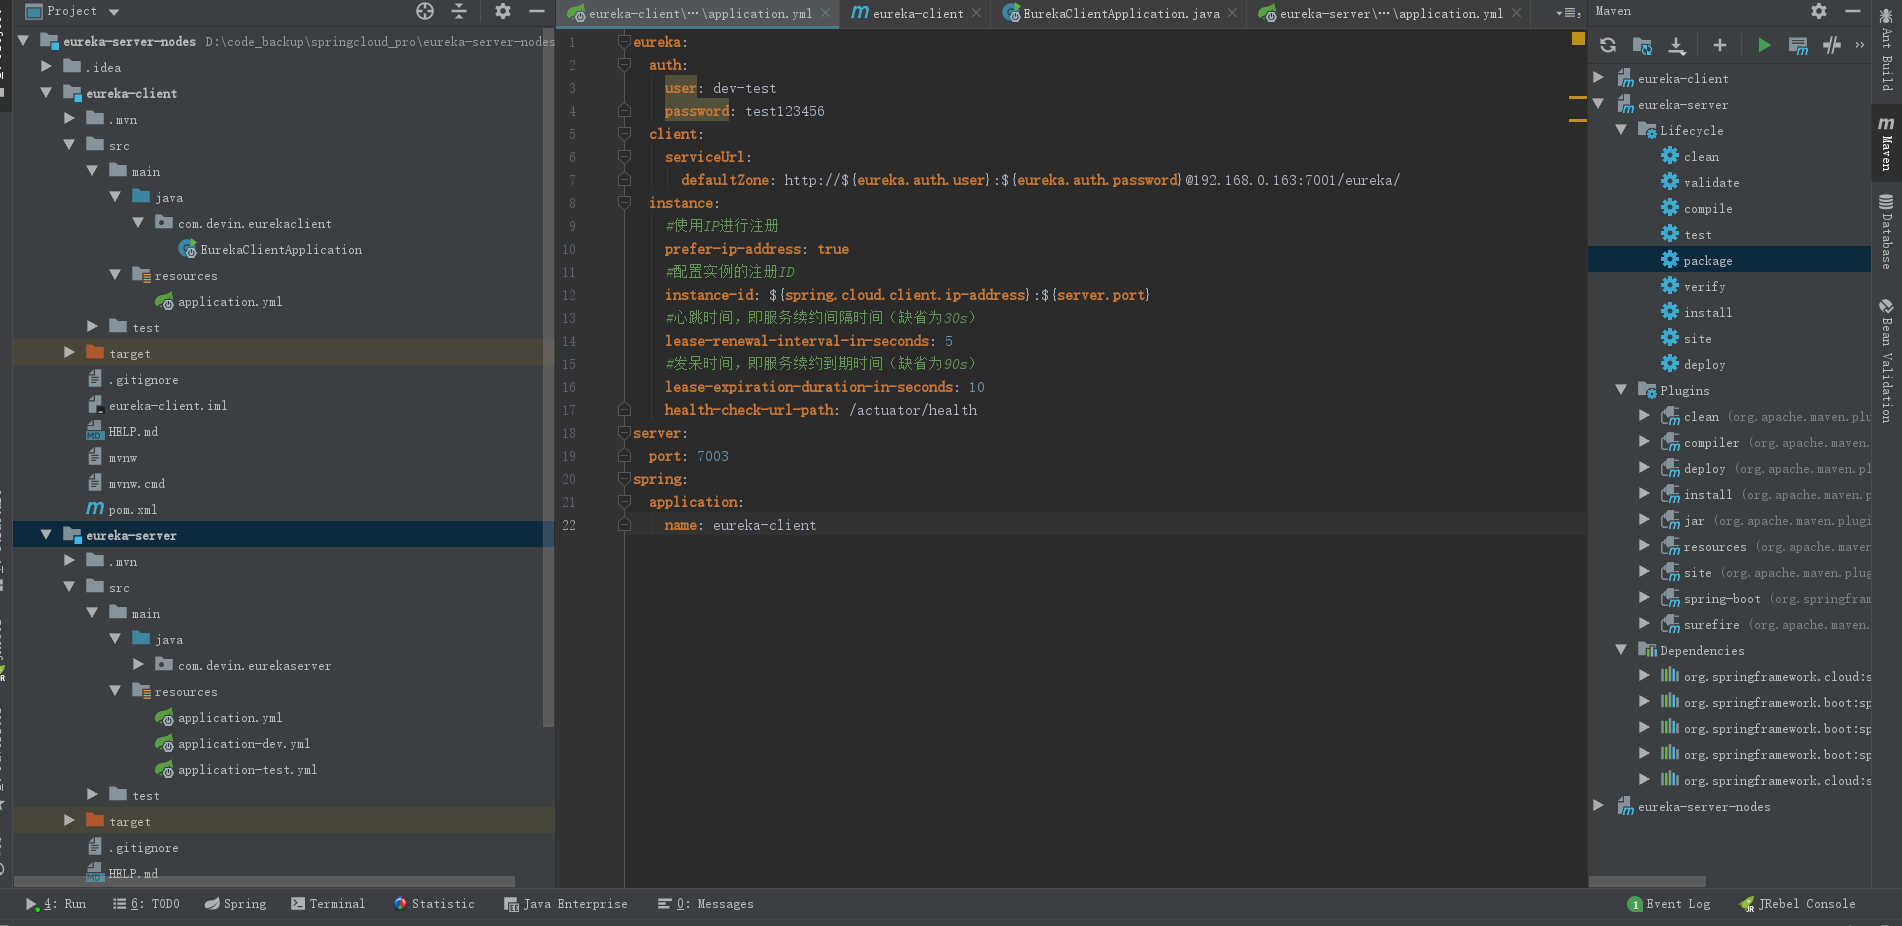
项目的结构如下:
