可参考博客:https://blog.csdn.net/cxjoker/article/details/79501887
完整代码如下:
trees.py
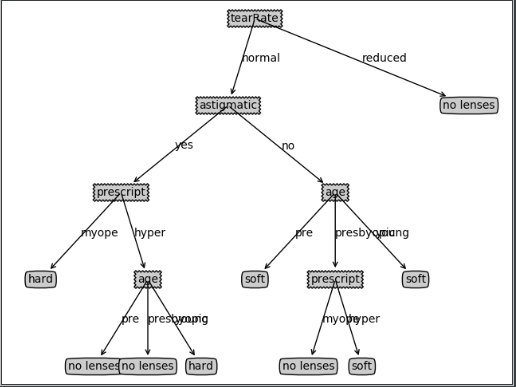
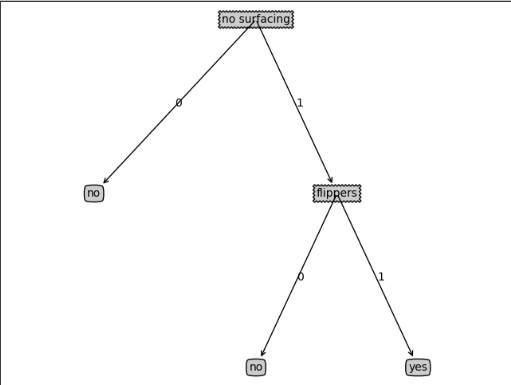
  1 from math import log
  2 import operator
  3 import treePlotter
  4 import pickle
  5
  6
  7 def calcShannonEnt(dataSet):
  8     numEntries = len(dataSet)  # 数据集中实例的总数
  9     labelCounts = {}  # 创建一个数据字典,它的键值是最后一列的数值
 10     for featVec in dataSet:
 11         currentLabel = featVec[-1]  # 当前的标签是最后一列的数值
 12         if currentLabel not in labelCounts.keys():  # 如果当前键值不在字典里,则扩展字典并将当前键值加入字典
 13             labelCounts[currentLabel] = 0
 14         labelCounts[currentLabel] += 1  # 每个键值都记录了当前类别出现的次数
 15     shannonEnt = 0.0
 16     for key in labelCounts:
 17         prob = float(labelCounts[key])/numEntries  # 使用所有类标签的发生频率计算类别出现的概率,并用此概率计算香浓熵
 18         shannonEnt -= prob * log(prob, 2)  # log默认以e为底,这里是以2为底
 19     return shannonEnt
 20
 21
 22 def creatDataSet():
 23     dataSet = [[1,1,'yes'],[1,1,'yes'],[1,0,'no'],[0,1,'no'],[0,1,'no']]  # 特征的值和类别标签
 24     labels = ['no surfacing', 'flippers']  # 特征的名称
 25     return dataSet, labels
 26
 27
 28 def splitDataSet(dataSet, axis, value):
 29     '''
 30     :param dataSet:待划分的数据集
 31     :param axis: 划分数据集的特征
 32     :param value: 特征的值
 33     :return: 由特征划分好的数据集
 34     '''
 35     retDatSet = []
 36     for featVec in dataSet:  # 遍历整个数据集的实例样本
 37         if featVec[axis] == value:
 38             # 如果实例特征的值与要求的值相等则将其添加到新创建的列表中,
 39             # 计算熵时仅根据label出现的概率进行计算,和新列表中保存下来的特征无关
 40             reducedFeatVec = featVec[:axis]
 41             reducedFeatVec.extend(featVec[axis+1:])
 42             retDatSet.append(reducedFeatVec)  # 划分后的新列表
 43     return retDatSet
 44
 45
 46 def chooseBestFeaturetoSplit(dataSet):
 47     # 实现选取特征,划分数据集,计算得出最好的划分数据集的特征
 48     numFeatures = len(dataSet[0]) - 1  # 当前数据集包含的特征数量
 49     baseEntropy = calcShannonEnt(dataSet)   # 计算整个数据集的原始香浓熵
 50     bestInfoGain = 0.0; bestFeature = -1
 51     for i in range(numFeatures):  # 遍历数据集中的所有特征
 52         featList = [example[i] for example in dataSet]
 53         uniqueVals = set(featList)  # 集合(set)是一个无序的不重复元素序列。去掉重复元素
 54         # 集合数据类型与列表类型相似,不同之处在于集合类型中的每个值互不相同。
 55         # 从列表中创建集合是Python语言得到列表中唯一元素值的最快方法。
 56         newEntropy = 0.0
 57         for value in uniqueVals:  # 遍历当前特征中的所有唯一属性值
 58             subDataSet = splitDataSet(dataSet, i, value)  # 对每个唯一属性值划分一次数据集
 59             prob = len(subDataSet)/float(len(dataSet))
 60             newEntropy += prob * calcShannonEnt(subDataSet)
 61             # 对划分后的新数据集计算香浓熵并对所有唯一特征值得到的熵求和
 62         infoGain = baseEntropy - newEntropy  # 信息增益是熵的减少或者是数据无序度的减少
 63         if(infoGain > bestInfoGain):  # 比较所有特征中的信息增益,返回最好特征划分的索引值
 64             bestInfoGain = infoGain
 65             bestFeature = i
 66     return bestFeature
 67
 68
 69 def majorityCnt(classList):
 70     classCount = {}
 71     for vote in classList:
 72         if vote not in classCount.keys(): classCount[vote] = 0
 73         classCount[vote] += 1  # 字典对象存储classList中每个类标签出现的频率
 74     sortedClassCount = sorted(classCount.items(), key=operator.itemgetter(1), reverse=True)
 75     # 使用operator操作键值排序字典,并返回出现次数最多的分类名称
 76     return sortedClassCount[0][0]
 77
 78
 79 def createTree(dataSet, labels):
 80     '''
 81     :param dataSet: 数据集
 82     :param labels:  标签列表
 83     :return:
 84     '''
 85     classList = [example[-1] for example in dataSet]  # 创建classList的列表变量,包含了数据集的所有类标签
 86     if classList.count(classList[0]) == len(classList):
 87         # 递归函数的第一个停止条件是所有的类标签完全相同,则直接返回该类标签
 88         return classList[0]
 89     if len(dataSet[0]) == 1:
 90         # 第二个停止条件是使用完了所有特征,仍然不能将数据集划分成仅包含唯一类别的分组
 91         # 返回出现次数最多的类别作为返回值
 92         return majorityCnt(classList)
 93     bestFeat = chooseBestFeaturetoSplit(dataSet)  # 当前数据集选取的最好的特征
 94     bestFeatLabel = labels[bestFeat]
 95     myTree = {bestFeatLabel:{}}  # 使用字典存储树的信息
 96     del(labels[bestFeat])
 97     featValues = [example[bestFeat] for example in dataSet]  # 得到数据集中最好的特征的值
 98     uniqueVals = set(featValues)
 99     for value in uniqueVals:  # 遍历当前选择特征包含的所有属性值
100         subLabels = labels[:]  # 复制类标签,并将其存储在新列表变量subLabels中,
101         # 为了保证每次调用函数createTree时不改变原始列表的内容,使用新变量subLabels代替原始列表
102         myTree[bestFeatLabel][value] = createTree(splitDataSet(dataSet, bestFeat,value), subLabels)
103         # 在每个数据集划分上递归调用函数createTree,得到的返回值将被插入到字典变量myTree中
104     return myTree
105
106
107 def classify(inputTree, featLabels, testVec):
108     firstStr = list(inputTree.keys())[0]  # 输入树的第一个特征名称
109     secondDict = inputTree[firstStr]  # 第一个特征名称对应的字典
110     featIndex = featLabels.index(firstStr)  # 第一个特征名称在特征中的索引
111     # 将标签字符串转换为索引,使用index方法查找当前列表中第一个匹配firstStr变量的元素
112     for key in secondDict.keys():
113         if testVec[featIndex] == key:  # 比较testVec变量中的值与树节点的值
114             if type(secondDict[key]).__name__ == 'dict':
115                 classLabel = classify(secondDict[key], featLabels, testVec)
116             else:
117                 classLabel = secondDict[key]  # 如果到达叶子节点则返回当前节点的分类标签
118     return classLabel
119
120
121 def storeTree(inputTree, filename):
122     fw = open(filename, 'wb')
123     pickle.dump(inputTree, fw, 0)  # 为了避免保存的file乱码,在dump()里加上第三个参数,设为0(ASCII协议).
124     fw.close()
125
126
127 def grabTree(filename):
128     fr = open(filename, 'rb')
129     return pickle.load(fr)
130
131
132 if __name__ == '__main__':
133     myDat, labels = creatDataSet()
134     # myDat[0][-1] = 'maybe'
135     # retDatSet = splitDataSet(myDat, 1, 0)
136     # print(retDatSet)
137     # ent = calcShannonEnt(myDat)
138     # print(ent)
139     # bestFeature = chooseBestFeaturetoSplit(myDat)
140     # print(bestFeature)
141     # myTree = createTree(myDat, labels)
142     myTree = treePlotter.retrieveTree(0)
143     # print(myTree)
144     label_ = classify(myTree, labels, [1,0])
145     print(label_)
146     storeTree(myTree, 'classifierStorage.txt')
147     # print(grabTree('classifierStorage.txt'))
148     fr =open('../machinelearninginaction/Ch03/lenses.txt')
149     lenses = [inst.strip().split('	') for inst in fr.readlines()]
150     lensesLabels = ['age', 'prescript', 'astigmatic', 'tearRate']
151     lensesTree = createTree(lenses, lensesLabels)
152     print(lensesTree)
153     treePlotter.createPlot(lensesTree)
treePlotter.py
  1 import matplotlib.pyplot as plt
  2
  3
  4 # 使用文本注解绘制树节点
  5 # 包含了边框的类型,边框线的粗细等
  6 decisionNode = dict(boxstyle="sawtooth", fc="0.8")
  7 # boxstyle为文本框的类型,sawtooth是锯齿形,fc是边框线粗细,pad指的是外边框锯齿形(圆形等)的大小
  8 leafNode = dict(boxstyle="round4", fc="0.8")  # 定义决策树的叶子结点的描述属性 round4表示圆形
  9 arrow_args = dict(arrowstyle="<-")  # 定义箭头属性
 10 # 定义文本框和箭头格式
 11
 12
 13 def plotNode(nodeTxt, centerPt, parentPt, nodeType):
 14     '''
 15     annotate是关于一个数据点的文本
 16     :param nodeTxt: 要显示的文本
 17     :param centerPt: 文本的中心点,箭头所在的点
 18     :param parentPt: 指向文本的点
 19     :param nodeType: 输入的节点(边框)的形状
 20     :return:
 21     '''
 22     '''
 23     添加注释。第一个参数是注释的内容,xy设置箭头的起始坐标,xytext设置注释内容显示的起始位置,文本的位置坐标
 24     arrowprops用来设置箭头,facecolor设置箭头的颜色
 25     headlength 箭头的头的长度,headwidth 箭头的宽度,width 箭身的宽度
 26     '''
 27     # annotate的作用是添加注释,nodetxt是注释的内容,
 28     createPlot.ax1.annotate(nodeTxt, xy=parentPt, xycoords='axes fraction',
 29                             xytext=centerPt,textcoords='axes fraction',
 30                             va='center',ha='center',bbox=nodeType,arrowprops=arrow_args)
 31
 32
 33
 34 '''
 35 def createPlot():
 36     fig = plt.figure(1, facecolor='white')
 37     fig.clf()
 38     createPlot.ax1 = plt.subplot(111, frameon = False)
 39     plotNode('decisionNode', (0.5, 0.1), (0.1, 0.5), decisionNode)
 40     plotNode('leafNode', (0.8, 0.1), (0.3, 0.8), leafNode)
 41     plt.show()
 42 '''
 43
 44
 45 def plotMidText(cntrPt, parentPt, txtString):
 46     '''
 47     作用是计算tree的中间位置
 48     :param cntrPt: 起始位置
 49     :param parentPt: 终止位置
 50     :param txtString: 文本标签信息
 51     :return:
 52     '''
 53     xMid = (parentPt[0] - cntrPt[0])/2.0 + cntrPt[0]
 54     # 找到x和y的中间位置
 55     yMid = (parentPt[1] - cntrPt[1])/2.0 + cntrPt[1]
 56     createPlot.ax1.text(xMid, yMid, txtString)
 57
 58
 59 def plotTree(myTree, parentPt, nodeTxt):
 60     numLeafs = getNumLeafs(myTree)
 61     depth = getTreeDepth(myTree)
 62     firstStr = list(myTree.keys())[0]
 63     cntrPt = (plotTree.xOff + (1.0 + float(numLeafs))/2.0/plotTree.totalW,plotTree.yOff)  # 计算子节点的坐标
 64     plotMidText(cntrPt, parentPt, nodeTxt)  # 绘制线上的文字
 65     # 计算父节点与子节点的中间位置,并在此处添加简单的文本标签信息
 66     plotNode(firstStr, cntrPt, parentPt, decisionNode)  # 绘制节点
 67     sencodDict = myTree[firstStr]
 68     plotTree.yOff = plotTree.yOff - 1.0/plotTree.totalD
 69     # 每绘制一次图,将y的坐标减少1.0 / plottree.totalD,间接保证y坐标上的深度
 70     for key in sencodDict.keys():
 71         if type(sencodDict[key]).__name__ == 'dict':
 72             plotTree(sencodDict[key], cntrPt, str(key))  # 如果不是叶子节点则递归调用plotTree函数
 73         else:
 74             plotTree.xOff = plotTree.xOff + 1.0/plotTree.totalW
 75             plotNode(sencodDict[key], (plotTree.xOff, plotTree.yOff), cntrPt, leafNode)
 76             plotMidText((plotTree.xOff, plotTree.yOff), cntrPt, str(key))
 77     plotTree.yOff = plotTree.yOff + 1.0 / plotTree.totalD
 78
 79
 80 def createPlot(inTree):
 81     fig = plt.figure(1, facecolor='white')
 82     fig.clf()  # 把画布清空
 83     axprops = dict(xticks=[], yticks=[])
 84     createPlot.ax1 = plt.subplot(111, frameon = False, **axprops)
 85     # createPlot.ax1为全局变量,绘制图像的句柄,subplot为定义了一个绘图,
 86     # 111表示figure中的图有1行1列,即1个,最后的1代表第一个图
 87     # frameon表示是否绘制坐标轴矩形
 88     plotTree.totalW = float(getNumLeafs(inTree))  # 全局变量,存储树的宽度,用于计算放置判断节点的位置
 89     plotTree.totalD = float(getTreeDepth(inTree))  # 全局变量,存储树的深度
 90     plotTree.xOff = -0.5/plotTree.totalW
 91     plotTree.yOff = 1.0
 92     # 追踪已经绘制的节点位置,以及放置下一个节点的恰当位置
 93     plotTree(inTree, (0.5, 1.0), '')
 94     plt.show()
 95
 96 def getNumLeafs(myTree):
 97     # 遍历整棵树,累计叶子节点的个数(不包括中间的分支节点),并返回该数值
 98     numLeafs = 0
 99     firstStr = list(myTree.keys())[0]
100     secondDict = myTree[firstStr]  # 根据键值得到对应的值,即根据第一个特征分类的结果
101     for key in secondDict.keys():  # 获取第二个小字典中的key
102         if type(secondDict[key]).__name__ == 'dict':  # 测试节点的数据类型是否为字典
103             # 判断是否小字典中是否还包含新的字典(即新的分支)
104             numLeafs += getNumLeafs(secondDict[key])
105             # 包含的话进行递归从而继续循环获得新的分支所包含的叶节点的数量
106         else:
107             numLeafs += 1
108             # 不包含的话就停止迭代并把现在的小字典加一表示这边有一个分支
109     return numLeafs
110
111
112 def getTreeDepth(myTree):
113     # 计算遍历过程中遇到判断节点的个数
114     maxDepth = 0
115     # print(myTree.keys())
116     firstStr = list(myTree.keys())[0]
117     secondDict = myTree[firstStr]
118     for key in secondDict.keys():
119         if type(secondDict[key]).__name__ == 'dict':
120             thisDepth = 1 + getTreeDepth(secondDict[key])  # 递归调用几次就有几个返回值maxDepth
121         else:
122             thisDepth = 1  # 如果不是字典说明这是一个判断节点
123         if thisDepth > maxDepth:
124             maxDepth = thisDepth
125     return maxDepth
126
127
128 def retrieveTree(i):
129     listOfTrees = [{'no surfacing': {0: 'no', 1: {'flippers': {0: 'no',1: 'yes'}}}},
130                    {'no surfacing': {0: 'no', 1: {'flippers': {0: {'head': {0: 'no', 1: 'yes'}},1:'no'}}}}]
131     return listOfTrees[i]
132
133
134 if __name__ == '__main__':
135     # createPlot()
136     # print(retrieveTree(1))
137     myTree = retrieveTree(0)
138     myTree['no surfacing'][3] = 'maybe'
139     # print(getNumLeafs(myTree))
140     # print(getTreeDepth(myTree))
141     createPlot(myTree)
两个例子的决策树: