记录一下在使用Vue和Element做项目时遇到过的难点。。。
1、在 <el-table>表格中嵌入 select下拉选择框,以及 tooltip提示框的使用
主要定义格式如红色标记代码
riderPlanListTableData : 是用来填充表格的数据
type='index' 是对每行都做个序号标记,方便取单行数据以及给单行数据赋值
特别说明一下这个 slot-scope="scope" :这个能定位到行数据,表格中有很多行时,需要通过scope.row去定位行数据 和index一起使用
          <el-table
                :data="riderPlanListTableData"
                stripe
                border
                type="index"
                fit
                style=" 100%"
                @select-all='selectAll'
                @select="handleSelect">
                <el-table-column
                  prop="careerLevelList"
                  label="产品">
                   <template slot-scope="scope"> <!-- scope.row.riderCGroupName 其中riderPlanListTableData中的属性-->
                    <el-select v-model="scope.row.riderCGroupName" placeholder="产品" clearable class="filter-item" @change="prdnameChange(scope.$index, scope.row)" style=" 420px" >
                      <el-option v-for="(item,index) in  scope.row.careerLevelList" :key="index" :label="item.riderCName+'-'+item.riderEName" :value="item.riderCode+'_'+item.careerLevel" />
                      <!-- 当 循环的key定义为index时,会自动取出每一条 能避免key重复的问题 -->
                    </el-select>
                    <el-input v-model='scope.row.riderType'  type='hidden' class="filter-item"/>  <!-- 设定一个隐藏的input框,因为后面需要用到这个riderType值 >
                   </template>
                </el-table-column>
                <el-table-column
                  prop="sumassured"
                  label="额度">
                  <template slot-scope="scope"> <!-- el-tooltip 这个是在当前输入框中加上提示信息,可以通过在content前面加 : 冒号,动态填充tooltip需要提示的值 -->
                    <el-tooltip class="item" effect="dark" :content="sumassuredTips" placement="top">
                      <el-input v-model="scope.row.sumassured"  @change="sumassuredChange(scope.$index, scope.row)" @focus="sumassuredFocus(scope.row)"   class="filter-item"/>
                    </el-tooltip>
                  </template>
                </el-table-column>
</el-table>
响应表格中的额度输入框onFocus的方法:sumassuredFocus(scope.row) : 这个scope.row可以取到表格中当前行所有的列数据
响应表格中的onchange方法:sumassuredChange(scope.$index,scope.row): index可以定位行序号,row可以定为当前行数据
let 和 var: let 定义的是局部变量,var 定义的是全局变量
this.$set(this.inputForm,'attribute','attributeValue'); //通过这句话可以给this.inputForm对应的属性赋值
    /**附加产品保额变化的change事件:计算出对应的保费 */
    sumassuredChange(index,row) {
        let inputForm = this.inputForm;
        this.tmpSplit = (row.riderCGroupName).split('_');
        this.$set(this.inputForm,'riderCode','1234');  //如果this.inputForm对象中有riderCode属性,1234则会覆盖riderCode属性值,如果没有则会创建一个riderCode属性并且赋值为1234
        this.$set(this.inputForm,'careerLevel',this.tmpSplit[1]);
        this.$set(this.inputForm,'sumAssured',row.sumassured);this.INPUT_FORM(this.inputForm);
        let inputObj = JSON.stringify(this.inputForm);
        let tmpThis = this; //这里这样子定义是因为进入CalRiderPremiumByCode方法后不能直接使用this,需要使用变量接收this值,然后再在方法里面使用变量
        let indexs = index;
        let row1 = row;

    /** 这一段代码是与后台进行交互
      1、inputObj是方法的入参对象 ,因为在api.js中指定了入参格式为 application/json,所以应该先调用 JSON.stringify()方法格式化入参,再传给后台
          2、CalRiderPremiumByCode方法需要在 service包下的 api.js文件中定义,并且在当前使用的文件中声明
        import {CalRiderPremiumByCode} from '../service/api'  //此声明语句应放在<script>标签下面
         3、res是后台交互方法 CalRiderPremiumByCode(inputObj)的返回值
      4、 tmpThis.$set(...) :这是使用后台返回的数据 给表格中的当前行指定的列输入框赋值,

      */
        CalRiderPremiumByCode(inputObj).then(function(res){
          if(res.code == '200' && res.msg == 'ok'){
              tmpThis.$set(tmpThis.riderPlanListTableData[indexs],'premiumperyear',res.data.result.annuallypremium);
            }else{
              alert('后台访问出错,请刷新页面');
            }
        }).catch(function(error){
            console.log(error)
        })
      }else{
        alert('保额不属于限定范围内,请重新输入!保额的最小值为:'+ row.minSumAssured+",最大值为:"+ row.maxSumAssured);
      }
    },
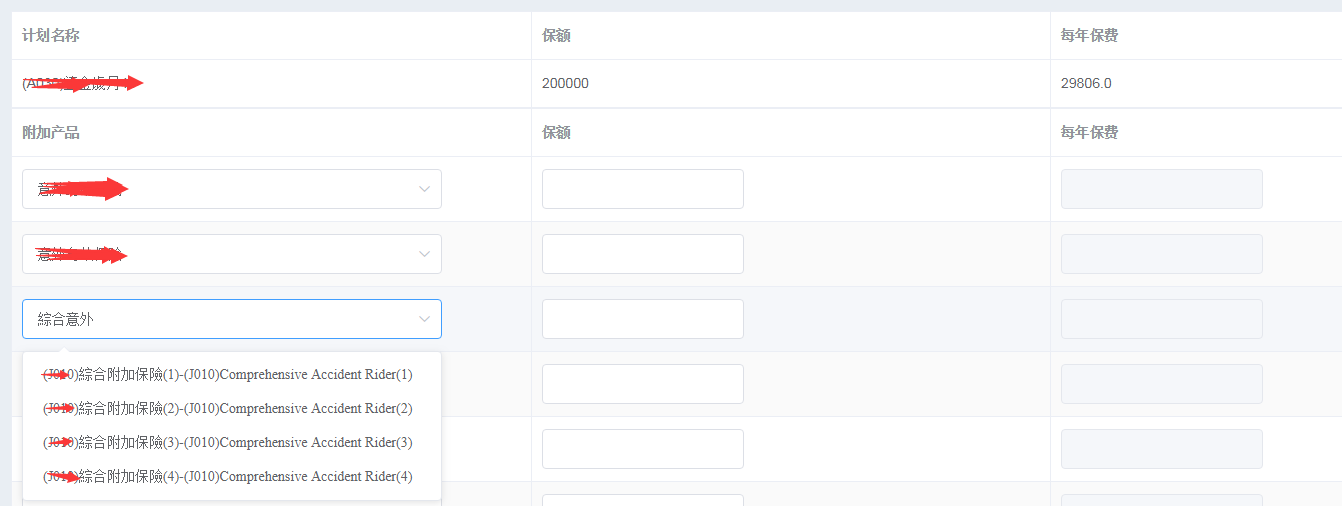
表格中嵌套select选择框的效果图:
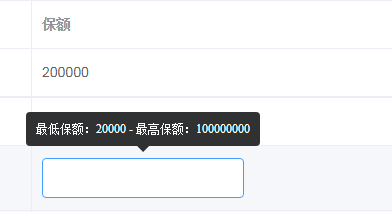
tooltip提示框的效果图:
2、<el-input>框设置为不可编辑时可使用 disabled='true' 或者 readonly='true'
区别: disabled为true:不可编辑且输入框颜色变深
readonly为true: 不可编辑,输入框颜色不变
3、页面交互参数使用 query 与 params定义
query: 相当于get方法,参数以及参数值会显示在URL上
params: 相当于post方法,参数以及参数值不会显示在URL上
params---- 请求中的使用:
使用格式: params:{ xxxx:'123' }
注意params必须和name一起使用,且请求前面不需要加 /
 this.$router.push({
        name: 'toMain',
        params: {
          handPrepaidAnnualTot:this.handPrepaidAnnualTot ,
          handPrepaidAnnualPrm:this.handPrepaidAnnualPrm,
          paymodeOptions: this.paymodeOptions,
          currencyOptions: this.currencyOptions,
        }
      })
},
params ---- 在请求 toMain对应的 xxxx .vue页面参数获取 : this.$route.params.xxx
    /** 初始化调用的方法   */
    selectInit() {
     //1.获取从附加保障页面点击上一步 传过来的参数,如果有值则直接使用当前值填充页面数据(复显)
      let tmpPrdInfoList = this.$route.params.onlProposalProductInfoList;
      let tmpPrdCategoryList = this.$route.params.onlProposalCategoryInfoList;
      let tmpSelectedPrdInfoList = this.$route.params.selectedPrdInforList;
      let tmpPaymodeList = this.$route.params.paymodeOptions;
      let tmpCurrencyList = this.$route.params.currencyOptions;

    },
query 请求中的使用:
注意 query必须和path一起使用,并且请求需要加 /
nextStep(){
  this.$router.push({
        path: '/toMain',
        query: {
          handPrepaidAnnualTot:this.handPrepaidAnnualTot ,
          handPrepaidAnnualPrm:this.handPrepaidAnnualPrm,
          selectedPrdInforList: this.prdcodeOptions,
          paymodeOptions: this.paymodeOptions,
          currencyOptions: this.currencyOptions,
        }
},
query-- 在请求 toMain对应的 xxxx .vue页面参数获取 : this.$route.query.xxx
selectInit() {//1.获取从附加保障页面点击上一步 传过来的参数,如果有值则直接使用当前值填充页面数据(复显)
      let tmpPrdInfoList = this.$route.query.onlProposalProductInfoList;
      let tmpPrdCategoryList = this.$route.query.onlProposalCategoryInfoList;
      let tmpSelectedPrdInfoList = this.$route.query.selectedPrdInforList;
      let tmpPaymodeList = this.$route.query.paymodeOptions;
      let tmpCurrencyList = this.$route.query.currencyOptions;
}