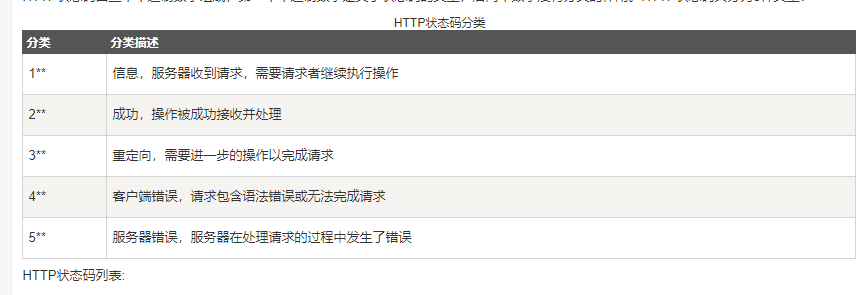
一.状态码
二.基本使用
"""
requests第三方库:
pip install requests

req参数:
  cookie
  cookies
  json[json数据格式]
  text[文本]
  content[二进制]
  status_code[请求状态码]
  headers[请求头]
  url[网址]
  history[请求历史]


1.请求参数
requests.get(url,headers=headers,params=data)

"""

#导入模块

import requests
import re

#请求网址
url = ""

headers = {

   "User-Agent":"Mozilla/5.0 (Windows NT 10.0; Win64; x64) AppleWeb
    Kit/537.36 (KHTML, like Gecko) Chrome/80.0.3987.122 Safari/537.36"
    }

#请求和添加请求头
req = requests.get(url,headers=headers)

#匹配模式
pattern = re.compile('<div.*?"card".*?href="(.*?)".*?card-img-top lazyload.*?data-src="(.*?)".*?</a>',re.S)


if not req.status_code == requests.codes.ok:

    exit()

else:

    html = req.text

    #获取匹配内容
    content = re.findall(pattern,html)

    print(content)
三.高级用法
1.文件上传
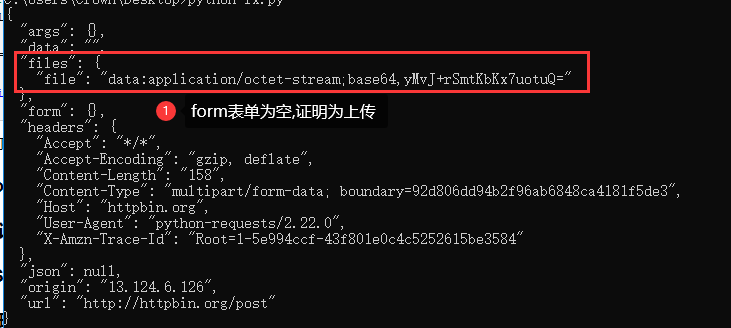
requests可以模拟提交一些数据,假如有的网站需要上传文件,我们也可以用它来实现
import requests

#打开文件
files = {'file':open('demo.txt','rb')}

#上传地址
url = "http://httpbin.org/post"

r = requests.post(url,files=files)

print(r.text)
上述打开demo.txt文件上传
2.Cookies
前面学过urllib的模块使用Cookies比较繁琐,使用requests可以一步完成
import requests

#使用get请求网址
r = requests.get("http://www.google.com/")

#输出cookie
cookie = r.cookies

for key,value in cookie.items():

    print(key + '=' + value)

这里我们首先调用cookies属性即可成功得到Cookies,可以发现它是RequestCookieJar类型。然后用items()方法将其转换为
元组组成的列表,遍历输出每一个Cookie的名称和值,实现Cookie的遍历解析。
也可以复制Cookie进行登陆,打开浏览器,或者快捷键Ctrl + Shift + i
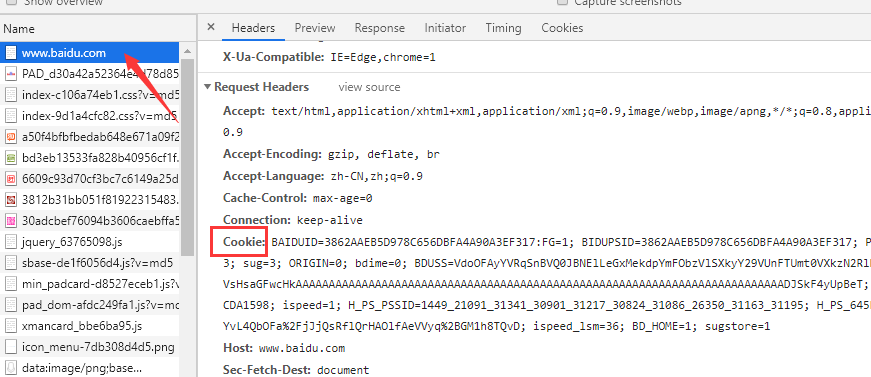
cookie里有许多参数,参数的意义自己查找,
下面使用cookie参数打开网页:
import requests

headers={
    "Cookie":"1P_JAR=2020-04-17-06
    NID=202=LQdy6FmSLcTT3ZmqeS4ajmEi4YKcAEz4DD9n1Kghv4lnwEu8b2b6K_3
    9tU-H0n0lkmLKQi3E2PDMKGuqCeT4fG7ixLfGSF91zLI8DfPLJ_To
    Gxb1oO7qNDq5mLRXtsFhTDGw4XYc7GX9a0BJP8JCNYjOpbkAwIploECTvGKmd3g",
    "Host":"www.google.com",
    "User-Agent":"Mozilla/5.0 (Windows NT 10.0; Win64; x64) AppleWeb
    Kit/537.36 (KHTML, like Gecko) Chrome/80.0.3987.122 Safari/537.36"

    }
#使用get请求网址
r = requests.get("http://www.google.com/",headers=headers)

html = r.text

print(html)
当然,你也可以通过cookies参数来设置,不过这样就需要构造RequestsCookieJar对象,而且需要分割一下cookies。这相对繁琐,不过效果是相同的
import requests

#Cookie参数
Cookies ="1P_JAR=2020-04-17-06;
    NID=202=LQdy6FmSLcTT3ZmqeS4ajmEi4YKcAEz4DD9n1Kghv4lnwEu8b2b6K_3
    9tU-H0n0lkmLKQi3E2PDMKGuqCeT4fG7ixLfGSF91zLI8DfPLJ_To
    Gxb1oO7qNDq5mLRXtsFhTDGw4XYc7GX9a0BJP8JCNYjOpbkAwIploECTvGKmd3g"

#创建Jar对象
jar = requests.cookies.RequestsCookieJar()

#请求头
headers={
    "Host":"www.google.com",
    "User-Agent":"Mozilla/5.0 (Windows NT 10.0; Win64; x64) AppleWeb
    Kit/537.36 (KHTML, like Gecko) Chrome/80.0.3987.122 Safari/537.36"

    }

#使用分号将cookie参数分割开
for cookie in Cookies.split(';'):
    key,value = cookie.split('=',1) #数字1代表只分开第一个带等号的
    #设置cookie
    jar.set(key,value)

#使用get请求网址
r = requests.get("http://www.google.com/",headers=headers)

#输出
print(r.text)
3.会话维持
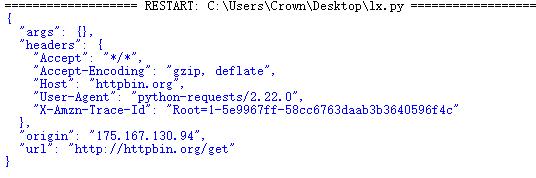
在requests中,如果直接利用get()和post()等方法的确可以模拟网页的请求,但是这实际上是不同的会话,就相当于
浏览器打开一个网页,再次请求又打开一个网页,会话维持就是打开一个网页进行操作:
import requests

url = "http://httpbin.org/get"
#创建会话窗口
s = requests.Session()

#先访问网页
s.get(url)

#再次访问
r = s.get(url)

print(r.text)
4.SSL证书验证
此外,requests还提供了证书验证的功能。当发送HTTP请求的时候,它会检查SSL证书,我们可以使用verify参数
控制是否检查此证书。其实如果不加verify参数的话,默认是True,会自动验证。
5.代理设置
代理就是防止自己的ip被封使用别人的ip
代理的使用用到proxies参数
"""
若代理需要使用HTTP Basic Auth:
   http://user:password@host:port
   proxies={
      "http":"http://user:password@host:port",

    }

除了基本的HTTP代理外,requests还支持SOCKS协议的代理:
   首先安装socks这个库:
      pip3 install 'requests[socks]'
   roxies={
      "http":"socks5://user:password@host:port",

    }


"""

import requests

url =""

proxies = {
    'https': 'https://128.199.252.41:44344',
    'http': 'https://128.199.252.41:44344'
}
headers = {
    'user-agent': 'Mozilla/5.0 (Windows NT 10.0; Win64; x64) AppleWebKit/537.36
 (KHTML, like Gecko) Chrome/56.0.2924.87 Safari/537.36'
}

r = requests.get(url,headers=headers,proxies=proxies,verify=False)

if r.status_code == requests.codes.ok:

    html = r.text

    print(html)
6.超时设置
r = requests.get(url,headers=headers,timeout=1)

#连接和读取
r = requests.get(url,headers=headers,timeout=(5,11))


import requests

url ="http://www.google.com/"


headers = {
    'user-agent': 'Mozilla/5.0 (Windows NT 10.0; Win64; x64) AppleWebKit/537.36 (KHTML, like Gecko) Chrome/56.0.2924.87 Safari/537.36'
}

r = requests.get(url,headers=headers,timeout=None) #永远不会超时

if r.status_code == requests.codes.ok:

    html = r.text

    print(html)
7.身份认证
一般的使用情况
import requests

#导入身份认证
from requests.auth import HTTPBasicAuth

url ="https://account.cnblogs.com/signin?returnUrl=https%3A%2F%2Fi-beta.cnblogs.com%2Fposts%2Fedit-done%3BpostId%3D12652508"


headers = {
    'user-agent': 'Mozilla/5.0 (Windows NT 10.0; Win64; x64) AppleWebKit/537.36 (KHTML, like Gecko)
    Chrome/56.0.2924.87 Safari/537.36'
}
username = "xxxx"

#进行编码设置
username = username.encode('utf-8')

password = "xxxxx"

r = requests.get(url,headers=headers,auth=HTTPBasicAuth(username,password))

if r.status_code == requests.codes.ok:

    html = r.text

    print(html)
此外,requests还有其他认证方式,如OAuth认证,不过需要安装oauth包,安装命令
pip3 install requests_oauthlib

使用:
"""

官方文档:https://requests-oauthlib.readthedocs.org/

"""
import requests

from requests_oauthlib import OAuth1

url = ""

auth = OAuth1("","","","")

requests.get(url,auth=auth)
8.Prepared Request
from requests import Request,Session


url = "http://httpbin.org/post"

data = {
     "name":"Julia"
    }

headers = {

   "User-Agent":"Mozilla/5.0 (Windows NT 10.0; Win64; x64) AppleWeb
    Kit/537.36 (KHTML, like Gecko) Chrome/80.0.3987.122 Safari/537.36"
    }

#会话窗口
s = Session()

req = Request('POST',url,data=data,headers=headers)

#会话窗口添加准备窗口
prepped = s.prepare_request(req)

#会话窗口发送请求
r = s.send(prepped)

print(r.text)
四.抓取(实战)
import requests
import re
import json
import time
from requests.exceptions import RequestException
#多线程
import threading

#传入url链接请求传回网页文本
def get_one_page(url):

    try:

        headers = {

       "User-Agent":"Mozilla/5.0 (Windows NT 10.0; Win64; x64) AppleWeb
        Kit/537.36 (KHTML, like Gecko) Chrome/80.0.3987.122 Safari/537.36"
        }

        response = requests.get(url,headers=headers)

        if response.status_code == 200:

            return response.text

        return None
    except RequestException:

        return None

#解析网页,将传入的网页解析
def parse_one_page(html):


    #匹配模式     视频地址   图片   标题  注释
    pattern = re.compile('<div.*?"card".*?href="(.*?)".*?card-img-top lazyload.*?data-src="(.*?)".*?</a>.*?"card-block".*?"card-title m-t-0 m-b-10">(.*?)</h4></a>.*?"card-title m-t-0 m-b-10">(.*?)</h5></a>',re.S)

    #解析结果
    items = re.findall(pattern,html)

    print("正在解析...")

    for item in items:
        #生成器产生一次就消失,将数据以return方式传出
        yield{
          'video_url': item[0],
          'image': item[1],
          'title' : item[2],
          'note' : item[3]

            }


#将数据保存到文本文件
def write_to_file(content):

    with open("color.txt","a",encoding="utf-8") as f:

        #json.dumps()实现字典序列化,字典转化为字符串
        #print(type(json.dumps(content)))

        #写入
        f.write(json.dumps(content,ensure_ascii=False)+'
')


#将图片保存
def image_to_file(image_url,name):

    headers = {

       "User-Agent":"Mozilla/5.0 (Windows NT 10.0; Win64; x64) AppleWeb
        Kit/537.36 (KHTML, like Gecko) Chrome/80.0.3987.122 Safari/537.36"
        }

    if re.match("http:",image_url) == None:

        image_url = "http:"+ image_url

    r = requests.get(image_url,headers=headers)

    with open(name+".jpg","wb") as f:

        f.write(r.content)

#改变地址进行翻页
def main(offset):

    #网址
    url = "https://page/8/#"+str(offset)

    #网页文本形式
    html = get_one_page(url)

    #解析匹配出来每一项里的项
    its = parse_one_page(html)

    print("第"+str(offset)+"页")

    for it in its:

        write_to_file(it)

        image_to_file(it["image"],it["title"])

        print("写入一次")


if __name__ == "__main__":

    for i in range(1,13):

        main(offset=i)

        time.sleep(1)

    print("完成")
多线程会更快