今天发现自己连Bundle类都没有搞清楚,于是花时间研究了一下。
根据google官方的文档(http://developer.android.com/reference/android/os/Bundle.html)
Bundle类是一个key-value对,“A mapping from String values to various Parcelable types.”
类继承关系:
java.lang.Object
android.os.Bundle
Bundle类是一个final类:
public final class
Bundle
extends Objectimplements Parcelable Cloneable
两个activity之间的通讯可以通过bundle类来实现,做法就是:
(1)新建一个bundle类
Bundle mBundle = new Bundle();
(2)bundle类中加入数据(key -value的形式,另一个activity里面取数据的时候,就要用到key,找出对应的value)
mBundle.putString("Data", "data from TestBundle");
(3)新建一个intent对象,并将该bundle加入这个intent对象
Intent intent = new Intent();
intent.setClass(TestBundle.this, Target.class);
intent.putExtras(mBundle);
完整代码如下:
android mainfest.xml如下:
<?xml version="1.0" encoding="utf-8"?>
<manifest xmlns:android="http://schemas.android.com/apk/res/android"
      package="com.tencent.test"
      android:versionCode="1"
      android:versionName="1.0">
    <application android:icon="@drawable/icon" android:label="@string/app_name">
        <activity android:name=".TestBundle"
                  android:label="@string/app_name">
            <intent-filter>
                <action android:name="android.intent.action.MAIN" />
                <category android:name="android.intent.category.LAUNCHER" />
            </intent-filter>
        </activity>
    <activity android:name=".Target"></activity>
    </application>
    <uses-sdk android:minSdkVersion="7" />
</manifest>
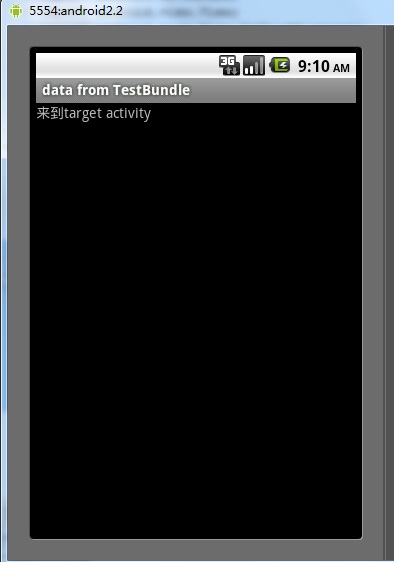
两个类如下:intent从TestBundle类发起,到Target类。
类1:TestBundle类:
import android.app.Activity;
import android.content.Intent;
import android.os.Bundle;
import android.view.View;
import android.view.View.OnClickListener;
import android.widget.Button;

public class TestBundle extends Activity {

    private Button button1;
    private OnClickListener cl;
    public void onCreate(Bundle savedInstanceState) {
        super.onCreate(savedInstanceState);
        setContentView(R.layout.main);

        button1 = (Button) findViewById(R.id.button1);
        cl = new OnClickListener(){
            @Override
            public void onClick(View arg0) {
                // TODO Auto-generated method stub
                Intent intent = new Intent();
                intent.setClass(TestBundle.this, Target.class);
                Bundle mBundle = new Bundle();
                mBundle.putString("Data", "data from TestBundle");//压入数据
                intent.putExtras(mBundle);
                startActivity(intent);
            }
        };
        button1.setOnClickListener(cl);
    }
}
类2: Target
import android.app.Activity;
import android.os.Bundle;

public class Target extends Activity{

    public void onCreate(Bundle savedInstanceState) {

        super.onCreate(savedInstanceState);
        setContentView(R.layout.target);
        <span style="color:#ff6600;">Bundle bundle = getIntent().getExtras();   </span> //得到传过来的bundle
        String data = bundle.getString("Data");//读出数据
        setTitle(data);

    }
}
布局文件:
main.xml
<?xml version="1.0" encoding="utf-8"?>
<LinearLayout xmlns:android="http://schemas.android.com/apk/res/android"
    android:orientation="vertical"
    android:layout_width="fill_parent"
    android:layout_height="fill_parent"
    >
<TextView
    android:layout_width="fill_parent"
    android:layout_height="wrap_content"
    android:text="@string/hello"
    />
<Button
    android:layout_width="fill_parent"
    android:layout_height="wrap_content"
    android:text="@string/button"
    android:id = "@+id/button1"
    />
</LinearLayout>
target.xml
<?xml version="1.0" encoding="utf-8"?>
<LinearLayout xmlns:android="http://schemas.android.com/apk/res/android"
    android:orientation="vertical"
    android:layout_width="fill_parent"
    android:layout_height="fill_parent"
    >
<TextView
    android:layout_width="fill_parent"
    android:layout_height="wrap_content"
    android:text="@string/target"
    />
</LinearLayout>
String.xml
<?xml version="1.0" encoding="utf-8"?>
<resources>
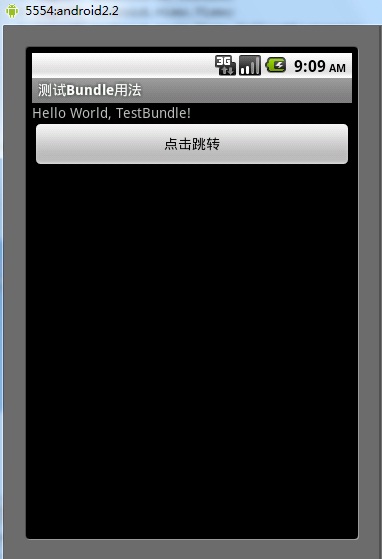
<string name="hello">Hello World, TestBundle!</string>
<string name="app_name">测试Bundle用法</string>
<string name="button">点击跳转</string>
<string name="target">来到target activity</string>
</resources>
结果:
跳转结果: