装 Docker
docker-io, docker-ce, docker-ee 区别
docker-io,docker-engin是以前早期的版本,版本号是 1.*,默认centos7 安装的是docker-io,最新版是 1.13。docker-ce是社区版本,适用于刚刚开始docker和开发基于docker研发的应用开发者或者小型团队。Ubuntu默认安装的是docker-ce,以下是官方描述:
Docker Community Edition (CE) is ideal for developers and small teams looking to get started with Docker and experimenting with container-based apps. Docker CE has three types of update channels, stable, test, and nightly:
- Stable gives you latest releases for general availability.
- Test gives pre-releases that are ready for testing before general availability.
- Nightly gives you latest builds of work in progress for the next major release.
For more information about Docker CE, see Docker Community Edition.
docker-ee是docker的企业版,适用于企业级开发,同样也适用于开发、分发和运行商务级别的应用的IT 团队。
Docker Enterprise is designed for enterprise development as well as IT teams who build, ship, and run business-critical applications in production and at scale. Docker Enterprise is integrated, certified, and supported to provide enterprises with the most secure container platform in the industry. For more info about Docker Enterprise, including purchasing options, see Docker Enterprise.
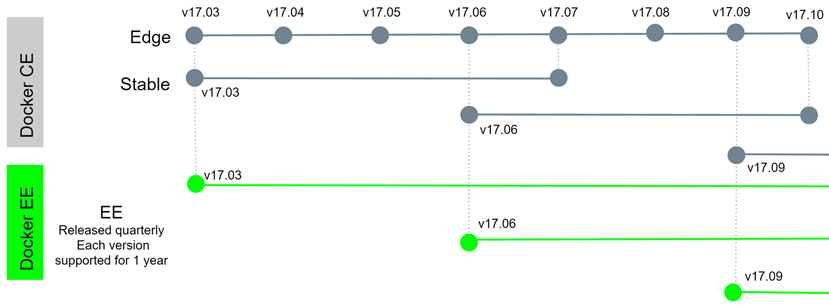
ps: docker-ce 和docker-ee 的可用版本是根据year-month 来的
-
Docker Engine改为Docker CE(社区版)
它包含了CLI客户端、后台进程/服务以及API。用户像以前以同样的方式获取。 -
Docker Data Center改为Docker EE(企业版)
在Docker三个定价层增加了额外的支付产品和支持 -
这些修改并不影响Docker Compose以及Docker Machine
-
Docker版本现在基于YY.MM
使用基于月份的发行版本,17.03 的第一版就指向17.03.0,如果有bug/安全修复需要发布,那么将会指向17.03.1等等。 -
"Edge"与"Stable"两个版本发行
Edge版本每月发布,提供一个月支持。
Stable版本每季度发布,提供4个月支持。
你可以通过Docker EE订阅 延长Stable版本支持以及补丁修复。 -

$ sudo apt update
$ # sudo apt install docker.io #老版本 不要
https://www.cnblogs.com/tylerzhou/p/10971336.html
https://developer.aliyun.com/mirror/docker-ce
# step 1: 安装必要的一些系统工具
sudo apt-get update
sudo apt-get -y install apt-transport-https ca-certificates curl software-properties-common
# step 2: 安装GPG证书
curl -fsSL https://mirrors.aliyun.com/docker-ce/linux/ubuntu/gpg | sudo apt-key add -
# Step 3: 写入软件源信息
sudo add-apt-repository "deb [arch=amd64] https://mirrors.aliyun.com/docker-ce/linux/ubuntu $(lsb_release -cs) stable"
# Step 4: 更新并安装Docker-CE
sudo apt-get -y update
sudo apt-get -y install docker-ce

# 安装指定版本的Docker-CE:
# Step 1: 查找Docker-CE的版本:
# apt-cache madison docker-ce
#   docker-ce | 17.03.1~ce-0~ubuntu-xenial | https://mirrors.aliyun.com/docker-ce/linux/ubuntu xenial/stable amd64 Packages
#   docker-ce | 17.03.0~ce-0~ubuntu-xenial | https://mirrors.aliyun.com/docker-ce/linux/ubuntu xenial/stable amd64 Packages
# Step 2: 安装指定版本的Docker-CE: (VERSION例如上面的17.03.1~ce-0~ubuntu-xenial)
# sudo apt-get -y install docker-ce=[VERSION]
安装完成后,使用以下通信程序启动服务,并确保它在每次重新启动后自动启动:
$ sudo systemctl start docker
$ sudo systemctl enable docker
安装库伯内特kubernetes(K8S)
https://developer.aliyun.com/mirror/kubernetes
https://linuxconfig.org/how-to-install-kubernetes-on-ubuntu-20-04-focal-fossa-linux
apt-get update && apt-get install -y apt-transport-https curl # http + https
curl -s https://mirrors.aliyun.com/kubernetes/apt/doc/apt-key.gpg | apt-key add # 签名密钥 与阿里demo略有不同,2020年5月,Ubuntu 16.04 Xenial Xerus 是当前最新的 Kubernetes 存储库
cat <<EOF >/etc/apt/sources.list.d/kubernetes.list
deb https://mirrors.aliyun.com/kubernetes/apt/ kubernetes-xenial main
EOF
apt-get update
apt-get install -y kubelet kubeadm kubectl kubernetes-cni # 比阿里多 kubernetes-cni
禁用交换内存
sudo swapoff -a
系统使用交换内存,Kubernetes 将拒绝工作。该命令将禁用交换内存,直到您的系统重新启动,因此,要永久更改:
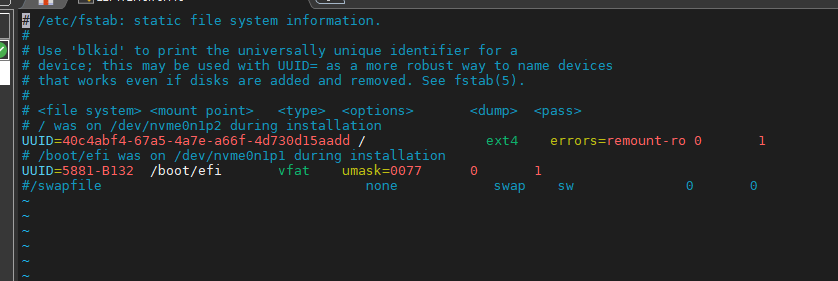
sudo vim /etc/fstab
注释掉/swapfile
设置主机名
sudo hostnamectl set-hostname kubernetes-master
 sudo hostnamectl set-hostname kubernetes-worker

在打开新主机之前,您不会注意到终端中的主机名会发生变化。最后,确保所有节点都有准确的时间和日期,否则您将遇到无效的 TLS 证书。
timedatectl set-ntp on # 开启时间同步
sudo apt install ntp
重新登录ssh,看到 用户切换到:
kubernetes-master:~$
在master主机下执行:sudo kubeadm init
kubernetes-master:~$ sudo kubeadm init
Ubuntu 20 上安装 ELK
https://linuxconfig.org/install-elk-on-ubuntu-20-04-focal-fossa-linux
在 Ubuntu Linux 上部署 Kippo SSH 蜜罐
https://linuxconfig.org/deployment-of-kippo-ssh-honeypot-on-ubuntu-linux
如何检查 Ubuntu 版本
https://linuxconfig.org/how-to-check-ubuntu-version
- 使用以下命令安装 SSH 服务器和客户端元包:
apt$ sudo apt install ssh
- 启用并启动 SSH 服务器守护进程:
$ sudo systemctl enable --now ssh
- 检查 SSH 服务器状态:
$ sudo systemctl status ssh
- 在尝试登录之前,您可能需要打开SSH 防火墙端口 22,并可以选择允许以根用户状态登录到 SSH服务器。
Ubuntu 20 上的 VNC 服务器
https://linuxconfig.org/vnc-server-on-ubuntu-20-04-focal-fossa-linux
命令行输入:
sudo apt-get install tightvncserver xfce4 xfce4-goodies安装好之后请一定先使用此命令设置一个VNC密码:
vncpasswd
(先输入操作密码两次,然后会询问是否设置一个查看(view-only)密码,按自己喜欢,一般没必要。)
设置开机启动
设置开机启动,需要在/etc/init.d/中创建一个文件。例如tightvncserver:
(注:启动脚本的名称,有和程序名一致的习惯)
sudo vi /etc/init.d/tightvncserver
内容如下:
#!/bin/sh
### BEGIN INIT INFO
# Provides:          tightvncserver
# Required-Start:    $local_fs
# Required-Stop:     $local_fs
# Default-Start:     2 3 4 5
# Default-Stop:      0 1 6
# Short-Description: Start/stop tightvncserver
### END INIT INFO

# More details see:
# http://www.penguintutor.com/linux/tightvnc

### Customize this entry
# Set the USER variable to the name of the user to start tightvncserver under
export USER='pi'
### End customization required

eval cd ~$USER

case "$1" in
  start)
    # 启动命令行。此处自定义分辨率、控制台号码或其它参数。
    su $USER -c '/usr/bin/tightvncserver -depth 16 -geometry 800x600 :1'
    echo "Starting TightVNC server for $USER "
    ;;
  stop)
    # 终止命令行。此处控制台号码与启动一致。
    su $USER -c '/usr/bin/tightvncserver -kill :1'
    echo "Tightvncserver stopped"
    ;;
  *)
    echo "Usage: /etc/init.d/tightvncserver {start|stop}"
    exit 1
    ;;
esac
exit 0
(注:USER变量的值为默认用户名,这里是pi。)
然后给 tightvncserver 文件加执行权限:
sudo chmod 755 /etc/init.d/tightvncserver
并更新开机启动列表:
sudo update-rc.d tightvncserver defaults
重启树莓派:
sudo shutdown -r now
手动启动
当然也可以手动启动VNC服务器程序,使用以下命令:
tightvncserver -geometry 800x600 :1
如果首次启动,并且未曾使用vncpasswd命令设置密码,程序会要求设置密码。开机启动很方便,所以还是推荐开机启动。
命令参数说明:
一、指定控制台的号码。
启动多个控制台,可以提供互不影响的多个桌面环境。如果不加此参数,tightvncserver会自动寻找从1开始的下一个空闲控制台。加上此参数,会强制使用指定的控制台,如果此控制台已经启动则报错。加此参数可有效防止无意多次启动程序(会启动多个控制台)白白浪费系统资源。
特殊的0号控制台——0号控制台就是连接真实显示器真正输出图像的那个桌面。对于VNC客户端,不输入端口号登录,默认就登录到0号控制台,方便。但是因为0号是真正的桌面,所以和开机启动桌面环境存在冲突。因此自动启动的配置教程中,使用1号控制台。
二、-geometry 800×600,分辨率。可以不加。
终止VNC控制台:
tightvncserver -kill :1
VNC客户端登录
下载VNC-Viewer:http://www.realvnc.com/download/viewer/
登录地址输入“IP地址 : 控制台号码”,0号控制台可不加号码。
vim ~/.vnc/xstartup
插入
#!/bin/sh
unset SESSION_MANAGER
unset DBUS_SESSION_BUS_ADDRESS
startxfce4 &
chmod +x ~/.vnc/xstartup
#更新
apt update
#安装桌面环境
sudo apt install xfce4 xfce4-goodies
#安装vncserver
apt install tightvncserver
#启动vncserver
vncserver
随后按照提示,输入vncserver登录时候的密码并再次输入确认。
从远程登录之后发现桌面一片灰白。看来还需要配置一下vncserver的环境:
第二步:配置vncserver的参数
#关闭vncserver :1窗口
vncserver -kill :1
#备份原来的配置文件
mv ~/.vnc/xstartup ~/.vnc/xstartup.bak
#编辑新的配置文件
vim ~/.vnc/xstartup
在xstartup文件中更新为如下内容:
#!/bin/bash
xrdb $HOME/.Xresources
startxfce4 &
然后设置该文档的权限
chmod +x ~/.vnc/xstartup随后重新启动vncserver即可连接图像界面,截图如下:

可以看到已经能够出现图形界面。但是目前是不安全的连接方式,如果需要考虑安全性,仍然需要进一步的配置。
在远程主机终端输入:
ssh -L 59000:localhost:5901 -C -N -l root server_ip
其中server_ip替换为您的远程主机IP地址即可
然后使用putty,其他设置与普通的ssh设置类似,只是需要设置ssh隧道,具体设置如下图所示:

在source port 中输入5901,destination输入 127.0.0.1:5901,然后点击Add按钮,即可添加入上图所示的效果。
随后首先在本地用ssh登录远程主机,然后再vncviewer等客户端中输入 127.0.0.1:1即可实现登录。
启动 VNC 服务器:vncserver:5901 端口
ss -ltn
添加防火墙
$ sudo ufw allow from any to any port 5901 proto tcp
Rule added
Rule added (v6)
https://linuxconfig.org/ubuntu-20-04-tricks-and-things-you-might-not-know