3.搭建网络:
搭建网络之前,要确保之前编译 caffe 时已经 make pycaffe 了。
步骤1:导入 Caffe
我们首先在 ResNet 文件夹中建立一个 mydemo.py 的文件,本参考资料我们用 spyder 打开。要导入 Caffe 的话直接 import caffe 是不可以的,因为系统找不到 caffe module,这时候要告诉系统 caffe 在哪里可以导入,因此需要添加 caffe 的路径,准确地说是 caffe-master/python 路径。为了以后的方便,我们在 ResNet 中再建立一个 init_path.py,在这个文件中写入以下代码并保存:
import os.path as osp
import sys

# 添加路径到系统路径
def add_path(path):
    if path not in sys.path:
        sys.path.insert(0,path)

# 返回当前文件所在目录
this_dir = osp.dirname(__file__)
# 组合成caffe的路径
pycaffe_path = osp.join(this_dir, 'caffe-master', 'python')
# 添加路径
add_path(pycaffe_path)
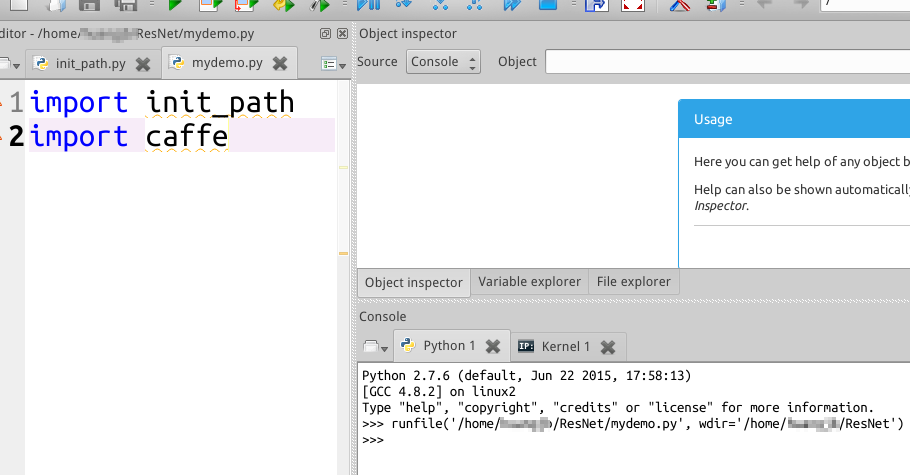
因为 init_path.py 是在 …/ResNet 下,所以 this_dir 这个返回的就是 …/ResNet 目录,那么 pycaffe_path = …/ResNet/caffe-master/python,这个路径添加进系统路径后,我们在 mydemo.py 中键入如下代码,然后运行,不报错就说明已经导入 Caffe 了。
import init_path
import caffe
import numpy as np
from caffe import layers as L, params as P

Fig 10 成功导入 Caffe
步骤2:创建网络的 prototxt 文件
Caffe 里面跑网络只需要 solver.prototxt 就可以了,solver 里面含有网络的模型(包括训练和测试的网络),模型也是 prototxt 文件。因此我们需要生成 solver 的 prototxt 和网络的 prototxt 文件。我们先生成网络的 prototxt 文件,在 ResNet 文件夹中再新建一个文件夹叫 res_net_model,用来存储网络模型文件。我们补充 mydemo.py 如下:
# -*- coding: utf-8 -*-
import init_path
import caffe
import numpy as np
import os.path as osp
from caffe import layers as L, params as P, to_proto

this_dir = osp.dirname(__file__)


def ResNet(split):
    pass

# 生成 ResNet 网络的 prototxt 文件
def make_net():

    # 创建 train.prototxt 并将 ResNet 函数返回的值写入 train.prototxt
    with open(this_dir + '/res_net_model/train.prototxt', 'w') as f:
        f.write(str(ResNet('train')))

    # 创建 test.prototxt 并将 ResNet 函数返回的值写入 test.prototxt
    with open(this_dir + '/res_net_model/test.prototxt', 'w') as f:
        f.write(str(ResNet('test')))

if __name__ == '__main__':

    make_net()
每次执行 mydemo.py 时,首先运行 make_net(),然后在 make_net 函数中创建 prototxt 文件,将 ResNet 返回的内容写入 prototxt,那么最关键的就是在 ResNet 返回的值。我们先给出在 ResNet 数据层的例子:
def ResNet(split):

    # 写入数据的路径
    train_file = this_dir + '/caffe-master/examples/cifar10/cifar10_train_lmdb'
    test_file = this_dir + '/caffe-master/examples/cifar10/cifar10_test_lmdb'
    mean_file = this_dir + '/caffe-master/examples/cifar10/mean.binaryproto'

    # source: 导入的训练数据路径;
    # backend: 训练数据的格式;
    # ntop: 有多少个输出,这里是 2 个,分别是 n.data 和 n.labels,即训练数据和标签数据,
    # 对于 caffe 来说 bottom 是输入,top 是输出
    # mirror: 定义是否水平翻转,这里选是

    # 如果写是训练网络的 prototext 文件
    if split == 'train':
        data, labels = L.Data(source = train_file, backend = P.Data.LMDB,
                              batch_size = 128, ntop = 2,
                              transform_param = dict(mean_file = mean_file,
                                                      crop_size =28,
                                                      mirror = True))


    # 如果写的是测试网络的 prototext 文件
    # 测试数据不需要水平翻转,你仅仅是用来测试
    else:

        data, labels = L.Data(source = test_file, backend = P.Data.LMDB,
                              batch_size = 128, ntop = 2,
                              transform_param = dict(mean_file = mean_file,
                                                      crop_size =28))
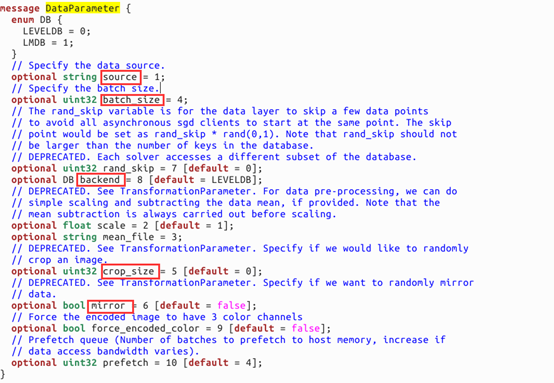
有人或许有疑问,为什么会有 L.data?L.Data 里面有这么多参数怎么来的?在 spyder 上面即使打了 L. 也不会提示 L 有哪些具体的函数(只显示系统固有函数),那么如何知道的呢?在 caffe-master/src/caffe/proto/caffe.proto 里面有这些函数的介绍,这是个混合编译的文件,当然读里面的内容并不难。下面是我们详细来说明:

Fig 11 caffe.proto 数据层截图
在 caffe.proto 搜索 DataParameter,我们就能找到这些参数,那么数据层的名字叫什么呢?很简单,把 Paramter 去掉就是了,也就是 L.Data,数据层有哪些参数,参数的类型都是什么,上面写得都很清楚,我们的例子用到了 source 和 batch_size(这 2 个必须指定),其他的参数都有default 选项,source 类型是 string,我们就知道是字符串类型,那就是存数据的路径了;batch_size 是 uint32,就是数字了;backend 有点特别,是 DB 类型的,我们看上面 DB 里面有 LEVELDB 和 LMDB,那么我们写的时候这样写 backend = P.Data.LMDB 或者 P.Data.LEVELDB,因为这里 default 是 LEVELDB 格式,而我们是数据类型是 LMDB,所以要赋值 backend,其他的依次类推了。
因为 caffe 里面训练基本都是用 SGD(随机梯度下降)的方法,因此都要取样本块,一次迭代只拿一个 batch 来训练,这里 batch_size 我们就设置为 128 (当然你也可以是 100 或者其他什么,不过建议不要太大)。为什么要设置 mean_file 路径?设置这个路径是为了让数据减去它的均值,这样网络收敛会更快,效果也往往会更好,相当于一个简单的 preprocessing 的过程。为什么要设置 crop_size?设置 crop_size 为 28 意味着将原来的 3 X 32 X 32 大小的图像随机剪裁成 3 X 28 X 28 大小的图像块作为输入数据,虽然论文中作者是在原来 3 X 32 X 32 大小的图像的上下左右加上 4 层 pad,pad 的值均为 0,变成了 3 X 40 X 40 的图像,然后在这个图像上随机剪裁成 3 X 32 X 32 大小图像作为输入数据,但这里为了快速实现 ResNet 因此采用了一个折中的办法,由于输入数据大小变成了 3 X 28 X 28,所以测试数据要进行剪裁成同样大小,这种剪裁的方法是 data augmentation的一种,可以增加样本的多样性。为什么要设置 mirror?mirror 设置为 True 意味将剪裁后的图像进行随机水平翻转,既要么翻转要么不翻转。跟上面的 data augmentation 一样,也是一种增加样本多样性的方法,我们认为图像经过水平翻转之后里面的物体仍然是那个物体。
数据层我们定义好了以后,接下来我们定义 ResNet Block,因为 ResNet Block 是有规律的,所有我们再额外写一些函数,补充代码如下:
def conv_BN_scale_relu(split, bottom, nout, ks, stride, pad):

    conv = L.Convolution(bottom, kernel_size = ks, stride = stride,
                         num_output = nout, pad = pad, bias_term = True,
                         weight_filler = dict(type = 'xvaier'),
                         bias_filler = dict(type = 'constant'),
                         param = [dict(lr_mult = 1, decay_mult = 1),
                                  dict(lr_mult = 2, decay_mult = 0)])
    if split == 'train':

        # 训练的时候我们对 BN 的参数取滑动平均
        BN = L.BatchNorm(
            conv, batch_norm_param = dict(use_global_stats = False),
                in_place = True, param = [dict(lr_mult = 0, decay_mult = 0),
                                          dict(lr_mult = 0, decay_mult = 0),
                                          dict(lr_mult = 0, decay_mult = 0)])

    else:

        # 测试的时候我们直接是有输入的参数,BN 的学习率惩罚设置为 0,由 scale 学习
        BN = L.BatchNorm(
            conv, batch_norm_param = dict(use_global_stats = True),
                in_place = True, param = [dict(lr_mult = 0, decay_mult = 0),
                                          dict(lr_mult = 0, decay_mult = 0),
                                          dict(lr_mult = 0, decay_mult = 0)])

    scale = L.Scale(BN, scale_param = dict(bias_term = True, in_place = True))
    relu = L.ReLu(scale, in_place = True)

    return scale, relu

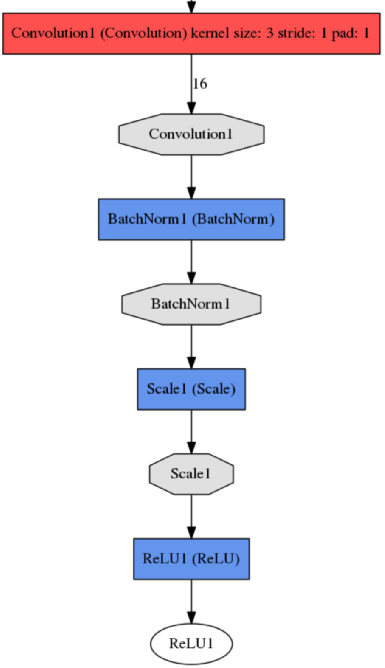
Fig 12 conv_BN_scale_relu 函数输入到输出结构
对 conv_BN_scale_relu 函数的解释:输入的数据为 bottom,nout 是卷积核的个数,也等于输出数据的通道数,ks 是卷积核的大小,3 的意思是 3 X 3 大小的卷积核,stride 意思是步长,pad 的意思是在输入数据上下左右补多少层 0,卷积之后我们还对数据进行 BN(BatchNormalization)操作,为什么要进行 BN,《Batch Normalization: Accelerating Deep Network Training by Reducing Internal Covariate Shift》这篇论文讲到过会加速网络的训练速度,具体这里就不讲了,然而 caffe 中 BN 层并不能学习到 α 和 β 参数,因此要加上 scale 层学习,这是作者在 ResNet code主页上 https://github.com/KaimingHe/deep-residual-networks 提到的:
![]()
经过scale层之后,我们再经过一个激活函数ReLU,我们返回的值是scale层的输出和ReLU的输出,这样可以供我们选择。下面讲解另外的一个函数:
def ResNet_block(split, bottom, nout, ks, stride, projection_stride, pad):

    # 1 代表不需要 1 X 1 的映射
    if projection_stride == 1:

        scale0 = bottom

    # 否则经过 1 X 1,stride = 2 的映射
    else:

        scale0, relu0 = conv_BN_scale_relu(split, bottom, nout, 1,
                                           projection_stride, 0)

    scale1, relu1 = conv_BN_scale_relu(split, bottom, nout, ks,
                                       projection_stride, pad)
    scale2, relu2 = conv_BN_scale_relu(split, bottom, nout, ks, stride, pad)

    wise = L.Eltwise(scale2, scale0, operation = P.Eltwise.SUM)
    wise_relu = L.ReLu(wise, in_place = True)

    return wise_relu
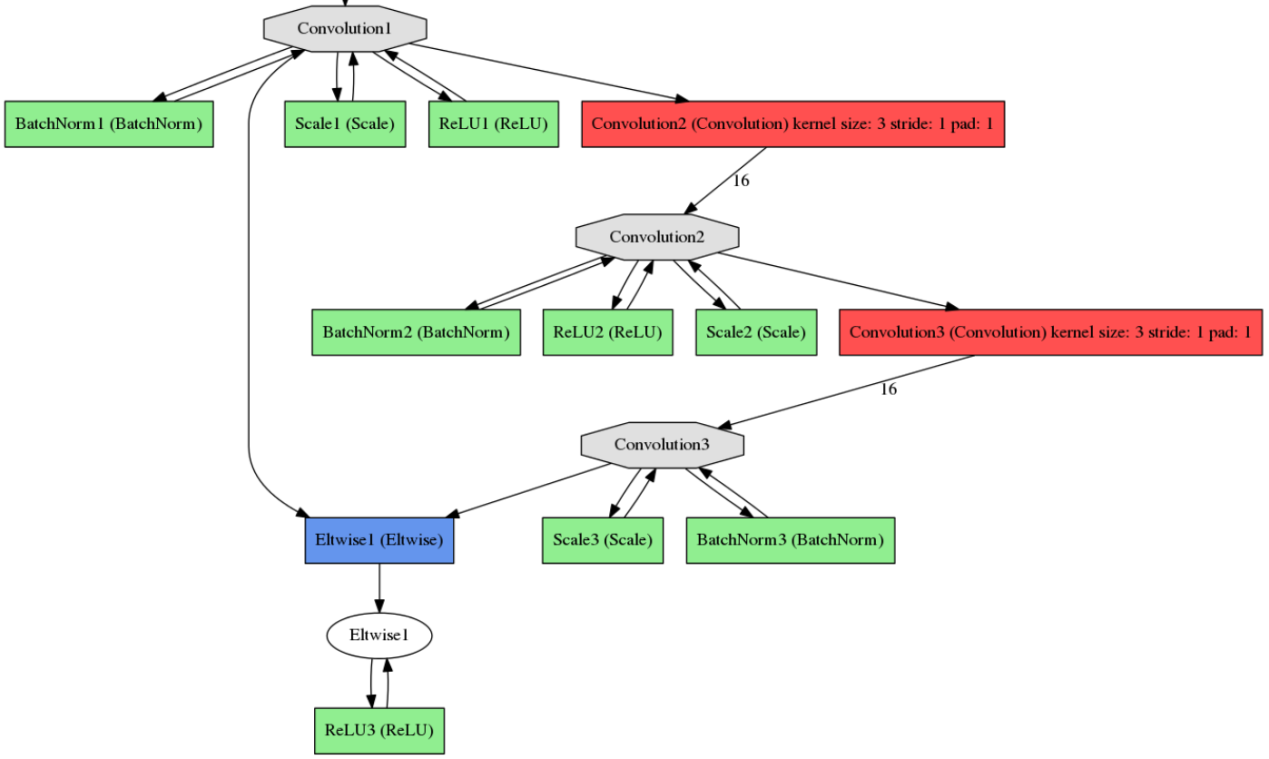
我们在 ResNe t结构介绍部分中提到了网络的结构,发现输入数据经过 2 次卷积操作后再与输入数据相加即为 ResNet 的基本结构,因此这个 ResNet_block 就定义了这个部分。

Fig 13 ResNet_bloc k函数输入到输出的结构