SERVLET
HttpServletResponse && HttpServletRequest
在web服务器接收到客户端的请求时,会分别创建两个对象:HttpServletResponse && HttpServletRequest
如果要获取客户端请求过来的数据,则须使用HttpServletRequest
如果要给客户端响应一些信息,则须使用HttpServletResonse
1、 HttpServletResponse
1.1、分类
一些负责向浏览器发送数据的常用方法:
ServletOutputStream getOutputStream() throws IOException;
PrintWriter getWriter() throws IOException;
一些负责向浏览器发送响应头的方法:
    void setCharacterEncoding(String var1);

    void setContentLength(int var1);

    void setContentLengthLong(long var1);

    void setContentType(String var1);

    void setDateHeader(String var1, long var2);

    void addDateHeader(String var1, long var2);

    void setHeader(String var1, String var2);

    void addHeader(String var1, String var2);

    void setIntHeader(String var1, int var2);

    void addIntHeader(String var1, int var2);
一些响应的状态码
    int SC_CONTINUE = 100;
    int SC_SWITCHING_PROTOCOLS = 101;
    int SC_OK = 200;
    int SC_CREATED = 201;
    int SC_ACCEPTED = 202;
    int SC_NON_AUTHORITATIVE_INFORMATION = 203;
    int SC_NO_CONTENT = 204;
    int SC_RESET_CONTENT = 205;
    int SC_PARTIAL_CONTENT = 206;
    int SC_MULTIPLE_CHOICES = 300;
    int SC_MOVED_PERMANENTLY = 301;
    int SC_MOVED_TEMPORARILY = 302;
    int SC_FOUND = 302;
    int SC_SEE_OTHER = 303;
    int SC_NOT_MODIFIED = 304;
    int SC_USE_PROXY = 305;
    int SC_TEMPORARY_REDIRECT = 307;
    int SC_BAD_REQUEST = 400;
    int SC_UNAUTHORIZED = 401;
    int SC_PAYMENT_REQUIRED = 402;
    int SC_FORBIDDEN = 403;
    int SC_NOT_FOUND = 404;
    int SC_METHOD_NOT_ALLOWED = 405;
    int SC_NOT_ACCEPTABLE = 406;
    int SC_PROXY_AUTHENTICATION_REQUIRED = 407;
    int SC_REQUEST_TIMEOUT = 408;
    int SC_CONFLICT = 409;
    int SC_GONE = 410;
    int SC_LENGTH_REQUIRED = 411;
    int SC_PRECONDITION_FAILED = 412;
    int SC_REQUEST_ENTITY_TOO_LARGE = 413;
    int SC_REQUEST_URI_TOO_LONG = 414;
    int SC_UNSUPPORTED_MEDIA_TYPE = 415;
    int SC_REQUESTED_RANGE_NOT_SATISFIABLE = 416;
    int SC_EXPECTATION_FAILED = 417;
    int SC_INTERNAL_SERVER_ERROR = 500;
    int SC_NOT_IMPLEMENTED = 501;
    int SC_BAD_GATEWAY = 502;
    int SC_SERVICE_UNAVAILABLE = 503;
    int SC_GATEWAY_TIMEOUT = 504;
    int SC_HTTP_VERSION_NOT_SUPPORTED = 505;
1.2、下载文件
首先,了解一些下载文件的过程。
- 获取下载文件的路径
- 下载的文件名
- 设置让浏览器支持下载我们需要的东西
- 获取下载文件的输入流
- 创建缓冲区
- 获取OutputStream对象
- 将FileOutputStream流写入buffer缓冲区
- 使用OutputStream将缓冲区中的数据输出到客户端
代码实现:
package com.charles.responce;

import javax.servlet.ServletException;
import javax.servlet.ServletOutputStream;
import javax.servlet.http.HttpServlet;
import javax.servlet.http.HttpServletRequest;
import javax.servlet.http.HttpServletResponse;
import java.io.FileInputStream;
import java.io.IOException;
import java.net.URLEncoder;

public class Down extends HttpServlet {
    @Override
    protected void doGet(HttpServletRequest req, HttpServletResponse resp) throws ServletException, IOException {
//        1. 要获取下载文件的路径
        String realPath = "D:\JavaProject\Demo05\Java_Web_Response\src\main\resources\123.jpg";
        System.out.println("文件路路径:"+ realPath);
//        2. 下载的文件名是啥?
        String fileName = realPath.substring(realPath.indexOf("\") + 1);
//        3. 设置想办法让浏览器能够支持下载我们需要的东西
        resp.setHeader("Content-Disposition","attachment;filename="+ URLEncoder.encode(fileName,"UTF-8"));
//        4. 获取下载文件的输入流
        FileInputStream in = new FileInputStream(realPath);
//        5. 创建缓冲区
        int len = 0;
        byte[] buffer = new byte[1024];
//        6. 获取OutputStream对象
        ServletOutputStream out = resp.getOutputStream();
//        7. 将FileOutputStream流写入到buffer缓冲区,使用OutputStream将缓冲区中的数据输出到客户端!
        if ((len = in.read(buffer)) != 1){
            out.write(buffer,0,len);
        }

    }

    @Override
    protected void doPost(HttpServletRequest req, HttpServletResponse resp) throws ServletException, IOException {
        doGet(req, resp);
    }
}
注册servlet后,结果展示:可以看到,页面跳转后,浏览器自动下载该图片。

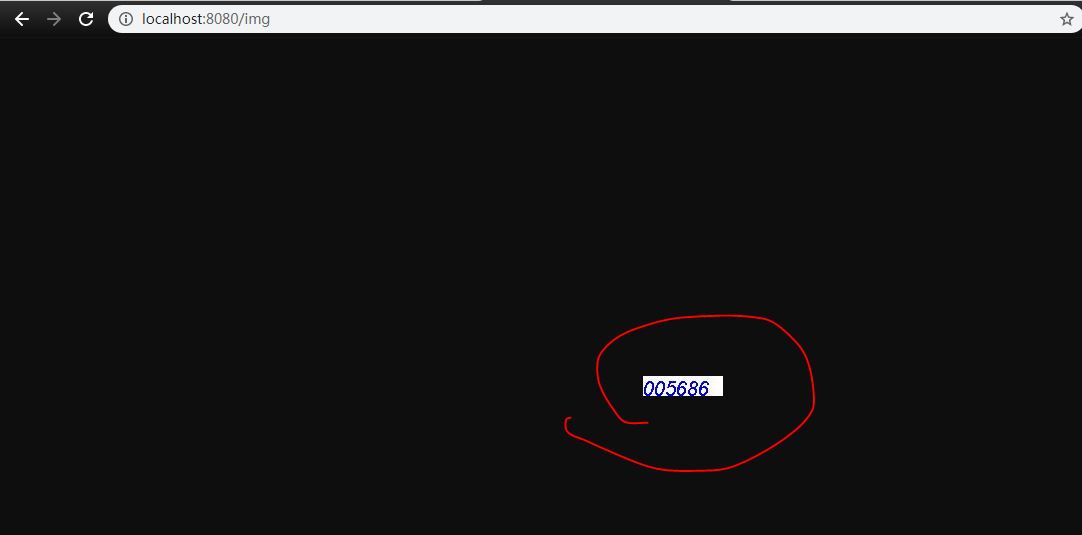
1.3、验证码功能
案例:创建一个图片数字验证码
代码实现:
package com.charles.responce;

import javax.imageio.ImageIO;
import javax.servlet.ServletException;
import javax.servlet.http.HttpServlet;
import javax.servlet.http.HttpServletRequest;
import javax.servlet.http.HttpServletResponse;
import java.awt.*;
import java.awt.image.BufferedImage;
import java.io.IOException;
import java.util.Random;

public class ImgServlet extends HttpServlet {
    @Override
    protected void doGet(HttpServletRequest req, HttpServletResponse resp) throws ServletException, IOException {
        // 设置浏览器每3秒刷新一次
        resp.setHeader("refresh", "3");

        // 在内存中创建一个图片
        BufferedImage image = new BufferedImage(80,20,BufferedImage.TYPE_INT_RGB);
        // 得到图片
        Graphics2D graphics2D = (Graphics2D) image.getGraphics(); // 笔
        // 设置图片的背景颜色
        graphics2D.setColor(Color.white);
        graphics2D.fillRect(0,0,80,20);
        // 给图片写数据
        graphics2D.setColor(Color.blue);
        graphics2D.setFont(new Font(null,Font.ITALIC,20));
        graphics2D.drawString(makeNum(),0,20);

        // 告诉浏览器,请求用图片方式打开
        resp.setContentType("image/jpeg");
        // 网站存在缓存,不让浏览器缓存
        resp.setDateHeader("expires",-1);
        resp.setHeader("Cache-Control","no-cache");
        resp.setHeader("Pragma","no-cache");

        // 把图片写给浏览器
        ImageIO.write(image,"jpg",resp.getOutputStream());
    }

    // 生成随机数
    public String makeNum(){
        Random rd = new Random();
        String num = rd.nextInt(9999) + " ";
        StringBuffer sb = new StringBuffer();
        for (int i = 0; i < 7-num.length(); i++) {
            sb.append("0");
        }
        num = sb.toString() + num;
        return num;
    }


    @Override
    protected void doPost(HttpServletRequest req, HttpServletResponse resp) throws ServletException, IOException {
        doGet(req, resp);
    }
}
注册servlet后,结果展示:
1.4、重定向
重定向(Redirect)就是通过各种方法将各种网络请求重新定个方向转到其它位置
登录案例:
代码展示:
1. 首页的jsp页面:
<html>
<body>
<form action="${pageContext.request.contextPath}/login" method="get">
    username <input type="text" name="username"> <br>
    password <input type="password" name="password"> <br>
    <input type="submit">
</form>

</body>
</html>
2. 重定向的jsp页面
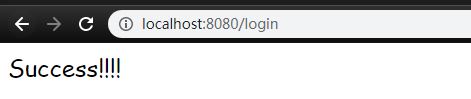
<%@ page contentType="text/html;charset=UTF-8" language="java" %>
<html>
<head>
    <title>Title</title>
</head>
<body>
<h1>Success!!!!!</h1>
</body>
</html>
3. servlet类
package com.charles.responce;

import javax.servlet.ServletException;
import javax.servlet.http.HttpServlet;
import javax.servlet.http.HttpServletRequest;
import javax.servlet.http.HttpServletResponse;
import java.io.IOException;

public class login extends HttpServlet {
    @Override
    protected void doGet(HttpServletRequest req, HttpServletResponse resp) throws ServletException, IOException {
        resp.setCharacterEncoding("GBK");
        // 处理请求
        String username = req.getParameter("username");
        String password = req.getParameter("password");

        System.out.println(username + ": " + password);

        // 重定向
        resp.sendRedirect("/r/success.jsp");

    }

    @Override
    protected void doPost(HttpServletRequest req, HttpServletResponse resp) throws ServletException, IOException {
        doGet(req, resp);
    }
}
注册servlet后,运行结果展示:
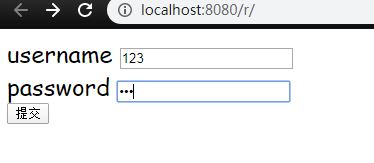
1. 随便输入一个账号密码
2. 提交数据后,页面重定向至成功页面

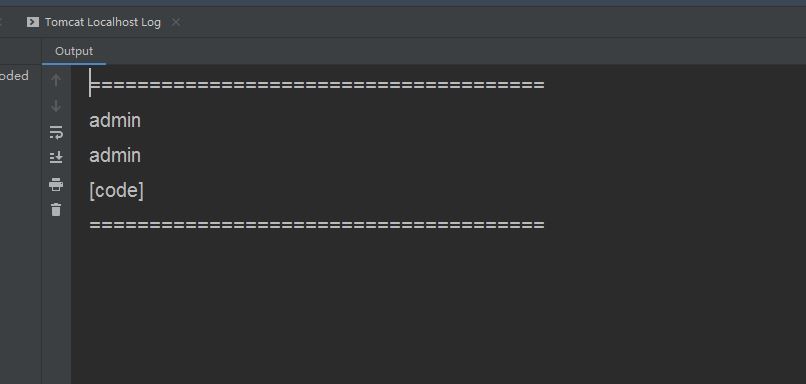
3. 控制台展示

2. HttpServletRequest
HttpServletRequest代表客户端的请求,用户通过Http协议访问服务器,HTTP请求中的所有信息会被封装到HttpServletRequest,通过这个HttpServletRequest的方法,获得客户端的所有信息;
在这里提供一个小案例,来展示Request的使用方法:
代码展示:
@Override
protected void doGet(HttpServletRequest req, HttpServletResponse resp) throws ServletException, IOException {

    req.setCharacterEncoding("utf-8");
    resp.setCharacterEncoding("utf-8");

    String username = req.getParameter("username");
    String password = req.getParameter("password");
    String[] hobbys = req.getParameterValues("hobbys");
    System.out.println("=============================");
    //后台接收中文乱码问题
    System.out.println(username);
    System.out.println(password);
    System.out.println(Arrays.toString(hobbys));
    System.out.println("=============================");


    System.out.println(req.getContextPath());
    //通过请求转发
    //这里的 / 代表当前的web应用
    req.getRequestDispatcher("/success.jsp").forward(req,resp);

}
展示的jsp页面:
<%@ page contentType="text/html;charset=UTF-8" language="java" %>
<html>
<head>
    <title>Title</title>
</head>
<body>

<div style="align-content: center">
    <form action="${pageContext.request.contextPath}/login" method="post">
        用户名:<input type="text" name="username">
        密码:<input type="password" name="password">
        爱好:
        <input type="checkbox" name="hobbies" value="code">code
        <input type="checkbox" name="hobbies" value="dance">dance
        <input type="checkbox" name="hobbies" value="sing">sing
        <input type="checkbox" name="hobbies" value="swim">swim
        <input type="submit">
    </form>

</div>
</body>
</html>
跳转的jsp页面:
<%@ page contentType="text/html;charset=UTF-8" language="java" %>
<html>
<head>
    <title>Title</title>
</head>
<body>
<hi>Success!!!!</hi>
</body>
</html>
注册servlet后,运行展示: