今天我特地写下笔记,希望可以完全掌握这个东西,也希望可以帮助到任何想对学习这个东西的同学。
本文用nginx部署服务为主要内容,基于CentOs 7.8系统。
文档版本:1.0.1
更新时间:2020-07-22 20:28
一. 相关环境或软件技术
1.1 CentOS 系统
CentOS(Community Enterprise Operating System,中文意思是社区企业操作系统)是Linux
当前安装版本CentOS 7.8版本,保持统一版本,方便后期维护。
1.2 Nginx
Nginx (engine x) 是一个高性能的HTTP和反向代理web服务器。
当前使用的nginx版本为 nginx-1.6.2 ,直接使用安装包安装。
1.3 PCRE
安装Nginx 前 必须安装 PCRE。PCRE 作用是让 Nginx 支持 Rewrite 功能。当前使用的版本为 pcre-8.35 的安装包。
Nginx是高度自由化的Web服务器,它的功能是由许多模块来支持。如果使用了某个模块,这个模块使用了一些类似zlib或OpenSSL等的第三方库,那么就必须先安装这些软件。
PCRE(Perl Compatible Regular Expressions)是一个Perl库,包括perl兼容的正则表达式库。如果我们在配置文件nginx.conf中使用了正则表达式,那么在编译Nginx时就必须把PCRE库编译进Nginx,因为Nginx的HTTP模块需要靠它来解析正则表达式。另外,pcre-devel是使用PCRE做二次开发时所需要的开发库,包括头文件等,这也是编译Nginx所必须使用的。
1.4 前端包目录结构
nginx安装后,需要上传前端代码文件,进行页面访问。汇聚前端包一般是只有一个名为 dist 文件夹,文件夹的目录结构如下:
-- dist
    -- static
    -- index.html
    -- umi.css
    -- umi.js
其中static内包含的是静态文件。
二. 安装部署
2.1 xshell操作
-
当前文档以xshell为例。打开xshell后,新建会话连接,先输入会话名称和服务器的ip:
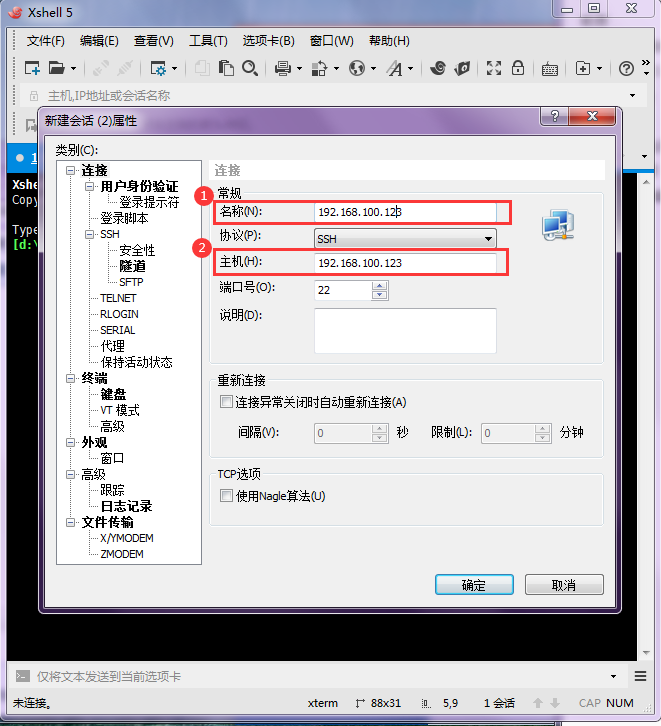
-
点击用户身份验证,输入服务器的用户名和密码,确定后保存:
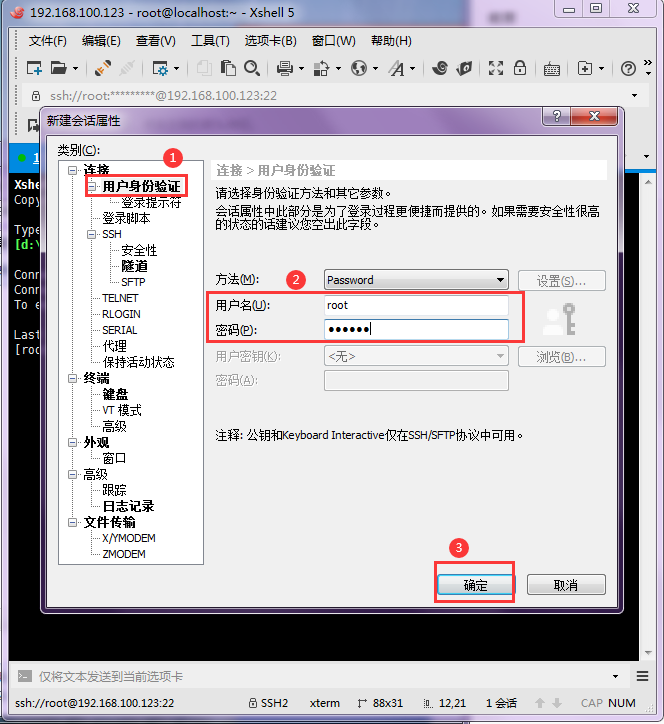
-
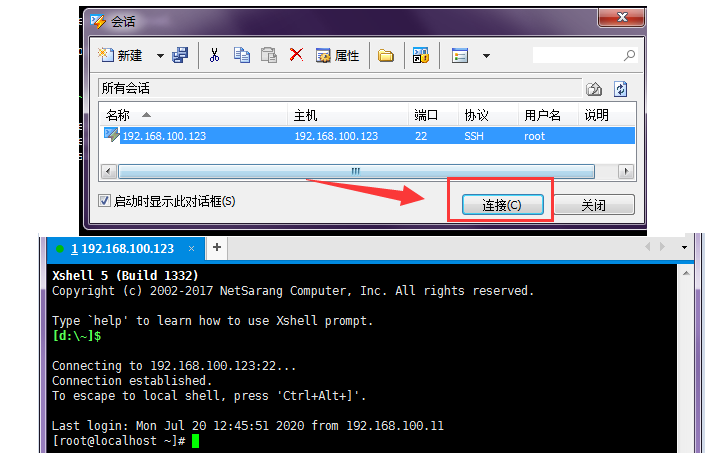
连接后进入代码编辑:
2.2 安装PCRE
这里安装使用的是安装包模式。
-
进入统一设置(可以自己定义路径)的文件夹:
[root@localhost ~]# cd /usr/local/src
-
使用命令 rz 后直接回车,然后选择 pcre-8.35 安装包上传。
[root@localhost src]# rz
(上传后,可用命令 ls 查看是否有上传)
-
解压安装包
[root@localhost src]# tar zxvf pcre-8.35.tar.gz
(上传后,可用命令 ls 查看是否有解压)
-
进入pcre安装包目录
[root@localhost src]# cd pcre-8.35
-
检测配置
./configure 是用来检测你的安装平台的目标特征的。比如它会检测你是不是有CC或GCC,并不是需要CC或GCC,它是个shell脚本。配置完之后控制台会打印出pcre配置的摘要信息。
[root@localhost pcre-8.35]# ./configure
-
编译
make 是用来编译的,它从Makefile中读取指令,然后编译。
[root@localhost pcre-8.35]# make
-
安装
make install 是用来安装的,它也从Makefile中读取指令,安装到指定的位置。
[root@localhost pcre-8.35]# make install
-
安装后,可查看pcre版本。
[root@bogon pcre-8.35]# pcre-config --version

如上图所示,有显示8.35版本,则表示安装成功。
2.3 安装Nginx
这里安装使用的是安装包模式。
-
进入统一设置(可以自己定义路径)的文件夹:
[root@bogon pcre-8.35]# cd /usr/local/src
-
使用命令 rz 后直接回车,然后选择 nginx-1.6.2 安装包上传。
[root@localhost src]# rz
(上传后,可用命令 ls 查看是否有上传)
-
解压安装包
[root@localhost src]# tar zxvf nginx-1.6.2.tar.gz
(上传后,可用命令 ls 查看是否有解压)
-
进入nginx安装包目录
[root@bogon src]# cd nginx-1.6.2
-
配置(如想了解更多配置,可以访问https://www.cnblogs.com/flashfish/p/11025961.html)
[root@localhost nginx-1.6.2]# ./configure --prefix=/usr/local/webserver/nginx --with-http_stub_status_module --with-http_ssl_module --with-pcre=/usr/local/src/pcre-8.35
-
编译
[root@localhost nginx-1.6.2]# make
-
安装
[root@localhost nginx-1.6.2]# make install
-
安装后,查看版本号
[root@localhost nginx-1.6.2]# /usr/local/webserver/nginx/sbin/nginx -v
如果如下所示,显示版本号(以下代码无需执行),则表示已安装。
nginx version: nginx/1.6.2
-
启动nginx
[root@localhost nginx-1.6.2]# /usr/local/webserver/nginx/sbin/nginx
-
请到浏览器地址栏输入服务器地址,比如当前示例地址是 192.168.100.123 ,进行访问,如下所示,表示nginx安装成功,并可以访问。
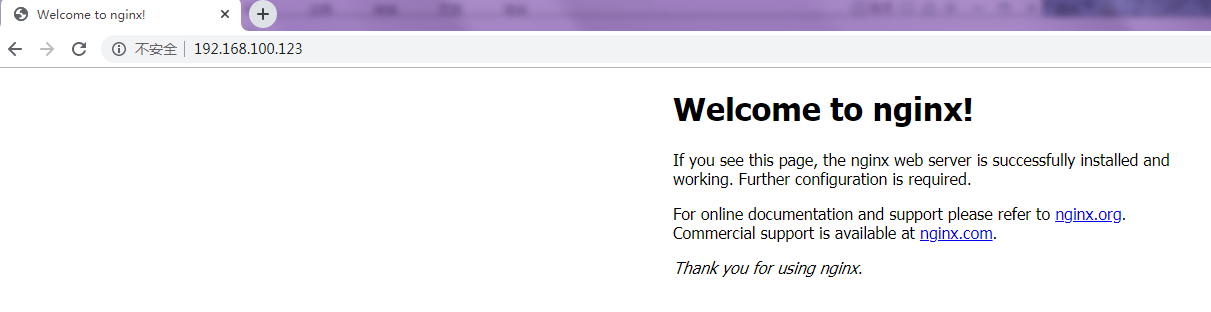
-
如果访问不了,可能是服务器防火墙没有关闭,关闭命令如下:
[root@localhost html]# systemctl stop firewalld
[root@localhost html]# systemctl disable firewalld
如果显示以下代码,表示关闭成功
Removed symlink /etc/systemd/system/multi-user.target.wants/firewalld.service.
Removed symlink /etc/systemd/system/dbus-org.fedoraproject.FirewallD1.service.
-
关闭后重启nginx,然后再去浏览器访问
/usr/local/webserver/nginx/sbin/nginx -s -reload
三. nginx部署多套服务
3.1 前端配置
先把前端包解压,然后用文本打开前端包下的 index.html 文件,默认代码如下:
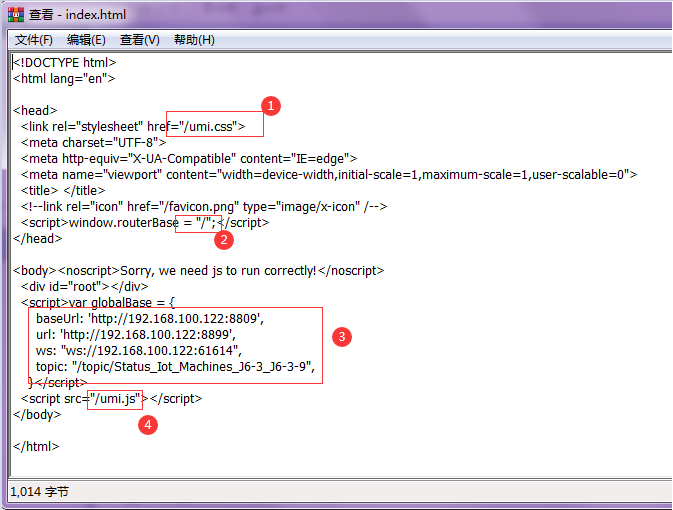
上图标注的4个点都是必须要配置的点,其中:
-
第1,4个标注点,是前端包的默认路径,可以添加配置
-
第3个标注点是ip,端口等其他全局配置,需要和后端对应匹配
-
第2个标注点是访问后的路径替换。我们访问的是nginx的location的后面那个东西(3.2.2章节),然后window.routeBase会替换掉这个地址
配置完成后,把dist再重新打包成 zip 格式,然后把dist下的static文件夹也打包成 zip 格式,先放着,用以上传。
3.2 Nginx对应配置
nginx的目录结构包含了conf文件夹和html文件夹,主要操作在于这两个。
3.2.1 上传前端包
1.打开linux系统下已经安装好的nginx,先找到nginx下的html文件夹,然后在当前文件夹用命令 rz 直接上传刚刚打包的dist.zip和static.zip 。
2.前端包下有个static文件夹(目录结构请看1.4章节),这个单独拿出来,重新压缩成 zip 然后用命令 rz 上传,上传后可以使用命令 ls 查看是否有上传。
解压static.zip
[root@localhost html]# unzip static.zip
解压后,如下图所示蓝色部分为文件夹,第二个框框为static文件夹下面的文件:

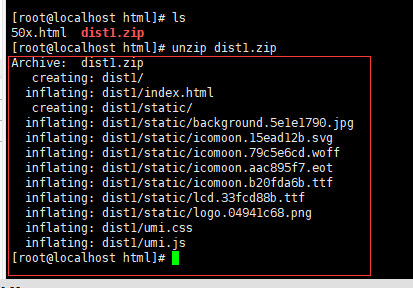
解压dist1.zip(dist1.zip只是举例)
[root@localhost html]# unzip dist1.zip
解压后如下:
多套服务部署后,nginx下的html文件夹目录结构如下:

至少包含dist5,static 两个文件夹。
3.2.2 配置 nginx.conf
首先进入(cd conf)conf文件夹,然后使用命令 vi nginx.conf 进行查看文件,
注意,命令vi nginx.conf 如果Enter后出现如下图提示
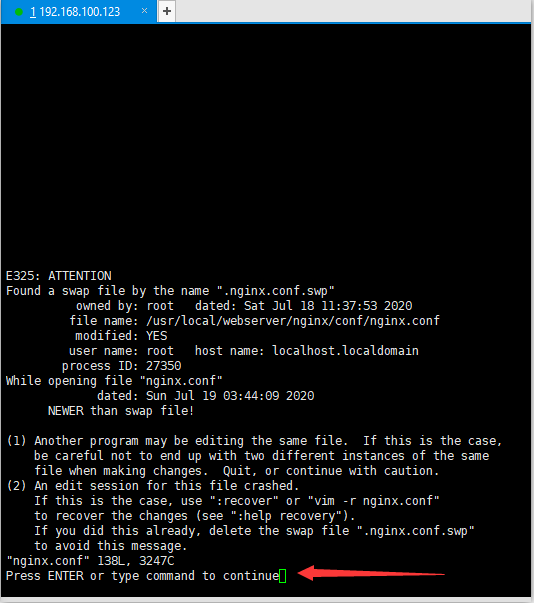
则再 Enter一次,否则就略过此步骤
文件默认配置如下:
#user nobody;
worker_processes 1;
#error_log logs/error.log;
#error_log logs/error.log notice;
#error_log logs/error.log info;
#pid logs/nginx.pid;
events {
worker_connections 1024;
}
http {
include mime.types;
default_type application/octet-stream;
#log_format main '$remote_addr - $remote_user [$time_local] "$request" '
# '$status $body_bytes_sent "$http_referer" '
# '"$http_user_agent" "$http_x_forwarded_for"';
#access_log logs/access.log main;
sendfile on;
#tcp_nopush on;
#keepalive_timeout 0;
keepalive_timeout 65;
#gzip on;
server {
listen 80;
server_name localhost;
#charset koi8-r;
#access_log logs/host.access.log main;
location / {
root html;
index index.html index.htm;
}
#error_page 404 /404.html;
# redirect server error pages to the static page /50x.html
#
error_page 500 502 503 504 /50x.html;
location = /50x.html {
root html;
}
# proxy the PHP scripts to Apache listening on 127.0.0.1:80
#
#location ~ .php$ {
# proxy_pass http://127.0.0.1;
#}
# pass the PHP scripts to FastCGI server listening on 127.0.0.1:9000
#
#location ~ .php$ {
# root html;
# fastcgi_pass 127.0.0.1:9000;
# fastcgi_index index.php;
# fastcgi_param SCRIPT_FILENAME /scripts$fastcgi_script_name;
# include fastcgi_params;
#}
# deny access to .htaccess files, if Apache's document root
# concurs with nginx's one
#
#location ~ /.ht {
# deny all;
#}
}
# another virtual host using mix of IP-, name-, and port-based configuration
#
#server {
# listen 8000;
# listen somename:8080;
# server_name somename alias another.alias;
# location / {
# root html;
# index index.html index.htm;
# }
#}
# HTTPS server
#
#server {
# listen 443 ssl;
# server_name localhost;
# ssl_certificate cert.pem;
# ssl_certificate_key cert.key;
# ssl_session_cache shared:SSL:1m;
# ssl_session_timeout 5m;
# ssl_ciphers HIGH:!aNULL:!MD5;
# ssl_prefer_server_ciphers on;
# location / {
# root html;
# index index.html index.htm;
# }
#}
}
然后,当前文本有编辑状态和非编辑状态两种模式(底部含有 -- INSTERT -- 表示编辑状态,无此标志表示非编辑状态),默认是非编辑状态。
修改配置有两种方式:
第一种,主动进入编辑状态(按a键或i键),编辑代码(80端口下,大概35行上下):
        ...
        location / {
            root   html;
            index  index.html index.htm;
        }
        ...
编辑后为:
        ...
        location /dist5 {
            try_files $uri $uri/ /dist5/index.html;
        }

        location /dist6 {
            try_files $uri $uri/ /dist6/index.html;
        }

        location /dist7 {
            try_files $uri $uri/ /dist7/index.html;
        }

        location /dist9 {
            try_files $uri $uri/ /dist9/index.html;
        }
        ...
然后按键ESC先退出编辑状态,之后再用命令 :wq 保存退出。(其他命令请看附录一)
提示:有一个location就是单套服务,多个就是多个服务。并且单套服务的可以直接把dist下的所有内容,都放到nginx的html下,访问的时候直接访问ip。
第二种,非编辑状态下可直接长按d键全部删除,删除后可能会自动进入编辑状态,接着将下面内容复制粘贴替换(注意:如果是xshell操作复制粘贴,有时候第一行的user会缺失一部分字符,需要补全。)。替换后,先用 ESC退出编辑状态,然后再用命令 :wq 保存退出。(其他命令请看附录一)
#user root;
worker_processes 1;
#error_log logs/error.log;
#error_log logs/error.log notice;
#error_log logs/error.log info;
#pid logs/nginx.pid;
events {
worker_connections 1024;
}
http {
include mime.types;
default_type application/octet-stream;
#log_format main '$remote_addr - $remote_user [$time_local] "$request" '
# '$status $body_bytes_sent "$http_referer" '
# '"$http_user_agent" "$http_x_forwarded_for"';
#access_log logs/access.log main;
sendfile on;
#tcp_nopush on;
#keepalive_timeout 0;
keepalive_timeout 65;
#gzip on;
server {
listen 80;
server_name localhost;
#charset koi8-r;
#access_log logs/host.access.log main;
location /dist5 {
try_files $uri $uri/ /dist5/index.html;
}
location /dist6 {
try_files $uri $uri/ /dist6/index.html;
}
location /dist7 {
try_files $uri $uri/ /dist7/index.html;
}
location /dist9 {
try_files $uri $uri/ /dist9/index.html;
}
#error_page 404 /404.html;
# redirect server error pages to the static page /50x.html
#
error_page 500 502 503 504 /50x.html;
location = /50x.html {
root html;
}
# proxy the PHP scripts to Apache listening on 127.0.0.1:80
#
#location ~ .php$ {
# proxy_pass http://127.0.0.1;
#}
# pass the PHP scripts to FastCGI server listening on 127.0.0.1:9000
#
#location ~ .php$ {
# root html;
# fastcgi_pass 127.0.0.1:9000;
# fastcgi_index index.php;
# fastcgi_param SCRIPT_FILENAME /scripts$fastcgi_script_name;
# include fastcgi_params;
#}
# deny access to .htaccess files, if Apache's document root
# concurs with nginx's one
#
#location ~ /.ht {
# deny all;
#}
}
# another virtual host using mix of IP-, name-, and port-based configuration
#
#server {
# listen 8000;
# listen somename:8080;
# server_name somename alias another.alias;
# location / {
# root html;
# index index.html index.htm;
# }
#}
# HTTPS server
#
#server {
# listen 443 ssl;
# server_name localhost;
# ssl_certificate cert.pem;
# ssl_certificate_key cert.key;
# ssl_session_cache shared:SSL:1m;
# ssl_session_timeout 5m;
# ssl_ciphers HIGH:!aNULL:!MD5;
# ssl_prefer_server_ciphers on;
# location / {
# root html;
# index index.html index.htm;
# }
#}
}
3.2.3 检查配置与重启查看
1. 保存退出后,在终端输入以下代码,检查配置是否正确:
[root@localhost conf]# /usr/local/webserver/nginx/sbin/nginx -t
如果显示以下内容,则表示配置正确(以下内容无需执行):
nginx: the configuration file /usr/local/webserver/nginx/conf/nginx.conf syntax is ok
nginx: configuration file /usr/local/webserver/nginx/conf/nginx.conf test is successful
2. 重启nginx
[root@localhost conf]# /usr/local/webserver/nginx/sbin/nginx -s reload
3. 到浏览器地址栏输入地址(如果已有页面,请清空缓存后刷新查看)查看,比如:
http://192.168.100.123/dist5
四. nginx部署单套服务
4.1前端配置
单套服务的nginx部署和多套服务部署类似,只是前端包配置和nginx对应的配置有所不同。
单套服务部署后,html文件夹目录结构如下:

至少包含index.html,umi.css,umi.js三个文件以及一个static文件夹。
4.2 Nginx对应配置
Nginx的单套服务与多套服务配置差别在于nginx.conf的配置不同。单套服务的主要修改配置代码部分是(80端口下的部分,第40行上下):
location / {
    root  html;
    index index.html index.htm;
}
修改后如下:
location / {
    try_files $uri $uri/ /index.html;
}
然后查看配置正确性,再重启nginx(参考3.2.3章节)
五. 更新操作
-
进入到nginx的html文件夹(命令请查看附录一)
-
先删除需要更新的包,否则可能会上传失败。比如(以下为示例代码,具体包名称以实际包为准);
rm dist.zip
删除提示如下:
rm:是否删除普通文件 "dist.zip"?
只需要在后面输入小写字母 y ,然后回车即可。删除后可用命令 ls 查看是否已被删除。
-
使用命令 rz 直接上传包
-
解压
解压覆盖会产生如下提示(如果已删除则忽略此步骤):
replace static/background.5e1e1790.jpg? [y]es, [n]o, [A]ll, [N]one, [r]ename:
可输入小写字母 y 一个一个覆盖,或者大写字母 A,全部覆盖。
-
去浏览器上进行清空缓存并刷新汇聚页面查看是否完成更新。
附录一:常用命令
----------
pwd 显示当前目录
ls 查看目录下的内容
cd xxx 进入到xxx目录
cd .. 返回上一层目录
cat 显示文件的内容
touch 创建文件
mv 移动文件
rm 删除文件
rm -rf xxx 删除文件夹(xxx是文件夹名称)
rm dir 删除目录
vi 查看编辑文件
unzip xxx.zip 解压zip的压缩包
tar
----------
ESC按键 退出编辑模式,才能使用以下命令
:q 冒号+q,退出不保存
:q! 强制退出不保存
:wq 保存并退出
gg 回到最上行
dd操作,删除行操作,当vi xxx某个文件的时候,有编辑模式和非编辑模式两种状态,dd删除操作是非编辑模式下的删除行操作
u 撤销
----------
查看nginx进程:ps aux | grep nginx
启动防火墙: systemctl start firewalld
关闭防火墙: systemctl stop firewalld
查看防火墙状态: systemctl status firewalld
开机禁用防火墙: systemctl disable firewalld
开机启用防火墙: systemctl enable firewalld
附录二:常见错误
-
删除带括号的会报错
[root@localhost src]# rm pcre-8.35.tar(1).gz
-bash: 未预期的符号 `(' 附近有语法错误
在括号前加 就可以。
[root@localhost src]# rm pcre-8.35.tar(1).gz
-
nginx已经启动,又再次启动,无效
nginx: [emerg] bind() to 0.0.0.0:80 failed (98: Address already in use)
nginx: [emerg] bind() to 0.0.0.0:80 failed (98: Address already in use)
nginx: [emerg] bind() to 0.0.0.0:80 failed (98: Address already in use)
......
生成很多类似这样的代码。这个时候不应该启动,而是重启nginx
[root@localhost /]# /usr/local/webserver/nginx/sbin/nginx -s reload
-
用tar去解压zip等压缩包解压不出来,tar是用来解压*.tar.gz文件的
[root@localhost src]# tar zxvf nginx-1.6.2.tar.gz
xxx.zip文件解压应该用命令 unzip ,如:
[root@localhost src]# unzip dist.zip
-
在终端输入命令时,若遇到权限问题,可以直接获得root权限。即在终端执行sudo -s,如下:
yzy@yzy-test:/usr/local/nginx/html$ sudo -s
,然后输入当前登录的普通用户密码(密码不可见,看起来像没有输入一样,保持正常输入就好),
[sudo] yzy 的密码: