博客主体样式更改
- 首先选一个框架模板,在此模板基础上进行样式调整。这里我选择darkgreentrip

- 在页面定制CSS代码中插入如下代码:
#home {
    margin: 0 auto;
     75%;/*原始65*/
    min- 980px;/*页面顶部的宽度*/
    background-color: rgba(245, 245, 245, 0.7);
    padding: 30px;
    margin-top: 50px;
    margin-bottom: 50px;
    box-shadow: 0 2px 6px rgba(100, 100, 100, 0.5);
    border-radius: 20px;  /*调节边框圆度*/
}
/*boby调节背景图片*/
body {
    background:url("https://timgsa.baidu.com/timg?image&quality=80&size=b9999_10000&sec=1607666000894&di=82916514ce52a2bda8d03efb78c7ed14&imgtype=0&src=http%3A%2F%2Fpic1.win4000.com%2Fwallpaper%2F8%2F59a671591d9bd.jpg");  /*背景图片链接*/
    background-position:center left;
    background-size: cover;
    background-repeat: no-repeat;
    background-attachment:fixed;
   cursor: url(https://blog-static.cnblogs.com/files/Carmena/favicon.ico),auto;
}
#blogTitle {
    height: 100%;  /*高度*/
    border-radius: 12px;
    clear: both;
    background-color: #cccccc69;   /*博客标题的背景*/

}
#blogTitle h1 {
    font-size: 36px;
    color::#fae4e4;
    font-weight: bold;
    line-height: 1.8em;/*原始 1.6em*/
    margin-top: 10px;/*原始 15px */
    margin-bottom:auto;
}
#blogTitle h2 {
    font-weight: normal;
    font-size: 17px; /*原始 16px ;font-size: 1.0rem;*/
    line-height: 1.8;
    color:  #462b2e;
    font-weight: bold;
    text-align: right;
    float: right;
    margin-top: auto;
}
#navigator{
border-radius: 7px;
    background-color: rgba(201, 49, 49, 0.7);          /*标题栏下的颜色*/
}
#navList a:link, #navList a:visited, #navList a:active{
    color: #FFFFFF;
    font-size: 18px;
    font-weight: bold;
}
.blogStats{
    color: #eee;
}
.postTitle {
    border-left: 8px solid rgba(132,112,255, 0);
    margin-left: 10px;
    margin-bottom: 10px;
    font-size: 20px;
    float: right;
     100%;
    clear: both;
}
.postTitle a:link, .postTitle a:visited, .postTitle a:active {
    color:     #ac0e0e;
    transition: all 0.4s linear 0s;
}
.postTitle a:hover {
    margin-left: 30px;
    color: #ac0e0e;
    text-decoration: none;
}
.postCon {
    float: right;
    line-height: 1.5em;
     100%;
    clear: both;
    padding: 10px 0;
}
.day .postTitle a {
    padding-left: 10px;
}
.day {
    background: rgba(255, 255, 255, 0.7);
}
/*文章附加信息*/
.postDesc {
 /* background: gray no-repeat 0 1px; */
    color: #852222;
    float: left;
     90%;
    clear: both;
    text-align: left;
    font-family: "微软雅黑" , "宋体" , "黑体" ,Arial;
    font-size: 13px;
    /*padding-right: 20px;5px  padding-left: 90px;posted 发表时间左边距离*/
    margin-right:20px;
     /* margin-top: 20px;*/
    line-height: 1.8;
    /* padding-bottom: 35px; */
}
.newsItem, .catListEssay, .catListLink, .catListNoteBook, .catListTag, .catListPostCategory,
.catListPostArchive, .catListImageCategory, .catListArticleArchive, .catListView,
.catListFeedback, .mySearch, .catListComment, .catListBlogRank, .catList, .catListArticleCategory ,#blog-calendar
{
    background: rgba(255, 255, 255, 0.7);
    margin-bottom: 25px;
    word-wrap: break-word;
}
.CalTitle{
    background: rgba(255, 255, 255, 0);
}
.catListTitle{
    margin-top: auto;
    margin-bottom: auto;
    background-color: rgba(201, 49, 49, 0.7);   /*栏目的条纹颜色*/
    border-bottom: none;
}
#topics{
    background: rgba(255, 255, 255, 0.7);
}
.c_ad_block{
    display: none;
}
#tbCommentBody{
     100%;
    height: 200px;
    background: rgba(255, 255, 255, 0.5);
}
#q,#google_q{background: rgba(255, 255, 255, 0);}

.CalNextPrev{background: rgba(255, 255, 255, 0);}

.cnblogs_code{
    background: rgba(255, 255, 255, 0);
}
.dayTitle{
    display: none;
    font-size: 18px;
}
.cnblogs_code div{
    background: rgba(255, 255, 255, 0);
}
.cnblogs_code_toolbar{
    background: rgba(255, 255, 255, 0);
}
#main{min- 640px;}
.entrylist{
    background: rgba(255, 255, 255, 0.5);
    min-height: 60px;
}
.CalTodayDay{
  font-weight: 700;
  color:   rgba(201, 49, 49, 0.8);
  background: #f533;
}
a.entrylistItemTitle{
  color:  #ac0e0e;
}
.entrylistTitle,.entrylistDescription{
   display:none;
}
.entrylistItem{
   margin-bottom: auto;
}
.entrylistItemPostDesc, .entrylistItem>.entrylistItemPostDesc>a:nth-child(1){
  color: #852222;
}
.entrylistPostSummary{
   color: #666;
}
.comment_textarea{
   background: rgba(255, 255, 255, 0.5);
   border-radius: 7px;
}
td>a>u{
  /*text-decoration:none;*/
  color: #852222;
}
div>ul{
  margin-bottom: auto;
}
ul>li{
  border-top:none;
}
.comment_btn{
  line-height: initial;
  border-radius:10px;
  border: none;
}
div>.pager{
    background-color: rgb(255,255,255,0);
    font-weight: 500;
    border:none;
    font-size:14px;
}
div>.pager a{
    border:none;
}
div>.pager a:hover, #nav_next_page> a:hover{
   color:#852222;
}
大家可以根据自己的喜好,更改对应的颜色配置、界面宽度、主题背景(可以百度搜索到喜欢的图片后,点击复制图片地址,替换代码中的地址)等。
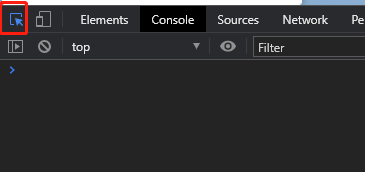
PS:给一些小建议,如果有想要更改的样式,而找不到的话,建议在自己的博客下打开F12,出现控制台后,点击如下图的按钮

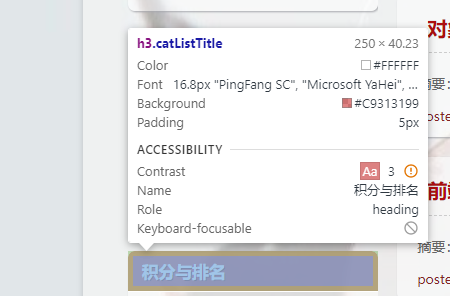
然后去页面中点击自己想要更改的内容,如下图:

点击后,控制台就会出现相应的HTML及css代码,如下图:

可以先在控制台对选择的CSS代码中更改,预览效果,然后再来后台更改。
鼠标效果
- 鼠标图案效果
在页面定制CSS如下代码片段中,插入下列(最后一行)代码:
/*boby调节背景图片*/
body {
    background:url("https://timgsa.baidu.com/timg?image&quality=80&size=b9999_10000&sec=1606476513478&di=92fdb162c0020c2b43d20fa5ffae2159&imgtype=0&src=http%3A%2F%2Fimage.biaobaiju.com%2Fuploads%2F20191015%2F15%2F1571124483-pUBXSkAZba.jpg");  /*背景图片链接*/
    background-position:center left;
    background-size: cover;
    background-repeat: no-repeat;
    background-attachment:fixed;
    cursor: url(https://files.cnblogs.com/files/wkfvawl/cursor.ico),auto;  /*鼠标效果*/
}
展示效果如图:

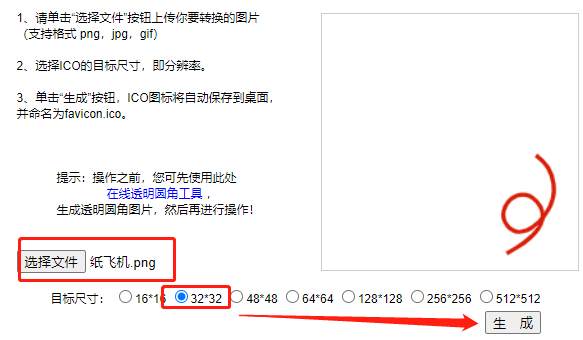
如果想换成其他自己喜欢的图标,可以去百度在线制作ico的网站(例如:http://www.ico51.cn/),先上传自己想要做成ico的图片(如果找不到合适的可以去阿里巴巴矢量图标库去找免费下载的),然后自己选择像素大小,一般这里选择32*32的就可以了。如下:

生成了ico之后,保存到本地,然后上传到博客园设置->文件。
然后将cursor: url(https://files.cnblogs.com/files/wkfvawl/cursor.ico),auto中的路径,改为你的文件路径https://blog-static.cnblogs.com/files/你的博客园名/favicon.ico
效果:

2. 鼠标点击效果
- 点击文字
将下面的代码复制到首页HTML代码块:
<script type="text/javascript">
/* 鼠标点击特效 */
var a_idx = 0;
jQuery(document).ready(function($) {
    $("body").click(function(e) {
        /* 内容可以更换为自己喜欢的 */
        var a = new Array("✌富强✌","❤民主❤","✌文明✌","❤和谐❤","✌自由✌","❤平等❤","✌公正✌","❤法治❤","✌爱国✌","❤敬业❤","✌诚信✌","❤友善❤");
        var $i = $("<span></span>").text(a[a_idx]);
        a_idx = (a_idx + 1) % a.length;
        var x = e.pageX,
        y = e.pageY;
        $i.css({
            "z-index": 999,
            "top": y - 20,
            "left": x,
            "position": "absolute",
            "font-weight": "bold",
            "color": "rgb("+~~(255*Math.random())+","+~~(255*Math.random())+","+~~(255*Math.random())+")" /* 随机颜色 */
        });
        $("body").append($i);
        $i.animate({
            "top": y - 180,
            "opacity": 0
        },
        1500,
        function() {
            $i.remove();
        });
    });
});
</script>
- 烟花效果
将下列代码复制到页脚HTML代码中去:
<script src="https://files.cnblogs.com/files/nthforsth/mouse-click.js"></script>
<canvas width="1777" height="841" style="position: fixed; left: 0px; top: 0px; z-index: 2147483647; pointer-events: none;"></canvas>
如果已经有了雪花特效的代码,需要放到和雪花特效的script同级,如下:

最终效果图如下:
