Spring framework简介
spring framework这个框架是spring项目中的核心项目,所有框架都依赖于这个框架.
它是一个一站式的开源框架,基础技术是IoC.
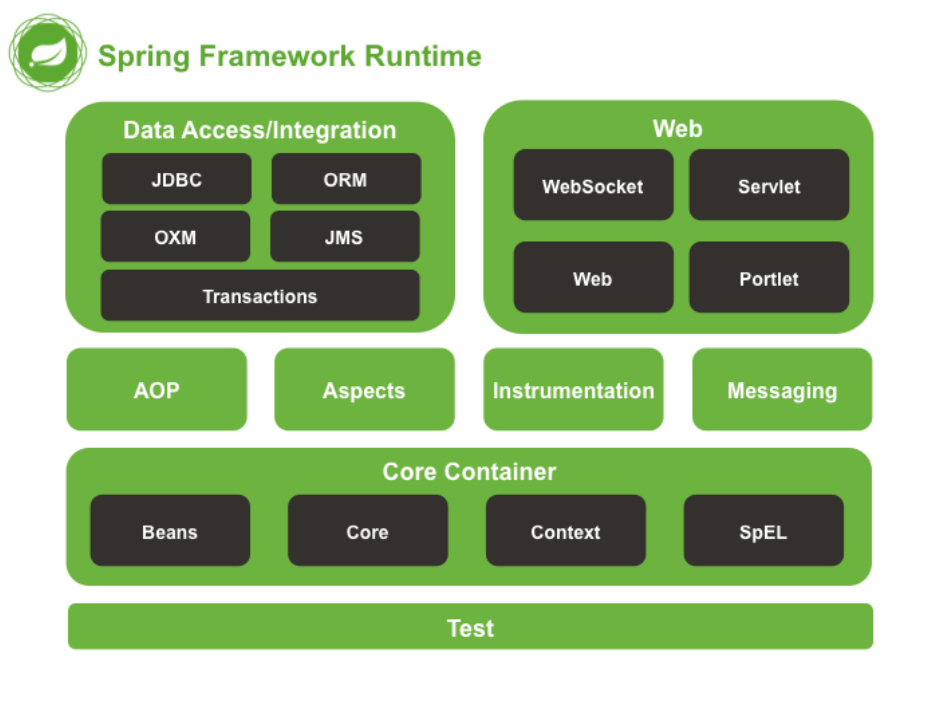
按官方文档主要分块为核心技术,测试,数据访问,Web,Integration
核心技术主要表现在Ioc容器,资源访问类Resource,校验,数据绑定和类型转换,Spring EL表达式,AOP
测试包含单元测试以及Integration测试
数据访问包含事务管理, DAO support, JDBC支持, ORM支持(Mybatis,Hibernate)
Web包含Spring MVC,WebSocket支持,其他MVC框架支持(Struts)
Integration是分布式项目会使用到的功能,不了解.

上图的每一个模块都对应了相当的jar包,所以使用某一模块必须把jar包依赖导入,
IoC概念以及目标

IoC就是让原本你自己管理的对象交由容器来进行管理,其主要的目的是松耦合.
IoC发展史
既然IoC的目标是为了松耦合,那它怎么做到的?

最后目标:降低对象之间的耦合度,IoC技术加入了配置把编码中对象的耦合度降低了.
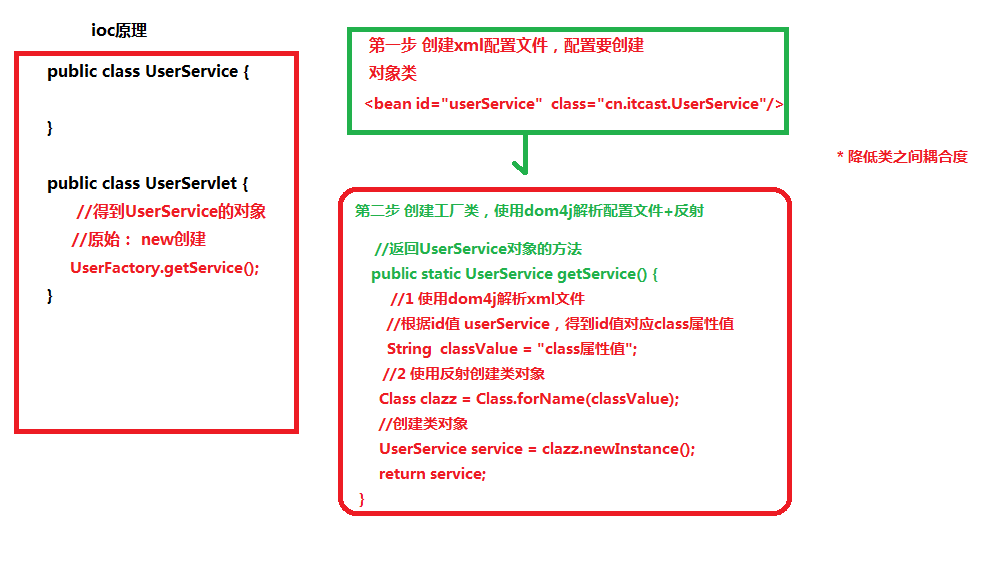
IoC的底层原理
IoC底层使用的技术包括:
(1)xml配置文件
(2)dom4j解决xml
(3)工厂设计模式
(4)反射
IoC应用入门
一.导入jar包
IoC是Spring framework的基础技术,所以需要导入基础包;

二.创建类,在类里面创建方法
需要创建交与容器的类模板(拥有getter和setter的POJO类)

三.创建spring配置文件,配置创建类
(1)spring的核心配置文件名称和位置不是固定的,
官方推荐放置于src下面,命名为applicationContext.xml
(2)引入schema约束
![]()

(3)配置对象创建
![]()
四.测试对象创建

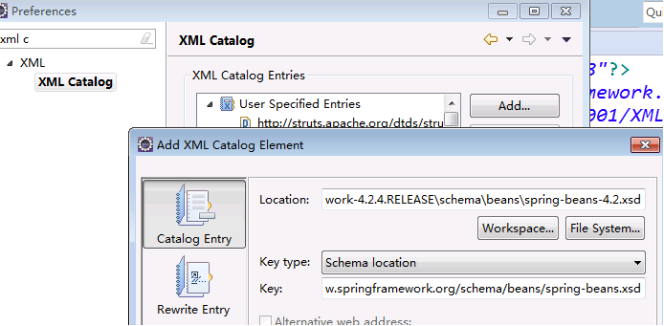
xml配置文件头部提示错误
解决方法是把schema约束引入spring,把约束文件引入到spring中.
![]()
IoC的三种配置管理方式
xml配置
实例化的三种方式
第一种使用类无参构造(重点)
![]()
第二种使用静态工厂来进行实例化

![]()
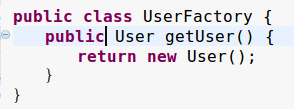
第三种使用实例工厂创建
![]()
bean标签常用的属性
常用属性有id, class, name, scope
id用于创建标识
class键入类的全路径名,引入模板类
name和id功能一致,但name允许包含特殊字符
scope用于指定创建类的方式以及其使用范围,参数如下
-singleton 单例创建对象,也就是始终都复用同一个对象,不会进行第二轮的创建
-prototype 每次创建都会创建一个新的对象
-request 创建对象并放置到request域中
-session 创建对象并放置到session域中
-globalSession 用于实现单点登录功能,比如百度下有百度云,百度翻译,百度相册之类多个应用,但是你只要登录上一个位置,多个位置都可以使用登录信息,这就是单点登录;这个参数基本不会使用,因为有一种就redis的技术更好地实现了这种功能.
属性注入
属性注入三种方式

set方法注入属性,其中包含基础属性注入,对象属性注入,复合属性注入
基础属性注入

![]()
对象属性注入
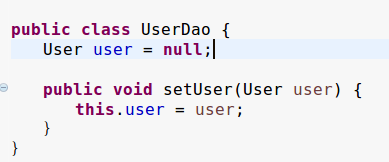

复合属性的注入
1.数组
2.list集合
3.map集合
4.properties

<bean id="person" class="com.harry.ioc.test">
        <!-- 数组 -->
        <property name="arrs">
            <list>
                <value>引用名1</value>
                <value>引用名2</value>
                <value>引用名3</value>
            </list>
        </property>

        <!-- list -->
        <property name="list">
            <list>
                <value>引用名4</value>
                <value>引用名5</value>
                <value>引用名6</value>
            </list>
        </property>

        <!-- map -->
        <property name="map">
            <map>
                <entry key="aa" value="引用名7"></entry>
                <entry key="bb" value="引用名8"></entry>
                <entry key="cc" value="引用名9"></entry>
            </map>
        </property>

        <!-- properties -->
        <property name="properties">
            <props>
                <prop key="driverclass">com.mysql.jdbc.Driver</prop>
                <prop key="username">root</prop>
            </props>
        </property>
    </bean>
有参构造函数注入属性

javaConfig类(有待补充)
注解
一.注解介绍
1.代码里特殊标记,使用注解可以完成功能
2.注解写法 @(属性名称=属性值)
3.注解可以使用在类,方法和属性之上
二.spring的注解开发导入包
1.core包
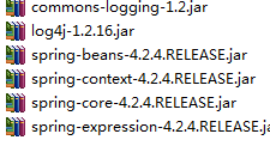
2.aop包

三.创建类和方法
四.创建spring配置文件引入新约束,开启注解扫描


五.注解创建对象
1.使用注解标记类

2.创建对象有四个注解标记

3.创建对象方式,单例还是多例

六.注解注入属性
1.创建service类,创建dao类


2.在service类使用注解注入dao
方式一.采用自动装载@Autowired
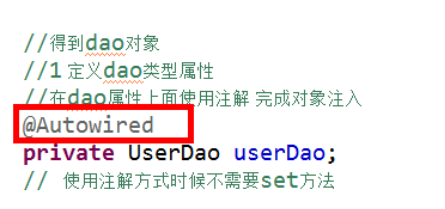
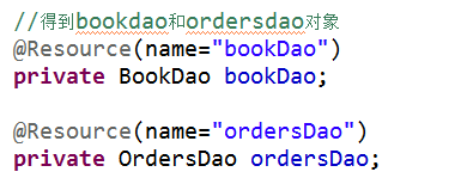
方式二.采用@Resource获取特定名称对象

七.配置文件和注解混合使用
1.配置文件创建对象注入容器

2.使用注解让容器实现属性注入
IoC和DI的区别所在
很多人认为IoC和DI是一个事物的两种说法,其实之间存在着细微的不同.
-IoC,控制反转,将对象交由容器进行管理;
-DI,依赖注入,将属性注入于对象之中;
-DI是依赖于控制反转技术的,如果使用IoC技术也就无法使用注入功能.
Spring整合web项目的原理
1 加载spring核心配置文件,
![]()
2 实现思想:把加载配置文件和创建对象过程,在服务器启动时候完成
3 实现原理
(1)ServletContext对象
(2)监听器
(3)具体使用:
- 在服务器启动时候,为每个项目创建一个ServletContext对象
- 在ServletContext对象创建时候,使用监听器可以具体到ServletContext对象在什么时候创建
- 使用监听器监听到ServletContext对象创建时候,
-- 加载spring配置文件,把配置文件配置对象创建
-- 把创建出来的对象放到ServletContext域对象里面(setAttribute方法)
- 获取对象时候,到ServletContext域得到 (getAttribute方法)
AOP基础概念
线程中的方法栈

java程序虚拟机启动时会载入程序码,虚拟机会为每一条正在运行的线程生成一个方法调用栈,线程以方法运行为执行单位.
AOP概念以及目标
AOP是面向切面编程,其实就是在不修改代码模块的情况下在你的模块中嵌入一些其他的代码.
目标是统一模块,从而抽取并消除一些散落在系统中块状代码(非业务逻辑).
AOP术语图解
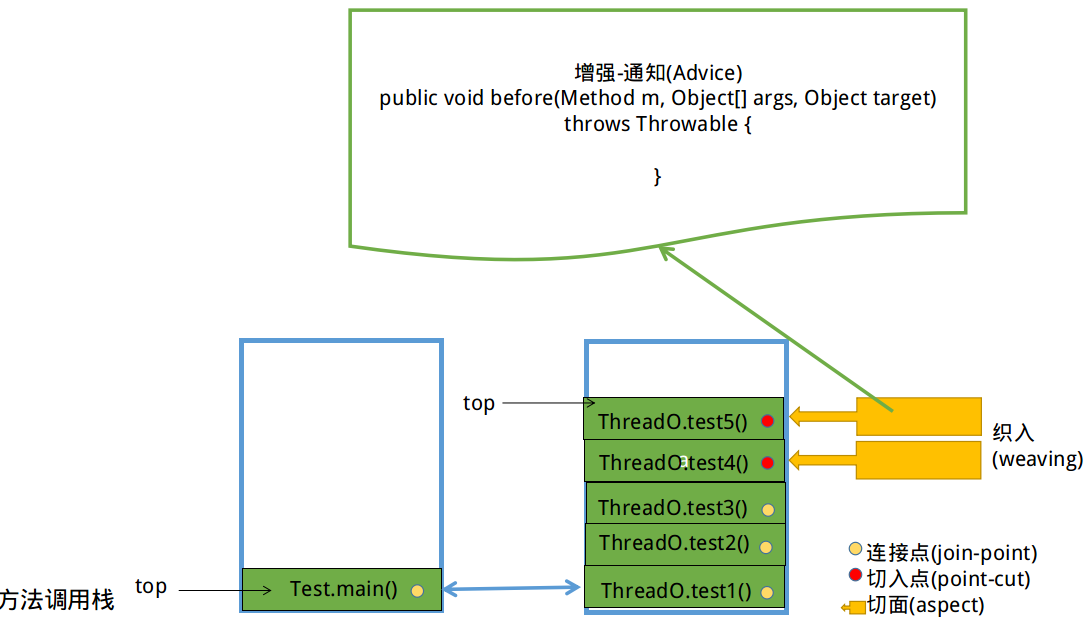
连接点:就是所有线程的方法,可以作为嵌入代码的候选对象;
切入点:最后被选为嵌入代码的对象;
切面:实现嵌入的对象;
增强通知:嵌入的内容(一些被定义的方法,包括前置通知,后置通知,异常通知,最终通知,环绕通知)
织入:嵌入代码的整个过程被叫做织入
AOP原理
AOP的出现是有了在业务代码中嵌入一些非业务代码,如日志通知,如连接数据库等事务.

1.修改源代码,过度耦合无关业务的代码;
2.无论是使用继承方式还是接口实现方式添加无关业务的代码,都会使对象间过度耦合;
3.使用动态代理模式来实现AOP,让容器去帮我们进行代码嵌入.
AOP使用解析(xml)
1.导入jar包(包括core包和aop包)
Spring的AOP是基于aspectj框架的,所以在导包时需要导入aspectj的支持包

2.创建spring核心配置文件,导入aop约束

3.配置bean对象,注入至容器中,并配置切面与切点

注:常用的表达式
execution(<访问修饰符>?<返回类型><方法名>(<参数>)<异常>)
(1)execution(* com.harry.aop.service.UserService.add(..))
(2)execution(* com.harry.aop.service.UserServic.*(..))
(3)execution(* *.*(..))
(4) 匹配所有save开头的方法 execution(* save*(..))
AOP使用解析(注解)
1.开启aop功能扫描
![]()
2.创建bean来作为切面类和切点类
![]()
3.创建切面切点定义

事务控制
事务是什么?事务控制?
事务这个词最早是在数据库中进行应用,讲的用户定义的一个数据库操作序列,这些操作要么全做要么全不做,是一个不可分割的工作单位。
事务的管理是指一个事务的开启,内容添加,提交和回滚.
代码层次的事务控制
事务控制原本是在数据库进行的,但由于ORM映射后,操作数据库的语句未必是SQL语句,事务控制也被迁移到了工程语言上(Java/C++/Python).Spring framework支持了事务管理的机制,通过ORM映射后可以在业务代码中实现事务控制.
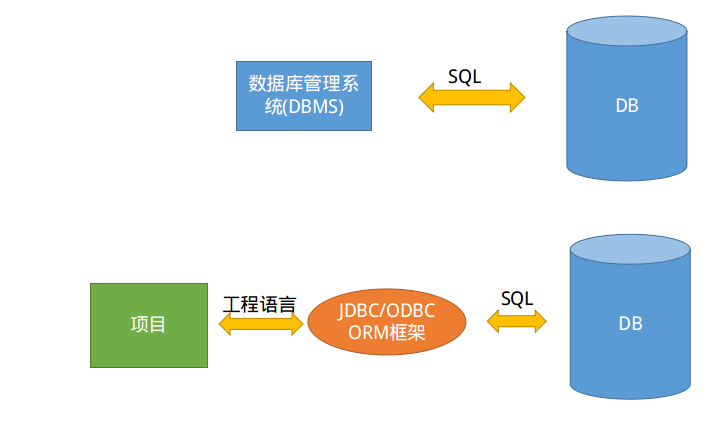
事务控制形式
编程式事务控制
自己手动控制事务,jdbc和Hibernate提供这种事务管理方式.
conn.setAutoCommit(false); //jdbc设置手动控制事务
session.beginTransaction(); //Hibernate开始一个事务
这种方式可以控制到代码细节,灵活多变.
声明式事务控制
以方法为单位,可以在类的方法中织入事务控制的代码,从而解除了事务代码与业务代码的耦合.
这种方式需要在配置文件中配置,虽然无法控制到代码细节(无法在某个方法中的某几行加入事务控制),但一般情况适用.
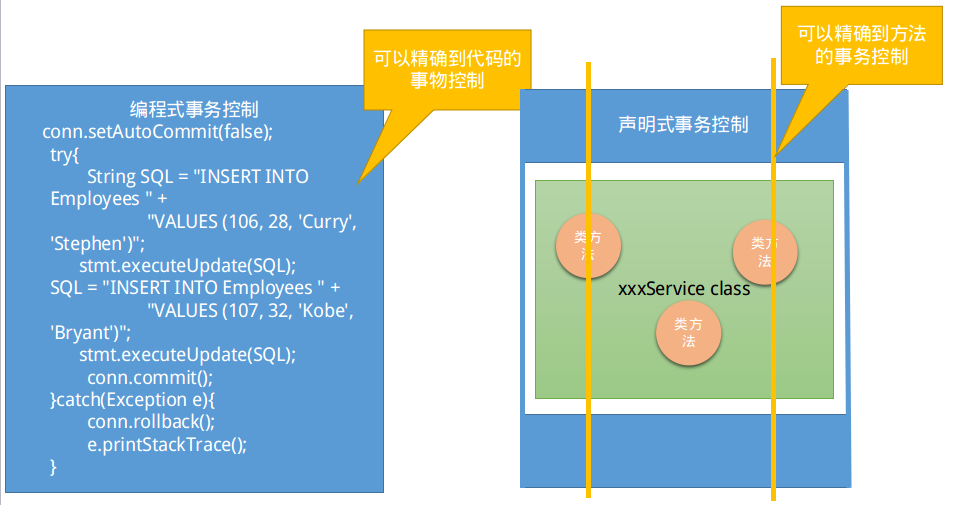
Spring事务控制
利用AOP技术实现声明式事务控制,包括XML方式和注解方式.
xml方式
1.导入jar包
2.加入ioc,aop,apectj,tx等约束,并配置数据源,声明式事务,aop

<?xml version="1.0" encoding="UTF-8"?>
<beans xmlns="http://www.springframework.org/schema/beans"
    xmlns:xsi="http://www.w3.org/2001/XMLSchema-instance"
    xmlns:p="http://www.springframework.org/schema/p"
    xmlns:context="http://www.springframework.org/schema/context"
    xmlns:aop="http://www.springframework.org/schema/aop"
    xmlns:tx="http://www.springframework.org/schema/tx"
    xsi:schemaLocation="http://www.springframework.org/schema/beans
         http://www.springframework.org/schema/beans/spring-beans.xsd
          http://www.springframework.org/schema/context
         http://www.springframework.org/schema/context/spring-context.xsd
         http://www.springframework.org/schema/aop
         http://www.springframework.org/schema/aop/spring-aop.xsd
         http://www.springframework.org/schema/tx
          http://www.springframework.org/schema/tx/spring-tx.xsd">


    <!-- 1. 数据源对象: C3P0连接池 -->
    <bean id="dataSource" class="com.mchange.v2.c3p0.ComboPooledDataSource">
        <property name="driverClass" value="com.mysql.jdbc.Driver"></property>
        <property name="jdbcUrl" value="jdbc:mysql:///hib_demo"></property>
        <property name="user" value="root"></property>
        <property name="password" value="root"></property>
        <property name="initialPoolSize" value="3"></property>
        <property name="maxPoolSize" value="10"></property>
        <property name="maxStatements" value="100"></property>
        <property name="acquireIncrement" value="2"></property>
    </bean>

    <!-- 2. JdbcTemplate工具类实例 -->
    <bean id="jdbcTemplate" class="org.springframework.jdbc.core.JdbcTemplate">
        <property name="dataSource" ref="dataSource"></property>
    </bean>

    <!-- 3. dao实例 -->
    <bean id="deptDao" class="com.harry.transaction.dao.DeptDao">
        <property name="jdbcTemplate" ref="jdbcTemplate"></property>
    </bean>

    <!-- 4. service实例 -->
    <bean id="deptService" class="com.harry.transaction.service.DeptService">
        <property name="deptDao" ref="deptDao"></property>
    </bean>

    <!-- #############5. Spring声明式事务管理配置############### -->
    <!-- 5.1 配置事务管理器类 -->
    <bean id="txManager" class="org.springframework.jdbc.datasource.DataSourceTransactionManager">
        <property name="dataSource" ref="dataSource"></property>
    </bean>

    <!-- 5.2 配置事务增强(如果管理事务?) -->
    <tx:advice id="txAdvice" transaction-manager="txManager">
        <tx:attributes>
            <tx:method name="*" read-only="false"/>
        </tx:attributes>
    </tx:advice>

    <!-- 5.3 Aop配置: 拦截哪些方法(切入点表表达式) + 应用上面的事务增强配置 -->
    <aop:config>
        <aop:pointcut expression="execution(* ccm.harry.transaction.service.save*(..))" id="pt"/>
        <aop:advisor advice-ref="txAdvice" pointcut-ref="pt"/>
    </aop:config>

</beans>
注解方式
1.导入jar包
2.xml数据源配置,事务管理类配置,开启ioc,aop,事务注解扫描.

<?xml version="1.0" encoding="UTF-8"?>
<beans xmlns="http://www.springframework.org/schema/beans"
    xmlns:xsi="http://www.w3.org/2001/XMLSchema-instance"
    xmlns:p="http://www.springframework.org/schema/p"
    xmlns:context="http://www.springframework.org/schema/context"
    xmlns:aop="http://www.springframework.org/schema/aop"
    xmlns:tx="http://www.springframework.org/schema/tx"
    xsi:schemaLocation="http://www.springframework.org/schema/beans
         http://www.springframework.org/schema/beans/spring-beans.xsd
          http://www.springframework.org/schema/context
         http://www.springframework.org/schema/context/spring-context.xsd
         http://www.springframework.org/schema/aop
         http://www.springframework.org/schema/aop/spring-aop.xsd
         http://www.springframework.org/schema/tx
          http://www.springframework.org/schema/tx/spring-tx.xsd">


    <!-- 1. 数据源对象: C3P0连接池 -->
    <bean id="dataSource" class="com.mchange.v2.c3p0.ComboPooledDataSource">
        <property name="driverClass" value="com.mysql.jdbc.Driver"></property>
        <property name="jdbcUrl" value="jdbc:mysql:///hib_demo"></property>
        <property name="user" value="root"></property>
        <property name="password" value="root"></property>
        <property name="initialPoolSize" value="3"></property>
        <property name="maxPoolSize" value="10"></property>
        <property name="maxStatements" value="100"></property>
        <property name="acquireIncrement" value="2"></property>
    </bean>

    <!-- 2. JdbcTemplate工具类实例 -->
    <bean id="jdbcTemplate" class="org.springframework.jdbc.core.JdbcTemplate">
        <property name="dataSource" ref="dataSource"></property>
    </bean>

    <!-- 事务管理器类 -->
    <bean id="txManager" class="org.springframework.jdbc.datasource.DataSourceTransactionManager">
        <property name="dataSource" ref="dataSource"></property>
    </bean>

    <!-- 开启注解扫描 -->
    <context:component-scan base-package="com.harry.transaction"></context:component-scan>

    <!-- 注解方式实现事务: 指定注解方式实现事务 -->
    <tx:annotation-driven transaction-manager="txManager"/>

</beans>
3.在Dao中的类或者类方法上使用@Transactional来表明事务增强的切入点
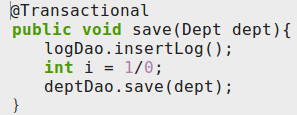
事务属性

@Transactional(
            readOnly = false,  // 读写事务
            timeout = -1,       // 事务的超时时间不限制
            noRollbackFor = ArithmeticException.class,  // 遇到数学异常不回滚
            isolation = Isolation.DEFAULT,              // 事务的隔离级别,数据库的默认
            propagation = Propagation.REQUIRED            // 事务的传播行为
    )
    public void save(Dept dept){
        deptDao.save(dept);
        int i = 1/0;
        deptDao.save(dept);
    }
上述属性除了事务传播行为,其他都容易理解.重点需要理解事务的传播行为.
Propagation.REQUIRED
指定当前的方法必须在事务的环境下执行;
如果当前运行的方法,已经存在事务, 就会加入当前的事务;
Propagation.REQUIRED_NEW
指定当前的方法必须在事务的环境下执行;
如果当前运行的方法,已经存在事务: 事务会挂起; 会始终开启一个新的事务,执行完后; 刚才挂起的事务才继续运行。

/***************************回滚,日志不会写入************************/
Class Log1{
        Propagation.REQUIRED
        insertLog();
}

    Propagation.REQUIRED
    Void  saveDept(){
        insertLog();    // 加入当前事务
        .. 异常, 会回滚
        saveDept();
    }
/****************回滚,日志会开启新事务并进行写入****************/
Class Log2{
        Propagation.REQUIRED_NEW
        insertLog();
}

    Propagation.REQUIRED
    Void  saveDept(){
        insertLog();    // 始终开启事务
        .. 异常, 日志不会回滚
        saveDept();
    }
