spring是轻量级的(非侵入式,这意味着你写的逻辑代码无需依赖框架本身,不用继承spring中的父类等)。Spring框架主要提供了IoC容器、AOP、数据访问、Web开发、消息、测试等相关技术。本文主要介绍Spring中的一些小知识点,关于模块功能竟会在后期整理。
Spring的模块
Spring是模块化的,可以只使用需要的部分,而无需引入整个框架。Spring模块包括IoC容器、AOP、数据访问、Web开发、消息、测试等。
Spring的具体结构如下图:
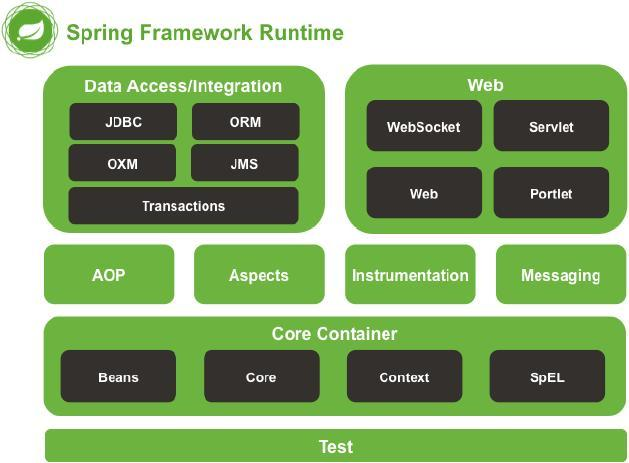
Spring的每一个小单元都至少对应一个jar包。
-
核心容器(Core Container)
-
Spring-Core : 核心工具类
-
Spring-Beans:定义Bean的支持
-
Spring-Context:运行时容器 、 Spring-Contex-Support : 对第三方包的继承支持
-
Spring-Expression:使用表达式语言在运行时查找和操作对象
-
切面(AOP、Aspects)
-
Spring-AOP:基于代理的AOP支持
-
Spring-Aspects:基于AspectJ的AOP支持
-
消息(Messaging)
-
Spring-Messaging:对于消息架构和协议的支持
-
网络(Web)
-
Spring-Web: 提供基础的Web功能,在Web项目中提供Spring容器
-
Spring-Webmvc:提供基于servlet的Spring MVC
-
Spring-WebSocket:提供WebSocket功能
-
Spring-WebSocket-Portlet:提供Portlet环境支持
-
数据访问集成(Data AccessIntegration)
-
Spring-JDBC:提供JDBC访问数据库的支持
-
Spring-TX:提供编程式和声明式的事务支持
-
Spring-ORM:提供对对象关系映射的支持
-
Spring-OXM:提供对象xml映射的支持
-
Spring-JMS:提供对JMS的支持
Spring框架的四大原则:
-
使用POJO(普通的Java对象)进行轻量级和最小侵入式开发
-
通过依赖注入和基于接口编程实现松耦合
-
通过AOP和默认习惯进行声明式编程
-
使用AOP和模板(templet)减少模式化代码
Spring事件(Application Event)
通过发布者,将事件发布,监听器会监听发布的事件并接受发送的信息。
Spring事件为Bean之间的消息通信提供了支持。(当一个Bean处理完一个任务之后,希望另一个Bean知道并能做相应的处理,这时需要让另一个Bean监听当前Bean所发送的事件。
具体实现:
1.自定义事件,继承ApplicationEvent
public class MyEvent extends ApplicationEvent{

    private static final long serialVersionUID = 3280614981975983900L;

    private String msg;

    public MyEvent(Object source, String msg) {
        super(source);
        this.setMsg(msg);
    }

    public String getMsg() {
        return msg;
    }

    public void setMsg(String msg) {
        this.msg = msg;
    }

}
2.自定义监听器,实现ApplicationListener
@Component
public class MyListener implements ApplicationListener<MyEvent>{

    @Override
    public void onApplicationEvent(MyEvent event) {
        String msg = event.getMsg();
        System.out.println(">>>>>>>>>>>>>>>>Get Message is :"+msg);
    }

}
3.使用容器发布事件
@Component
public class MyPublisher {

    @Autowired
    ApplicationContext context;

    public void publish(String msg){
        context.publishEvent(new MyEvent(this, msg));
    }
}
4.Demo
public class EventDemo {

    public static void main(String[] args) {
            AnnotationConfigApplicationContext context = new AnnotationConfigApplicationContext(EventConfig.class);
            MyPublisher publisher = context.getBean(MyPublisher.class);
            publisher.publish(">>>>>>>>>>>>>>>>>>>>Hello Appolication Event!");

            context.close();
    }
}
Spring Aware
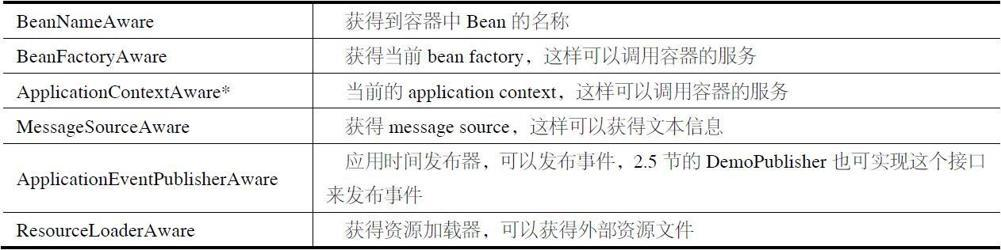
Spring依赖注入的最大亮点就是Bean对Spring容器的存在是无意识的(即:你可以将容器替换成别的容器)。但是实际项目中,你不可避免的要用到Spring容器本身的功能资源,此时Bean必须意识到Spring容器的存在,这就是Spring Aware。
Spring Aware的主要目的是让Bean获取Spring容器的服务。
下表是Aware接口及介绍:
具体实现:
1.创建Service,实现需要的Aware接口
@Service
public class AwareService implements BeanNameAware,ResourceLoaderAware{

    private String beanName;
    private ResourceLoader loader;

    @Override
    public void setBeanName(String name) {
        this.beanName = name;
    }

    @Override
    public void setResourceLoader(ResourceLoader resourceLoader) {
        this.loader = resourceLoader;
    }

    public void print() throws IOException{
        //Log:  >>>>>>>>>>>>>>>>>>>>>>Bean name is : awareService
        System.out.println(">>>>>>>>>>>>>>>>>>>>>>Bean name is : "+this.beanName);

        Resource resource = loader.getResource("classpath:com/blueStarWei4Spring/Aware/aware.txt");
        //Log:>>>>>>>>>>>>>>>>>>>>>>Resource context is : Spring Aware Test.
        //    Please continue...
        System.out.println(">>>>>>>>>>>>>>>>>>>>>>Resource context is : "+IOUtils.toString(resource.getInputStream()));
    }

}
2.创建外部资源aware.txt【为了实现ResourceLoaderAware读取资源文件】
Spring Aware Test.
Please continue...
3.Demo
public class AwareDemo {

    public static void main(String[] args) {
        AnnotationConfigApplicationContext context = new AnnotationConfigApplicationContext(AwareConfig.class);
        try {
            AwareService service = context.getBean(AwareService.class);
            service.print();
        } catch (IOException e) {
            e.printStackTrace();
        }
        context.close();
    }
}
多线程(异步任务)
Spring通过任务执行器(TaskExecutor)来实现多线程和并发编程。
使用ThreadPoolTaskExecutor可实现一个基于线程池的TaskExecutor,在配置类中通过@EnableAsync开启对异步任务的支持,并通过在Bean的方法上使用@Async来声明其是一个异步任务。
具体实现:
1.创建配置类,实现AsyncConfigurer接口
@Configuration
@ComponentScan("com.blueStarWei4Spring.Thread")
@EnableAsync
public class TaskExecutorConfig implements AsyncConfigurer{

    @Override
    public Executor getAsyncExecutor() {
        ThreadPoolTaskExecutor taskExecutor = new ThreadPoolTaskExecutor();
        taskExecutor.setCorePoolSize(5);
        taskExecutor.setMaxPoolSize(10);
        taskExecutor.setQueueCapacity(25);
        taskExecutor.initialize();
        return taskExecutor;
    }

    @Override
    public AsyncUncaughtExceptionHandler getAsyncUncaughtExceptionHandler() {
        return null;
    }

}
2.创建service
@Service
public class AsyncTaskService {

    @Async
    public void executeAsyncTask(int i){
        System.out.println("Execute Async Task : "+i);
    }

}
3.Demo
public class BeanDemo {

    public static void main(String[] args) {
        AnnotationConfigApplicationContext context = new AnnotationConfigApplicationContext(TaskExecutorConfig.class);
        AsyncTaskService service = context.getBean(AsyncTaskService.class);
        for (int i = 0; i < 10; i++) {
            //Execution is non-order
            service.executeAsyncTask(i);
        }
        context.close();
    }
}
计划任务
有时需要按照计划在指定的事件执行任务,或者每隔一段时间执行一次任务,这时候就需要计划任务(又称为:定时任务)。
Spring提供了@EnableSchedualing开启对计划任务的支持,并通过@Scheduled声明计划任务
具体实现:
1.在配置类上使用@EnableSchedualing开启对计划任务的支持
@Configuration
@ComponentScan("com.blueStarWei4Spring.Schedule")
@EnableScheduling
public class ScheduledTaskConfig {

}
2.在要执行计划任务的方法上使用@Scheduled声明计划任务
@Service
public class ScheduledTaskService {

    //fixedRate = 5000 :每隔5秒执行一次
    @Scheduled(fixedRate = 5000)
    public void reportCurrentTime(){
        System.out.println(">>reportCurrentTime>>>>>>>>>>>Current Time is :"+LocalTime.now());
    }

    //cron表达式: 秒 分 时 日 月  年
    //cron="0 06 19 * * ?" : 每天的19:06执行
    @Scheduled(cron="0 06 19 * * ?")
    public void fixTimeExecute(){
        System.out.println(">>>>fixTimeExecute>>>>>>>>>>>>>>>>Current Time is :"+LocalTime.now());
    }
}
3.Demo
只需要加载配置类,不需要手动调用计划任务。
public class ScheduledTaskDemo {

    public static void main(String[] args) {
        AnnotationConfigApplicationContext context = new AnnotationConfigApplicationContext(ScheduledTaskConfig.class);
    }
}
4.补充
public class LinuxCondition implements Condition{

    @Override
    public boolean matches(ConditionContext context, AnnotatedTypeMetadata metadata) {
        //TODO you can add your logic
        return true;
    }

}
public class WindowsCondition implements Condition{

    @Override
    public boolean matches(ConditionContext context, AnnotatedTypeMetadata metadata) {
        //TODO you can add your logic
        return false;
    }

}
2.创建Service:根据产生的Bean处理业务
public interface ListService {

    public String showListCmd();

}
public class LinuxListService implements ListService {

    @Override
    public String showListCmd() {
        return "ls";
    }

}
public class WindowsListService implements ListService {

    @Override
    public String showListCmd() {
        return "dir";
    }

}
3.在配置类中配置Service
@Configuration
public class ConditionConfig {

    @Bean
    @Conditional(WindowsCondition.class)
    public ListService windowsListService(){
        return new WindowsListService();
    }

    @Bean
    @Conditional(LinuxCondition.class)
    public ListService linuxListService(){
        return new LinuxListService();
    }
}
4.Demo
public class ConditionDemo {

    public static void main(String[] args) {
        AnnotationConfigApplicationContext context = new AnnotationConfigApplicationContext(ConditionConfig.class);
        ListService service = context.getBean(ListService.class);
        System.out.println(">>>>>>>>>>>>>>>>>>>>>>>>"+service.showListCmd());
    }
}
补充概念
元数据:描述数据的数据,本身不具备任何操作。(比如:注解、xml配置)
元注解和组合注解:可以注解到别的注解上的注解叫元注解,被注解的注解叫做组合注解
Spring注解集合
|
Spring注解
|
|||
|
类型
|
注解
|
用途
|
备注
|
|
声明Bean
|
@Component
|
组件,表明这个类是一个Bean
|
通常用于实体类
|
|
@Service
|
在业务逻辑层使用(Service层)
|
|
|
|
@Repository
|
在数据访问层使用(DAO层)
|
|
|
|
@Controller
|
在展示层使用,控制器的声明
|
|
|
|
注入Bean
|
@Autowired
|
注解在属性或set()上
【推荐注解在属性上】
|
按byType自动注入
可以与@Qualifier(name)联合使用,指定按byNAme自动注入
|
|
@Resource
|
按ByName自动注入
|
||
|
@Inject
|
由JSR-250提供
|
||
|
配置类
|
@Configuration
|
声明当前类为配置类
|
相当于xml形式的Spring配置
|
|
@Bean
|
声明方法的返回值是一个Bean(方法上)
|
|
|
|
@ComponentScan
|
用于对Component进行扫描并注册成Bean
|
|
|
|
@EnableWebMvc
|
开启web MVC的配置支持
|
|
|
|
@EnableConfigrationProperties
|
开启对@ConfigurationProperties注解配置Bean的支持
|
|
|
|
@EnableJpaRepositories
|
开启对Spring Data JPA Repository的支持
|
|
|
|
@EnableTransactionManagement
|
开启注解式事务的支持
|
|
|
|
@EnableCaching
|
开启注解式缓存的支持
|
|
|
|
@EnableAspectJAutoProxy
|
开启Spring对AspectJ代理的支持
|
|
|
|
AOP
|
@Aspect
|
声明一个切面(类上)
|
|
|
@Order
|
指定切面的优先级
|
可缺省
|
|
|
@PointCut
|
声明切点
|
在Java配置类中使用
|
|
|
@Before
|
在方法执行之前执行(方法上)
|
|
|
|
@After
|
在方法执行之后执行(方法上)
|
被代理的方法抛出异常,@After标记的方法也会执行
|
|
|
@AfterReturning
|
在方法正常执行之后执行(方法上)
|
被代理的方法抛出异常,@AfterReturning标记的方法不会执行
|
|
|
@AfterThrowing
|
在方法抛出异常后执行
|
|
|
|
@Around
|
在方法执行之前以及之后执行(方法上)
|
可以修改被代理方法的返回值
|
|
|
@Bean的属性支持
|
@Scope
|
设置如何创建Bean实例
|
设置类型包括:
Singleton:单例(默认模式)
Protetype:每次调用创建一个新的bean
Request:给每个Http request创建一个bean
Session:给每个Http session创建一个bean
GlobalSession:给每个global Http session创建一个bean
|
|
@StepSession
|
在Spring Batch中还有涉及
|
|
|
|
@PostConstruct
|
在构造函数执行之后执行(方法上)
|
由JSR-250提供,等价于xml配置文件中bean的initMethod
|
|
|
@PreDestroy
|
在bean销毁前执行
|
由JSR-250提供,等价于xml配置文件中bean的destroyMethod
|
|
|
@Value注解
|
@Value
[使用的是SpEL表达式]
|
注入普通字符
|
@Value("Winn")
String name;
|
|
注入操作系统属性
|
@Value("#{systemProperties['os.name']}")
String osName;
|
||
|
注入表达式结果
|
@Value("#{T(java.lang.Math).random()*100}")
String randomNumber;
|
||
|
注入其他bean属性的值
|
@Value("#{domeClass.name}")
String name;
|
||
|
注入文件资源
|
@Value("classpath:com/blueStarWei/rsc/test.txt")
Resource file;
|
||
|
注入外部配置文件
|
@Value("${book.name}")
String bookName;
还需要在类上添加
@PropertySource("classpath:com/blueStarWei/rsc/test.txt")
还需要配置一个PropertySourcesPlaceholderConfigurer的bean
|
||
|
环境切换
|
@Profile
|
通过设定Environment的ActiveProfiles来设定当前context需要使用的配置环境(类或方法上)
|
在不同环境下使用不同的配置文件
|
|
@Conditional
|
定义条件化的bean(方法上)
|
通过实现Condition接口,并重写matches方法,从而决定该bean是否被实例化
|
|
|
多线程
|
@EnableAsync
|
开启对异步任务的支持(配置类上)
|
|
|
@Async
|
声明异步任务(类或方法上)
|
如果注释在类上,则该类内所有的方法都是异步方法
|
|
|
计划任务相关
|
@EnableScheduling
|
开启计划任务的支持(类上)
|
在配置类上使用
|
|
@Scheduled
|
申明这是一个任务(方法上)
|
需要线开启计划任务的支持
计划任务包括cron、fixDelay、fixRate等类型
|
|
|
测试相关
|
@RunWith
|
运行器,Spring中通常用于对JUnit的支持
|
@RunWith(SpringJUnit4ClassRunner.class)
|
|
@ContextConfiguration
|
加载配置ApplicationContext |
classes属性用来加载配置类
@ContextConfiguration(classes={AppConfig.class})
|
|
|
事务
|
@Transactional
|
使用事务
|
属性 propagation用来指定事务的传播行为(默认传播行为Propagation.REQUIRED)
属性isolation用来指定事务的隔离级别
|
|
补充
|
@Import
|
导入配置类
|
|
参考资料
- 汪云飞《JavaEE开发的颠覆者:Spring Boot实战》