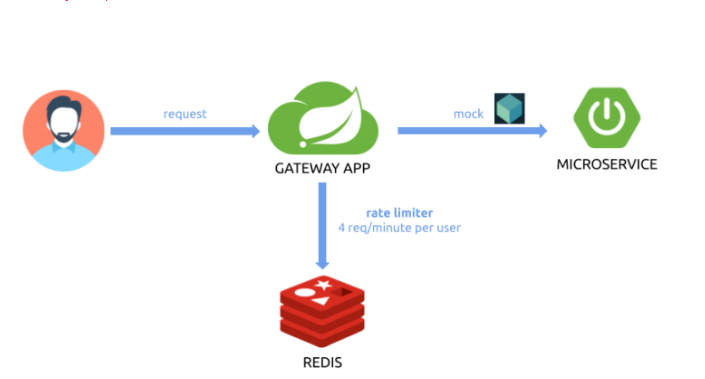
在本文中,您将学习如何使用 Spring Cloud Gateway 为经过身份验证的用户启用速率限制。为什么重要?API 网关是您的微服务系统的入口点。因此,您应该提供适当的安全级别。速率限制可以防止您的 API 遭受 DoS 攻击并限制网络抓取。
您可以使用 Spring Cloud Gateway 轻松配置速率限制。这个特性的基本介绍可以参考我的文章基于Redis做Spring Cloud Gateway 中的速率限制实践-spring cloud 入门教程。同样,今天我们也将使用 Redis 作为速率限制器的后端。此外,我们将配置 HTTP 基本身份验证。当然,您可以提供一些更高级的身份验证机制,例如 X509 证书或 OAuth2 登录。如果您考虑一下,请阅读我的文章Spring Cloud Gateway OAuth2 with Keycloak。
1. 依赖
让我们从依赖开始。由于我们将创建一个集成测试,我们需要一些额外的库。首先,我们将使用 Testcontainers 库。它允许我们在 JUnit 测试期间运行 Docker 容器。我们将使用它来运行 Redis 和一个模拟服务器,它负责模拟下游服务。当然,我们需要包含一个带有 Spring Cloud Gateway 和 Spring Data Redis 的 starter。要实现 HTTP 基本身份验证,我们还需要包含 Spring Security。这是 Maven 中所需依赖项的完整列表pom.xml。
<dependency>
   <groupId>org.springframework.cloud</groupId>
   <artifactId>spring-cloud-starter-gateway</artifactId>
</dependency>
<dependency>
   <groupId>org.springframework.boot</groupId>
   <artifactId>spring-boot-starter-data-redis-reactive</artifactId>
</dependency>
<dependency>
   <groupId>org.springframework.boot</groupId>
   <artifactId>spring-boot-starter-security</artifactId>
</dependency>
<dependency>
   <groupId>org.springframework.boot</groupId>
   <artifactId>spring-boot-starter-test</artifactId>
   <scope>test</scope>
</dependency>
<dependency>
   <groupId>org.testcontainers</groupId>
   <artifactId>mockserver</artifactId>
   <scope>test</scope>
</dependency>
<dependency>
   <groupId>org.mock-server</groupId>
   <artifactId>mockserver-client-java</artifactId>
   <scope>test</scope>
</dependency>
2. 配置 HTTP 基本身份验证
为了配置 HTTP 基本身份验证,我们需要创建@Configuration带有@EnableWebFluxSecurity. 这是因为 Spring Cloud Gateway 建立在 Spring WebFlux 和 Netty 之上。此外,我们将创建一组测试用户MapReactiveUserDetailsService。
@Configuration
@EnableWebFluxSecurity
public class SecurityConfig {

   @Bean
   public SecurityWebFilterChain filterChain(ServerHttpSecurity http) {
      http.authorizeExchange(exchanges ->
         exchanges.anyExchange().authenticated())
            .httpBasic();
      http.csrf().disable();
      return http.build();
   }

   @Bean
   public MapReactiveUserDetailsService users() {
      UserDetails user1 = User.builder()
            .username("user1")
            .password("{noop}1234")
            .roles("USER")
            .build();
      UserDetails user2 = User.builder()
            .username("user2")
            .password("{noop}1234")
            .roles("USER")
            .build();
      UserDetails user3 = User.builder()
            .username("user3")
            .password("{noop}1234")
            .roles("USER")
            .build();
      return new MapReactiveUserDetailsService(user1, user2, user3);
   }
}
3.配置Spring Cloud Gateway Rate Limiter key
需要使用名为 的组件启用请求速率限制器功能GatewayFilter。此过滤器采用可选 keyResolver 参数。该 KeyResolver 接口允许您创建可插拔策略,派生出限制请求的密钥。在我们的例子中,它将是一个用户登录。一旦用户成功通过身份验证,其登录信息就会存储在 Spring 中SecurityContext。为了检索响应式应用程序的上下文,我们应该使用ReactiveSecurityContextHolder.
@Bean
KeyResolver authUserKeyResolver() {
   return exchange -> ReactiveSecurityContextHolder.getContext()
           .map(ctx -> ctx.getAuthentication()
              .getPrincipal().toString());
}
4. 测试场景
在测试场景中,我们将模拟传入流量。每个请求都需要有一个Authorization包含用户凭据的标头。单个用户每分钟可以发送 4 个请求。超过该限制后,Spring Cloud Gateway 将返回 HTTP 代码HTTP 429 - Too Many Requests。流量被寻址到下游服务。因此,我们使用 Testcontainers 运行模拟服务器。
5. 测试 Spring Cloud Gateway 安全限速器
最后,我们可以进行测试实现。我将使用 JUnit4,因为我之前在示例存储库中的其他示例中使用过它。我们有三个用于速率限制器配置的参数:replenishRate、burstCapacity和requestedTokens。由于我们还允许每秒少于 1 个请求,因此我们需要为burstCapacity和设置正确的值requestedTokens。简而言之,该requestedTokens属性设置请求花费多少令牌。另一方面,burstCapacity属性是允许用户的最大请求数(或成本)。
在测试过程中,我们在user1、user2和之间随机设置用户名user3。测试重复 20 次。
@SpringBootTest(webEnvironment =
SpringBootTest.WebEnvironment.DEFINED_PORT,
properties = {"rateLimiter.secure=true"})
@RunWith(SpringRunner.class)
public class GatewaySecureRateLimiterTest {
private static final Logger LOGGER =
LoggerFactory.getLogger(GatewaySecureRateLimiterTest.class);
private Random random = new Random();
@Rule
public TestRule benchmarkRun = new BenchmarkRule();
@ClassRule
public static MockServerContainer mockServer =
new MockServerContainer();
@ClassRule
public static GenericContainer redis =
new GenericContainer("redis:5.0.6").withExposedPorts(6379);
@Autowired
TestRestTemplate template;
@BeforeClass
public static void init() {
System.setProperty("spring.cloud.gateway.routes[0].id", "account-service");
System.setProperty("spring.cloud.gateway.routes[0].uri", "http://" + mockServer.getHost() + ":" + mockServer.getServerPort());
System.setProperty("spring.cloud.gateway.routes[0].predicates[0]", "Path=/account/**");
System.setProperty("spring.cloud.gateway.routes[0].filters[0]", "RewritePath=/account/(?<path>.*), /$\{path}");
System.setProperty("spring.cloud.gateway.routes[0].filters[1].name", "RequestRateLimiter");
System.setProperty("spring.cloud.gateway.routes[0].filters[1].args.redis-rate-limiter.replenishRate", "1");
System.setProperty("spring.cloud.gateway.routes[0].filters[1].args.redis-rate-limiter.burstCapacity", "60");
System.setProperty("spring.cloud.gateway.routes[0].filters[1].args.redis-rate-limiter.requestedTokens", "15");
System.setProperty("spring.redis.host", redis.getHost());
System.setProperty("spring.redis.port", "" + redis.getMappedPort(6379));
new MockServerClient(mockServer.getContainerIpAddress(), mockServer.getServerPort())
.when(HttpRequest.request()
.withPath("/1"))
.respond(response()
.withBody("{"id":1,"number":"1234567890"}")
.withHeader("Content-Type", "application/json"));
}
@Test
@BenchmarkOptions(warmupRounds = 0, concurrency = 1, benchmarkRounds = 20)
public void testAccountService() {
String username = "user" + (random.nextInt(3) + 1);
HttpHeaders headers = createHttpHeaders(username,"1234");
HttpEntity<String> entity = new HttpEntity<String>(headers);
ResponseEntity<Account> r = template
.exchange("/account/{id}", HttpMethod.GET, entity, Account.class, 1);
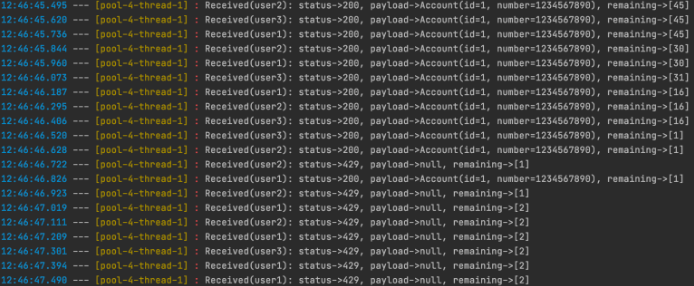
LOGGER.info("Received({}): status->{}, payload->{}, remaining->{}",
username, r.getStatusCodeValue(), r.getBody(), r.getHeaders().get("X-RateLimit-Remaining"));
}
private HttpHeaders createHttpHeaders(String user, String password) {
String notEncoded = user + ":" + password;
String encodedAuth = Base64.getEncoder().encodeToString(notEncoded.getBytes());
HttpHeaders headers = new HttpHeaders();
headers.setContentType(MediaType.APPLICATION_JSON);
headers.add("Authorization", "Basic " + encodedAuth);
return headers;
}
}让我们运行测试。感谢junit-benchmarks库,我们可以配置测试的轮数。每次我记录来自网关的响应时,包括用户名、HTTP 状态、有效负载和X-RateLimit-Remaining显示剩余令牌数量的标头。 结果如下。
使用 Zuul、Ribbon、Feign、Eureka 和 Sleuth、Zipkin 创建简单spring cloud微服务用例-spring cloud 入门教程
微服务集成SPRING CLOUD SLEUTH、ELK 和 ZIPKIN 进行监控-spring cloud 入门教程
使用Hystrix 、Feign 和 Ribbon构建微服务-spring cloud 入门教程
使用 Spring Boot Admin 监控微服务-spring cloud 入门教程