安装步骤
1、准备工具安装目录
将压缩包gcc-linaro-arm-linux-bnueabihf-4.9-2014.07_linux.tar存放在一个目录下,这个目录就是你等会解压缩的目录,以后这个目录就不能随便删掉了,我的存放路径是/home/zyr/Am335x/Sourcefiletools,如下图,记住这个路径,等会还会用到。
zyr@ubuntu:~/Am335x/Sourcefiletools$ ls
gcc-linaro-arm-linux-gnueabihf-4.9-2014.07_linux
gcc-linaro-arm-linux-gnueabihf-4.9-2014.07_linux.tar
zyr@ubuntu:~/Am335x/Sourcefiletools$ pwd
/home/zyr/Am335x/Sourcefiletools
zyr@ubuntu:~/Am335x/Sourcefiletools
2、安装软件
使用tar命令:tar xvf gcc-linaro-arm-linux-gnueabihf-4.9-2014.07_linux.tar将Sourcefiletools文件夹下的gcc-linaro-arm-linux-gnueabihf-4.9-2014.07_linux.tar解压缩安装到当前目录。通过下图可以看到解压成功了,并且解压后的文件存放在了
- /home/zyr/Am335x/Sourcefiletools/gcc-linaro-arm-linux-gnueabihf-4.9-2014.07_linux
文件夹下,如下图所示,这个存放路径可得记住,如下图
zyr@ubuntu:~/Am335x/Sourcefiletools/gcc-linaro-arm-linux-gnueabihf-4.9-2014.07_linux$ ls
arm-linux-gnueabihf  bin  lib  libexec  share
zyr@ubuntu:~/Am335x/Sourcefiletools/gcc-linaro-arm-linux-gnueabihf-4.9-2014.07_linux$
3、配置系统环境变量
配置环境前先坐下普及:
Ubuntu不同目录下profile与bashrc的区别
/etc/profile 此文件为系统的每个用户设置环境信息,当用户第一次登录时,该文件被执行,并从/etc/profile.d目录的配置文件中搜集shell的设置。
/etc/bash.bashrc 为每一个运行bash shell的用户执行此文件,当bash shell被打开时,该文件被读取。
~/.bash_profile 每个用户都可使用该文件输入专用于自己使用的shell信息,当用户登录时,该文件仅仅执行一次,默认情况下,他设置一些环境变量,执行用户的.bashrc文件。
~/.bashrc 该文件包含专用于你的bash shell的bash信息,当登录时以及每次打开新的shell时,该文件被读取。
~/.bash_logout 当每次退出系统(退出bash shell)时,执行该文件。
另外,/etc/profile中设定的变量(全局)的可以作用于任何用户,而~/.bashrc等中设定的变量(局部)只能继承/etc/profile中的变量,他们是"父子"关系。
~/.bash_profile 是交互式、login 方式进入 bash 运行的。
~/.bashrc 是交互式 non-login 方式进入 bash 运行的。
通常二者设置大致相同,所以通常前者会调用后者。
接下来配置系统环境变量,把交叉编译工具链的路径添加到环境变量PATH中去,这样就可以在任何目录下使用这些工具。记下上一步中的安装路径,使用命令:vim /home/aldrich/.bashrc 编辑.bashrc文件,添加环境变量。
在该文件中最后一行添加:
sudo gedit /etc/profile
# /etc/profile: system-wide .profile file for the Bourne shell (sh(1))
# and Bourne compatible shells (bash(1), ksh(1), ash(1), ...).

if [ "$PS1" ]; then
  if [ "$BASH" ] && [ "$BASH" != "/bin/sh" ]; then
    # The file bash.bashrc already sets the default PS1.
    # PS1='h:w$ '
    if [ -f /etc/bash.bashrc ]; then
      . /etc/bash.bashrc
    fi
  else
    if [ "`id -u`" -eq 0 ]; then
      PS1='# '
    else
      PS1='$ '
    fi
  fi
fi

if [ -d /etc/profile.d ]; then
  for i in /etc/profile.d/*.sh; do
    if [ -r $i ]; then
      . $i
    fi
  done
  unset i
fi
export PATH=$PATH:/home/zyr/Am335x/Sourcefiletools/gcc-linaro-arm-linux-gnueabihf-4.9-2014.07_linux/bin/
这个路径就是那个bin目录所在的路径,可能你的不一样,按照你实际的目录填就可以了,
编写完保存就好了
4、使环境变量生效
使用命令:source /etc/profile 使环境变量生效
5、检查环境变量是否设置成功
在终端上输入命令 arm-linux-gnueabifh- 再按Tab键,可以看到下图,说明环境变量设置成功了
zyr@ubuntu:~$ arm-linux-gnueabihf-
arm-linux-gnueabihf-addr2line        arm-linux-gnueabihf-gfortran
arm-linux-gnueabihf-ar               arm-linux-gnueabihf-gprof
arm-linux-gnueabihf-as               arm-linux-gnueabihf-ld
arm-linux-gnueabihf-c++              arm-linux-gnueabihf-ld.bfd
arm-linux-gnueabihf-c++filt          arm-linux-gnueabihf-ldd
arm-linux-gnueabihf-cpp              arm-linux-gnueabihf-ld.gold
arm-linux-gnueabihf-dwp              arm-linux-gnueabihf-nm
arm-linux-gnueabihf-elfedit          arm-linux-gnueabihf-objcopy
arm-linux-gnueabihf-g++              arm-linux-gnueabihf-objdump
arm-linux-gnueabihf-gcc              arm-linux-gnueabihf-pkg-config
arm-linux-gnueabihf-gcc-4.9.1        arm-linux-gnueabihf-pkg-config-real
arm-linux-gnueabihf-gcc-ar           arm-linux-gnueabihf-ranlib
arm-linux-gnueabihf-gcc-nm           arm-linux-gnueabihf-readelf
arm-linux-gnueabihf-gcc-ranlib       arm-linux-gnueabihf-size
arm-linux-gnueabihf-gcov             arm-linux-gnueabihf-strings
arm-linux-gnueabihf-gdb              arm-linux-gnueabihf-strip
zyr@ubuntu:~$ arm-linux-gnueabihf-
6、安装32位库兼容包(因为系统是64位的,安装的交叉编译器是32位的)
sudo apt-get install ia32-libs 装一些32位的库
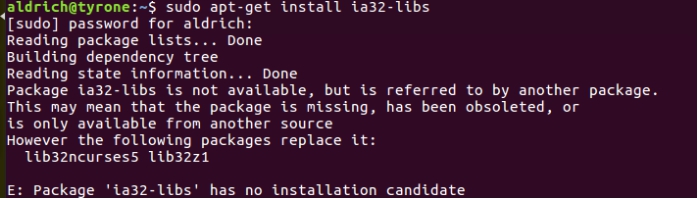
出现上述界面是因为Ubuntu16.04版本已不支持ia32-libs的软件包,而是使用了lib32ncurses5、lib32z1软件包做为替代,所以在Ubuntu16.04版本当中应该安装执行:
sudo apt-get install lib32ncurses5 lib32z1
待安装完32位的库之后,再使用命令:arm-linux-gnueabihf-gcc -v,出现这种错误:
ubuntu arm-linux-gnueabihf-gcc: error while loading shared libraries: libstdc++.so.6
安装:
sudo apt-get install lib32stdc++6
然后再查看arm-linux-gnueabihf-gcc -v就可以看到版本了:
zyr@ubuntu:~/Am335x/Kernel/linux-4.1.36$ arm-linux-gnueabihf-gcc -v
Using built-in specs.
COLLECT_GCC=arm-linux-gnueabihf-gcc
COLLECT_LTO_WRAPPER=/home/zyr/Am335x/Sourcefiletools/gcc-linaro-arm-linux-gnueabihf-4.9-2014.07_linux/bin/../libexec/gcc/arm-linux-gnueabihf/4.9.1/lto-wrapper
Target: arm-linux-gnueabihf
Configured with: /cbuild/slaves/oorts/crosstool-ng/builds/arm-linux-gnueabihf-linux/.build/src/gcc-linaro-4.9-2014.07/configure --build=i686-build_pc-linux-gnu --host=i686-build_pc-linux-gnu --target=arm-linux-gnueabihf --prefix=/cbuild/slaves/oorts/crosstool-ng/builds/arm-linux-gnueabihf-linux/install --with-sysroot=/cbuild/slaves/oorts/crosstool-ng/builds/arm-linux-gnueabihf-linux/install/arm-linux-gnueabihf/libc --enable-languages=c,c++,fortran --disable-multilib --enable-multiarch --with-arch=armv7-a --with-tune=cortex-a9 --with-fpu=vfpv3-d16 --with-float=hard --with-pkgversion='crosstool-NG linaro-1.13.1-4.9-2014.07 - Linaro GCC 4.9-2014.07' --with-bugurl=https://bugs.launchpad.net/gcc-linaro --enable-__cxa_atexit --enable-libmudflap --enable-libgomp --enable-libssp --with-gmp=/cbuild/slaves/oorts/crosstool-ng/builds/arm-linux-gnueabihf-linux/.build/arm-linux-gnueabihf/build/static --with-mpfr=/cbuild/slaves/oorts/crosstool-ng/builds/arm-linux-gnueabihf-linux/.build/arm-linux-gnueabihf/build/static --with-mpc=/cbuild/slaves/oorts/crosstool-ng/builds/arm-linux-gnueabihf-linux/.build/arm-linux-gnueabihf/build/static --with-isl=/cbuild/slaves/oorts/crosstool-ng/builds/arm-linux-gnueabihf-linux/.build/arm-linux-gnueabihf/build/static --with-cloog=/cbuild/slaves/oorts/crosstool-ng/builds/arm-linux-gnueabihf-linux/.build/arm-linux-gnueabihf/build/static --with-libelf=/cbuild/slaves/oorts/crosstool-ng/builds/arm-linux-gnueabihf-linux/.build/arm-linux-gnueabihf/build/static --enable-threads=posix --disable-libstdcxx-pch --enable-linker-build-id --enable-plugin --enable-gold --with-local-prefix=/cbuild/slaves/oorts/crosstool-ng/builds/arm-linux-gnueabihf-linux/install/arm-linux-gnueabihf/libc --enable-c99 --enable-long-long --with-mode=thumb --disable-multilib --with-float=hard
Thread model: posix
gcc version 4.9.1 20140710 (prerelease) (crosstool-NG linaro-1.13.1-4.9-2014.07 - Linaro GCC 4.9-2014.07)
7、交叉编译工具验证--编译内核:
在内核目录下建立如下脚本文件(bulid-kernel.sh):
#! /bin/bash
echo "Configure the kernel"
until
    echo "1.make the omap2plus.defconfig"
    echo "2.make the menuconfig( Boot options -> Kernel command line type (root=/dev/mmcblk0p2 rootwait console=ttyo0,115200) )"
    echo "3.make the dtb"
    echo "4.make the zImage"
    echo "5.make the uImage"
    echo "6.make the distclean"
    echo "7.make the modules"
    echo "8.quit"

    read input
    test $input = 8
    do
        case $input in
        1)make ARCH=arm CROSS_COMPILE=arm-linux-gnueabihf- omap2plus_defconfig;;
        2)make ARCH=arm CROSS_COMPILE=arm-linux-gnueabihf- menuconfig;;
        3)make ARCH=arm CROSS_COMPILE=arm-linux-gnueabihf- am335x-boneblack.dtb;;
        4)make ARCH=arm CROSS_COMPILE=arm-linux-gnueabihf- zImage;;
        5)make ARCH=arm CROSS_COMPILE=arm-linux-gnueabihf- LOADADDR=0x80008000 uImage;;
        6)make ARCH=arm CROSS_COMPILE=arm-linux-gnueabihf- distclean;;
        7)make ARCH=arm CROSS_COMPILE=arm-linux-gnueabihf- -j8 modules;;
        8)echo"quit";;
        esac
        done
运行脚本文件bulid-kernel.sh
sh build-kernel.sh
zyr@ubuntu:~/Am335x/Kernel/linux-4.1.36$ sh build-kernel.sh
Configure the kernel
1.make the omap2plus.defconfig
2.make the menuconfig( Boot options -> Kernel command line type (root=/dev/mmcblk0p2 rootwait console=ttyo0,115200) )
3.make the dtb
4.make the zImage
5.make the uImage
6.make the distclean
7.make the modules
8.quit
1
#
# configuration written to .config
#
1.make the omap2plus.defconfig
2.make the menuconfig( Boot options -> Kernel command line type (root=/dev/mmcblk0p2 rootwait console=ttyo0,115200) )
3.make the dtb
4.make the zImage
5.make the uImage
6.make the distclean
7.make the modules
8.quit
输入控制命令2时产生错误:
执行make menuconfig时出现如下错误
@ubuntu:/home/dev/busybox-1.19.3# make menuconfig
  HOSTCC  scripts/kconfig/lxdialog/checklist.o
In file included from scripts/kconfig/lxdialog/checklist.c:24:0:
scripts/kconfig/lxdialog/dialog.h:31:20: fatal error: curses.h: 没有那个文件或目录
compilation terminated.
make[2]: *** [scripts/kconfig/lxdialog/checklist.o] 错误 1
make[1]: *** [menuconfig] 错误 2
make: *** [menuconfig] 错误 2

这时因为ubuntu系统中缺少一个套件 ncurses devel ,把此套件安装下即可
apt-get install libncurses5-dev
按以上方法解决,最终可以配置内核了。