本文是《使用ML.NET和Azure Function进行机器学习 - 第1部分》的续篇。
像机器一样识别鸢尾花
回顾第1部分,您将使用Visual Studio创建一个新的Azure Function项目。
注意:确保安装了Azure Workload以查看此模板。
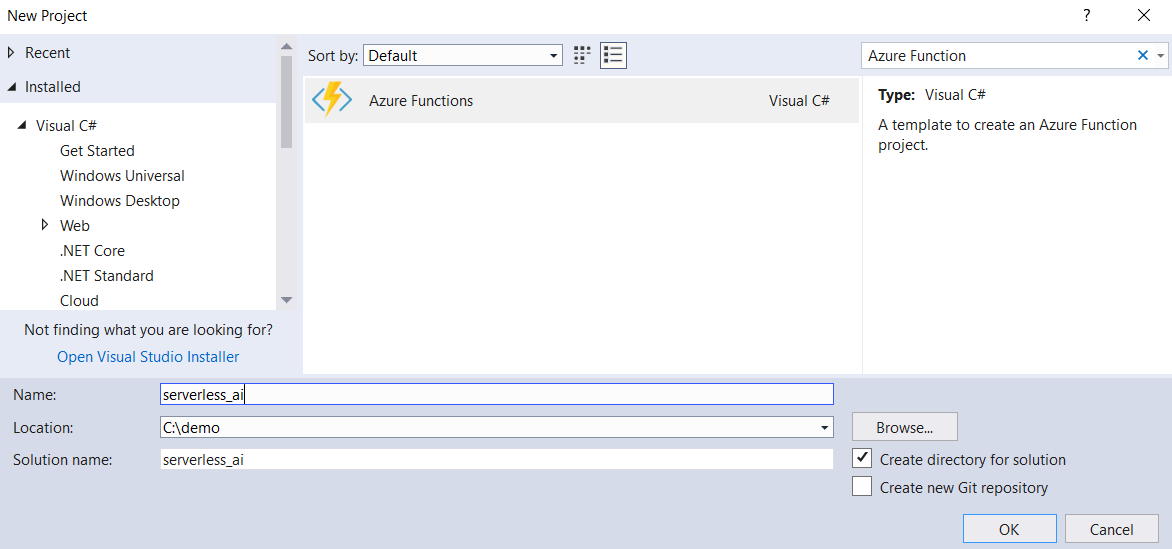
从Visual Studio的第1部分打开演示解决方案,并使用名为serverless_ai的Azure Functions项目模板创建新项目。
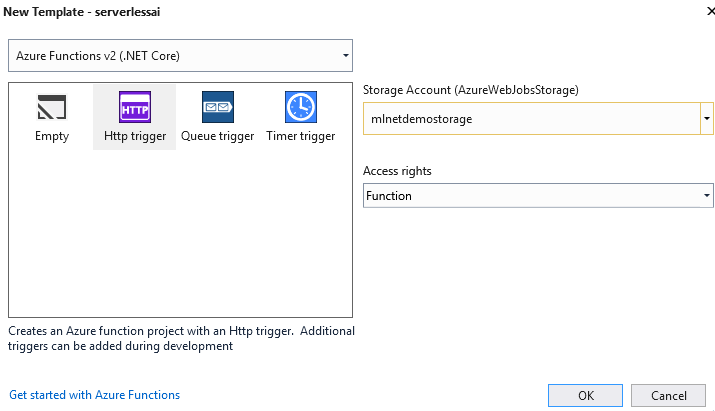
出现提示时,选择Http触发器选项并将其连接到项目的Azure存储帐户(此帖子的mlnetdemostorage1)。
然后完成以下步骤:
- 使用NuGet将Microsoft.ML包添加到项目中。
- 复制IrisData.cs和IrisPrediction.cs文件从示范项目到serverless_ai项目。你再次需要它们。
将Http触发器类Function1的名称更改为预测并复制以下代码:
 using Newtonsoft.Json;
 using Microsoft.ML;

 namespace serverless_ai
 {
     public static class Predict
     {
         [FunctionName("Predict")]
         public static IActionResult Run([HttpTrigger(AuthorizationLevel.Function, "get", "post", Route = null)]HttpRequest req,
         [Blob("models/model.zip", FileAccess.Read, Connection = "AzureWebJobsStorage")] Stream serializedModel,
         TraceWriter log)
         {
             if (typeof(Microsoft.ML.Runtime.Data.LoadTransform) == null ||
                 typeof(Microsoft.ML.Runtime.Learners.LinearClassificationTrainer) == null ||
                 typeof(Microsoft.ML.Runtime.Internal.CpuMath.SseUtils) == null ||
                 typeof(Microsoft.ML.Runtime.FastTree.FastTree) == null)
             {
                 log.Error("Error loading ML.NET");
                 return new StatusCodeResult(500);
             }

             //Read incoming request body
             string requestBody = new StreamReader(req.Body).ReadToEnd();

             log.Info(requestBody);

             //Bind request body to IrisData object
             IrisData data = JsonConvert.DeserializeObject<IrisData>(requestBody);

             //Load prediction model
             var model = PredictionModel.ReadAsync<IrisData, IrisPrediction>(serializedModel).Result;

             //Make prediction
             IrisPrediction prediction = model.Predict(data);

             //Return prediction
             return (IActionResult)new OkObjectResult(prediction.PredictedLabels);
         }
     }
 }
这些行使用您的模型来评估新的鸢尾花虹据以进行预测。您的应用已准备好进行测试。
在部署之前在本地测试
要测试本地计算机上的Azure Function应用程序,请检查local.settings.json文件以确保AzureWebJobsStorage具有与之关联的值。这是您的本地应用程序将在Azure存储帐户上找到您上载的模型的方式。如果有一个值(它应该会在您绑定的项目到您的帐户创建时),你可以F5的serverless_ai为了项目来运行它。现在打开Postman (或类似的REST API工具)并使用以下正文发送POST调用到http://localhost:7071/api/Predict:
{
  "SepalLength": 3.3,
  "SepalWidth": 1.6,
  "PetalLength": 0.2,
  "PetalWidth": 5.1
}
如果一切顺利,分类程序将返回“Iris-verginica”。
部署Skynet
...或者您从Visual Studio部署的任何AI,转到工具栏中的构建设置。
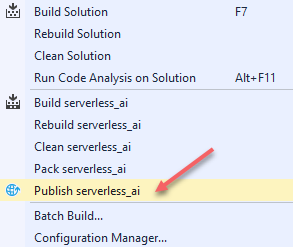
选择“发布serverless_ai”以部署Azure Function应用程序。
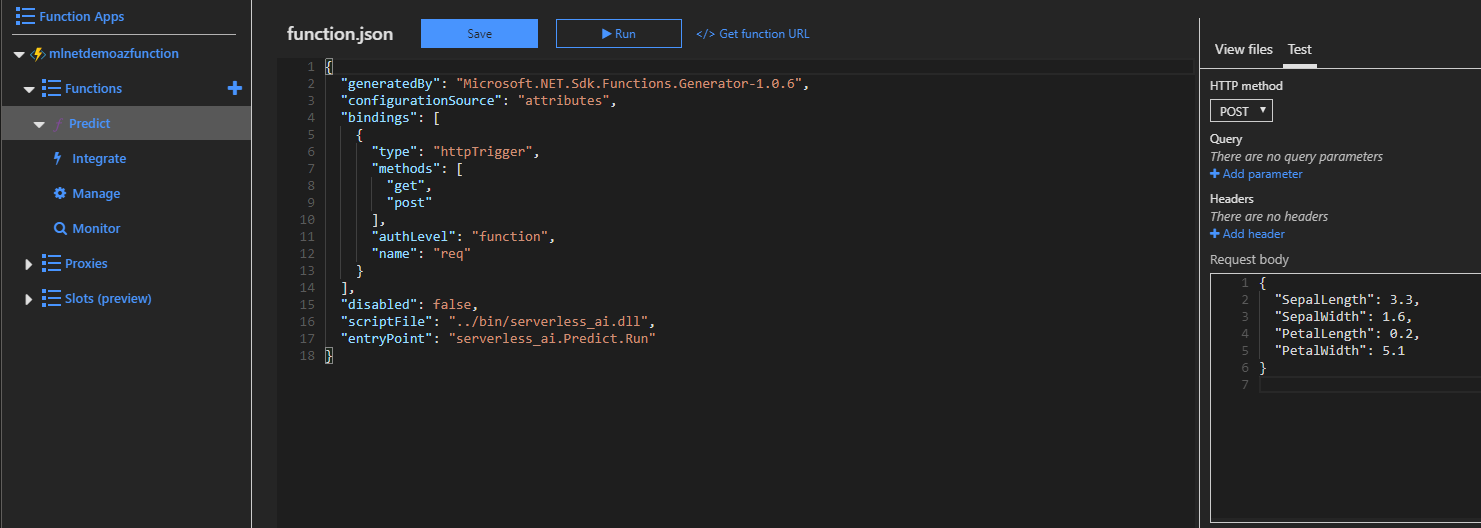
要在Azure门户中测试应用程序部署,请选择mlnetdemo下的Azure Function应用程序(或者您将其命名),然后选择其下的Predict功能。使用屏幕右侧的“ 测试”面板查看已部署的应用程序。
结尾
这会将您的鸢尾花分类程序放在Azure上供其他人尝试吧。恭喜!您现在将人工智能应用成功部署到云端了。