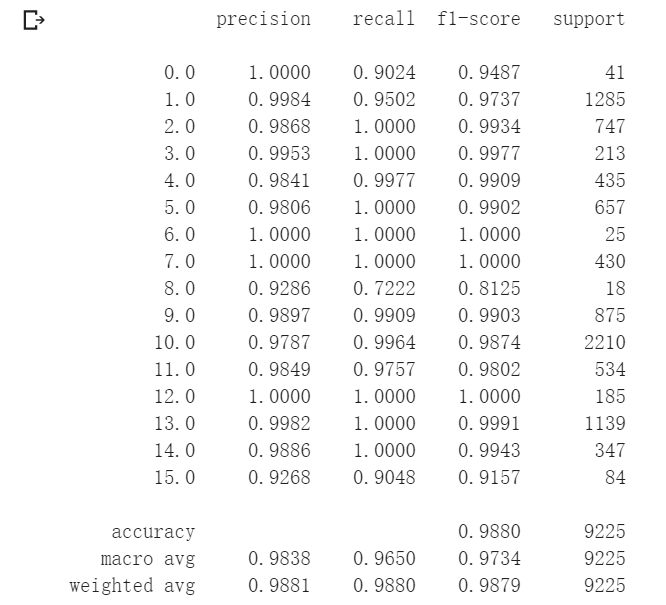
尝试在HybridSN 高光谱分类网络卷积层后加入SENet模块,代码如下:
class SELayer(nn.Module):
    def __init__(self, channel, reduction=16):
        super(SELayer, self).__init__()
        self.avg_pool = nn.AdaptiveAvgPool2d(1)
        self.fc = nn.Sequential(
            nn.Linear(channel, channel // reduction, bias=False),
            nn.ReLU(inplace=True),
            nn.Linear(channel // reduction, channel, bias=False),
            nn.Sigmoid()
        )

    def forward(self, x):
        b, c, _, _ = x.size()
        y = self.avg_pool(x).view(b, c)
        y = self.fc(y).view(b, c, 1, 1)
        return x * y.expand_as(x)

class HybridSN(nn.Module):
  def __init__(self):
    super(HybridSN, self).__init__()
    self.conv1=nn.Conv3d(in_channels=1,out_channels=8,kernel_size=(7,3,3))
    self.conv2=nn.Conv3d(in_channels=8,out_channels=16,kernel_size=(5,3,3))
    self.conv3=nn.Conv3d(in_channels=16,out_channels=32,kernel_size=(3,3,3))
    self.se1 = SELayer(576, 16)
    self.conv4 = nn.Conv2d(576, 64, 3)
    self.se2 = SELayer(64, 16)
    self.fc1=nn.Linear(18496,256)
    self.fc2=nn.Linear(256,128)
    self.fc3=nn.Linear(128,class_num)
    self.dropout = nn.Dropout(p=0.4)

  def forward(self, x):
    x=F.relu(self.conv1(x))
    x=F.relu(self.conv2(x))
    x=F.relu(self.conv3(x))
    x=torch.reshape(x,[x.shape[0],576,19,19])
    x=self.se1(x)
    x=F.relu(self.se2(self.conv4(x)))
    x=torch.flatten(x,start_dim=1)
    x=F.relu(self.fc1(x))
    x=self.dropout(x)
    #x=F.dropout(x,p=0.4,training=self.training)
    x=F.relu(self.fc2(x))
    x=self.dropout(x)
    #x=F.dropout(x,p=0.4,training=self.training)
    x=self.fc3(x)
    return x
原始HybridSN准确率在96.85%,加入SENet模块后准确率为98.42%。
之后尝试加入bn,代码如下:
class HybridSN(nn.Module):
  def __init__(self):
    super(HybridSN, self).__init__()
    self.conv1=nn.Conv3d(in_channels=1,out_channels=8,kernel_size=(7,3,3))
    self.bn1 = nn.BatchNorm3d(8)
    self.conv2=nn.Conv3d(in_channels=8,out_channels=16,kernel_size=(5,3,3))
    self.bn2 = nn.BatchNorm3d(16)
    self.conv3=nn.Conv3d(in_channels=16,out_channels=32,kernel_size=(3,3,3))
    self.bn3 = nn.BatchNorm3d(32)
    self.se1 = SELayer(576, 16)
    self.conv4 = nn.Conv2d(576, 64, 3)
    self.bn4 = nn.BatchNorm2d(64)
    self.se2 = SELayer(64, 16)
    self.fc1=nn.Linear(18496,256)
    self.fc2=nn.Linear(256,128)
    self.fc3=nn.Linear(128,class_num)
    self.dropout = nn.Dropout(p=0.4)

  def forward(self, x):
    x=F.relu(self.bn1(self.conv1(x)))
    x=F.relu(self.bn2(self.conv2(x)))
    x=F.relu(self.bn3(self.conv3(x)))
    x=torch.reshape(x,[x.shape[0],576,19,19])
    x=self.se1(x)
    x=F.relu(self.bn4(self.se2(self.conv4(x))))
    x=torch.flatten(x,start_dim=1)
    x=F.relu(self.fc1(x))
    x=self.dropout(x)
    #x=F.dropout(x,p=0.4,training=self.training)
    x=F.relu(self.fc2(x))
    x=self.dropout(x)
    #x=F.dropout(x,p=0.4,training=self.training)
    x=self.fc3(x)
    return x
准确率提升到98.80%。
关于nn.Dropout与nn.functional.dropout
因为nn.functional在forward中可以直接用不需要先定义,于是用的x=F.dropout(x,p=0.4)进行dropout,在训练中一切正常,然而在测试中即使加了model.eval(),测试结果仍然不能复现。原因如下:
使用F.dropout ( nn.functional.dropout )的时候需要设置它的training状态,training值默认为True(旧版本默认False),所以即使是eval(),dropout仍然生效。可修改为x=F.dropout(x,p=0.4,training=self.training),此时dropout状态会根据模型自身training状态变化。
如果用nn.Dropout()则不需要设置training参数,因为其本身就是对F.dropout()的包装,Ref:官方文档
class Dropout(_DropoutNd):
    def forward(self, input: Tensor) -> Tensor:
    return F.dropout(input, self.p, self.training, self.inplace)
思考
加入了两个SENet模块。第一个SENet模块接在三维卷积reshape后,此时还保持着高光谱立方体数据在空间组合上的特性,此时加入注意力机制可使光谱中含有较多信息的光谱波段筛选出来增加其权重。第二个SENet模块在二维卷积后,此时数据上少了一个空间维度的信息,用来筛选具有更多信息的特征通道。
疑问
关于relu和bn的先后顺序,本次实验测试是先bn后relu效果更好,目前争议挺多。Ref:Batch-normalized 应该放在非线性激活层的前面还是后面?
关于senet和relu的先后顺序,试用不同初始化参数的随机种子,结果有好有坏。有人解释网络模块的插入应该在卷积操作后,非线性激活函数的前面(relu),因为SENet最后选择sigmoid来凸显不同通道的重要程度(实验上sigmoid的效果也更好一些,相比于relu、tanh),相当于一个门控单元。而我们知道simmoid激活函数在网络很深的时候会出现梯度消失和爆炸,尤其是在嵌入残差网络,所以选择在原激活函数前添加模块。Ref:不定期读一篇PAPER之SENET
视频学习
语义分割
图片输入网络,输出n(类别数)个通道,取最大值

FCN
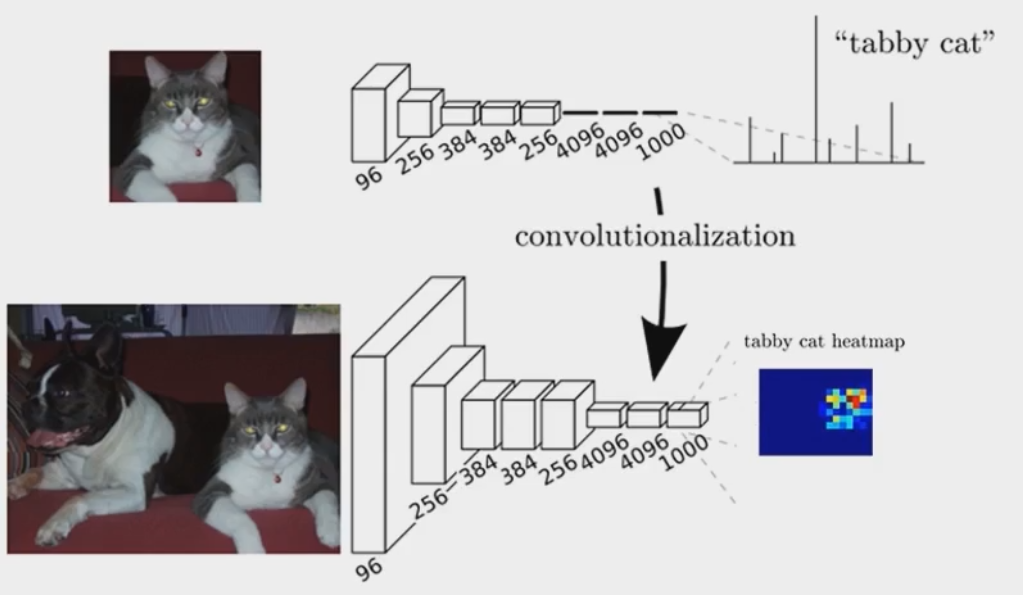
用卷积层替换全连接层,将输出的heatmap经过upsampling变为原图大小的图片。
ASPP
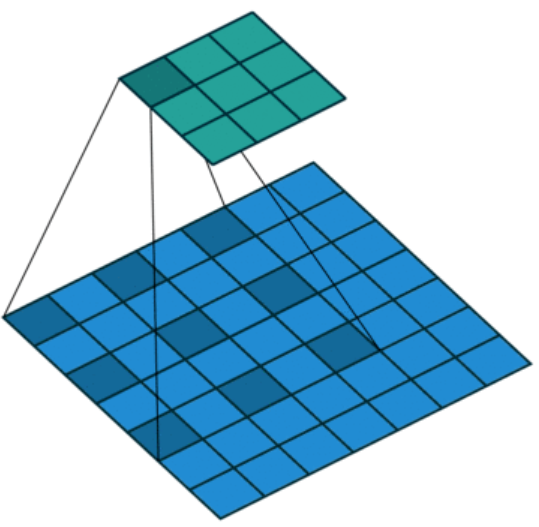
空洞卷积
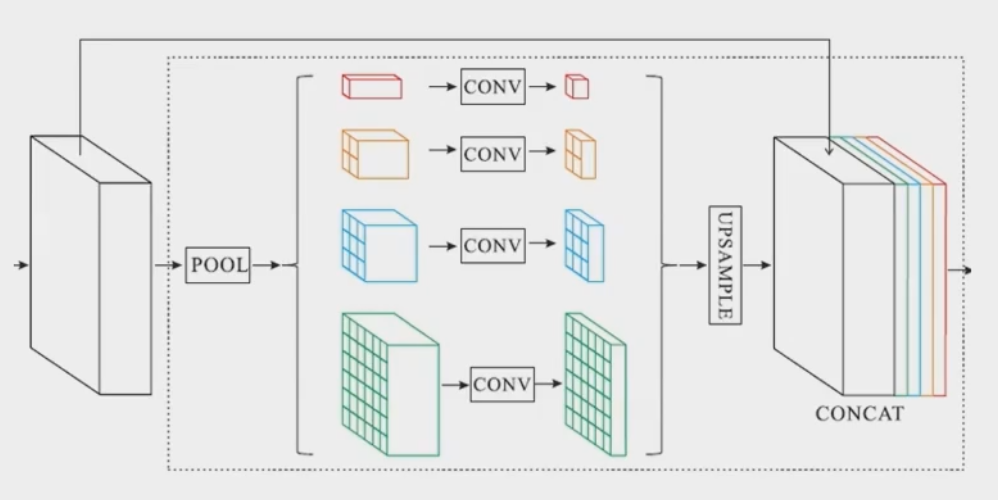
PSPNET
不同尺度的pooling与原始特征concat,增加感受野
Non-local Neural Networks
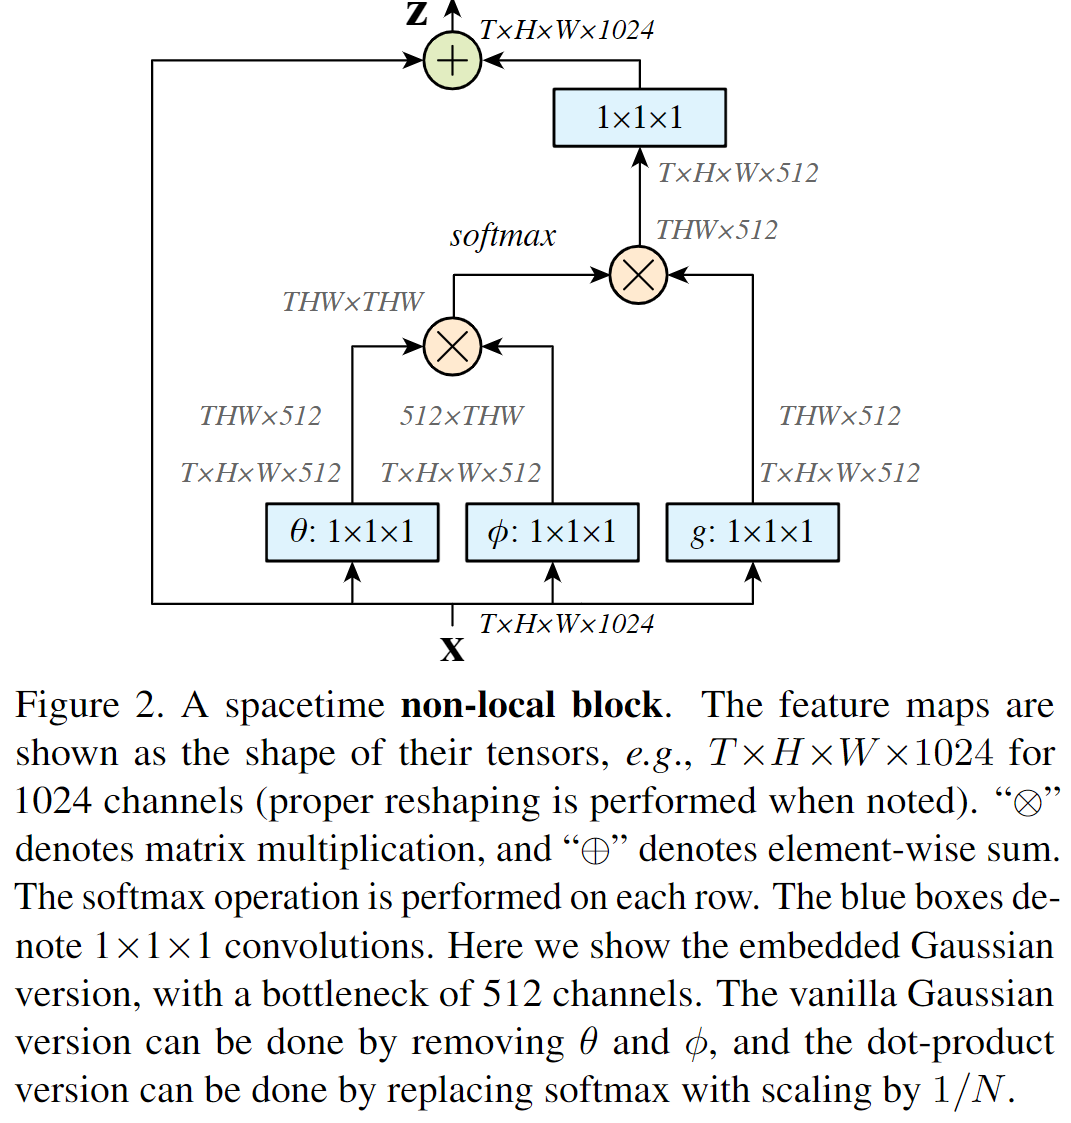
捕捉相距较远像素之间的关系,传统方法通常采用较大的的卷积核,但论其本质都是在邻域内进行捕捉,对远距离数据效果有限。
作者将传统计算机视觉方法Non-local mean扩展到神经网络中,提出了Non-local层,可以直接通过计算任意两个位置的交互来捕捉依赖,不需要管距离位置。此结构也验证了在视频中的两帧,一段话中不同词的联系等。

按照非局部均值,给出non-local operation的定义
i代表输出的位置(时间点、空间点、时空点),j代表遍历全部可能点,f代表相似度的函数,g是输入缩放函数,c(x)是归一化因子。
j是可能出现在任意位置上的,所以无论是时间、空间的任意位置,都会影响输出。
定义Non-local Block如下:
PSANet

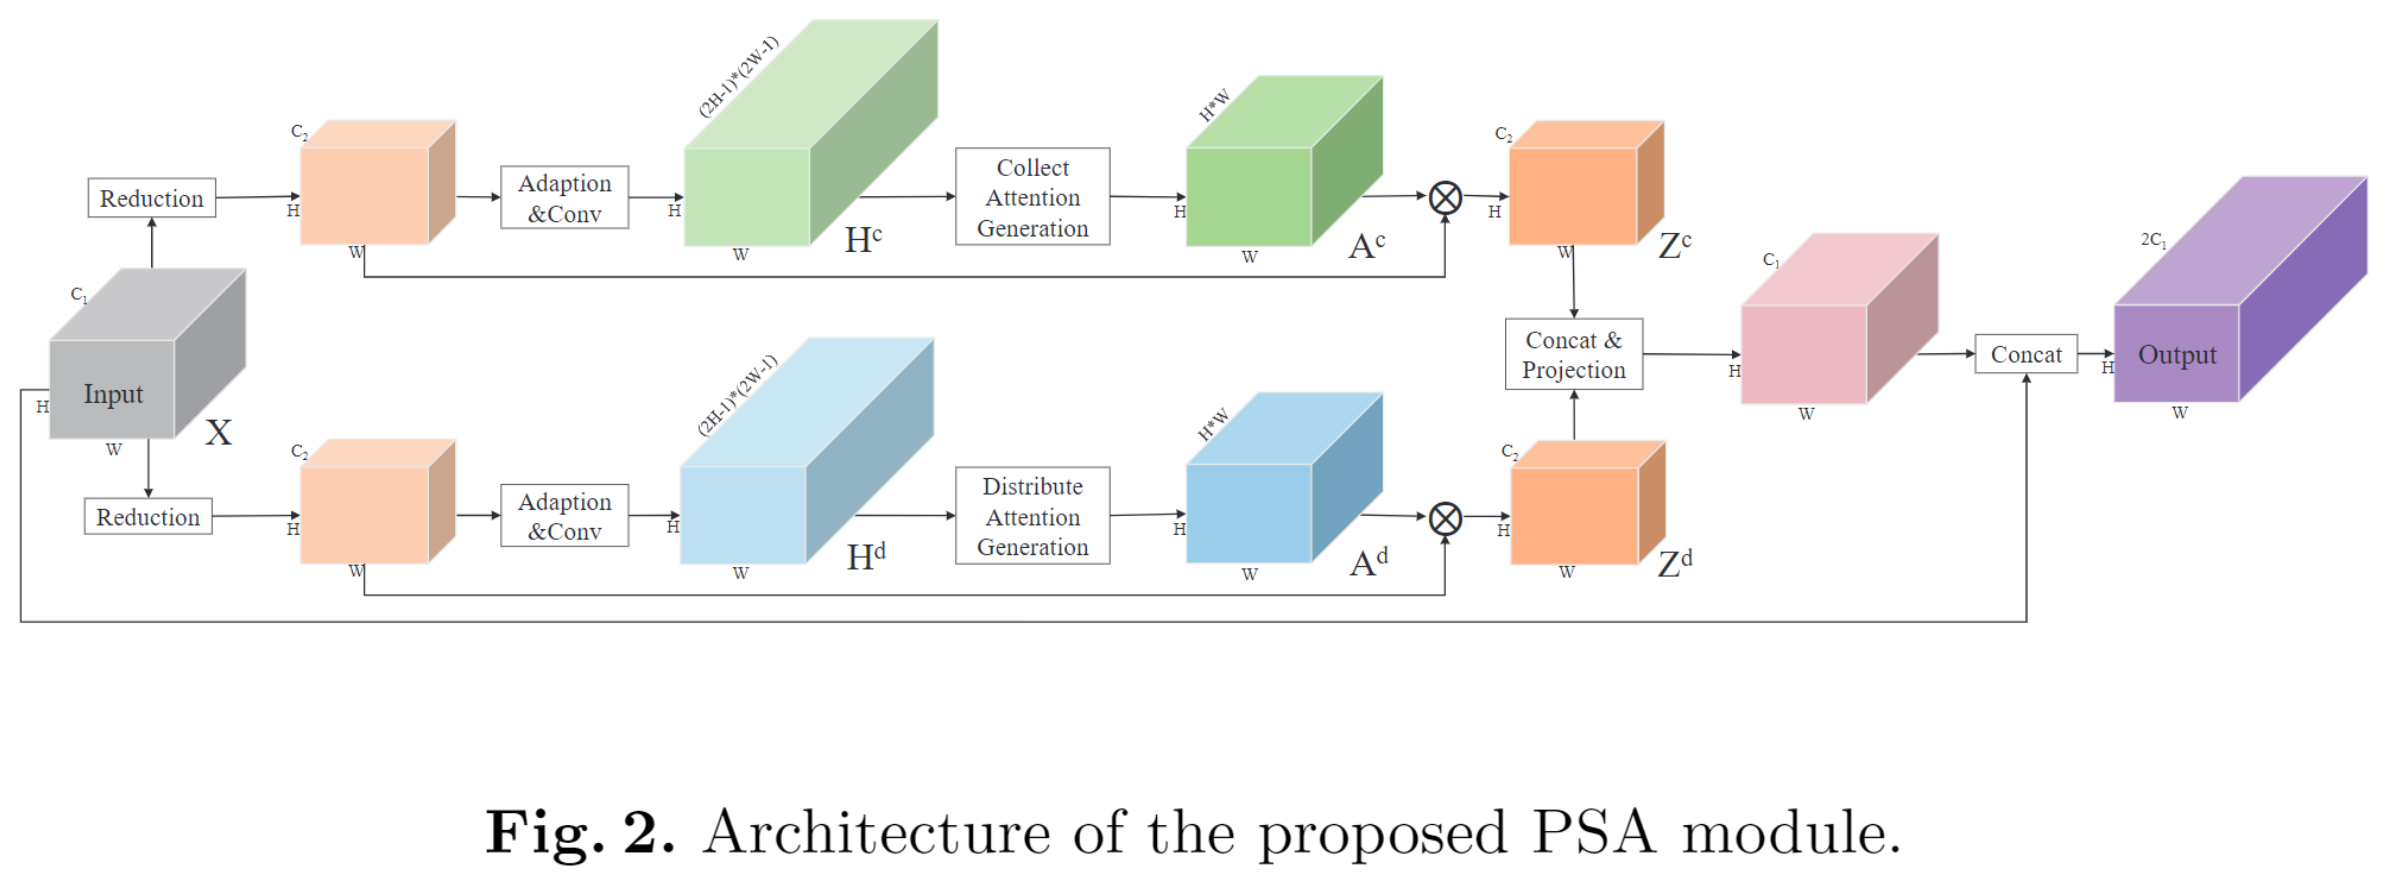
作者将计算分为两部分,Collect和Distribute。相加后得结论:
模块由两个平行支路组成,一个做Collect,一个做Distribute。
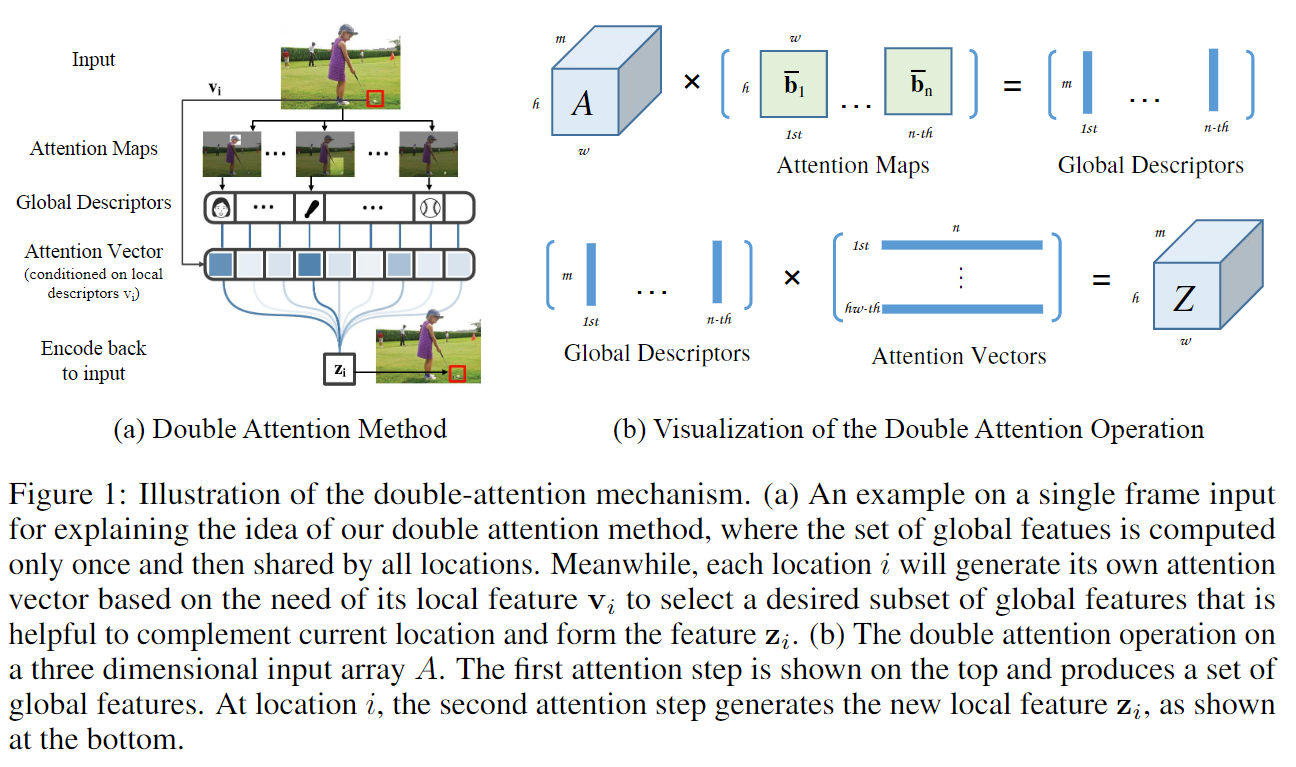
A^2-Nets
作者认为图像是由若干关键内容组成,这些组合因子K远小于像素数N,所以以K重构后的图片具有稀疏低秩的效果。
