第1章 装完系统后,希望让网络文件共享服务NFS(iptables),仅在3级别上开机自启动,该如何做?解答:什么是开机自启动,杀毒软件大家都知道吧,例如:360等每次开机都会自动起来对吧,我们就需要360这样,在Linux下软件服务跟随系统启动而启动的配置。
chkconfig iptables on/off
/etc/rc.local
/etc/init.d/iptables staet
chkconfig 管理开机自启动
level 指定运行级别的意思
--list 显示一个列表
1.1 仅在3级别上开机自启动:
[root@oldboyedu-40-nb ~]# chkconfig |grep ipt
iptables 0:off 1:off 2:off 3:off 4:off 5:off 6:off
[root@oldboyedu-40-nb ~]# chkconfig --level 3 iptables on
[root@oldboyedu-40-nb ~]# chkconfig |grep ipt
iptables 0:off 1:off 2:off 3:on 4:off 5:off 6:off
[root@oldboyedu-40-nb ~]# chkconfig --level 2345 iptables on
[root@oldboyedu-40-nb ~]# chkconfig |grep ipt
iptables 0:off 1:off 2:on 3:on 4:on 5:on 6:off
[root@oldboyedu-40-nb ~]# chkconfig iptables off
[root@oldboyedu-40-nb ~]# chkconfig |grep ipt
iptables 0:off 1:off 2:off 3:off 4:off 5:off 6:off
[root@oldboyedu-40-nb ~]# chkconfig --list iptables
iptables 0:off 1:off 2:off 3:off 4:off 5:off 6:off
[root@oldboyedu-40-nb ~]# chkconfig --list iptable
error reading information on service iptable: No such file or directory
0:off 1:off 2:off 3:off 4:of5:off 6:off 这个0到6就是运行级别
平时都是用 3是工作中默认的运行级别 完全的多用户模式 命令行模式 命令模式
1.2 如何彻底关闭iptables?
1./etc/init.d/iptables stop 临时 关闭正在运行的防火墙
2.chkconfig iptables off 永久 让iptables不会在开机的时候自启动
3.检查
chkconfig |grep ipt
/etc/init.d/iptables status
第2章 /etc/目录为linux系统的默认的配置文件及服务启动命令的目录
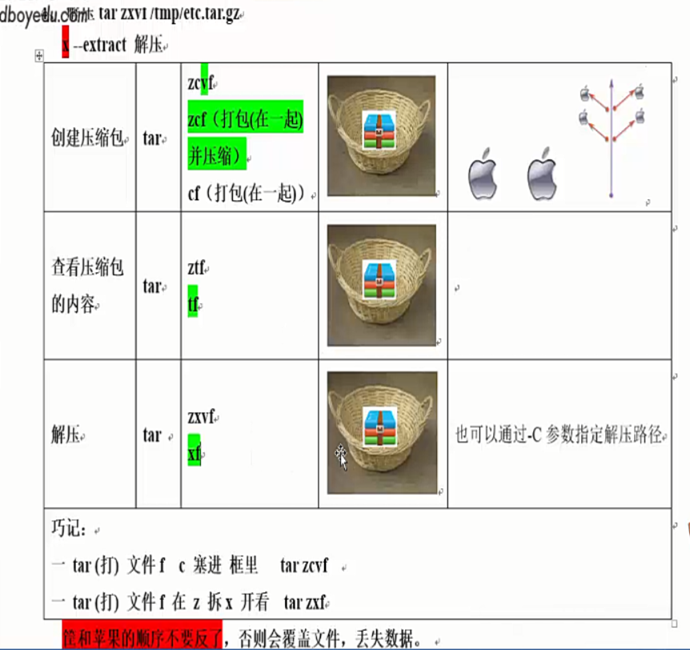
请用tar打包/etc整个目录(打包及压缩)
请用tar打包/etc整个目录(打包及压缩,但需要排除/etc/services文件)
请把a点命令的压缩包,解压到/tmp指定目录下(最好只用tar命令实现)
解答:
windows压缩-----linux 打包(苹果放入到筐中) 压缩(节约空间 地方)
打包:
注意打包的内容和包的先后顺序。
- 创建压缩包
tar zcvf [路径 位置]/筐 [相对路径 位置]一堆苹果
打包 压缩===>两个步骤
打包(tar命令默认是打包)
压缩====>z====>gzip====>etc。tar.gz
linux 打包(把这个文件放在筐里)及压缩(把这个筐挤碎了)
tar zcvf 筐(压缩包的名字) 苹果 目录苹果 苹果 ..... 你要压缩的东西
tar zcvf /tmp/etc.tar.gz /etc/
z------压缩工具--gzip 通过gzip软件进行压缩 在压缩包的尾巴加上.tar.gz
最长一种压缩之后我们一般给压缩包命名为xxxx.tar.gz
c------创建 create
v------显示创建/解压过程
平时一般不会加v 都是zcf
f------指定压缩包的位置和名字
t-------list---显示列表
x--------extract解压
简单来说压缩:
tar 压zcf 后面跟压缩位置 要压缩的文件位置
例子:
[root@- ~]# tar zcf /tmp/etc.tar.gz /etc/
[root@- ~]# tar zcvf /oldgirl/etc.tar.gz /etc/
查看压缩包里的内容:
tf就可以
[root@- ~]# tar ztf /tmp/etc.tar.gz
解压:
默认解压到当前目录,需要先进入一个目录,当然也可以自己指
tar 解zwvf 原文件所在地址 -C 后面跟上要解压的目录
例子:
解压自定义目录:tar zxvf /tmp/etc.tar.gz -C /oldg
1.1 a.请用tar打包/etc整个目录
[root@oldboyedu-40-nb ~]# ls -l /tmp/
total 9512
-rw-r--r-- 1 root root 9738690 May 20 02:43 etc.tar.gz
[root@oldboyedu-40-nb ~]# tar zcf /tmp/etc.tar.gz /etc/
tar: Removing leading `/' from member names
tar: Removing leading `/' from hard link targets
1.2 请用tar打包/etc整个目录(打包及压缩,但需要排除/etc/services文件)
[root@oldboyedu-40-nb /]# tar zcf /tmp/etc-paichu.tar.gz /etc/ --exclude=etc/services
tar: Removing leading `/' from member names
tar: Removing leading `/' from hard link targets
[root@oldboyedu-40-nb /]# tar tf /tmp/etc-paichu.tar.gz |grep "services"
etc/init/readahead-disable-services.conf
[root@oldboyedu-40-nb /]# tar tf /tmp/etc.tar.gz |grep "services"
etc/init/readahead-disable-services.conf
etc/services
1.3 请把a点命令的压缩包,解压到/tmp指定目录下(最好只用tar命令实现)
[root@oldboyedu-40-nb tmp]# ls -l
total 9640
-rw-r--r-- 1 root root 9738690 May 20 03:10 etc.tar.gz
-rw-r--r-- 1 root root 127314 May 20 03:34 ser.tar.gz
[root@oldboyedu-40-nb tmp]# cd /tmp/
[root@oldboyedu-40-nb tmp]# tar xf /tmp/ser.tar.gz
[root@oldboyedu-40-nb tmp]# ls
etc etc.tar.gz ser.tar.gz
[root@oldboyedu-40-nb tmp]# tree
.
├── etc
│?? └── services
├── etc.tar.gz
└── ser.tar.gz
1 directory, 3 files
1.4 附加 :把 /tmp/etc.tar.gz 解压到 /mnt
[root@oldboyedu-40-nb tmp]# ls -l /mnt/
total 0
-rw-r--r--. 1 root root 0 Aug 17 2017 test.txt
[root@oldboyedu-40-nb tmp]# tar xf /tmp/etc.tar.gz -C /mnt/
1.5 扩展:创建一个压缩包的时候 提示
Removing leading `/' from member names
[root@oldboyedu-40-nb tmp]#
[root@oldboyedu-40-nb tmp]# tar zcf /tmp/ser.tar.gz /etc/services
tar: Removing leading `/' from member names
tar: 删除 开头的 /斜线 从 苹果中(文件名字中)
1.5.1 现象:
把你压缩包中的文件最前面的斜线删除 根 /etc/services =======> etc/services 绝对路径 >>>>> 相对路径
1.5.2 原因
创建压缩包 绝对路径
/etc/services
压缩包里面的内容
etc/services
解压的时候 按照压缩包里面位置 进行解压的
根下面 etc 下面的services 会把/etc/services 文件覆盖 ===危险
1.5.3 解决方法:
如果你创建了一个压缩包 压缩包里面的内容(苹果) 你使用的是绝对路径
处于安全考虑 把绝对路径---去掉最前面的/----->相对路径
tar命令为了安全 把你使用的绝对路径 变化为了 相对路径
[root@oldboyedu-40-nb tmp]# tar zcf /tmp/ser.tar.gz /etc/services
tar: Removing leading `/' from member names
[root@oldboyedu-40-nb tmp]# tar tf /tmp/ser.tar.gz
etc/services
打包压缩 用相对路径
[root@oldboyedu-40-nb tmp]# cd /
[root@oldboyedu-40-nb /]# tar zcf /tmp/ser.tar.gz etc/services
cd / && tar zcf /tmp/ser.tar.gz etc/services
1.6 附加·把/etc目录打包压缩到 /tmp/
cd / && tar zcf /tmp/etc2.tar.gz etc
第2章 已知如下命令及结果:
mkdir /oldboy ; echo "I am oldboy,myqq is 31333741">/oldboy/oldboy.txt
[root@oldboyedu-40-nb oldboy]# cat oldboy.txt
I am oldboy,myqq is 31333741
2.1 现在要从文件中过滤出“oldboy”和“31333741”字符串,请给出命令
2.1.1 方法1-sed + sed
[root@oldboyedu-40-nb oldboy]# sed 's#I am ##g' oldboy.txt
oldboy,myqq is 31333741
[root@oldboyedu-40-nb oldboy]# sed 's#I am ##g' oldboy.txt |sed 's#,myqq is##g'
oldboy 31333741
2.1.2 方法2-sed+awk
[root@oldboyedu-40-nb oldboy]# cat oldboy.txt
I am oldboy,myqq is 31333741
[root@oldboyedu-40-nb oldboy]# awk '{print $1}' oldboy.txt
I
[root@oldboyedu-40-nb oldboy]# awk '{print $2}' oldboy.txt
am
[root@oldboyedu-40-nb oldboy]# awk '{print $1,$2}' oldboy.txt
I am
[root@oldboyedu-40-nb oldboy]# awk '{print $3}' oldboy.txt
oldboy,myqq
[root@oldboyedu-40-nb oldboy]#
[root@oldboyedu-40-nb oldboy]# sed 's#,# #g' oldboy.txt
I am oldboy myqq is 31333741
[root@oldboyedu-40-nb oldboy]# sed 's#,# #g' oldboy.txt |awk '{print $3,$6}'
oldboy 31333741
[root@oldboyedu-40-nb oldboy]# sed 's#,# #g' oldboy.txt |awk '{print $3,$NF}'
oldboy 31333741
2.1.3 方法3-awk
菜刀====分隔符(表示每一列的结束)
####第一里程碑-指定一个新的菜刀
[root@oldboyedu-40-nb oldboy]# cat oldboy.txt
I am oldboy,myqq is 31333741
[root@oldboyedu-40-nb oldboy]# awk '{print $2}' oldboy.txt
am
[root@oldboyedu-40-nb oldboy]# awk -F "," '{print $1}' oldboy.txt
I am oldboy
[root@oldboyedu-40-nb oldboy]# awk -F "," '{print $1,$2}' oldboy.txt
I am oldboy myqq is 31333741
####第二个里程碑-指定多把菜刀
[root@oldboyedu-40-nb oldboy]# cat oldboy.txt
I am oldboy,myqq is 31333741
[root@oldboyedu-40-nb oldboy]# awk -F "[, ]" '{print $3,$NF}' oldboy.txt
oldboy 31333741
2.1.4 方法4-sed+cut
[root@oldboyedu-40-nb oldboy]# cut -d " " -f1 oldboy.txt
I
[root@oldboyedu-40-nb oldboy]# cut -d " " -f2 oldboy.txt
am
[root@oldboyedu-40-nb oldboy]# cut -d " " -f3 oldboy.txt
oldboy,myqq
[root@oldboyedu-40-nb oldboy]# sed 's#,# #g' oldboy.txt
I am oldboy myqq is 31333741
[root@oldboyedu-40-nb oldboy]# sed 's#,# #g' oldboy.txt |cut -d " " -f3,6
oldboy 31333741
第二种awk中 想取一个几百列文件 中间的怎么取
1.确定好目标
2.看看选择什么菜刀
2.2 如果需要从文件中过滤出“oldboy,31333714”字符串,请在给出命令
[root@oldboyedu-40-nb oldboy]# awk -F "[ ,]" '{print $3,$NF}' oldboy.txt
oldboy 31333741
[root@oldboyedu-40-nb oldboy]# awk -F "[ ,]" '{print $3","$NF}' oldboy.txt
oldboy,31333741
第3章 如何查看/etc/services文件的有多少行?

[root@oldboy40 ~]# wc -l /etc/services
10774 /etc/services
1.1 屌丝去洗浴中心之路
1.路通不通
ping
2.是否有人打劫
iptable selinux
3.查看是否有人提供服务
telnet 10.0.0.200 22 ##查看22端口是否开启(提供服务)
22端口 对应的 sshd服务(远程连接)
1.2 如何查看sshd 进程是否在运行?
ps -ef |grep "sshd"
#ps process
#ps -ef 显示出系统中正在运行的进程
[root@oldboyedu-40-nb oldboy]# ps -ef |grep "sshd"
root 1522 1 0 Aug28 ? 00:00:00 /usr/sbin/sshd
root 3594 1522 0 Aug28 ? 00:00:01 sshd: root@pts/1
root 3596 1522 0 Aug28 ? 00:00:00 sshd: root@pts/2
root 3955 1522 0 02:06 ? 00:00:00 sshd: root@pts/0
root 3974 3598 0 02:06 pts/1 00:00:00 grep sshd
[root@oldboyedu-40-nb oldboy]# ps -ef |grep "/sshd"
root 1522 1 0 Aug28 ? 00:00:00 /usr/sbin/sshd
root 3976 3598 0 02:07 pts/1 00:00:00 grep /sshd
[root@oldboyedu-40-nb oldboy]# ps -ef |grep "/sshd"|wc -l
2
第2章 过滤出/etc/services 文件包含3306或1521两数字所在的行的内容。
[root@oldboyedu-40-nb oldboy]# egrep "3306|1521" /etc/services
mysql 3306/tcp # MySQL
mysql 3306/udp # MySQL
ncube-lm 1521/tcp # nCube License Manager
ncube-lm 1521/udp # nCube License Manager
[root@oldboyedu-40-nb oldboy]# #egrep ===== grep -E
第3章 命令行及shell中加单引号和加双引号的区别
3.1 单引号: 所见即所得 吃啥吐啥 单引号里面的内容会原封不动的显示出来
[root@oldboyedu-40-nb oldboy]# echo '$LANG $(hostname)'
$LANG $(hostname)
3.2 双引号: 双引号会解析(运行)里面的特殊的符号 $LANG $(hostname)
[root@oldboyedu-40-nb oldboy]# echo "$LANG $(hostname) "
en_US.UTF-8 oldboyedu-40-nb