概述
Silverlight 2 Beta 1版本发布了,无论从Runtime还是Tools都给我们带来了很多的惊喜,如支持框架语言Visual Basic, Visual C#, IronRuby, Ironpython,对JSON、Web Service、WCF以及Sockets的支持等一系列新的特性。《一步一步学Silverlight 2系列》文章带您快速进入Silverlight 2开发。
本文将简单介绍在Silverlight 2中如何使用WebRequest进行数据的提交和获取。
简单示例
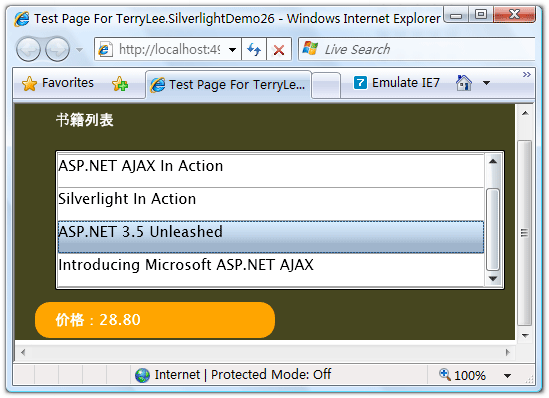
在本文中,我们仍然使用在一步一步学Silverlight 2系列(12):数据与通信之WebClient中用过的示例,只不过稍微做一点小的改动,使用WebRequest提交书籍编号数据,并根据书籍号返回价格信息。最终运行的结果如下图:
编写界面布局,XAML如下:
<Grid Background="#46461F">
    <Grid.RowDefinitions>
        <RowDefinition Height="40"></RowDefinition>
        <RowDefinition Height="*"></RowDefinition>
        <RowDefinition Height="40"></RowDefinition>
    </Grid.RowDefinitions>
    <Grid.ColumnDefinitions>
        <ColumnDefinition></ColumnDefinition>
    </Grid.ColumnDefinitions>
    <Border Grid.Row="0" Grid.Column="0" CornerRadius="15"
            Width="240" Height="36"
            Margin="20 0 0 0" HorizontalAlignment="Left">
        <TextBlock Text="书籍列表" Foreground="White"
                   HorizontalAlignment="Left" VerticalAlignment="Center"
                   Margin="20 0 0 0"></TextBlock>
    </Border>
    <ListBox x:Name="Books" Grid.Row="1" Margin="40 10 10 10"
             SelectionChanged="Books_SelectionChanged">
        <ListBox.ItemTemplate>
            <DataTemplate>
                <StackPanel>
                    <TextBlock Text="{Binding Name}" Height="32"></TextBlock>
                </StackPanel>
            </DataTemplate>
        </ListBox.ItemTemplate>
    </ListBox>
    <Border Grid.Row="2" Grid.Column="0" CornerRadius="15"
            Width="240" Height="36" Background="Orange"
            Margin="20 0 0 0" HorizontalAlignment="Left">
        <TextBlock x:Name="lblPrice" Text="价格:" Foreground="White"
                   HorizontalAlignment="Left" VerticalAlignment="Center"
                   Margin="20 0 0 0"></TextBlock>
    </Border>
</Grid>
编写HttpHandler,注意我使用了context.Request.Form["No"],在后面我们将使用WebRequest在RequestReady方法中将数据写入请求流:
public class BookHandler : IHttpHandler
{
    public static readonly string[] PriceList = new string[] {
        "66.00",
        "78.30",
        "56.50",
        "28.80",
        "77.00"
    };
    public void ProcessRequest(HttpContext context)
    {
        context.Response.ContentType = "text/plain";
        context.Response.Write(PriceList[Int32.Parse(context.Request.Form["No"])]);
    }

    public bool IsReusable
    {
        get
        {
            return false;
        }
    }
}
在界面加载时绑定书籍列表,关于数据绑定可以参考一步一步学Silverlight 2系列(11):数据绑定。
private void UserControl_Loaded(object sender, RoutedEventArgs e)
{
    List<Book> books = new List<Book>() {
        new Book("Professional ASP.NET 3.5"),
        new Book("ASP.NET AJAX In Action"),
        new Book("Silverlight In Action"),
        new Book("ASP.NET 3.5 Unleashed"),
        new Book("Introducing Microsoft ASP.NET AJAX")
    };

    Books.ItemsSource = books;
}
接下来在SelectionChanged事件中实现用户选择书籍时,我们使用WebRequest提交书籍编号,并且获得价格数据,仍然采用异步模式,提供RequestReady和ResponseReady两个回调函数:
private string bookNo;

void Books_SelectionChanged(object sender, SelectionChangedEventArgs e)
{
    bookNo = Books.SelectedIndex.ToString();

    Uri endpoint = new Uri("http://localhost:49955/BookHandler.ashx");

    WebRequest request = WebRequest.Create(endpoint);
    request.Method = "POST";
    request.ContentType = "application/x-www-form-urlencoded";
    request.BeginGetRequestStream(new AsyncCallback(RequestReady), request);
    request.BeginGetResponse(new AsyncCallback(ResponseReady), request);
}
实现RequestReady方法,将书籍的编号写入请求流中。
void RequestReady(IAsyncResult asyncResult)
{
    WebRequest request = asyncResult.AsyncState as WebRequest;
    Stream requestStream = request.EndGetRequestStream(asyncResult);

    using (StreamWriter writer = new StreamWriter(requestStream))
    {
        writer.Write(String.Format("No={0}", bookNo));
        writer.Flush();
    }
}
实现ResponseReady方法,显示返回的结果。
void ResponseReady(IAsyncResult asyncResult)
{
    WebRequest request = asyncResult.AsyncState as WebRequest;
    WebResponse response = request.EndGetResponse(asyncResult);

    using (Stream responseStream = response.GetResponseStream())
    {
        StreamReader reader = new StreamReader(responseStream);
        lblPrice.Text = "价格:" + reader.ReadToEnd();
    }
}
最后运行的结果如下:
用户选择一本书籍后,将显示其价格:
结束语
本文简单介绍了在Silverlight 2中如何使用WebRequest提交和获取数据,你可以从这里下载示例程序。

