关于IOS与服务器交互json数据
①从服务器接受json数据:
这个可以用AFN,接受方式一般为get。如:
 1 +(NSArray *)getContactsFromServer:(ZMMeetingAddViewController *)meetingAddController{
 2     NSMutableArray *contactsArr = [NSMutableArray array];
 3
 4     NSString *urlGetContactsFromServer = [NSString stringWithFormat:@"http://xxx.com"];
 5
 6     urlGetContactsFromServer = [urlGetContactsFromServer stringByAddingPercentEscapesUsingEncoding:NSUTF8StringEncoding];
 7     AFHTTPRequestOperationManager *requestManager = [[AFHTTPRequestOperationManager alloc]init];
 8     requestManager.responseSerializer.acceptableContentTypes = [NSSet setWithObjects:@"text/html",@"application/json", @"text/plain", nil];
 9     requestManager.requestSerializer.HTTPShouldHandleCookies = YES;
10
11     [requestManager GET:urlGetContactsFromServer
12              parameters:nil
13                 success:^(AFHTTPRequestOperation *operation, id responseObject) {
14                     NSDictionary *dict = responseObject;
15                     NSString *resultStr = [dict objectForKey:@"result"];
16                     NSArray *contactsList = [dict objectForKey:@"list"];
17                     NSString *errorStr = [dict objectForKey:@"error_reason"];
18                     if (resultStr && [resultStr isEqualToString:@"success"]) {
19                         for (NSDictionary *dic in contactsList) {
20                             NSString *telNum = [dic objectForKey:@"tel"];
21                             NSString *userName = [dic objectForKey:@"name"];
22                             ZMContactsFromServer *contact = [[ZMContactsFromServer alloc]init];
23                             contact.userName = userName;
24                             contact.telNum = telNum;
25                             [contactsArr addObject:contact];
26                         }
27                     } else {
28                         NSLog(@"%@",errorStr);
29                     }
30                     meetingAddController.allContacts = contactsArr;
31
32                     [meetingAddController.tableView reloadData];
33
34                 } failure:^(AFHTTPRequestOperation *operation, NSError *error){
35                     NSLog(@"数据请求失败");
36
37                 }];
38
39     return contactsArr;
40 }
②往服务器发送json数据,需要注意以下几点
⑴一定要用post方式
⑵设置请求头
⑶设置请求体
- (void)touchesBegan:(NSSet *)touches withEvent:(UIEvent *)event
{
    // 1.创建请求
    NSURL *url = [NSURL URLWithString:@"http://xxx.com"];
    NSMutableURLRequest *request = [NSMutableURLRequest requestWithURL:url];
    request.HTTPMethod = @"POST";

    // 2.设置请求头
    [request setValue:@"application/json" forHTTPHeaderField:@"Content-Type"];

    // 3.设置请求体
    NSDictionary *json = @{@"order_id" : @"123",@"user_id" : @"789",@"shop" : @"Toll"};

    // NSData --> NSDictionary
    // NSDictionary --> NSData
    NSData *data = [NSJSONSerialization dataWithJSONObject:json options:NSJSONWritingPrettyPrinted error:nil];
    request.HTTPBody = data;

    // 4.发送请求
    [NSURLConnection sendAsynchronousRequest:request
                                       queue:[NSOperationQueue mainQueue]
                           completionHandler:^(NSURLResponse *response, NSData *data, NSError *connectionError){
                                NSLog(@"%d", data.length);
    }];
}
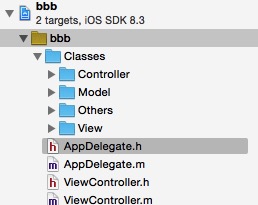
2.关于如何在项目中如何建立分类文件夹的问题,即Classes下分Controller、Model、View、Others等,像这样

但下午在建文件夹时,是这样

不知道是什么原因,按照以前那种方法分类后再编译会提示“Appdelegate.h file not found”错误。
由于新建项目时用的Xcode版本是6.3.2,用5.2版本按照这种方法则完全正常,所以想当然的以为是xcode版本问题,还在网上查了半天资料。后来问了人,才恍然大悟。
xcode中用new group方法添加的文件夹不是真实存在的,若想真实存在,则需要点击项目名称——show in finder,新建文件夹Classes,然后往里边拖或Add Files To "项目名称"时,这时就要特别注意选择类型

应选择“Create groups”,而不是“Create folder reference”。
切记。
3. 关于多线程处理问题
子线程是不能更新UI的,它只负责数据的处理。只有主线程才能更新UI,若在子线程更新UI,则会报
Tried to obtain the web lock from a thread other than the main thread or the web thread. This may be a result of calling to UIKit from a secondary thread. Crashing now
比如,点击按钮产生一个新线程
-(void)clickTheBtn{
    NSThread *buttonThread = [[NSThread alloc] initWithTarget:self selector:@selector(readSim) object:nil];
    [buttonThread setName:@"thread-1"];
    [buttonThread start];
}
错误做法
-(void)readSim{
    //其它操作
    //更新UI
    [self.imgBtn setImage:[UIImage imageNamed:@"newimg"] forState:UIControlStateNormal];//会报错
}
正确的做法
-(void)readSim{
    //其它操作
    //更新UI
    dispatch_sync(dispatch_get_main_queue(), ^(){
        // 这里的代码会在主线程执行
        [self.imgBtn setImage:[UIImage imageNamed:@"newimg"] forState:UIControlStateNormal];
    });
}
利用block块的方法比普通方法简单,如
//在主线程上执行操作
[self performSelectorOnMainThread:@selector(run) withObject:nil waitUntilDone:YES];
4.json格式问题,在处理json时,从后台返回来的格式如下
@"{"name":"wewins bluetooth data","uuid":"26750052"}"
但打印后却显示正常
{"name":"wewins bluetooth data","uuid":"26750052"}
这可能是Xcode进行了自动转译。对于这种形式的json,用传统替代字符串的方法处理会出现问题,由于“”属于转义字符,所以处理“”时得用“\”
1 NSString *uuidDev = self.locationArray[1];//self.locationArray[1]即为上述反斜杠形式字符串
2 NSString *character = nil;
3 for (int i=0; i<strWithLine.length; i++) {
4     character = [strWithLine substringWithRange:NSMakeRange(i, 1)];
5     if ([character isEqualToString:@"""]) {
6         [strWithLine deleteCharactersInRange:NSMakeRange(i, 1)];
7     }
8 }
上面的方法在处理单个或无规则位置的反斜杠“”有用。对于上述形式则需要用SBJson来处理。
1 NSMutableString *strWithLine = self.locationArray[1];
2 SBJsonParser *jsonParser = [[SBJsonParser alloc] init];
3 NSDictionary *dictTemp = [jsonParser objectWithString:strWithLine];
SBJson的功能很强大,对于数组或是字典,都可以用objectWithString来解析
1 NSString *jsonStr  = @"{"name":"jia","age":"24"}";
2 NSString *jsonStr2 = @"["1","2"]";
3 SBJsonParser *jsonParser = [[SBJsonParser alloc] init];
4 NSMutableDictionary *dict = [jsonParser objectWithString:jsonStr];
5 NSLog(@"%@",dict);
6 NSMutableArray *arr = [jsonParser objectWithString:jsonStr2];
7 NSLog(@"%@",arr);
5.关于代理取值后数组数据消失的问题
经过是这样的,之前要把一个功能整合到项目中,这个功能的作用是在程序启动时用代理获取一个数组,先做的demo,测试正常。但加到项目中后,刚开始数组是有值的,但跳转几次页面后数据消失(之前的demo也有页面跳转),然后开始分析。
之前一直以为是自己的程序有问题,debug测试了老半天,对该数组进行追踪,发现没有其它操作,但数据就是莫名其妙地消失了。
经过debug,还是有了点眉目,因为项目是混合应用,所以页面有的是单纯的html跳转,有的是controller之间跳。当时完全没有想到这里,认为demo中经过几次页面跳转后数据还在,现在跳转后不在了是自己的写法有问题。
然后呢,最后问题确认了,项目中多加了一个跳转,然后再返回原页面。这步操作是原生写法,不是HTML的。在返回原页面时用的是
1 MainPageViewController *second = [[MainPageViewController alloc] init];
2 AppDelegate *appDelegate = [[UIApplication sharedApplication] delegate];
3 appDelegate.window.rootViewController = second;
由上边可以看出返回原页面时对controller新建了一个实例。跟原来的controller不是同一个,所以数组数据就消失了。
知道问题在哪,解决方法就有了。
①页面跳转时都不要新建实例,可以把controller作为参数传递。这样不管跳转几次,都只有一个实例
②若新建了实例,那么需要把数据存到单例中,最明显的例子就是Appdelegate和NSUserDefaults。
1 //存储时,在AppDelegate.h中
2 @property(nonatomic,strong) NSMutableArray *tempArr;
3 //在需要储存数据的controller中
4 AppDelegate *mainDelegate = [[UIApplication sharedApplication] delegate];
5 mainDelegate.tempArr = self.dataArr;
6 //读取数据时
7 AppDelegate *mainDelegate = [[UIApplication sharedApplication] delegate];
8 NSArray *arrList = mainDelegate.tempArr;
6.沙盒的应用,往plist文件存储数据
一些基本的数据类型,如NSString、NSDictionary、NSArray、NSData、NSNumber等可以存储到plist文件中。如:
 1 //要存储的数组
 2 NSString *str = @"abc";
 3 NSString *astr = @"efg";
 4 NSArray *Array = [NSArray arrayWithObjects:str, astr, nil];
 5
 6 //存储数据
 7 NSString *Path = [NSSearchPathForDirectoriesInDomains(NSDocumentDirectory, NSUserDomainMask, YES) lastObject];
 8 NSString *filename = [Path stringByAppendingPathComponent:@"test.plist"];
 9 [NSKeyedArchiver archiveRootObject:Array toFile:filename];
10
11 //获取数据
12 NSArray *arr = [NSKeyedUnarchiver unarchiveObjectWithFile: filename];
13 NSString *strRead = [arr objectAtIndex:0];
14 NSString *astrRead =  [arr objectAtIndex:1];
此类操作时需要用NSKeyedArchiver的archiveRootObject和unarchiveObjectWithFile操作。这在SSKeyChain中也有用到。
若要存储model类,则需要重写encodeWithCoder和initWithCoder方法。如在一个对象User中
在.h中
1 @interface ZMUserModel : NSObject<NSCoding>
2 @property(nonatomic,copy) NSString *userId;
3 @property(nonatomic,copy) NSString *userIpAdd;
4 @property(nonatomic,copy) NSString *userTel;
5 @end
在.m中
@implementation ZMUserModel

-(void)encodeWithCoder:(NSCoder *)aCoder{
    [aCoder encodeObject:self.userId forKey:@"userId"];
    [aCoder encodeObject:self.userIpAdd forKey:@"userIpAdd"];
    [aCoder encodeObject:self.userTel forKey:@"userTel"];
}

-(id)initWithCoder:(NSCoder *)aDecoder{
    if (self == [super init]) {
        self.userId = [aDecoder decodeObjectForKey:@"userId"];
        self.userIpAdd = [aDecoder decodeObjectForKey:@"userIpAdd"];
        self.userTel = [aDecoder decodeObjectForKey:@"userTel"];
    }
    return self;
}

@end
然后在获取时可以用类似于下边的
for (NSData *userData in defaultsArr) {
    ZMUserModel *userModel = [NSKeyedUnarchiver unarchiveObjectWithData:userData];
    if ([userId isEqualToString:userModel.userId]) {
        ipStr = userModel.userIpAdd;
        userTel = userModel.userTel;
    }
}
7.Category是IOS的一种设计模式,用来对已存在的类添加方法,新添加的方法也会被扩展的类的子类继承。假如某个类的方法有bug而不方便修改时,可以用Category解决。但要注意的是,此时要实现那个bug方法的所有功能,否则会出现新bug。
Category只能添加类的方法,不能添加新属性。
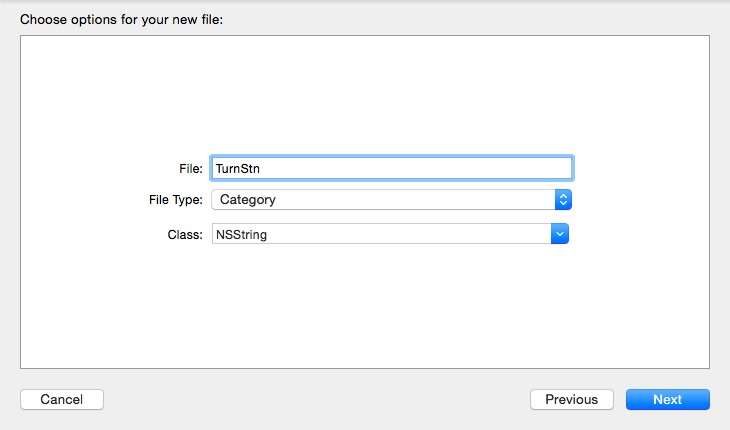
添加方法为:新建File——>Source—>Objective-C File,选FileType和Class,命名。如对NSString添加TurnStn方法(反转字符),则

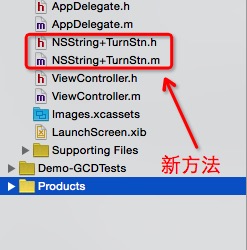
系统会生成固定格式的方法名,NSString+TurnStn。

在NSString+TurnStn的.h中
@interface NSString (TurnStn)
+ (NSString *) reverseString:(NSString *)strSrc;
@end
在.m中实现
 1 @implementation NSString (TurnStn)
 2 + (NSString *)reverseString:(NSString *)strSrc;
 3 {
 4     NSMutableString *reversedString =[[NSMutableString alloc]init];
 5     NSInteger charIndex = [strSrc length];
 6     while (charIndex > 0) {
 7         charIndex--;
 8         NSRange subStrRange =NSMakeRange(charIndex, 1);
 9         [reversedString appendString:[strSrcsubstringWithRange:subStrRange]];
10     }
11     return reversedString;
12 }
13 @end
使用时直接调用reverseString即可,非常方便。
还有一种特殊的Category使用方法。如在view中想获取宽度,需要用
CGFloat widthTemp = self.frame.size.width;
若不想这么繁琐,则可以扩展
在UIView+ShortStr的.h中
1 @interface UIView (ShortStr)
2 // 这样只会生成方法的声明, 不会生成方法的实现和成员变量
3 @property(nonatomic,assign) CGFloat width;
4 @end
在.m中
 1 @implementation UIView (ShortStr)
 2 - (void)setWidth:(CGFloat)width
 3 {
 4     CGRect frame = self.frame;
 5     frame.size.width = width;
 6     self.frame = frame;
 7 }
 8
 9 - (CGFloat)width
10 {
11     return self.frame.size.width;
12 }
13 @end
8.NSString转换大小写
有两套方法,一种是lowercaseString,uppercaseString;另一套是uppercaseStringWithLocale,lowercaseStringWithLocale
推荐用第二套,因为考虑到本地化问题
1 NSString *testString = @"Hello World";
2 NSString *lowerCaseString1 = [testString lowercaseString];
3 NSLog(@"lowerCaseString1: %@",lowerCaseString1);
4 //结果为 hello world
5
6 NSString *upperStr = [testString uppercaseStringWithLocale:[NSLocale currentLocale]];
7 NSLog(@"upperStr: %@",upperStr);
8 //结果为 HELLO WORLD
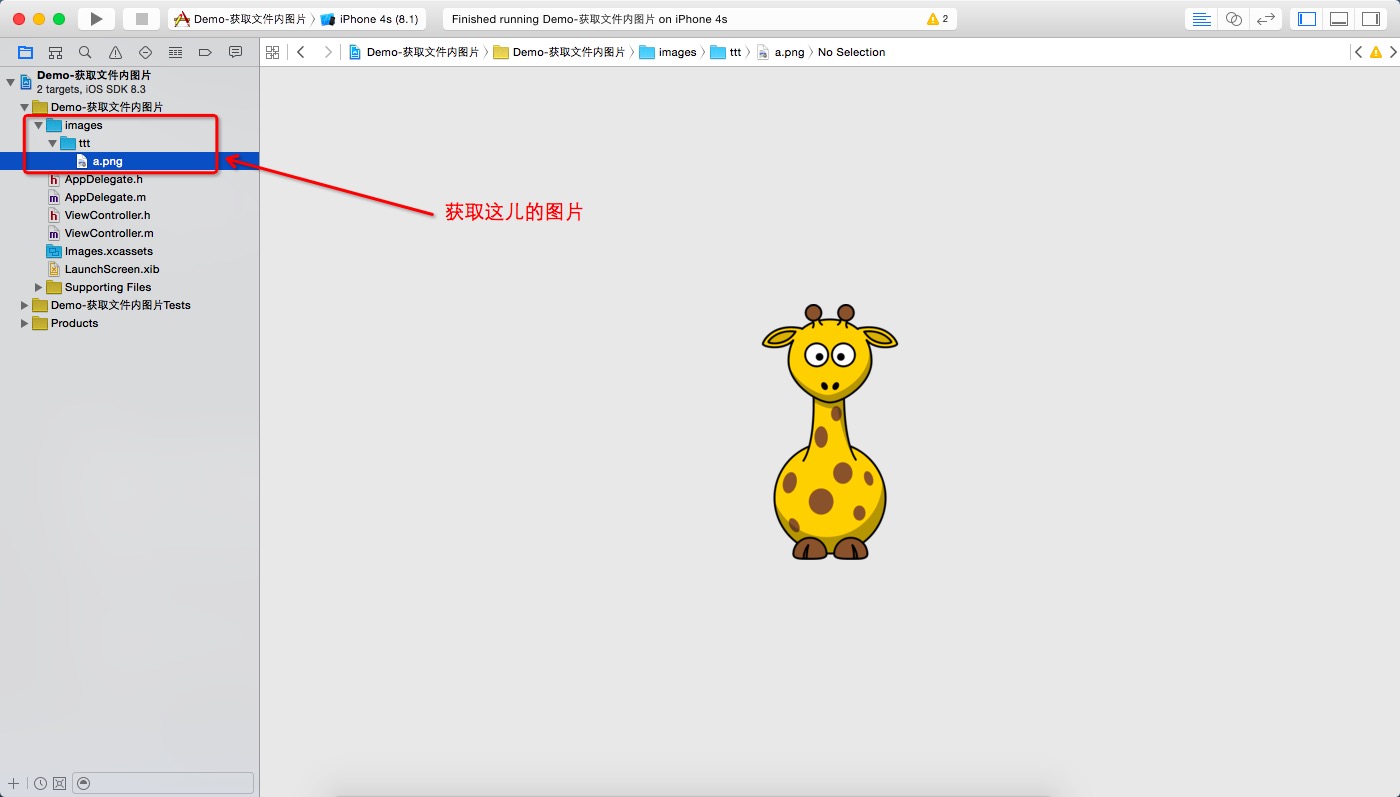
9.获取folder reference(即蓝色文件夹)内文件

常规的图片获取方法
UIImage *img = [UIImage imageNamed:@"a"];
是获取不到的,这只适用于group类型的(黄色文件夹)。
正确的应该是
1 NSString *path = [[NSBundle mainBundle] pathForResource:@"a.png" ofType:nil inDirectory:@"images/ttt"];
2 UIImage *img = [UIImage imageWithContentsOfFile:path];
或者是
UIImage *img = [UIImage imageNamed:@"images/ttt/a.png"];
这里牵涉到ios的相对路径和绝对路径。下边的就是相对路径
UIImage *img=[UIImage imageNamed:@"cellicon.png"];
folder里的由于不能编译,所以得是绝对路径。获取程序根目录的方法为:
NSString *basePath = [NSString stringWithFormat:@"%@%@",[[NSBundle mainBundle]resourcePath],@"/"];
NSLog("根路径为%@",basePath);
打印结果为
根路径为/Users/apologize/Library/Developer/CoreSimulator/Devices/9175C57E-399F-41DA-8405-D153A5FBEC9F/data/Containers/Bundle/Application/9852AB51-3E69-4CB6-ADF3-AAE3AF563429/Demo-获取文件内图片.app/
10.关于block变量的使用
在使用MBProgressHud时,出现
Variable is not assignable (missing__block type specifier)
出错代码如下

经查找,是因为在block内部使用block外部定义的局部变量时,该变量没有被__block修饰(注意是双下划线)。没有被__block修饰的变量在block内部是readonly的。若想修改,只能在前边加__block修饰
但是,若在block内修改全局变量,则不需要__block修饰。
那么修改方案如下
 1 @property(nonatomic,strong) MBProgressHUD *hhh;
 2
 3 -(void)showTextDialog{
 4     __block MBProgressHUD *mbHud = [[MBProgressHUD alloc]initWithView:self.view];
 5     [self.view addSubview:mbHud];
 6     mbHud.dimBackground = YES;
 7     mbHud.labelText = @"请稍等";
 8     [mbHud showAnimated:YES whileExecutingBlock:^{
 9         //对话框显示时进行的操作
10         sleep(3);
11     }completionBlock:^{
12         //操作完后取消对话框
13         [mbHud removeFromSuperview];
14         mbHud = nil;
15         self.hhh = nil;
16     }];
17 }
11. 关于UIAlertView的自动消失
网上的有两种方法,一种用NSTimer,一种用dismissWithClickedButtonIndex。这里说下第二种。
之前用
 1 -(void)clickBtn{
 2     NSThread *newThread = [[NSThread alloc]initWithTarget:self selector:@selector(showAlert) object:nil];
 3     [newThread setName:@"newThread"];
 4     [newThread start];
 5
 6 }
 7
 8 -(void)showAlert{
 9     __block UIAlertView *alert = [[UIAlertView alloc]init];
10     dispatch_sync(dispatch_get_main_queue(), ^(){
11         alert = [[UIAlertView alloc]initWithTitle:nil message:@"正在写卡" delegate:self cancelButtonTitle:nil otherButtonTitles:nil, nil];
12         [alert show];
13
14     });
15
16     [alert dismissWithClickedButtonIndex:0 animated:YES ];
17 }
但有时会出现alert窗口一直不消失的情况。这时只需做个判断即可,alertView有个visible属性
if (alert.visible) {
        [alert dismissWithClickedButtonIndex:0 animated:YES ];
}
还有一种是delay再执行消失,但这种情况下alert的展示是固定时长的,酌情使用
 1 - (void)showAlert{
 2     UIAlertView *alert = [[UIAlertView alloc] initWithTitle:@"title" message:@"message" delegate:nil
 3 cancelButtonTitle:nil otherButtonTitles:nil];
 4
 5     [alert show];
 6     [self performSelector:@selector(dimissAlert) withObject:alert afterDelay:2.0];
 7 }
 8
 9 -(void)dimissAlert{
10     if (alert.visible) {
11         [alert dismissWithClickedButtonIndex:0 animated:YES ];
12     }
13 }