经过上一篇的介绍,相信小伙伴们已经按奈不住内心对springboot的向往,本篇我将继续向小伙伴介绍springboot配置文件的配置,已经全局配置参数如何使用,好了下面开始我们今天的内容介绍。
我们知道Spring Boot支持容器的自动配置,默认是Tomcat,当然我们也是可以进行修改的:
1、首先我们排除spring-boot-starter-web依赖中的Tomcat:在pom文件中排除tomcat的starter
<dependency>
   <groupId>org.springframework.boot</groupId>
   <artifactId>spring-boot-starter-web</artifactId>
   <exclusions>
      <exclusion>
         <groupId>org.springframework.boot</groupId>
         <artifactId>spring-boot-starter-tomcat</artifactId>
      </exclusion>
   </exclusions>
</dependency>
2、加入Jetty容器
<dependency>
   <groupId>org.springframework.boot</groupId>
   <artifactId>spring-boot-starter-jetty</artifactId>
</dependency>
这样我们的springboot容器就修改成Jetty容器了。
为了方便我们的调试,这里给大家推荐一款http调试工具:Postman
下面我们聊一下springboot的全局配置文件:application.properties
在开发中一定遇到过这样的需求,就是修改我们的容器访问端口,既然springboot默认加载容器,那么端口设置当然是通过配置文件来控制的,相当方便我们只需要在配置文件中添加:
server.port=6666
这样我们的容器端口就修改为6666了。
我们还可以通过配置文件来设置项目访问别名:
server.context-path=/springboot1
这样我们启动项目通过http://localhost:6666/springboot1即可访问到我们的项目
以上只是springboot配置文件配置的冰山一角,比如我们还可以设置数据库连接配置(database),设置开发环境配置,部署环境配置,实现两者之间的无缝切换。
下面我们一起了解一下关于springboot的controller的使用,springboot为我们提供了三个注解:
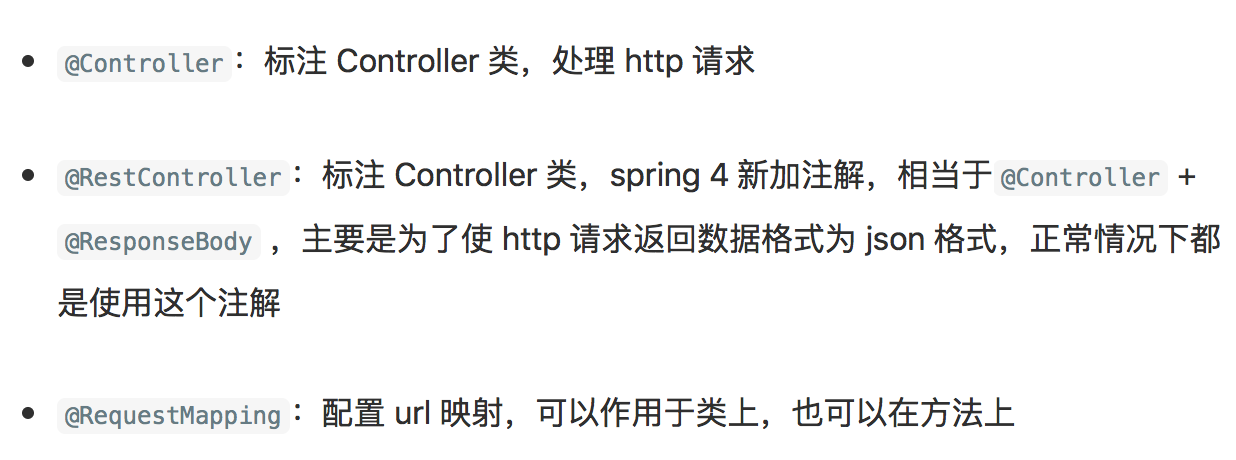
上一篇我们使用的便是@RestController,下面我们来一起使用@Controller试试:
@Controller
//@ResponseBody
public class RequestTest {

    /**
     * 不对请求方式限制
     * @return
     */
    @RequestMapping(value = "/req")
    public String req(){
        return "success";
    }
}
当我们在浏览器输入http://localhost:8080/springboot1/req回车,发现404
{
    "timestamp": 1515332935215,
    "status": 404,
    "error": "Not Found",
    "message": "No message available",
    "path": "/springboot1/req"
}
这是为什么呢?这是因为@Controller必须配合模板使用,所以我们这里打开maven的pom文件,添加spingboot的模板:
<!-- springboot模板 -->
<dependency>
    <groupId>org.springframework.boot</groupId>
    <artifactId>spring-boot-starter-thymeleaf</artifactId>
</dependency>
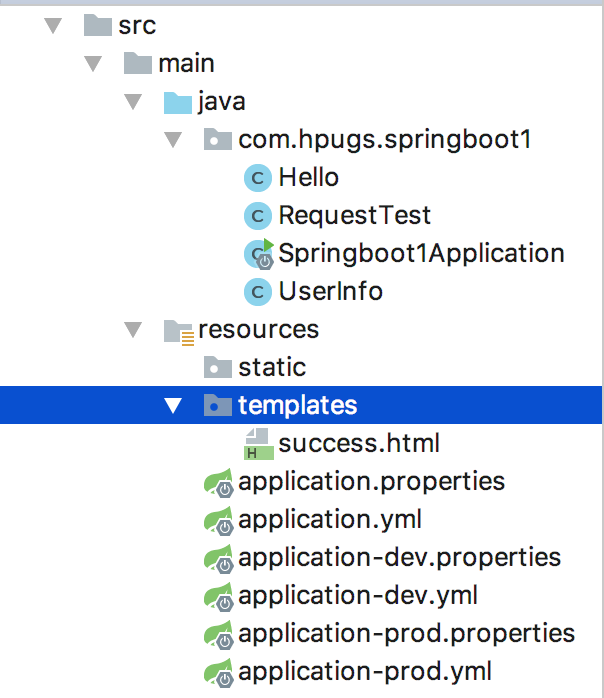
然后在我们项目的resources目录下找到templates(如过没有,新建一个,但一定要注意文件夹名称必须保持一致),然后创建一个success.html这样我们再次启动项目,访问刚刚的地址,是不是就Ok了。
不过这里需要说明一点,现在的企业级开发都是前后端分离,我们做后台服务只需要返回对应的数据即可,当然使用模板还有一个弊端,那就是性能会造成一定的损耗,所以这里大家简单了解即可。
上面的介绍中已经说了,@Controller+@ResponseBody相当于@RestController,所以这里推荐大家使用@RestController。
下面我们来介绍介绍一下@RequestMapping(value = "/req"),这个注解相信大家已经知道他的用法了,当然这个注解不但可以使用在方法上,同样适用于类。
@RestController
//@Controller
//@ResponseBody
@RequestMapping(value = "/test")
public class RequestTest {

    /**
     * 不对请求方式限制
     * @return
     */
    @RequestMapping(value = "/req")
    public String req(){
        return "success";
    }

    /**
     * 限制请求方式为GET
     * @return
     */
    @RequestMapping(value = "/req1", method = RequestMethod.GET)
    public String req1(){
        return "success";
    }

    /**
     * 限制请求方式为POST
     * @return
     */
    @RequestMapping(value = "/req2", method = RequestMethod.POST)
    public String req2(){
        return "success";
    }
}
对于method相信看到这里你一定已经知道他的用处了,是的指定访问类型,没有设置默认任何方式都可以访问。不知道小伙伴是否想到如果在类的@RequestMapping设置过method那么类中的方法默认继承,当然也可以在方法处单独设定,优先级的问题,小伙伴自己尝试一下吧。
下面我将给大家介绍一下如何在Controller中的访问配置文件中的常量。首先我们在配置文件中添加:
name=hpugs
age=35
content=name:${name};age:${age}
我们在配置文件中使用常量,通过${}来使用。
下面我们在Controller中将参数注入:
    //注入配置文件中的参数
    @Value("${name}")
    private String name;
    @Value("${age}")
    private Integer age;
    @Value("${content}")
    private String content;

    @RequestMapping(value = "/req3", method = RequestMethod.GET)
    public String req3(){
        return "name=" + name;
    }

    @RequestMapping(value = "/req4", method = RequestMethod.GET)
    public String req4(){
        return "age=" + age;
    }

    @RequestMapping(value = "/req5", method = RequestMethod.GET)
    public String req5(){
        return "content=" + content;
    }
启动我们的项目访问一下试试。
这样的使用如果你感觉还不过瘾,这里再教大家一招:我们通过类映射配置文件,借助类来进行参数使用,相对单个参数注入要方便一些,首先创建一个Java类
@Component
@ConfigurationProperties(prefix = "userInfo")
public class UserInfo {

    private String names;
    private Integer age;
    private String content;

    public Integer getAge() {
        return age;
    }

    public String getNames() {
        return names;
    }

    public void setNames(String names) {
        this.names = names;
    }

    public void setAge(Integer age) {
        this.age = age;
    }

    public String getContent() {
        return content;
    }

    public void setContent(String content) {
        this.content = content;
    }
}
然后在我们的配置文件中设置参数:
userInfo.names=小破孩
userInfo.age=25
userInfo.content=name:${userInfo.names};age:${userInfo.age}
接线来使我们的Controller:
    //注入对象
    @Autowired
    private UserInfo userInfo;

    @RequestMapping(value = "/req6", method = RequestMethod.GET, produces="text/plain;charset=UTF-8")
    public String req6(){
        return "name=" + userInfo.getNames();
    }

    @RequestMapping(value = "/req7", method = RequestMethod.GET)
    public String req7(){
        return "age=" + userInfo.getAge();
    }

    @RequestMapping(value = "/req8", method = RequestMethod.GET)
    public String req8(){
        return "content=" + userInfo.getContent();
    }
好了重启我们的项目访问试试看。
小伙伴们不知道遇到这个问题没?出现了中文乱码,首先大家先不要着急,我们先看另外一种springboot的配置文件:application.yml。这个配置文件通过换行空格来替换“;”,我们看一下同样的配置在yml下面如何配置:
server:
  port: 8888
  context-path: /springboot1

name: hpugs
age: 35
content: name:${name};age:${age}

userInfo:
  names: 小破孩
  age: 25
  content: name:${userInfo.names};age:${userInfo.age}
现在我们启动项目运行试一试。
回到上面的乱码问题,当我们使用yml时是不是没有出现乱码,小伙伴是不是有点郁闷了,这是为什么呢?这是因为.properties文件使用的是unicode的编码形式,所以当我们输入中文时会出现乱码。当然引乱码的还有一种原因那就是我能的编码设置和前端不一致,这个我们通过在配置文件中添加:
spring:
    http:
        encoding:
          force: true
          charset: UTF-8
        enabled: true
server:
  tomcat:
    uri-encoding: UTF-8
来进行控制。这里再给大家介绍一下开发小技巧,springboot为我们提供了在不同开发环境下的不同配置文件解决方法:
#yml格式
spring:
    profiles:
      active: prod

#.properties格式
spring.profiles.active=dev
好了到这里关于springboot Controller的内容就先到这里,下一篇springboot Controller如何带参访问。
以上内容如有出错,请不舍赐教。谢谢