由于微信的推出二维码走进了我们的生活,并且越来越多的人们正在发挥着自己的想象力去使用它,来方便我们的生活,我曾经听说过一个笑话,当我们死后,墓碑上不再有墓志铭,而会出现一个记录你一生信息的二维码,当人们走到你们的墓碑前,掏出手机扫一扫就可以看到你一生的丰功伟绩。这是不是很有意思,我都认这会在不久的将来成为现实,哈哈,玩笑说完了,下面我们来一起学习一下如何在Android开发中让二维码为我们服务。
本篇我将会带领朋友们实现一个记录个人基本信息的二维码设计思路,对于搞过算法的大牛们,这里要让你们失望了,对于二维码生成的算法,本人才疏学浅尚且无法为大家分享,本篇事例的实现我们将借助core.jar实现,对于这个jar包的下载,我为大家提供一个链接,方便大家学习使用:http://pan.baidu.com/s/1bnGZoF9
准备好我们的jar包后,我们开始今天的设计,第一步:创建工程,导入jar包
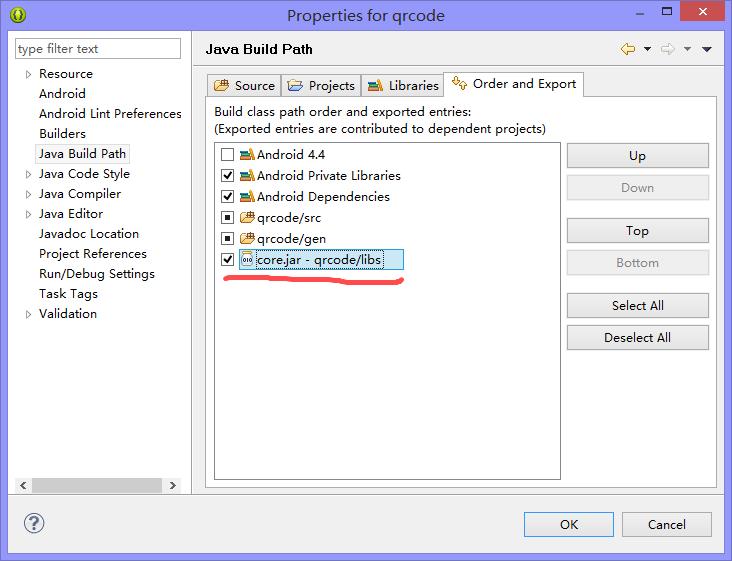
在我们的集成开发环境中,创建一个Android工程项目,为我们今天事例的设计做铺垫。创建好工程后,将我们刚刚下载好的jar包导入到我们的工程中,Ctrl+c我们的jar包,在我们的工程目录下找到libs文件夹Ctrl+v,然后呢?就是通过集成开发环境将我们的jar包导入到工程。

第二步:创建我们的布局文件:
<RelativeLayout xmlns:android="http://schemas.android.com/apk/res/android"
    xmlns:tools="http://schemas.android.com/tools"
    android:layout_width="match_parent"
    android:layout_height="match_parent"
    android:paddingBottom="@dimen/activity_vertical_margin"
    android:paddingLeft="@dimen/activity_horizontal_margin"
    android:paddingRight="@dimen/activity_horizontal_margin"
    android:paddingTop="@dimen/activity_vertical_margin"
    tools:context=".MainActivity" >
  <LinearLayout
            android:layout_width="fill_parent"
            android:layout_height="wrap_content"
            android:orientation="vertical"
            android:id="@+id/ll"
            >
     <!-- 用于展示我们创建的二维码 -->
    <ImageView
        android:id="@+id/imgCode"
        android:layout_width="100dip"
        android:layout_height="100dip"
        android:layout_gravity="center_horizontal" />

            <!-- 公司 -->

            <LinearLayout
                android:layout_width="fill_parent"
                android:layout_height="wrap_content"
                android:orientation="horizontal" >

                <TextView
                    android:layout_width="wrap_content"
                    android:layout_height="wrap_content"
                    android:text="公司" />

                <EditText
                    android:id="@+id/etCompany"
                    android:layout_width="fill_parent"
                    android:layout_height="wrap_content"
                    android:hint="选填" />
            </LinearLayout>


            <!-- 电话 -->

            <LinearLayout
                android:layout_width="fill_parent"
                android:layout_height="wrap_content"
                android:orientation="horizontal" >

                <TextView
                    android:layout_width="wrap_content"
                    android:layout_height="wrap_content"
                    android:text="电话" />

                <EditText
                    android:id="@+id/etPhone"
                    android:layout_width="fill_parent"
                    android:layout_height="wrap_content"
                    android:hint="选填" />
            </LinearLayout>
            <!-- 邮箱 -->

            <LinearLayout
                android:layout_width="fill_parent"
                android:layout_height="wrap_content"
                android:orientation="horizontal" >

                <TextView
                    android:layout_width="wrap_content"
                    android:layout_height="wrap_content"
                    android:text="邮箱" />

                <EditText
                    android:id="@+id/etEmail"
                    android:layout_width="fill_parent"
                    android:layout_height="wrap_content"
                    android:hint="选填" />
            </LinearLayout>

            <!-- 网址 -->

            <LinearLayout
                android:layout_width="fill_parent"
                android:layout_height="wrap_content"
                android:orientation="horizontal" >

                <TextView
                    android:layout_width="wrap_content"
                    android:layout_height="wrap_content"
                    android:text="网址" />

                <EditText
                    android:id="@+id/etWeb"
                    android:layout_width="fill_parent"
                    android:layout_height="wrap_content"
                    android:text="http://" />
            </LinearLayout>


            <Button  android:id="@+id/but"
                android:layout_width="fill_parent"
                android:layout_height="wrap_content"
                android:text="生成二维码"/>
        </LinearLayout>

</RelativeLayout>
第三步:编辑我们Activity:
public class MainActivity extends Activity {

    private EditText etCompany;
    private EditText etPhone;
    private EditText etEmail;
    private EditText etWeb;


    private Bitmap logo;
    private static final int IMAGE_HALFWIDTH = 40;//宽度值,影响中间图片大小

    @Override
    protected void onCreate(Bundle savedInstanceState) {
        super.onCreate(savedInstanceState);
        setContentView(R.layout.activity_main);
        //获得资源图片,可改成获取本地图片或拍照获取图片
        logo=BitmapFactory.decodeResource(super.getResources(), R.drawable.ic_launcher);

        etCompany =(EditText) findViewById(R.id.etCompany);
        etPhone=(EditText) findViewById(R.id.etPhone);
        etEmail =(EditText) findViewById(R.id.etEmail);
        etWeb =(EditText) findViewById(R.id.etWeb);
        findViewById(R.id.but).setOnClickListener(new OnClickListener() {
            @Override
            public void onClick(View v) {
                String company=etCompany.getText().toString().trim() ;
                String phone =etPhone .getText().toString().trim() ;
                String email = etEmail.getText().toString().trim() ;
                String web = etWeb.getText().toString().trim() ;
                //二维码中包含的文本信息
                String contents= "BEGIN:VCARD
VERSION:3.0
ORG:"+company+"
TEL:"+phone+"
URL:"+web+"
EMAIL:"+email+"
END:VCARD";
            try {
                //调用方法createCode生成二维码
                Bitmap bm=createCode(contents, logo, BarcodeFormat.QR_CODE);
                ImageView img=(ImageView)findViewById(R.id.imgCode) ;
                //将二维码在界面中显示
                img.setImageBitmap(bm);
            } catch (WriterException e) {
                e.printStackTrace();
            }

            }
        });

    }

    /**
     * 生成二维码
     * @param string 二维码中包含的文本信息
     * @param mBitmap logo图片
     * @param format  编码格式
     * @return Bitmap 位图
     * @throws WriterException
     */
    public Bitmap createCode(String string,Bitmap mBitmap, BarcodeFormat format)
            throws WriterException {
        Matrix m = new Matrix();
        float sx = (float) 2 * IMAGE_HALFWIDTH / mBitmap.getWidth();
        float sy = (float) 2 * IMAGE_HALFWIDTH
                / mBitmap.getHeight();
        m.setScale(sx, sy);//设置缩放信息
        //将logo图片按martix设置的信息缩放
        mBitmap = Bitmap.createBitmap(mBitmap, 0, 0,
                mBitmap.getWidth(), mBitmap.getHeight(), m, false);

        MultiFormatWriter writer = new MultiFormatWriter();//
        Hashtable<EncodeHintType, String> hst = new Hashtable<EncodeHintType, String>();
        hst.put(EncodeHintType.CHARACTER_SET, "UTF-8");//设置字符编码
        BitMatrix matrix = writer.encode(string, format, 400, 400, hst);//生成二维码矩阵信息
        int width = matrix.getWidth();//矩阵高度
        int height = matrix.getHeight();//矩阵宽度
        int halfW = width / 2;
        int halfH = height / 2;
        int[] pixels = new int[width * height];//定义数组长度为矩阵高度*矩阵宽度,用于记录矩阵中像素信息
        for (int y = 0; y < height; y++) {//从行开始迭代矩阵
            for (int x = 0; x < width; x++) {//迭代列
                if (x > halfW - IMAGE_HALFWIDTH && x < halfW + IMAGE_HALFWIDTH
                        && y > halfH - IMAGE_HALFWIDTH
                        && y < halfH + IMAGE_HALFWIDTH) {//次处位置用于存放图片信息
                    pixels[y * width + x] = mBitmap.getPixel(x - halfW
                            + IMAGE_HALFWIDTH, y - halfH + IMAGE_HALFWIDTH);//记录图片每个像素信息
                } else {
                    if (matrix.get(x, y)) {//如果有黑块点,记录信息
                        pixels[y * width + x] = 0xff000000;//记录黑块信息
                    }
                }

            }
        }
        Bitmap bitmap = Bitmap.createBitmap(width, height,
                Bitmap.Config.ARGB_8888);
        // 通过像素数组生成bitmap
        bitmap.setPixels(pixels, 0, width, 0, 0, width, height);
        return bitmap;
    }

}
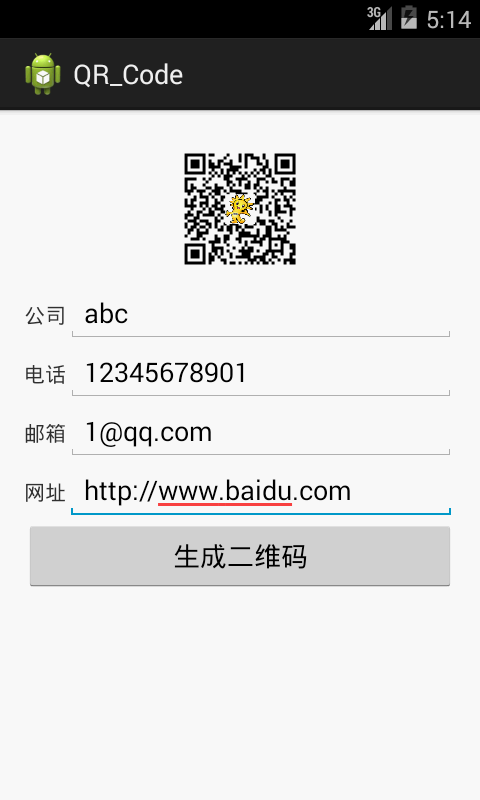
上面的代码注释已经非常详细,这里我再简单说几句,这部分代码分为上下两部分,上部分都是我们经常使用的,下部分则是我们二维码创建的重点。ok到这里我们的效果就实现了,最后上一张效果图:
