最近这两年最流行的java框架也属SpringBoot了,早在前几年我一直用NinjaFramwork这个java框架,也是非常优秀,不过最近在面试各家公司的过程中最为流行的还是SpringBoot了,因此也学一下吧
https://spring.io/projects/spring-boot#samples 这是官方教程,秒杀一切教程
https://github.com/spring-projects/spring-boot 这是官方教程,秒杀一切教程
以上是官方demo,建议学习就学官方的,接下来我把学习过程以及整个技术选型记录下来,如有建议或更正希望大家能提出.
------------------------------------------------------------------------------------------------------------------------------------------------------------------------------------------------------------------------------------------------------------------
1:为什么使用SpringBoot而不使用Ninjaframwork?
没有为什么,大家都在用而已,Ninjaframwork也非常好,官网Ninja - full stack web framework for Java -
Spring Boot的核心思想就是约定大于配置,一切自动完成。采用Spring Boot可以大大的简化你的开发模式,所有你想集成的常用框架,它都有对应的组件支持
而我用了接近4年的Ninjaframwork也是如此优秀,本着学习的原则选择一下springboot
2:初步了解一下springboot吧。(官方已经很详细的介绍,但还是想看一下国内一些企业或个人的想法)
参考http://www.最代码(改为英文即可).com/blog/3545313038879744.htm (博客园竟然禁止)
http://www.ityouknow.com/springboot/2016/01/06/springboot(%E4%B8%80)-%E5%85%A5%E9%97%A8%E7%AF%87.html
java -jar app.jar --spring.profiles.active=dev 启动测试环境的配置文件
3:学习构建一个SpringBoot,使用maven还是gradle构建项目呢?
用了接近4年的maven 本着学习的原则,直接换gradle ,官方介绍参考https://gradle.org/
国内人士分析参考https://blog.csdn.net/zguoshuaiiii/article/details/78376331
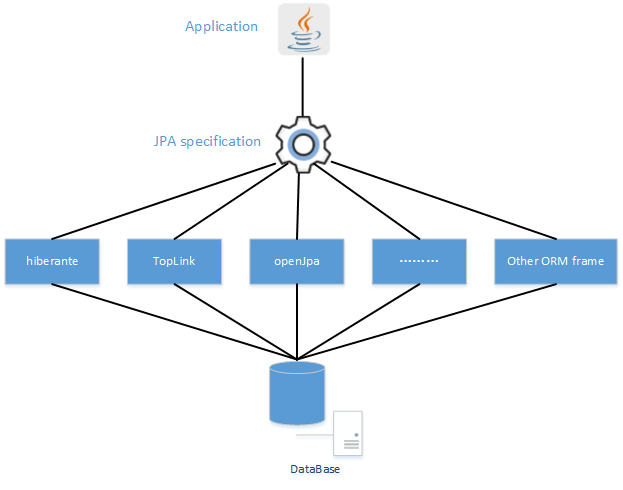
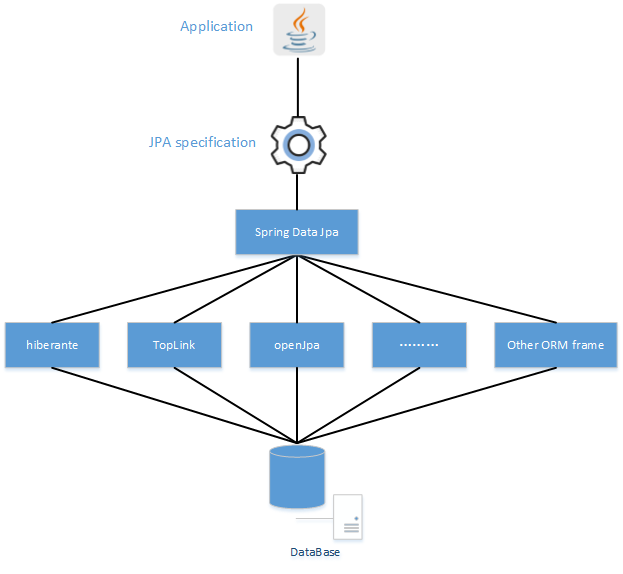
4:Spring Data JPA hibernate 什么关系?
参考http://www.cnblogs.com/xiaoheike/p/5150553.html
https://blog.csdn.net/linux__xu/article/details/75574342
https://blog.csdn.net/xihuanyuye/article/details/81201441
https://blog.csdn.net/qq897958555/article/details/53208002
5 项目使用什么数据库连接呢? 不用想太多,直接postgresql 即可
6 接下来 就要登陆系统,那么 Shiro和Spring Security对比 ,参考:原文:https://blog.csdn.net/liyuejin/article/details/77838868
Shiro简介
Apache Shiro是Java的一个安全框架。目前,使用Apache Shiro的人越来越多,因为它相当简单,对比Spring Security,可能没有Spring Security做的功能强大,但是在实际工作时可能并不需要那么复杂的东西,所以使用小而简单的Shiro就足够了。对于它俩到底哪个好,这个不必纠结,能更简单的解决项目问题就好了。
Shiro架构与功能介绍
1.认证与授权相关基本概念
两个基本的概念
安全实体:系统需要保护的具体对象数据
权限:系统相关的功能操作,例如基本的CRUD
Authentication:身份认证/登录,验证用户是不是拥有相应的身份;
Authorization:授权,即权限验证,验证某个已认证的用户是否拥有某个权限;即判断用户是否能做事情,常见的如:验证某个用户是否拥有某个角色。或者细粒度的验证某个用户对某个资源是否具有某个权限;
Session Manager:会话管理,即用户登录后就是一次会话,在没有退出之前,它的所有信息都在会话中;会话可以是普通JavaSE环境的,也可以是如Web环境的;
Cryptography:加密,保护数据的安全性,如密码加密存储到数据库,而不是明文存储;
Web Support:Web支持,可以非常容易的集成到Web环境;
Caching:缓存,比如用户登录后,其用户信息、拥有的角色/权限不必每次去查,这样可以提高效率;
Concurrency:shiro支持多线程应用的并发验证,即如在一个线程中开启另一个线程,能把权限自动传播过去;
Testing:提供测试支持;
Run As:允许一个用户假装为另一个用户(如果他们允许)的身份进行访问;
Remember Me:记住我,这个是非常常见的功能,即一次登录后,下次再来的话不用登录了。
2.Shiro四大核心功能:Authentication,Authorization,Cryptography,Session Management
Java安全框架Shiro和Spring Security对比
Shiro架构
3.Shiro三个核心组件:Subject, SecurityManager 和 Realms.
Subject:主体,代表了当前“用户”,这个用户不一定是一个具体的人,与当前应用交互的任何东西都是Subject,如网络爬虫,机器人等;即一个抽象概念;所有Subject都绑定到SecurityManager,与Subject的所有交互都会委托给SecurityManager;可以把Subject认为是一个门面;SecurityManager才是实际的执行者;
SecurityManager:安全管理器;即所有与安全有关的操作都会与SecurityManager交互;且它管理着所有Subject;可以看出它是Shiro的核心,它负责与后边介绍的其他组件进行交互,如果学习过SpringMVC,你可以把它看成DispatcherServlet前端控制器;
Realm:域,Shiro从从Realm获取安全数据(如用户、角色、权限),就是说SecurityManager要验证用户身份,那么它需要从Realm获取相应的用户进行比较以确定用户身份是否合法;也需要从Realm得到用户相应的角色/权限进行验证用户是否能进行操作;可以把Realm看成DataSource,即安全数据源。
Spring Security简介
Spring Security是一个能够为基于Spring的企业应用系统提供声明式的安全访问控制解决方案的安全框架。它提供了一组可以在Spring应用上下文中配置的Bean,充分利用了Spring IoC,DI(控制反转Inversion of Control ,DI:Dependency Injection 依赖注入)和AOP(面向切面编程)功能,为应用系统提供声明式的安全访问控制功能,减少了为企业系统安全控制编写大量重复代码的工作。它是一个轻量级的安全框架,它确保基于Spring的应用程序提供身份验证和授权支持。它与Spring MVC有很好地集成,并配备了流行的安全算法实现捆绑在一起。安全主要包括两个操作“认证”与“验证”(有时候也会叫做权限控制)。“认证”是为用户建立一个其声明的角色的过程,这个角色可以一个用户、一个设备或者一个系统。“验证”指的是一个用户在你的应用中能够执行某个操作。在到达授权判断之前,角色已经在身份认证过程中建立了。
它的设计是基于框架内大范围的依赖的,可以被划分为以下几块。
Web/Http 安全:这是最复杂的部分。通过建立 filter 和相关的 service bean 来实现框架的认证机制。当访问受保护的 URL 时会将用户引入登录界面或者是错误提示界面。
业务对象或者方法的安全:控制方法访问权限的。
AuthenticationManager:处理来自于框架其他部分的认证请求。
AccessDecisionManager:为 Web 或方法的安全提供访问决策。会注册一个默认的,但是我们也可以通过普通 bean 注册的方式使用自定义的 AccessDecisionManager。
AuthenticationProvider:AuthenticationManager 是通过它来认证用户的。
UserDetailsService:跟 AuthenticationProvider 关系密切,用来获取用户信息的。
Java安全框架Shiro和Spring Security对比
Shiro和Spring Security比较
Shiro比Spring更容易使用,实现和最重要的理解
Spring Security更加知名的唯一原因是因为品牌名称
“Spring”以简单而闻名,但讽刺的是很多人发现安装Spring Security很难
然而,Spring Security却有更好的社区支持
Apache Shiro在Spring Security处理密码学方面有一个额外的模块
Spring-security 对spring 结合较好,如果项目用的springmvc ,使用起来很方便。但是如果项目中没有用到spring,那就不要考虑它了。
Shiro 功能强大、且 简单、灵活。是Apache 下的项目比较可靠,且不跟任何的框架或者容器绑定,可以独立运行
---------------------
初步理解Spring Security并实践 参考:https://www.jianshu.com/p/e6655328b211
pring Security主要做两件事,一件是认证,一件是授权。
1.Spring Security初体验
Spring Security如何使用,先在你的项目pom.xml文件中声明依赖。
<dependency>
    <!-- 由于我使用的spring boot所以我是引入spring-boot-starter-security而且我使用了spring io所以不需要填写依赖的版本号 -->
    <groupId>org.springframework.boot</groupId>
    <artifactId>spring-boot-starter-security</artifactId>
</dependency>
然后创建一个类并继承WebSecurityConfigurerAdapter这个方法,并在之类中重写configure的3个方法,其中3个方法中参数包括为HttpSecurity(HTTP请求安全处理),AuthenticationManagerBuilder(身份验证管理生成器)和WebSecurity(WEB安全)。
public class SecurityConfiguration extends WebSecurityConfigurerAdapter {

       @Override
       protected void configure(AuthenticationManagerBuilder auth){
            super.configure(auth);
       }

       @Override
       protected void configure(HttpSecurity http){
            super.configure(http);
       }

       @Override
       protected void configure(WebSecurity web){
            super.configure(web);
       }
}
接下来我们先看看protected void configure(HttpSecurity http)这个方法提供了一个默认的配置。
protected void configure(HttpSecurity http) throws Exception {
    http
        .authorizeRequests()
            .anyRequest().authenticated()
            .and()
        .formLogin()
            .and()
        .httpBasic();
}
http.authorizeRequests()其中这里的意思是指通过authorizeRequests()方法来开始请求权限配置。
而接着的.anyRequest().authenticated()是对http所有的请求必须通过授权认证才可以访问。


而and()是返回一个securityBuilder对象,formLogin()和httpBasic()是授权的两种方式。


当然这些界面都是spring security原生的界面,我们也可以自定义我们的formLogin页面!
protected void configure(HttpSecurity http) throws Exception {
    http
        .authorizeRequests()
            .anyRequest().authenticated()
            .and()
        .formLogin()
            //指定登录页的路径
            .loginPage("/login")
            //必须允许所有用户访问我们的登录页(例如未验证的用户,否则验证流程就会进入死循环)
            //这个formLogin().permitAll()方法允许所有用户基于表单登录访问/login这个page。
            .permitAll();
}
提示一下,这个自定义表单登录的自定义页面中的登录名参数必须被命名为username
密码参数必须被命名为password。
而接下来当我们需要对某些开放的url,给与任何人访问的时候,我们应该如何设置呢?答案很简单我们先看着代码慢慢深入!
protected void configure(HttpSecurity http) throws Exception {
    http
        //http.authorizeRequests()方法有多个子节点,每个macher按照他们的声明顺序执行
        .authorizeRequests()

             //我们指定任何用户都可以访问多个URL的模式。
             //任何用户都可以访问以"/resources/","/signup", 或者 "/about"开头的URL。
            .antMatchers("/resources/**", "/signup", "/about").permitAll()

             //以 "/admin/" 开头的URL只能让拥有 "ROLE_ADMIN"角色的用户访问。
             //请注意我们使用 hasRole 方法,没有使用 "ROLE_" 前缀。
            .antMatchers("/admin/**").hasRole("ADMIN")

             //任何以"/db/" 开头的URL需要同时具有 "ROLE_ADMIN" 和 "ROLE_DBA"权限的用户才可以访问。
             //和上面一样我们的 hasRole 方法也没有使用 "ROLE_" 前缀。
            .antMatchers("/db/**").access("hasRole('ADMIN') and hasRole('DBA')")

             //任何以"/db/" 开头的URL只需要拥有 "ROLE_ADMIN" 和 "ROLE_DBA"其中一个权限的用户才可以访问。
            //和上面一样我们的 hasRole 方法也没有使用 "ROLE_" 前缀。
            .antMatchers("/db/**").hasAnyRole("ADMIN", "DBA")

             //尚未匹配的任何URL都要求用户进行身份验证
            .anyRequest().authenticated()
            .and()
        // ...
        .formLogin();
}
我们可以在authorizeRequests() 后定义多个antMatchers()配置器来控制不同的url接受不同权限的用户访问,而其中permitAll() 方法是运行所有权限用户包含匿名用户访问。
而hasRole("权限")则是允许这个url给与参数中相等的权限访问。
access("hasRole('权限') and hasRole('权限')") 是指允许访问这个url必须同时拥有参数中多个身份权限才可以访问。
hasAnyRole("ADMIN", "DBA")是指允许访问这个url必须同时拥有参数中多个身份权限中的一个就可以访问该url。

2.Spring Security定制登录退出行为
我们接下来就简单的定制一下登录登出行为!
protected void configure(HttpSecurity http) throws Exception {
    http
         //通过formlogin方法登录,并设置登录url为/api/user/login
        .formLogin().loginPage("/api/user/login")
         //指定登录成功后跳转到/index页面
        .defaultSuccessUrl("/index")
         //指定登录失败后跳转到/login?error页面
        .failureUrl("/login?error")
        .permitAll()
        .and()
         //开启cookie储存用户信息,并设置有效期为14天,指定cookie中的密钥
        .rememberMe().tokenValiditySeconds(1209600).key("mykey")
        .and()
        .logout()
         //指定登出的url
        .logoutUrl("/api/user/logout")
         //指定登场成功之后跳转的url
        .logoutSuccessUrl("/index")
        .permitAll();
}
3.Spring Security定制自定义用户认证

public class SecurityConfiguration extends WebSecurityConfigurerAdapter {

       @Override
       //重写了configure参数为AuthenticationManagerBuilder的方法
       protected void configure(AuthenticationManagerBuilder auth){
            //并根据传入的AuthenticationManagerBuilder中的userDetailsService方法来接收我们自定义的认证方法。
            //且该方法必须要实现UserDetailsService这个接口。
            auth.userDetailsService(new myUserDetailsService())
                //密码使用BCryptPasswordEncoder()方法验证,因为这里使用了BCryptPasswordEncoder()方法验证。所以在注册用户的时候在接收前台明文密码之后也需要使用BCryptPasswordEncoder().encode(明文密码)方法加密密码。
                .passwordEncoder(new BCryptPasswordEncoder());;
       }

       @Override
       protected void configure(HttpSecurity http){
            super.configure(http);
       }

       @Override
       protected void configure(WebSecurity web){
            super.configure(web);
       }
}
新建myUserDetailsService方法并实现UserDetailsService这个接口
@Component
public class myUserDetailsService implements UserDetailsService {

    @Autowired
    //由于是演示这里就不再创建service层了,直接注入UserRepository。
    private UserRepository userRepository;

    @Override
    public UserDetails loadUserByUsername(String userName) throws UsernameNotFoundException {
        //查询账号是否存在,是就返回一个UserDetails的对象,否就抛出异常!
        User user = userRepository.findByName(userName);
        if (user == null) {
            throw new UsernameNotFoundException("UserName " + userName + " not found");
        }
        return new SecurityUser(user);
    }
}
基本的认证逻辑就到这里了,对于有另外的业务需求都可以在自定义的myUserDetailsService中处理完成!
4.Spring Security定制自定义授权策略
@EnableGlobalAuthentication
public class SecurityConfig extends WebSecurityConfigurerAdapter{

    @Override
    protected void configure(HttpSecurity http) throws Exception {
        http.formLogin()
                .and()
                .csrf().disable()
                .authorizeRequests()
                .antMatchers("/admin").permitAll()
                 //使用自定义授权策略
                .anyRequest().access("@mySecurity.check(authentication,request)");
    }
}
新建MySecurity类
@Component("mySecurity")
public class MySecurity(){

    //这里应该注入用户和该用户所拥有的权限(权限在登录成功的时候已经缓存起来,当需要访问该用户的权限是,直接从缓存取出!),然后验证该请求是否有权限,有就返回true,否则则返回false不允许访问该Url。
    //而且这里还传入了request,我也可以使用request获取该次请求的类型。
    //根据restful风格我们可以使用它来控制我们的权限,例如当这个请求是post请求,证明该请求是向服务器发送一个新建资源请求,我们可以使用request.getMethod()来获取该请求的方式,然后在配合角色所允许的权限路径进行判断和授权操作!
    public boolean check(Authentication authentication, HttpServletRequest request){
          //如果能获取到Principal对象不为空证明,授权已经通过
          Object principal  = authentication.getPrincipal();
          if(principal  != null && principal  instanceof UserDetails){
                  //获取请求登录的url
                  System.out.println(((UserDetails)principal).getAuthorities()) ;
                  return true;
          }
          return false;
    }
}
-----------------------------------------------------------------------------------------------------------------------
Spring Boot中CrudRepository与JpaRepository
参考https://blog.csdn.net/xuemengrui12/article/details/80525227
先看下两者的接口代码:
@NoRepositoryBean
public interface CrudRepository<T, ID extends Serializable> extends Repository<T, ID> {
<S extends T> S save(S var1);
<S extends T> Iterable<S> save(Iterable<S> var1);
T findOne(ID var1);
boolean exists(ID var1);
Iterable<T> findAll();
Iterable<T> findAll(Iterable<ID> var1);
long count();
void delete(ID var1);
void delete(T var1);
void delete(Iterable<? extends T> var1);
void deleteAll();
}
@NoRepositoryBean
public interface JpaRepository<T, ID extends Serializable> extends PagingAndSortingRepository<T, ID>, QueryByExampleExecutor<T> {
List<T> findAll();
List<T> findAll(Sort var1);
List<T> findAll(Iterable<ID> var1);
<S extends T> List<S> save(Iterable<S> var1);
void flush();
<S extends T> S saveAndFlush(S var1);
void deleteInBatch(Iterable<T> var1);
void deleteAllInBatch();
T getOne(ID var1);
<S extends T> List<S> findAll(Example<S> var1);
<S extends T> List<S> findAll(Example<S> var1, Sort var2);
}
看一下他们的继承关系
注意下两者的save方法的不同,JpaRepository 中的save方法实现源码:
@Transactional
public <S extends T> List<S> save(Iterable<S> entities) {
List<S> result = new ArrayList<S>();
if (entities == null) {
return result;
}
for (S entity : entities) {
result.add(save(entity));
}
return result;
}
CrudRepository 中的save方法源代码
@Transactional
public <S extends T> S save(S entity) {
if (entityInformation.isNew(entity)) {
em.persist(entity);//是新的就插入
return entity;
} else {
return em.merge(entity); //不是新的merge
}
}
由源码可知CrudRepository 中的save方法是相当于merge+save ,它会先判断记录是否存在,如果存在则更新,不存在则插入记录。唉,还是需要多看源码啊
参考:
https://blog.csdn.net/zgf19930504/article/details/50537222
https://blog.csdn.net/strive_peter/article/details/76276758
https://blog.csdn.net/hikeboy/article/details/58597053
http://makaidong.com/youhan26/1/976_10156939.html
到底用哪一个 参考:https://www.ibm.com/developerworks/cn/opensource/os-cn-spring-jpa/index.html
Spring Boot, MySQL, JPA, Hibernate Restful CRUD API Tutorial
参考https://www.callicoder.com/spring-boot-rest-api-tutorial-with-mysql-jpa-hibernate/
Spring Boot has taken Spring framework to the next level. It has drastically reduced the configuration and setup time required for spring projects.
You can setup a project with almost zero configuration and start building the things that actually matter to your application.
If you are new to Spring boot and want to get started with it quickly, then this blog post is for you.
In this post, we’ll build a Restful CRUD API for a simple note-taking application. A Note can have a title and some content. We’ll first build the apis to create, retrieve, update and delete a Note, and then test them using postman.
So, Let’s get started!
Creating the Project
Spring Boot provides a web tool called Spring Initializer to bootstrap an application quickly. Just go to http://start.spring.io and follow the steps below to generate a new project.
Step 1 : Click Switch to full version on http://start.spring.io page.
Step 2 : Enter the details as follows -
- Group : com.example
- Artifact : easy-notes
- Name : easy-notes
- Description : Rest API for a Simple Note Taking Application
- Package Name : com.example.easynotes
- Packaging : jar (This is the default value)
- Java Version : 1.8 (Default)
- Dependencies : Web, JPA, MySQL, DevTools

Once all the details are entered, click Generate Project to generate and download your project. Spring Initializer will generate the project with the details you have entered and download a zip file with all the project folders.
Next, Unzip the downloaded zip file and import it into your favorite IDE.
Exploring the Directory Structure
Following is the directory structure of our Note taking application -

Let’s understand the details of some of the important files and directories -
1. EasyNotesApplication
This is the main entry point of our Spring Boot application.
package com.example.easynotes;

import org.springframework.boot.SpringApplication;
import org.springframework.boot.autoconfigure.SpringBootApplication;

@SpringBootApplication
public class EasyNotesApplication {

	public static void main(String[] args) {
		SpringApplication.run(EasyNotesApplication.class, args);
	}
}
It contains a simple annotation called @SpringBootApplication which is a combination of the following more specific spring annotations -
-
@Configuration : Any class annotated with
@Configurationannotation is bootstrapped by Spring and is also considered as a source of other bean definitions. -
@EnableAutoConfiguration : This annotation tells Spring to automatically configure your application based on the dependencies that you have added in the
pom.xmlfile.For example, If
spring-data-jpaorspring-jdbcis in the classpath, then it automatically tries to configure aDataSourceby reading the database properties fromapplication.propertiesfile. -
@ComponentScan : It tells Spring to scan and bootstrap other components defined in the current package (com.example.easynotes) and all the sub-packages.
The main() method calls Spring Boot’s SpringApplication.run() method to launch the application.
2. resources/
This directory, as the name suggests, is dedicated to all the static resources, templates and property files.
-
resources/static - contains static resources such as css, js and images.
-
resources/templates - contains server-side templates which are rendered by Spring.
-
resources/application.properties - This file is very important. It contains application-wide properties. Spring reads the properties defined in this file to configure your application. You can define server’s default port, server’s context path, database URLs etc, in this file.
You can refer this page for common application properties used in Spring Boot.
3. EasyNotesApplicationTests - Define unit and integration tests here.
4. pom.xml - contains all the project dependencies
Configuring MySQL Database
As I pointed out earlier, Spring Boot tries to auto-configure a DataSource if spring-data-jpa is in the classpath by reading the database configuration from application.properties file.
So, we just have to add the configuration and Spring Boot will take care of the rest.
Open application.properties file and add the following properties to it.
## Spring DATASOURCE (DataSourceAutoConfiguration & DataSourceProperties)
spring.datasource.url = jdbc:mysql://localhost:3306/notes_app?useSSL=false
spring.datasource.username = root
spring.datasource.password = root


## Hibernate Properties
# The SQL dialect makes Hibernate generate better SQL for the chosen database
spring.jpa.properties.hibernate.dialect = org.hibernate.dialect.MySQL5InnoDBDialect

# Hibernate ddl auto (create, create-drop, validate, update)
spring.jpa.hibernate.ddl-auto = update
You will need to create a database named notes_app in MySQL, and change the spring.datasource.username & spring.datasource.password properties as per your MySQL installation.
In the above properties file, the last two properties are for hibernate. Spring Boot uses Hibernate as the default JPA implementation.
The property spring.jpa.hibernate.ddl-auto is used for database initialization. I’ve used the value “update” for this property.
It does two things -
-
When you define a domain model, a table will automatically be created in the database and the fields of the domain model will be mapped to the corresponding columns in the table.
-
Any change to the domain model will also trigger an update to the table. For example, If you change the name or type of a field, or add another field to the model, then all these changes will be reflected in the mapped table as well.
Using update for spring.jpa.hibernate.ddl-auto property is fine for development. But, For production, You should keep the value of this property to “validate”, and use a database migration tool like Flyway for managing changes in the database schema.
Creating the Note model
All right! Let’s now create the Note model. Our Note model has following fields -
id: Primary Key with Auto Increment.title: The title of the Note. (NOT NULL field)content: Note’s content. (NOT NULL field)createdAt: Time at which theNotewas created.updatedAt: Time at which theNotewas updated.
Now, let’s see how we can model this in Spring. Create a new package called model inside com.example.easynotes and add a class named Note.java with following contents -
package com.example.easynotes.model;

import com.fasterxml.jackson.annotation.JsonIgnoreProperties;
import org.springframework.data.annotation.CreatedDate;
import org.springframework.data.annotation.LastModifiedDate;
import org.springframework.data.jpa.domain.support.AuditingEntityListener;
import javax.persistence.*;
import javax.validation.constraints.NotBlank;
import java.util.Date;

@Entity
@Table(name = "notes")
@EntityListeners(AuditingEntityListener.class)
@JsonIgnoreProperties(value = {"createdAt", "updatedAt"},
        allowGetters = true)
public class Note implements Serializable {
    @Id
    @GeneratedValue(strategy = GenerationType.IDENTITY)
    private Long id;

    @NotBlank
    private String title;

    @NotBlank
    private String content;

    @Column(nullable = false, updatable = false)
    @Temporal(TemporalType.TIMESTAMP)
    @CreatedDate
    private Date createdAt;

    @Column(nullable = false)
    @Temporal(TemporalType.TIMESTAMP)
    @LastModifiedDate
    private Date updatedAt;

    // Getters and Setters ... (Omitted for brevity)
}
-
All your domain models must be annotated with
@Entityannotation. It is used to mark the class as a persistent Java class. -
@Tableannotation is used to provide the details of the table that this entity will be mapped to. -
@Idannotation is used to define the primary key. -
@GeneratedValueannotation is used to define the primary key generation strategy. In the above case, we have declared the primary key to be anAuto Incrementfield. -
@NotBlankannotation is used to validate that the annotated field isnot nullor empty. -
@Columnannotation is used to define the properties of the column that will be mapped to the annotated field. You can define several properties like name, length, nullable, updateable etc.By default, a field named
createdAtis mapped to a column namedcreated_atin the database table. i.e. all camel cases are replaced with underscores.If you want to map the field to a different column, you can specify it using -
@Column(name = "created_on") private String createdAt; -
@Temporalannotation is used withjava.util.Dateandjava.util.Calendarclasses. It converts the date and time values from Java Object to compatible database type and vice versa. -
@JsonIgnorePropertiesannotation is a Jackson annotation. Spring Boot uses Jackson for Serializing and Deserializing Java objects to and from JSON.This annotation is used because we don’t want the clients of the rest api to supply the
createdAtandupdatedAtvalues. If they supply these values then we’ll simply ignore them. However, we’ll include these values in the JSON response.
Enable JPA Auditing
In our Note model we have annotated createdAt and updatedAt fields with @CreatedDate and @LastModifiedDate annotations respectively.
Now, what we want is that these fields should automatically get populated whenever we create or update an entity.
To achieve this, we need to do two things -
1. Add Spring Data JPA’s AuditingEntityListener to the domain model.
We have already done this in our Note model with the annotation @EntityListeners(AuditingEntityListener.class).
2. Enable JPA Auditing in the main application.
Open EasyNotesApplication.java and add @EnableJpaAuditing annotation.
package com.example.easynotes;

import org.springframework.boot.SpringApplication;
import org.springframework.boot.autoconfigure.SpringBootApplication;
import org.springframework.data.jpa.repository.config.EnableJpaAuditing;

@SpringBootApplication
@EnableJpaAuditing
public class EasyNotesApplication {

    public static void main(String[] args) {
        SpringApplication.run(EasyNotesApplication.class, args);
    }
}
Creating NoteRepository to access data from the database
The next thing we’re gonna do is create a repository to access Note’s data from the database.
Well, Spring Data JPA has got us covered here. It comes with a JpaRepository interface which defines methods for all the CRUD operations on the entity, and a default implementation of JpaRepository called SimpleJpaRepository.
Cool! Let’s create the repository now. First, Create a new package called repository inside the base package com.example.easynotes. Then, create an interface called NoteRepository and extend it from JpaRepository -
package com.example.easynotes.repository;

import com.example.easynotes.model.Note;
import org.springframework.data.jpa.repository.JpaRepository;

@Repository
public interface NoteRepository extends JpaRepository<Note, Long> {

}
Note that, we have annotated the interface with @Repository annotation. This tells Spring to bootstrap the repository during component scan.
Great! That is all you have to do in the repository layer. You will now be able to use JpaRepository’s methods like save(), findOne(), findAll(), count(), delete() etc.
You don’t need to implement these methods. They are already implemented by Spring Data JPA’s SimpleJpaRepository. This implementation is plugged in by Spring automatically at runtime.
Checkout all the methods available from SimpleJpaRepository’s documentation.
Spring Data JPA has a bunch of other interesting features like Query methods (dynamically creating queries based on method names), Criteria API, Specifications, QueryDsl etc.
I strongly recommend you to checkout the Spring Data JPA’s documentation to learn more.
Creating Custom Business Exception
We’ll define the Rest APIs for creating, retrieving, updating, and deleting a Note in the next section.
The APIs will throw a ResourceNotFoundException whenever a Note with a given id is not found in the database.
Following is the definition of ResourceNotFoundException. (I’ve created a package named exception inside com.example.easynotes to store this exception class) -
package com.example.easynotes.exception;

import org.springframework.http.HttpStatus;
import org.springframework.web.bind.annotation.ResponseStatus;

@ResponseStatus(value = HttpStatus.NOT_FOUND)
public class ResourceNotFoundException extends RuntimeException {
    private String resourceName;
    private String fieldName;
    private Object fieldValue;

    public ResourceNotFoundException( String resourceName, String fieldName, Object fieldValue) {
        super(String.format("%s not found with %s : '%s'", resourceName, fieldName, fieldValue));
        this.resourceName = resourceName;
        this.fieldName = fieldName;
        this.fieldValue = fieldValue;
    }

    public String getResourceName() {
        return resourceName;
    }

    public String getFieldName() {
        return fieldName;
    }

    public Object getFieldValue() {
        return fieldValue;
    }
}
Notice the use of @ResponseStatus annotation in the above exception class. This will cause Spring boot to respond with the specified HTTP status code whenever this exception is thrown from your controller.
Creating NoteController
The Final Step - We’ll now create the REST APIs for creating, retrieving, updating and deleting a Note.
First, create a new package controller inside com.example.easynotes. Then, create a new class NoteController.java with the following contents -
package com.example.easynotes.controller;

import com.example.easynotes.exception.ResourceNotFoundException;
import com.example.easynotes.model.Note;
import com.example.easynotes.repository.NoteRepository;
import org.springframework.beans.factory.annotation.Autowired;
import org.springframework.http.ResponseEntity;
import org.springframework.web.bind.annotation.*;
import javax.validation.Valid;
import java.util.List;

@RestController
@RequestMapping("/api")
public class NoteController {

    @Autowired
    NoteRepository noteRepository;

    // Get All Notes

    // Create a new Note

    // Get a Single Note

    // Update a Note

    // Delete a Note
}
@RestController annotation is a combination of Spring’s @Controller and @ResponseBody annotations.
The @Controller annotation is used to define a controller and the @ResponseBody annotation is used to indicate that the return value of a method should be used as the response body of the request.
@RequestMapping("/api") declares that the url for all the apis in this controller will start with /api.
Let’s now look at the implementation of all the apis one by one.
1. Get All Notes (GET /api/notes)
// Get All Notes
@GetMapping("/notes")
public List<Note> getAllNotes() {
    return noteRepository.findAll();
}
The above method is pretty straightforward. It calls JpaRepository’s findAll() method to retrieve all the notes from the database and returns the entire list.
Also, The @GetMapping("/notes") annotation is a short form of @RequestMapping(value="/notes", method=RequestMethod.GET).
2. Create a new Note (POST /api/notes)
// Create a new Note
@PostMapping("/notes")
public Note createNote(@Valid @RequestBody Note note) {
    return noteRepository.save(note);
}
The @RequestBody annotation is used to bind the request body with a method parameter.
The @Valid annotation makes sure that the request body is valid. Remember, we had marked Note’s title and content with @NotBlank annotation in the Note model?
If the request body doesn’t have a title or a content, then spring will return a 400 BadRequest error to the client.
3. Get a Single Note (Get /api/notes/{noteId})
// Get a Single Note
@GetMapping("/notes/{id}")
public Note getNoteById(@PathVariable(value = "id") Long noteId) {
    return noteRepository.findById(noteId)
            .orElseThrow(() -> new ResourceNotFoundException("Note", "id", noteId));
}
The @PathVariable annotation, as the name suggests, is used to bind a path variable with a method parameter.
In the above method, we are throwing a ResourceNotFoundException whenever a Note with the given id is not found.
This will cause Spring Boot to return a 404 Not Found error to the client (Remember, we had added a @ResponseStatus(value = HttpStatus.NOT_FOUND) annotation to the ResourceNotFoundException class).
4. Update a Note (PUT /api/notes/{noteId})
// Update a Note
@PutMapping("/notes/{id}")
public Note updateNote(@PathVariable(value = "id") Long noteId,
                                        @Valid @RequestBody Note noteDetails) {

    Note note = noteRepository.findById(noteId)
            .orElseThrow(() -> new ResourceNotFoundException("Note", "id", noteId));

    note.setTitle(noteDetails.getTitle());
    note.setContent(noteDetails.getContent());

    Note updatedNote = noteRepository.save(note);
    return updatedNote;
}
5. Delete a Note (DELETE /api/notes/{noteId})
// Delete a Note
@DeleteMapping("/notes/{id}")
public ResponseEntity<?> deleteNote(@PathVariable(value = "id") Long noteId) {
    Note note = noteRepository.findById(noteId)
            .orElseThrow(() -> new ResourceNotFoundException("Note", "id", noteId));

    noteRepository.delete(note);

    return ResponseEntity.ok().build();
}
Running the Application
We’ve successfully built all the apis for our application. Let’s now run the app and test the apis.
Just go to the root directory of the application and type the following command to run it -
$ mvn spring-boot:run
The application will start at Spring Boot’s default tomcat port 8080.
Great! Now, It’s time to test our apis using postman.
Testing the APIs
Creating a new Note using POST /api/notes API

Retrieving all Notes using GET /api/notes API

Retrieving a single Note using GET /api/notes/{noteId} API

Updating a Note using PUT /api/notes/{noteId} API

Deleting a Note using DELETE /api/notes/{noteId} API

More Resources
The application that we built in this article had only one domain model. If you want to learn how to build REST APIs in an application with more than one domain models exhibiting a one-to-many relationship between each other, then I highly recommend you to check out the following article -
Spring Boot, JPA, Hibernate One-To-Many mapping example
Also, Go through the following article to learn how to build a full stack application with authentication and authorization using Spring Boot, Spring Security and React -
Spring Boot + Spring Security + JWT + MySQL + React Full Stack Polling App - Part 1
Conclusion
Congratulations folks! We successfully built a Restful CRUD API using Spring Boot, Mysql, Jpa and Hibernate.
You can find the source code for this tutorial on my github repository. Feel free to clone the repository and build upon it.
Thank you for reading. Please ask any questions in the comment section below.