1.新建maven项目(具体的新建过程就不细说了)
2.添加maven依赖,也就是在pom.xml文件添加项目的依赖jar包:
<project xmlns="http://maven.apache.org/POM/4.0.0" xmlns:xsi="http://www.w3.org/2001/XMLSchema-instance"
  xsi:schemaLocation="http://maven.apache.org/POM/4.0.0 http://maven.apache.org/maven-v4_0_0.xsd">
  <modelVersion>4.0.0</modelVersion>
  <groupId>springboot-test</groupId>
  <artifactId>bootTest</artifactId>
  <packaging>war</packaging>
  <version>0.0.1-SNAPSHOT</version>
  <name>bootTest Maven Webapp</name>
  <url>http://maven.apache.org</url>

    <!-- SpringBoot版本(核心) -->
     <parent>
        <groupId>org.springframework.boot</groupId>
        <artifactId>spring-boot-starter-parent</artifactId>
        <version>1.4.0.RELEASE</version>
        <relativePath />
    </parent>

    <dependencies>
        <!-- web -->
        <dependency>
            <groupId>org.springframework.boot</groupId>
            <artifactId>spring-boot-starter-web</artifactId>
        </dependency>

        <!-- 持久层(SpringData) -->
        <dependency>
            <groupId>org.springframework.boot</groupId>
            <artifactId>spring-boot-starter-data-jpa</artifactId>
        </dependency>

        <!-- MySql -->
           <dependency>
            <groupId>mysql</groupId>
            <artifactId>mysql-connector-java</artifactId>
        </dependency>

        <!-- JDBC依赖 -->
        <dependency>
            <groupId>org.springframework.boot</groupId>
            <artifactId>spring-boot-starter-jdbc</artifactId>
        </dependency>

         <dependency>
            <groupId>org.springframework.boot</groupId>
            <artifactId>spring-boot-starter-test</artifactId>
            <scope>test</scope>
        </dependency>

        <!-- 模板(渲染HTML页面) -->
        <dependency>
           <groupId>org.springframework.boot</groupId>
           <artifactId>spring-boot-starter-thymeleaf</artifactId>
        </dependency>
    </dependencies>

        <build>
        <finalName>spring-boot-data-jpa</finalName>
        <plugins>
            <plugin>
                <groupId>org.apache.maven.plugins</groupId>
                <artifactId>maven-compiler-plugin</artifactId>
                <configuration>
                    <source>1.8</source>
                    <target>1.8</target>
                </configuration>
            </plugin>
        </plugins>
    </build>

</project>
3.在application.properties(放在resources目录下)中添加配置信息:
##JDBC Setting(Mysql的配置信息)
spring.datasource.driver-class-name=com.mysql.jdbc.Driver
spring.datasource.url=jdbc:mysql://127.0.0.1:3306/boottest?useUnicode=true&characterEncoding=utf-8
spring.datasource.username=root
spring.datasource.password=root
spring.datasource.max-idle=10
spring.datasource.max-wait=10000
spring.datasource.min-idle=5
spring.datasource.initial-size=5

##服务器的配置信息
server.port=8080
server.session.timeout=10
server.tomcat.uri-encoding=UTF-8

## SpringDataJPA Settings
#spring.jpa.generate-ddl:true ----->将这个属性设置为TRUE,就是设置数据库自动更新,即但数据库没有实体所对应的的表时,自动创建,有对应的表时执行更新,和hibernate的hbm2ddl.auto:updata功能差不多
spring.jpa.generate-ddl: true
spring.jpa.show-sql: true
spring.jpa.properties.hibernate.format_sql: false
#设置模板位置,即html文件的存放位置
spring.thymeleaf.prefix=classpath:/templates/
4.项目的文件目录

5.测试
5.1 实体类User
package com.yxl.springboot.entity;

import javax.persistence.Entity;
import javax.persistence.GeneratedValue;
import javax.persistence.Id;
import javax.persistence.Table;

@Entity
@Table(name = "user") //声明实体对应得表,如果没有则创建(前提是application.properties文件中有相应的配置)
public class User {
    @Id
    @GeneratedValue
    private int id;
    private String name;
    private String password;


    public User() {
        super();
        // TODO Auto-generated constructor stub
    }

    public User(int id, String name, String password) {
        super();
        this.id = id;
        this.name = name;
        this.password = password;
    }

    public int getId() {
        return id;
    }

    public void setId(int id) {
        this.id = id;
    }

    public String getName() {
        return name;
    }

    public void setName(String name) {
        this.name = name;
    }

    public String getPassword() {
        return password;
    }

    public void setPassword(String password) {
        this.password = password;
    }
}
5.2 Mapper(Dao)层
package com.yxl.springboot.mapper;

import org.springframework.data.jpa.repository.JpaRepository;

import com.yxl.springboot.entity.User;

//继承JpaRepository类
public interface UserMapper extends JpaRepository<User, Integer>{

    public User findByName(String name);

}
5.3 controller层
package com.yxl.springboot.controller;

import java.util.List;

import org.springframework.beans.factory.annotation.Autowired;
import org.springframework.stereotype.Controller;
import org.springframework.ui.Model;
import org.springframework.web.bind.annotation.RequestMapping;

import com.yxl.springboot.entity.User;
import com.yxl.springboot.mapper.UserMapper;

@Controller
public class SpringBootTestController {

    @Autowired
    private UserMapper userMapper;

    @RequestMapping(value = "/find")
    public String springBootTest(Model model) {
        User findByName = userMapper.findByName("test");
        model.addAttribute("user", findByName);
        return "test";
    }

    @RequestMapping(value = "/all")
    public String selectAll(Model model) {
         List<User> selectAll = userMapper.findAll();
         model.addAttribute("user", selectAll);
        return "test1";
    }

}
5.4 test.html
<!DOCTYPE html>
<html xmlns="http://www.w3.org/1999/xhtml" xmlns:th="http://www.thymeleaf.org"
      xmlns:sec="http://www.thymeleaf.org/thymeleaf-extras-springsecurity3">
<head>
<meta charset="UTF-8"></meta>
<title>Insert title here</title>
</head>
<body>
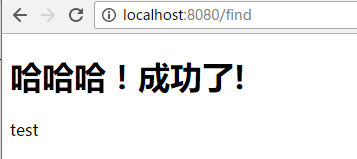
<h1>哈哈哈!成功了!</h1>
<!-- 模板渲染 -->
<p th:text="${user.name}"></p>
</body>
</html>
5.5 test1.html
<!DOCTYPE html>
<html xmlns="http://www.w3.org/1999/xhtml" xmlns:th="http://www.thymeleaf.org"
      xmlns:sec="http://www.thymeleaf.org/thymeleaf-extras-springsecurity3">
<head>
<meta charset="UTF-8"></meta>
<title>Insert title here</title>
</head>
<body>
<h1>哈哈哈!成功了!</h1>
<table>
    <thead>
        <tr>
            <td>编号</td>
            <td>姓名</td>
            <td>密码</td>
        </tr>
    </thead>
    <tbody>
        <!-- 循环遍历 -->
        <tr th:each = "user : ${user}">
            <td th:text = "${user.id}"></td>
            <td th:text = "${user.name}"></td>
            <td th:text = "${user.password}"></td>
        </tr>
    </tbody>
</table>
</body>
</html>
5.5 程序入口Application.java
package com.yxl.springboot;

import org.springframework.boot.SpringApplication;
import org.springframework.boot.autoconfigure.SpringBootApplication;

@SpringBootApplication
public class Application {

    public static void main(String[] args) {
         SpringApplication.run(Application.class, args);
    }

}
5.6 数据库数据

5.7 运行结果
test.html

test1.html
