在学习c++基础总结了笔记,并分享出来。有问题请及时联系博主:Alliswell_WP,转载请注明出处。
04-c++day05
目录:
一、类和对象
1、强化训练——数组类的封装
2、加号运算符重载
3、左移运算符重载
4、前置后置递增运算符重载
5、指针运算符重载
6、赋值运算符重载
7、[]运算符重载
二、总结
一、类和对象
1、强化训练——数组类的封装
练习:
数组类的封装.cpp
 1 #define _CRT_SECURE_NO_WARNINGS
 2 #include<iostream>
 3 using namespace std;
 4 #include"MyArray.h"
 5
 6 void test01()
 7 {
 8     //堆区创建数组
 9     MyArray* array = new MyArray(30);
10
11     MyArray* array2 = new MyArray(*array);//new方式指定调用拷贝构造
12     MyArray array3 = *array;//构造函数返回的本体
13
14
15     MyArray* array4(array);//等价于MyArray* array4 = array;这个是声明一个指针,和array执行的地址相同,所以不会调用拷贝构造
16
17     delete array;
18
19     //尾插法测试
20     for(int i = 0; i < 10; i++)
21     {
22         array2->push_Back(i);
23     }
24
25     //获取数据测试
26     for(int i = 0; i < 10; i++)
27     {
28         cout << array2->getData(i) << endl;
29     }
30
31     //设置值测试
32     array2->setData(0, 1000);
33
34     cout << array2->getData(0) << endl;
35
36     //获取数组大小
37     cout << "array2的数组大小为:" << array2->getSize() << endl;
38     //获取数组容量
39     cout << "array2的数组容量为:" << array2->getCapacity() << endl;
40
41     //获取、设置数组内容?如何用[]进行设置和访问
42     //cout << array3[0] << endl;
43     //array3[0] = 1000;
44 }
45
46 int main()
47 {
48     test01();
49
50     system("pause");
51     return EXIT_SUCCESS;
52 }
MyArray.h
 1 #pragma once
 2 #include<iostream>
 3 using namespace std;
 4
 5 class MyArray
 6 {
 7 public:
 8     MyArray();//默认构造,默认100容量
 9     MyArray(int capacity);
10     MyArray(const MyArray& array);
11
12     ~MyArray();
13
14     //尾插法
15     void push_Back(int val);
16
17     //根据索引获取值
18     int getData(int index);
19
20     //根据索引设置值
21     void setData(int index, int val);
22
23     //获取数组大小
24     int getSize();
25     //获取数组容量
26     int getCapacity();
27
28 private:
29     int* pAddress;//指向真正存储数据的指针
30     int m_Size;//数组大小
31     int m_Capacity;//数组容量
32 };
MyArray.cpp
 1 #include"MyArray.h"
 2
 3 //默认构造
 4 MyArray::MyArray()
 5 {
 6     this->m_Capacity = 100;
 7     this->m_Size = 0;
 8     this->pAddress = new int[this->m_Capacity];
 9 }
10 //有参构造 参数 数组容量
11 MyArray::MyArray(int capacity)
12 {
13     cout << "有参构造调用" <<endl;
14     this->m_Capacity = capacity;
15     this->m_Size = 0;
16     this->pAddress = new int[this->m_Capacity];
17 }
18 //拷贝构造
19 MyArray::MyArray(const MyArray& array)
20 {
21     cout << "拷贝构造调用" <<endl;
22     this->pAddress = new int[array.m_Capacity];
23     this->m_Size = array.m_Size;
24     this->m_Capacity = array.m_Capacity;
25
26     for(int i = 0; i < array.m_Size; i++)
27     {
28         this->pAddress[i] = array.pAddress[i];
29     }
30 }
31 //析构
32 MyArray::~MyArray()
33 {
34     if(this->pAddress != NULL)
35     {
36         cout << "析构调用" <<endl;
37         delete[] this->pAddress;
38         this->pAddress = NULL;
39     }
40 }
41
42 void MyArray::push_Back(int val)
43 {
44     //判断越界?用户自己处理
45     this->pAddress[this->m_Size] = val;
46     this->m_Size++;
47 }
48
49 int MyArray::getData(int index)
50 {
51     return this->pAddress[index];
52 }
53
54 void MyArray::setData(int index, int val)
55 {
56     this->pAddress[index] = val;
57 }
58
59 //获取数组大小
60 int getSize()
61 {
62     return this->m_Size;
63 }
64 //获取数组容量
65 int getCapacity()
66 {
67     return this->m_Capacity;
68 }
2、加号运算符重载
运算符重载基本概念
运算符重载,就是对已有的运算符重新进行定义,赋予其另一种功能,以适应不同的数据类型。
运算符重载(operator overloading)只是一种”语法上的方便”,也就是它只是另一种函数调用的方式。
在c++中,可以定义一个处理类的新运算符。这种定义很像一个普通的函数定义,只是函数的名字由关键字operator及其紧跟的运算符组成。差别仅此而已。它像任何其他函数一样也是一个函数,当编译器遇到适当的模式时,就会调用这个函数。
语法:
定义重载的运算符就像定义函数,只是该函数的名字是operator@,这里的@代表了被重载的运算符。函数的参数中参数个数取决于两个因素。
1)运算符是一元(一个参数)的还是二元(两个参数);
2)运算符被定义为全局函数(对于一元是一个参数,对于二元是两个参数)还是成员函数(对于一元没有参数,对于二元是一个参数-此时该类的对象用作左耳参数)
[两个极端]
有些人很容易滥用运算符重载。它确实是一个有趣的工具。但是应该注意,它仅仅是一种语法上的方便而已,是另外一种函数调用的方式。从这个角度来看,只有在能使涉及类的代码更易写,尤其是更易读时(请记住,读代码的机会比我们写代码多多了)才有理由重载运算符。如果不是这样,就改用其他更易用,更易读的方式。
对于运算符重载,另外一个常见的反应是恐慌:突然之间,C运算符的含义变得不同寻常了,一切都变了,所有C代码的功能都要改变!并非如此,对于内置的数据类型的表示总的所有运算符是不可能改变的。
如果想让自定义数据类型进行+运算,那么就需要重载+运算符。

 1 #define _CRT_SECURE_NO_WARNINGS
 2 #include<iostream>
 3 using namespace std;
 4
 5 class Person
 6 {
 7 public:
 8     Person()
 9     {
10
11     }
12     Person(int a, int b):m_A(a),m_B(b)
13     {
14
15     }
16
17     //+号运算符重载 成员函数
18     /*
19     Person operator+(Person& p)
20     {
21         Person tmp;
22         tmp.m_A = this->m_A + p.m_A;
23         tmp.m_B = this->m_B + p.m_B;
24         teturn tmp;
25     }
26     */
27
28     int m_A;
29     int m_B;
30 };
31
32 //利用全局函数 进行+号运算符的重载
33 Person operator+(Person& p1, Person& p2)
34 {
35     Person tmp;
36     tmp.m_A = p1->m_A + p2.m_A;
37     tmp.m_B = p1->m_B + p2.m_B;
38     teturn tmp;
39 }
Person operator+(Person& p1, int a)//二元
{
    Person tmp;
    tmp.m_A = p1->m_A + a;
    tmp.m_B = p1->m_B + a;
    teturn tmp;
}
40
41 void test01()
42 {
43     Person p1(10, 10);
44     Person p2(10, 10);
45
46     Person p3 = p1 + p2;//p1+p2 从什么表达式转变的?p1.operator+(p2)、operator+(p1, p2)
47     Person p4 = p1 + 10;//重载的版本
48     cout << "p3的m_A:" << p3.m_A << " m_B:" << p3.m_B << endl;
49 }
50
51 int main()
52 {
53     test01();
54
55     system("pause");
56     return EXIT_SUCCESS;
57 }
3、左移运算符重载
不要随意乱用符号重载,内置数据类型的运算符不可以重载。
 1 #define _CRT_SECURE_NO_WARNINGS
 2 #include<iostream>
 3 using namespace std;
 4
 5 class Person
 6 {
 7     friend ostream& operator<<(ostream& cout, Person& p1);
 8
 9 public:
10     Person(){}
11     Person(int a, int b)
12     {
13         this->m_A = a;
14         this->m_B = b;
15     }
16
17     /* 重载左移运算符不可以写到成员函数中
18     void operator<<()
19     {
20
21     }
22     */
23
24 private:
25     int m_A;
26     int m_B;
27 };
28 //全局函数中
29 ostream& operator<<(ostream& cout, Person& p1)//第一个参数cout,第二个参数p1
30 {
31     cout << "m_A = " << p1.m_A << "m_B = " << p1.m_B;
32     return cout;
33 }
34
35
36 void test01()
37 {
38     Person p1(10, 10);
39
40     cout << p1 << endl;
41
42
43 }
44
45 int main()
46 {
47     test01();
48
49     system("pause");
50     return EXIT_SUCCESS;
51 }
4、前置后置递增运算符重载
自增自减(++/--)运算符重载
重载的++和--运算符有点让人不知所措,因为我们总是希望能根据它们出现在所作用对象的前面还是后面来调用不同的函数。解决办法很简单,例如当编译器看到++a(前置++),它就调用operator++(a),当编译器看到a++(后置++),它就会去调用operator++(a,int).
优先使用++和--的标准形式,优先调用前置++。
如果定义了++c,也要定义c++,递增操作符比较麻烦,因为他们都有前缀和后缀形式,而两种语义略有不同。重载operator++和operator--时应该模仿他们对应的内置操作符。
对于++和--而言,后置形式是先返回,然后对象++或者--,返回的是对象的原值。前置形式,对象先++或--,返回当前对象,返回的是新对象。其标准形式为:
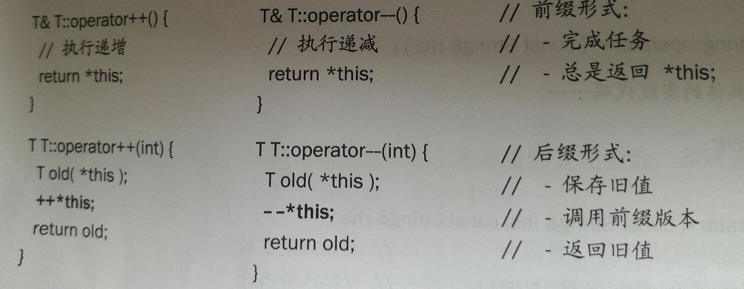
调用代码时候,要优先使用前缀形式,除非确实需要后缀形式返回的原值,前缀和后缀形式语义上是等价的,输入工作量也相当,只是效率经常会略高一些,由于前缀形式少创建了一个临时对象。
练习:自己实现int 类型MyInteger,内部维护int数据。
 1 #define _CRT_SECURE_NO_WARNINGS
 2 #include<iostream>
 3 using namespace std;
 4
 5 class MyInteger
 6 {
 7     friend ostream& operator<<(ostream& cout, MyInteger& myInt);
 8 public:
 9     MyInteger()
10     {
11         m_Num = 0;
12     }
13
14     //前置++重载
15     MyInteger& operator++()
16     {
17         this->m_Num++;
18         return *this;
19     }
20
21     //后置++重载
22     MyInteger operator++(int)//占位参数
23     {
24         //先保存目前数据
25         MyInteger tmp = *this;
26         m_Num++;
27         return tmp;
28     }
29
30     int m_Num;
31 };
32
33 ostream& operator<<(ostream& cout, MyInteger& myInt)
34 {
35     cout << myInt.m_Num;
36     return cout;
37 }
38
39 void test01()
40 {
41     MyInteger myInt;
42
43     //前置++
44     cout << ++myInt << endl;
45
46     //后置++
47     cout << myInt++ << endl;
48
49     cout << myInt << endl;
50 }
51
52 int main()
53 {
54     test01();
55
56     system("pause");
57     return EXIT_SUCCESS;
58 }
5、指针运算符重载
 1 #define _CRT_SECURE_NO_WARNINGS
 2 #include<iostream>
 3 using namespace std;
 4
 5 class Person
 6 {
 7 public:
 8     Person(int age)
 9     {
10         this->m_Age = age;
11     }
12
13     void showAge()
14     {
15         cout << "年龄为:" << this->m_Age << endl;
16     }
17     ~Person()
18     {
19         cout << "Person的析构调用" << endl;
20     }
21
22
23     int m_Age;
24 };
25
26 //智能指针
27 //用来托管自定义类型的对象,让对象进行自动的释放
28 class smartPointer
29 {
30 public:
31     smartPointer(Person* person)
32     {
33         this->person = person;
34     }
35
36     //重载->让智能指针对象像Person *p一样去使用
37     Person* operator->()
38     {
39         return this->person;
40     }
41
42     //重载*
43     Person& operator*()
44     {
45         return *this->person;
46     }
47
48     ~smartPointer()
49     {
50         cout << "智能指针析构了" << endl;
51         if(this->person != NULL)
52         {
53             delete this->person;
54             this->person = NULL;
55         }
56     }
57
58 private:
59     Person* person;
60 };
61
62 void test01()
63 {
64     //Person p1(10);//自动析构
65
66     //Person* p1 = new Person(10);
67     //delete p1;
68
69     smartPointer sp(new Person(10));//sp开辟到了栈上,自动释放
70     sp->showAge();//sp->->showAge();编译器优化了写法(sp->返回才是真正指针)
71
72     (*sp).showAge();
73 }
74
75 int main()
76 {
77     test01();
78
79     system("pause");
80     return EXIT_SUCCESS;
81 }
6、赋值运算符重载
系统默认给类提供 赋值运算符写法 是简单值拷贝,导致如果类中有指向堆区的指针,就可能出现深浅拷贝的问题。
 1 #define _CRT_SECURE_NO_WARNINGS
 2 #include<iostream>
 3 using namespace std;
 4
 5 //一个类默认创建:默认构造、析构、拷贝构造、operator=赋值运算符(进行简单的值传递)
 6 class Person
 7 {
 8 public:
 9     Person(int a)
10     {
11         this->m_A = a;
12     }
13
14
15     int m_A;
16 };
17
18
19 void test01()
20 {
21     Person p1(10);
22
23     Person p2(0);
24
25     p2 = p1;//赋值
26
27     cout << "p2的m_A:" << p2.m_A << endl;
28 }
29
30 class Person2
31 {
32 public:
33     Person2(char* name)
34     {
35         this->pName = new char[strlen(name) + 1];
36         strcpy(this->pName, name);
37     }
38
39     //重载= 赋值运算符
40     Person2& operator=(const Person2& p)
41     {
42         //先判断,如果原来已经堆区有内容,先释放
43         if(this->pName != NULL)
44         {
45             delete[] this->pName;
46             this->pName = NULL;
47         }
48
49         this->pName = new char[strlen(p.pName) + 1];
50         strcpy(this->pName, p.pName);
51
52         return *this;
53     }
54
55
56
57     ~Person2()
58     {
59         if(this->pName != NULL)
60         {
61             delete[] this->pName;
62             this->pName = NULL;
63         }
64     }
65
66     char* pName;
67 };
68
69 void test02()
70 {
71     Person2 p1("狗蛋");
72
73     Person2 p2("狗剩");
74
75     Person2 p3(" ");
76
77     p3 = p2 = p1;//链式
78
79     cout << p2.pName << endl;
80     cout << p3.pName << endl;
81 }
82
83
84 int main()
85 {
86     test01();
87
88     system("pause");
89     return EXIT_SUCCESS;
90 }
7、[]运算符重载
对练习1优化,对数组索引操作
数组类的封装.cpp
 1 #define _CRT_SECURE_NO_WARNINGS
 2 #include<iostream>
 3 using namespace std;
 4 #include"MyArray.h"
 5
 6 void test01()
 7 {
 8     //堆区创建数组
 9     MyArray* array = new MyArray(30);
10
11     MyArray* array2 = new MyArray(*array);//new方式指定调用拷贝构造
12     MyArray array3 = *array;//构造函数返回的本体
13
14
15     MyArray* array4(array);//等价于MyArray* array4 = array;这个是声明一个指针,和array执行的地址相同,所以不会调用拷贝构造
16
17     delete array;
18
19     //尾插法测试
20     for(int i = 0; i < 10; i++)
21     {
22         array2->push_Back(i);
23     }
24
25     //获取数据测试
26     for(int i = 0; i < 10; i++)
27     {
28         cout << array2->getData(i) << endl;
29     }
30
31     //设置值测试
32     array2->setData(0, 1000);
33
34     cout << array2->getData(0) << endl;
35
36     //获取数组大小
37     cout << "array2的数组大小为:" << array2->getSize() << endl;
38     //获取数组容量
39     cout << "array2的数组容量为:" << array2->getCapacity() << endl;
40
41     //获取、设置数组内容?如何用[]进行设置和访问
42     array3.push_Back(10000);
43     cout << array3.getData(0) << endl;
44     cout << array3[0] << endl;
45     array3[0] = 100;
46     cout << array3[0] << endl;
47 }
48
49 int main()
50 {
51     test01();
52
53     system("pause");
54     return EXIT_SUCCESS;
55 }
MyArray.h
 1 #pragma once
 2 #include<iostream>
 3 using namespace std;
 4
 5 class MyArray
 6 {
 7 public:
 8     MyArray();//默认构造,默认100容量
 9     MyArray(int capacity);
10     MyArray(const MyArray& array);
11
12     ~MyArray();
13
14     //尾插法
15     void push_Back(int val);
16
17     //根据索引获取值
18     int getData(int index);
19
20     //根据索引设置值
21     void setData(int index, int val);
22
23     //获取数组大小
24     int getSize();
25
26     //获取数组容量
27     int getCapacity();
28
29     //[]运算符重载
30     int& operator[](int index);
31
32
33 private:
34     int* pAddress;//指向真正存储数据的指针
35     int m_Size;//数组大小
36     int m_Capacity;//数组容量
37 };
MyArray.cpp
 1 #include"MyArray.h"
 2
 3 //默认构造
 4 MyArray::MyArray()
 5 {
 6     this->m_Capacity = 100;
 7     this->m_Size = 0;
 8     this->pAddress = new int[this->m_Capacity];
 9 }
10 //有参构造 参数 数组容量
11 MyArray::MyArray(int capacity)
12 {
13     cout << "有参构造调用" <<endl;
14     this->m_Capacity = capacity;
15     this->m_Size = 0;
16     this->pAddress = new int[this->m_Capacity];
17 }
18 //拷贝构造
19 MyArray::MyArray(const MyArray& array)
20 {
21     cout << "拷贝构造调用" <<endl;
22     this->pAddress = new int[array.m_Capacity];
23     this->m_Size = array.m_Size;
24     this->m_Capacity = array.m_Capacity;
25
26     for(int i = 0; i < array.m_Size; i++)
27     {
28         this->pAddress[i] = array.pAddress[i];
29     }
30 }
31 //析构
32 MyArray::~MyArray()
33 {
34     if(this->pAddress != NULL)
35     {
36         cout << "析构调用" <<endl;
37         delete[] this->pAddress;
38         this->pAddress = NULL;
39     }
40 }
41
42 void MyArray::push_Back(int val)
43 {
44     //判断越界?用户自己处理
45     this->pAddress[this->m_Size] = val;
46     this->m_Size++;
47 }
48
49 int MyArray::getData(int index)
50 {
51     return this->pAddress[index];
52 }
53
54 void MyArray::setData(int index, int val)
55 {
56     this->pAddress[index] = val;
57 }
58
59 //获取数组大小
60 int getSize()
61 {
62     return this->m_Size;
63 }
64 //获取数组容量
65 int getCapacity()
66 {
67     return this->m_Capacity;
68 }
69 //[]运算符重载
70 int& operator[](int index)
71 {
72     return this->pAddress[index];
73 }
二、总结
1 加号运算符重载
1.1 如果想让自定义数据类型 进行+运算,那么就需要重载 + 运算符
1.2 在成员函数 或者 全局函数里 重写一个+运算符的函数
1.3 函数名 operator+ () {}
1.4 运算符重载 也可以提供多个版本
2 左移运算符重载
2.1 不要随意乱用符号重载
2.2 内置数据类型 的运算符不可以重载
2.3 cout << 直接对Person自定义数据类型 进行输出
2.4 写到全局函数中 ostream& operator<< ( ostream & cout, Person & p1 ) {}
2.5 如果重载时候想访问 p1的私有成员,那么全局函数要做Person的友元函数
3 前置 后置 ++ 运算符重载
3.1 自己实现int类型 MyInteger
3.2 内部维护以int数据
3.3 MyInteger myInt
3.4 myInt ++ 后置 ++myInt 前置
3.5 重载++运算符 operator++() 前置 operator++(int) 后置
3.6 前置理念 先++ 后返回自身 后置理念 先保存住原有值 内部++ 返回临时数据
3.7 练习 自己实现递减运算符重载 --
4 智能指针实现
4.1 Person类有showAge 成员函数
4.2 如果new出来的Person对象,就要让程序员自觉的去释放 delete
4.3 有了智能指针,让智能指针托管这个Person对象,对象的释放就不用操心了,让智能指针管理
4.4 为了让智能指针想普通的Person*指针一样使用 就要重载 -> 和*
5 赋值运算符重载
5.1 系统默认给类提供 赋值运算符写法 是简单值拷贝
5.2 导致如果类中有指向堆区的指针,就可能出现深浅拷贝的问题
5.3 所以要重载 = 运算符
5.4 如果想链式编程 return*this
6 []运算符重载
6.1 返回数组索引的引用
6.2 int & operator[](int index)
6.3 return this->pAddress[index]
在学习c++基础总结了笔记,并分享出来。有问题请及时联系博主:Alliswell_WP,转载请注明出处。