以下知识点均来自:https://learning-pytest.readthedocs.io/zh/latest/doc/fixture/builtin-fixture.html#pytestconfig 和网上搜的一些
pytest框架
Pytest 查找测试策略
默认情况下,pytest 会递归查找当前目录下所有以 test 开始或结尾的 Python 脚本,并执行文件内的所有以 test 开始或结束的函数和方法。
命令:
Cmd:
到test目录下
执行pytest或者py.test。 pytest将运行当前目录及其子目录下所有名称为‘test_*.py’或’*_test.py‘文件
注解
pytest 使用 . 标识测试成功(PASSED);pytest 使用 F 标识测试失败(FAILED)
常用参数详解
--help,查看帮助
--collect-only 展示将要执行的测试用例,而不执行。
-k 通过指定测试用例名称表达是来执行测试用例。
-m 用于执行被标记的测试用例。
-x 出现失败测试用例就停止执行。
--maxfail=num 允许执行失败的次数。
-s 允许在测试时输出信息。
--lf 重新执行上一个测试失败的用例
--ff 重新执行全部用例,优先执行上一次失败的用例。
-v 输出更详细的信息
-q 简化输出信息
-l 失败的测试用例被堆栈追踪
--tb=style 用于决定不到到失败时暑促信息的显示方式(short,line,no)
--duration=N 统计测试阶段的执行时间
也可以直接在文件中直接运行
def test_a():
print('-----test_a')
assert 1
def test_b():
print('------test_b')
assert 0
if __name__ == '__main__':
pytest.main(['-s','aaa.py'])
直接运行就行
上例中,在执行(就像Python解释器执行普通的Python脚本一样)测试用例的时候,pytest.main(["-s",
"demo1.py"])中的传参需要是一个元组或者列表(我的pytest是5.2.2版本),之前的版本可能需要这么调用pytest.main("-s
demo1.py"),传的参数是str的形式,至于你使用哪种,取决于报不报错:
TypeError: `args` parameter expected to be a list or tuple of strings, got: '-s demo1.py' (type: <class 'str'>
遇到上述报错,就是参数需要一个列表或者元组的形式,而我们使用的是str形式。
Pytest用例规则
测试文件以test_开头(以test结尾也可以)
测试类以Test开头且不能带init方法
测试函数以test开头
断言使用assert
配置文件
Pytest配置文件可以改变pytest的运行方式,他是一个固定的文件pytest.ini文件
读取配置信息,按指定的方式去运行
[pytest]
# 添加命令行参数
addopts = -s
# 文件搜索路径
testpaths = ./scripts
# 文件名称
python_files = test_*.py
# 类名称
python_classes = Test*
# 方法名称
python_functions = test_*
addopts
addopts 参数可以更改默认命令行选项, 这个当我们在 cmd 输入指令去执行用例 的时候,会用到,比如我想测试完生成报告,指令比较长
pytest -s —html=report.html
每次输入这么多,不太好记住,于是可以加到 pytest.ini 里
在配置文件中修改 addopts = -s —html=report.html
这样我下次打开 cmd,直接输入 pytest,它就能默认带上这些参数了
断言
assert a == b
捕获异常
import pytest

def func():

   raise TypeError('自定义异常,如果是已存在的异常不需要写这个func函数')

def test_raises():

   with pytest.raises(TypeError) as e:

      pass

   exec_msg = e.value.args[0]

   assert exec_msg == 'port type must be int'
标记测试函数
由于某种原因(如 test_func2 的功能尚未开发完成),我们只想执行指定的测试函数
使用 pytest.mark 在函数上进行标记
class Test_class():

    @pytest.mark.finished

    def test_func1(self):

        assert 1 == 1

    @pytest.mark.unfinished

    def test_func2(self):

        assert 1 != 1
cmd:pytest -m finished 文件名
执行结果:
================= 1 passed, 2 deselected, 2 warnings in 0.05s =================
使用 mark,我们可以给每个函数打上不同的标记,测试时指定就可以允许所有被标记的函数
注解
一个函数可以打多个标记;多个函数也可以打相同的标记。
运行测试时使用 -m 选项可以加上逻辑,如:
C:UserszypPycharmProjectsuntitled est> pytest -m "finished and commit"
C:UserszypPycharmProjectsuntitled est> pytest -m "finished and not merged"
跳过测试
对于上面的通过标记指定的测试可以解决一些问题,但有时候的处境是我们能进行反向的操作才是最好的解决途径,即通过标记指定要挑过的测试
Pytest 使用特定的标记 pytest.mark.skip 完美的解决了这个问题。
在上面的代码加上如下:
@pytest.mark.skip(reason='out-of-data api')

def test_connect(self):

    pass
============= 1 failed, 1 passed, 1 skipped, 2 warnings in 0.09s ==============
aaa.py .Fs
注解
pytest 使用 s 表示测试被跳过(SKIPPED)。
Pytest 还支持使用 pytest.mark.skipif 为测试函数指定被忽略的条件。
@pytest.mark.skipif(condition=1 < 2,reason='如果条件为true就跳过用例')

def test_api(self):

    pass
预见的错误
如果我们事先知道测试函数会执行失败,但又不想直接跳过,而是希望显示的提示
Pytest使用pytest.mark.xfail实现预见错误
@pytest.mark.xfail()

def test_api(self):

    id_1 = 1

    id_2 = 1

    assert id_1 != id_2
======== 1 failed, 1 passed, 1 skipped, 1 xfailed, 2 warnings in 0.09s ========
注解
pytest 使用 x 表示预见的失败(XFAIL)。
如果预见的是失败,但实际运行测试却成功通过,pytest 使用 X 进行标记(XPASS)
参数化
当对一个测试函数进行测试时,通常会传递多组参数。参数化测试,使得每组参数都独立的执行一次测试,使用pytest.mark.parametrize(argnames, argvalues)
@pytest.mark.parametrize('password',['123456','asasasasas','3232sdsds23'])

def test_password_length(self,password):

    assert len(password) >= 8
运行结果如下:
collected 3 items
aaa.py F.. [100%]
=====1 failed, 2 passed in 0.11s =====
能看出来执行了3次
再看一个多参数的例子,用于校验用户密码
@pytest.mark.parametrize('user,password',

                         [('jack','abcdefgh'),

                          ('tom', 'a123456a')])

def test_password_md5(user,password):

    db = {'jack':'e8dc4081b13434b45189a720b77b6818',

          'tom': '1702a132e769a623c1adb78353fc9503'}

    import hashlib

    assert hashlib.md5(password.encode('utf-8')).hexdigest() == db[user]
注意上面@pytest.mark.parametrize('user,password',
这里是一个字符串,两个字段中间加逗号
使用 pytest -v aaa.py执行
collected 2 items
aaa.py::test_password_md5[jack-abcdefgh] PASSED [ 50%]
aaa.py::test_password_md5[tom-a123456a] PASSED [100%]
===== 2 passed in 0.05s ======
如果我们觉得每组测试的默认参数显示不清晰,我们可以使用pytest.param的id参数进行自定义
@pytest.mark.parametrize('user,password',

                         [pytest.param('jack','abcdefgh',id='User<Jack>'),

                          pytest.param('tom', 'a123456a', id='User<Tom>')])

def test_password_md5(user,password):

    db = {'jack':'e8dc4081b13434b45189a720b77b6818',

          'tom': '1702a132e769a623c1adb78353fc9503'}

    import hashlib

    assert hashlib.md5(password.encode('utf-8')).hexdigest() == db[user]

# pytest -v aaa.py结果为:

# collected 2 items

# aaa.py::test_password_md5[User<Jack>] PASSED                             [ 50%]

# aaa.py::test_password_md5[User<Tom>] PASSED                              [100%]

# ============================== 2 passed in 0.03s ==============================
什么是固件
固件是一些函数,pytest会在执行测试之前(后)加载运行他们。我们可以利用固件做任何事,其中最常见的可能就是数据库的初始连接和最后关闭操作。Pytest使用pytest.fixture()定义固件
@pytest.fixture()

def postcode():

    return '010'


def test_postcode(postcode):

    assert postcode == '010'
固件可以定义在各测试脚本中,但更多时候,我们希望固件能复用,这就要对固件进行集中管理,pytest使用文件conftest.py集中管理固件
注释
在复杂的项目中,可以在不同的目录层级定义conftest.py,其作用域为其所在的目录和子目录。不要自己调用conftest.py,pytest会自动调用,可以把conftest当做插件来理解
1.预处理和后处理
很多时候需要在测试前进行预处理(如数据库连接),并在测试完成进行清理(关闭数据库连接)
当大量重复的这类操作,最佳实践事使用固件来自动化所有预处理和后处理
pytest使用yield关键词将固件分为两部分,yield之前代码属于预处理,会在测试前执行;yield之后的代码属于后处理,将在测试完成后执行
@pytest.fixture()

def db():

    print('连接数据库成功')

    yield

    print('连接关闭')


def seach_user(user_id):

    d = {'001':'xiaoming'}

    return d[user_id]


def test_seach(db):

    assert seach_user('001') == 'xiaoming'

# 使用命令pytest -s aaa.py,结果为:

# aaa.py 连接数据库成功

# .连接关闭
执行时要用-s,阻止消息被吞: pytest -s
可以看到上面的结果是先返回成功,再打印的连接关闭
如果想更细的跟踪固件执行,可以使用—setup-show: pytest --setup-show aaa.py
2.作用域
固件的作用是为了抽离重复的工作和方便复用,为了更精细化控制固件,pytest使用作用域来进行指定固件的使用范围
在定义固件时,通过scope参数声明作用域,可选项有
Function:函数级,每个测试函数都会执行一次固件
Class:类级别,每个测试类执行一次,所有方法都可以使用
Module:模块级,每个模块执行一次,模块内函数和方法都可使用
Session:会话级,一次测试只执行一次,所有被找到的函数和方法都可用
默认作用域为function
@pytest.fixture(scope='function')

def func_scope():

    pass

@pytest.fixture(scope='module')

def mod_scope():

    pass

@pytest.fixture(scope='session')

def sess_scope():

    pass

@pytest.fixture(scope='class')

def class_scope():

    pass

# 最简单使用固件方式是作为测试函数参数:

def test_multi_scope(sess_scope,mod_scope,func_scope):

    pass
pytest --setup-show aaa.py执行结果如下,可以清楚看到各固件的作用域和执行顺序:
collected 1 item
aaa.py
SETUP S base_url
SETUP S _verify_url (fixtures used: base_url)
SETUP S sess_scope
SETUP S sensitive_url (fixtures used: base_url)
SETUP M mod_scope
SETUP F _skip_sensitive (fixtures used: sensitive_url)
SETUP F func_scope
aaa.py::test_multi_scope (fixtures used: _skip_sensitive, _verify_url, base_url, func_scope, mod_scope, request, sensitive_url, sess_scope).
TEARDOWN F func_scope
TEARDOWN F _skip_sensitive
TEARDOWN M mod_scope
TEARDOWN S sensitive_url
TEARDOWN S sess_scope
TEARDOWN S _verify_url
TEARDOWN S base_url
======= 1 passed in 0.03s====
对于类使用作用域,需要使用pytest.mark.usefixtures(对函数和方法也适用)
@pytest.fixture(scope='class')

def class_scope():

    pass

@pytest.mark.usefixtures('class_scope')

class TestClassScope:

    def test_1(self):

        pass

    def test_2(self):

        pass
pytest --setup-show aaa.py执行,可见所有测试函数都在固件作用范围内
3.自动执行
目前为止,所有固件的使用都是手动指定,或者作为参数,或者使用usefixtures
如果我们想让固件自动执行,可以在定义时指定autouse参数
下面是两个自动计时固件,一个用于统计每个函数运行时间(function 作用域),一个用于计算测试总耗时(session 作用域):
import time

DATE_FORMAT = '%Y-%m-%d %H:%M:%S'

@pytest.fixture(scope='session',autouse=True)

def time_session_scope():

    start = time.time()

    print('
start:{}'.format(time.strftime(DATE_FORMAT,time.localtime(start))))

    yield

    finished = time.time()

    print('finished:{}'.format(time.strftime(DATE_FORMAT),time.localtime(finished)))

    print('总共用时{:.3f}s'.format(finished - start))

@pytest.fixture(autouse=True)

def timer_function_scope():

    start = time.time()

    yield

    print('时间:{:.3f}s'.format(time.time() - start))


def test_one():

    time.sleep(1)

def test_two():

    time.sleep(2)


# pytest -s aaa.py执行结果为

'''

collected 2 items

aaa.py

start:2020-07-20 16:40:57

.时间:1.004s

.时间:2.016s

finished:2020-07-20 16:41:00

总共用时3.020s

========= 2 passed in 3.05s=========

'''
4.重命名
固件的名称默认为定义时的函数名,如果不想使用默认,可以通过name来指定名称
@pytest.fixture(name='age')

def calculate_average_age():

    return 28

def test_age(age):

    assert age == 28
5.固件的参数化
,我们可以通过参数控制连接到不同数据库,抽离相同的操作
固件参数化需要使用pytest内置的request,并通过request.param获取参数
@pytest.fixture(params=[('redis','3679'),('elasticsearch','9200')])

def param(request):

    return request.param


@pytest.fixture(autouse=True)

def db(param):

    print('
成功连接%s:%s'%param)

    yield

    print('
成功关闭连接%s%s'%param)

def test_api():

    assert 1 == 1

# pytest -s aaa.py 执行结果

'''

aaa.py

成功连接redis:3679

.

成功关闭连接redis3679

成功连接elasticsearch:9200

.

成功关闭连接elasticsearch9200

===== 2 passed in 0.05s ====

'''
注:与函数参数化使用@pytest.mark.parametrize不同,固件在定义时使用params参数进行参数化。固件参数化依赖内置固件request及其属性param
内置固件
tmpdir&tmpdir_factory
用于临时文件和目录管理,默认会在测试结束时删除
注:tmpdir 只有function作用域,只能在函数内使用
使用tmpdir.mkdir()创建临时目录,tmpdir,join()创建临时文件(或者使用创建的目录)
def test_tmpdir(tmpdir):

    a_dir = tmpdir.mkdir('mytmpdir')

    a_file = a_dir.join('tmpfile.txt')


    a_file.write('hello pytest!')

    assert a_file.read() == 'hello pytest!'
注:tmpdir_factory可以在所有作用域使用,包括function,class,module,session
@pytest.fixture(scope='module')
def my_tmpdir_factory(tmpdir_factory):
a_dir = tmpdir_factory.mktemp('mytmpdir')
a_file = a_dir.join('tmpfile.txt')
a_file.write('hello pytest')
return a_file.read()
def test_one(my_tmpdir_factory):
assert my_tmpdir_factory
== 'hello pytest'
class TestClass:
def test_two(self,my_tmpdir_factory):
assert my_tmpdir_factory
== 'hello pytest'
常用插件
pytest测试报告插件
下载:pip install pytest-html
在配置文件中,添加参数:
[pytest]
addopts = -s --html=report/report.html
Allure+pytest 生成测试报告
python 主流自动化测试报告插件有三个:HTMLTestRunner、BeautifulReport 和 Allure。HTMLTestRunner是一个比较古老的报告模板,界面也不是很好看。BeautifulReport 界面很简洁,看起来也很直观,是一款比较不错的报告插件。Allure 是一款轻量级的开源自动化测试报告生成框架
pip install pytest-allure-adaptor
windows安装
下载allure工具之前,它依赖Java环境,我们还需要先配置Java环境。验证电脑是否有java环境,可以直接cmd下敲 Java,如果有信息说明已经存在该环境
前情提示: allure是基于Java的一个程序,需要Java1.8+的环境,没有安装需要去安装一下。
安装教程:https://www.cnblogs.com/nojacky/p/9497724.html
下载并解压好了allure工具包之后,还需要将allure包内的bin目录添加到系统的环境变量中。
链接:https://github.com/allure-framework/allure2/releases/tag/2.13.1,win 10貌似设置环境变量后需要使用管理员权限再次打开命令提示符
https://www.cnblogs.com/du-hong/p/11597592.html
2.13.5版本没有bin文件,不知道怎么弄
完事之后再终端测试下
C:Userszyp>allure --version
使用
一般使用allure要经历几个步骤:
配置pytest.ini文件。
编写用例并执行。
使用allure工具生成html报告。
[pytest]
addopts = -v -s --html=report/report.html --alluredir ./report/result
此时我们在终端(如果是windows平台,就是cmd),路径是项目的根目录,执行下面的命令。
PS:我在pycharm中的terminal输入allure提示'allure' 不是内部或外部命令,也不是可运行的程序或批处理文件。但windows的终端没有问题。
C:UserszypPycharmProjectsuntitledzixue>allure generate report/result -o report/allure_html --clean Report successfully generated to reportallure_html
命令的意思是,根据report
esult目录中的数据(这些数据是运行pytest后产生的)。在report目录下新建一个allure_html目录,而这个目录内有index.html才是最终的allure版本的HTML报告;如果你是重复执行的话,使用--clean清除之前的报告。
当然,故事还是没有完!在使用allure生成报告的时候,在编写用例阶段,还可以有一些参数可以使用:
- title,自定义用例标题,标题默认是用例名。
- description,测试用例的详细说明。
- feature和story被称为行为驱动标记,因为使用这个两个标记,通过报告可以更加清楚的掌握每个测试用例的功能和每个测试用例的测试场景。或者你可以理解为feature是模块,而story是该模块下的子模块。
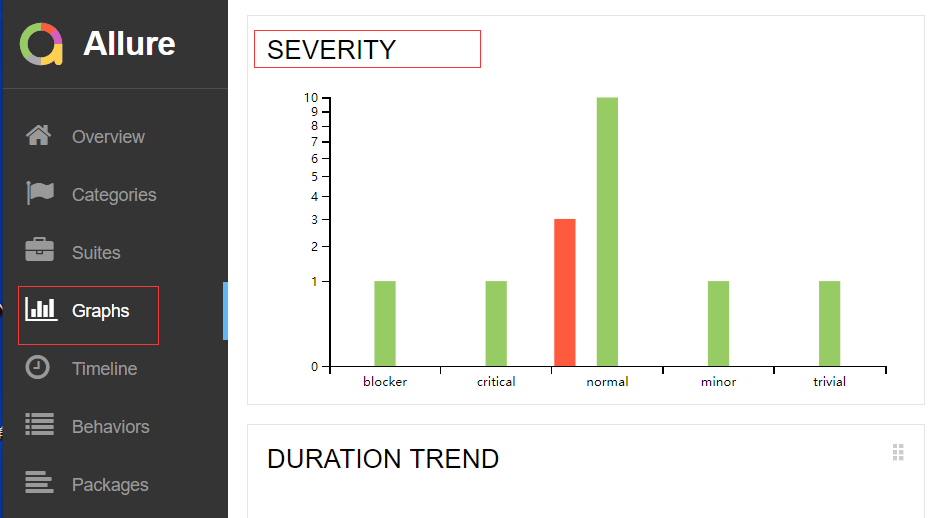
- allure中对severity级别的定义:
- Blocker级别:中断缺陷(客户端程序无响应,无法执行下一步操作)
- Critical级别:临界缺陷( 功能点缺失)
- Normal级别:普通缺陷(数值计算错误)
- Minor级别:次要缺陷(界面错误与UI需求不符)
- Trivial级别:轻微缺陷(必输项无提示,或者提示不规范)
- dynamic,动态设置相关参数。
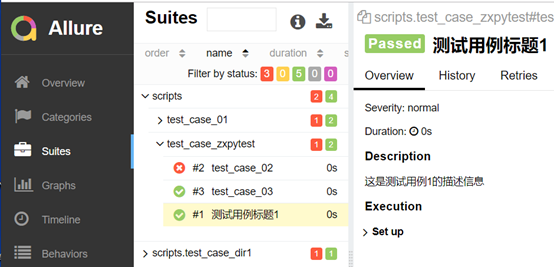
allure.title与allure.description


import allure
@allure.title('测试用例标题1')
@allure.description('这是测试用例1的描述信息')
def test_case_01():
    assert 1
def test_case_02():
    assert 0
def test_case_03():
    assert 1
C:UserszypPycharmProjectsuntitledzixue>pytest
C:UserszypPycharmProjectsuntitledzixue>allure generate report/result -o report/allure_html --clean Report successfully generated to reportallure_html
feature和story
import allure

@allure.feature('登录模块')
class TestCaseLogin(object):

    @allure.story('登录模块下的子模块: test1')
    def test_case_01(self):
        assert 1

    @allure.story('登录模块下的子模块: test2')
    def test_case_02(self):
        assert 1

    @allure.story('登录模块下的子模块: test3')
    def test_case_03(self):
        assert 1

    @allure.story('登录模块下的子模块: test4')
    def test_case_04(self):
        assert 1

@allure.feature('注册模块')
class TestCaseRegister(object):
    @allure.story('注册模块下的子模块: test1')
    def test_case_01(self):
        assert 1

    @allure.story('注册模块下的子模块: test2')
    def test_case_02(self):
        assert 1

    @allure.story('注册模块下的子模块: test3')
    def test_case_03(self):
        assert 1

    @allure.story('注册模块下的子模块: test4')
    def test_case_04(self):
        assert 1
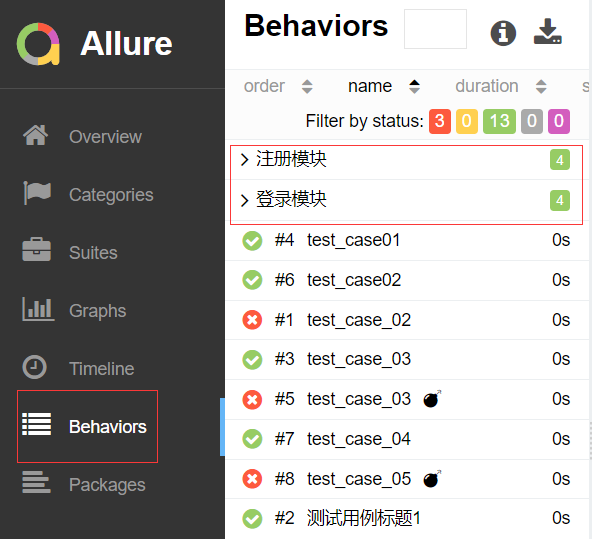
由上图可以看到,不同的用例被分为不同的功能中。
allure.severity
allure.severity用来标识测试用例或者测试类的级别,分为blocker,critical,normal,minor,trivial5个级别。
import allure

@allure.feature('登录模块')
class TestCaseLogin(object):
    @allure.severity(allure.severity_level.BLOCKER)
    def test_case_01(self):
        assert 1
    @allure.severity(allure.severity_level.CRITICAL)
    def test_case_02(self):
        assert 1
    @allure.severity(allure.severity_level.MINOR)
    def test_case_03(self):
        assert 1
    @allure.severity(allure.severity_level.TRIVIAL)
    def test_case_04(self):
        assert 1
     # 默认级别是normal,所有用例5可以不添加装饰器
    def test_case_05(self):
        assert 1
severity的默认级别是normal,所以上面的用例5可以不添加装饰器了。
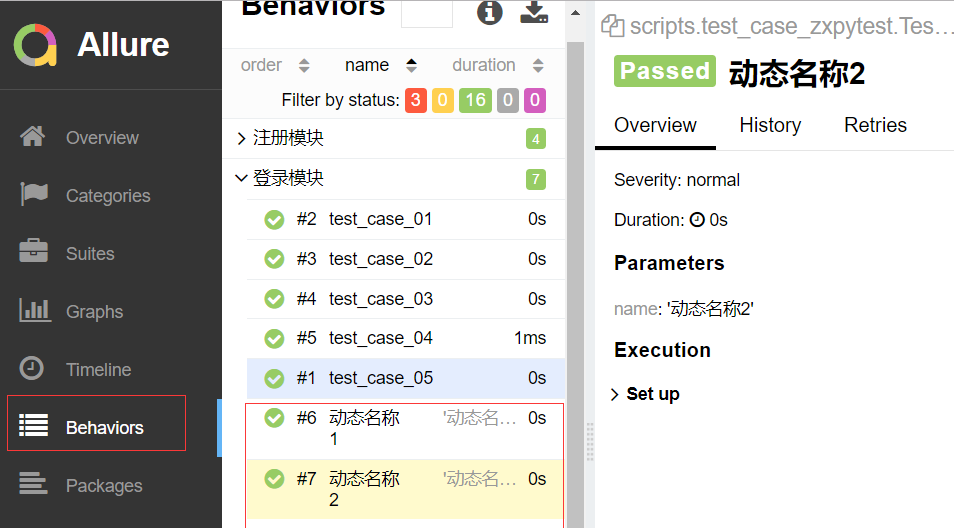
allure.dynamic
import pytest
import allure

@allure.feature('登录模块')
class TestCaseLogin(object):

    @allure.severity(allure.severity_level.BLOCKER)
    def test_case_01(self):
        assert 1

    @allure.severity(allure.severity_level.CRITICAL)
    def test_case_02(self):
        assert 1

    @allure.severity(allure.severity_level.MINOR)
    def test_case_03(self):
        assert 1

    @allure.severity(allure.severity_level.TRIVIAL)
    def test_case_04(self):
        assert 1
    @pytest.mark.parametrize('name', ['动态名称1', '动态名称2'])
    def test_case_05(self, name):
        allure.dynamic.title(name)
控制用例执行顺序
在之前,用例的执行顺序都是从上到下依次执行,我们可以通过一个插件来实现
pip install pytest-ordering
使用
import pytest

class TestCaseClass(object):
    @pytest.mark.run(order=3)
    def test_case_03(self):
        print('执行用例03.......')
        assert 1

@pytest.mark.run(order=2)
def test_case01():
    print('执行用例01.......')
    assert 1  # 断言成功

@pytest.mark.run(order=1)
def test_case02():
    print('执行用例02.......')
    assert 1  # 断言成功
执行结果
scripts/test_case_zxpytest.py::test_case02 执行用例02.......
PASSED
scripts/test_case_zxpytest.py::test_case01 执行用例01.......
PASSED
scripts/test_case_zxpytest.py::TestCaseClass::test_case_03 执行用例03.......
手动控制用例执行顺序的方法是在给各用例添加一个装饰器:
@pytest.mark.run(order=x) # x 是一个整数
如果有人较劲传个0或者负数啥的,那么它们的排序关系应该是这样的:
0 > 正数 > 没有参与的用例 > 负数
# 正数和负数就是按照大小关系排列的
失败重试
失败重试意思是指定某个用例执行失败可以重新运行。
下载
pip install pytest-rerunfailures
使用
需要在pytest.ini文件中, 配置:
[pytest]
addopts = -s --html=report/report.html --reruns=3
;addopts = -s --alluredir ./report/result
testpaths = ./scripts
python_files = test_case_zxpytest.py
def test_case01():
    print('执行用例01.......')
    assert 1  # 断言成功

def test_case02():
    print('执行用例02.......')
    assert 0  # 断言失败,需要重新执行

class TestCaseClass(object):

    def test_case_03(self):
        print('执行用例03.......')
        assert 1
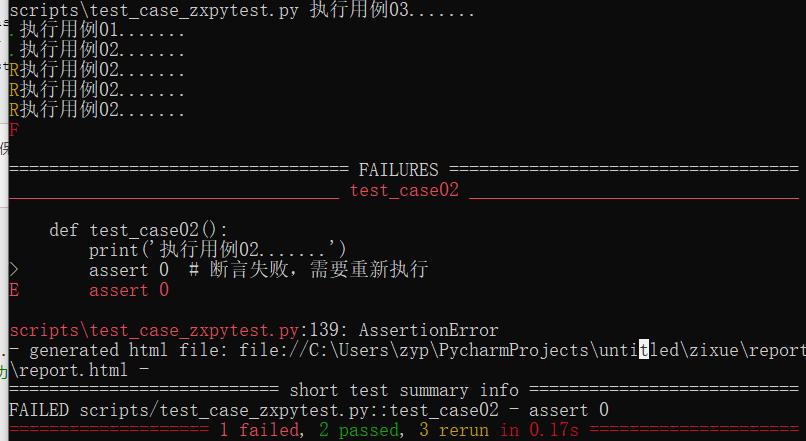
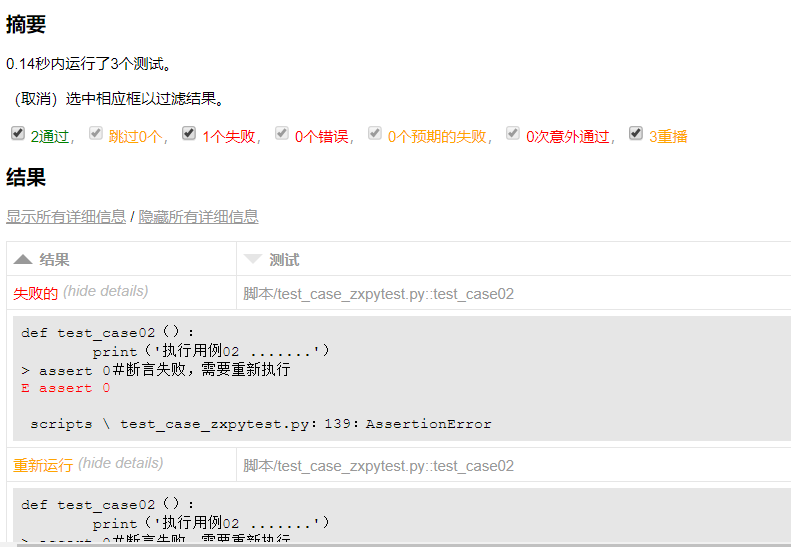
上面演示了用例失败了,然后重新执行多少次都没有成功,这是一种情况
接下来,来看另一种情况,那就是用例执行失败,重新执行次数内通过了,那么剩余的重新执行的次数将不再执行。
import random

def test_case01():
    print('执行用例01.......')
    assert 1  # 断言成功

def test_case02():
    print('执行用例02.......')
    status = random.randint(0, 2)
    if status:
        assert 1  # 断言成功,无需再重复执行了
    else:
        assert 0  # 断言失败,需要重新执行
class TestCaseClass(object):

    def test_case_03(self):
        print('执行用例03.......')
        assert 1
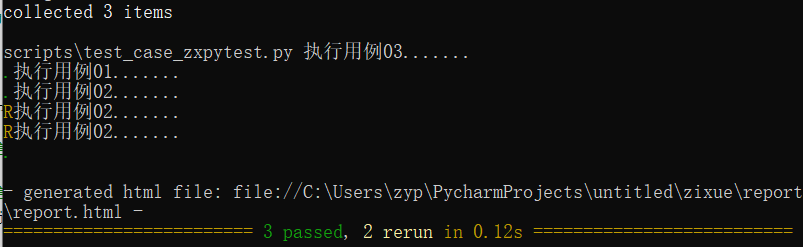
可以看出来只重复执行了两次,第二次执行成功了,第三次就不再执行
并发执行
一条一条用例的执行,肯定会很慢,来看如何并发的执行测试用例,当然这需要相应的插件。
下载
pip install pytest-xdist
使用
在配置文件中添加
[pytest]
addopts =  -v -s --html=report/report.html -n=auto
;addopts = -s --alluredir ./report/result
testpaths = ./scripts
python_files = test_case_zxpytest.py
;python_files = test_*.py
python_classes = Test*
python_functions = test_*
就是这个-n=auto:
-n=auto,自动侦测系统里的CPU数目。-n=numprocesses,也就是自己指定运行测试用例的进程数。
并发的配置可以写在配置文件中,然后其他正常的执行用例脚本即可。
另外一种就是在终端中指定,先来看示例:
import pytest
def test_case01():
    print('执行用例01.......')
    assert 1  # 断言成功


@pytest.mark.skipif(condition= 2 > 1, reason='跳过用例')
def test_case02():
    print('执行用例02.......')
    assert 0  # 断言失败

class TestCaseClass(object):

    def test_case_03(self):
        print('执行用例03.......')
        assert 1

    def test_case_04(self):
        print('执行用例04.......')
        assert 1

# C:UserszypPycharmProjectsuntitledzixue>pytest .scripts	est_case_zxpytest.py -s -n auto
# ============================= test session starts =============================
# platform win32 -- Python 3.7.2, pytest-5.4.3, py-1.9.0, pluggy-0.13.1 -- c:userszypappdatalocalprogramspythonpython37python.exe
# cachedir: .pytest_cache
# metadata: {'Python': '3.7.2', 'Platform': 'Windows-10-10.0.18362-SP0', 'Packages': {'pytest': '5.4.3', 'py': '1.9.0', 'pluggy': '0.13.1'}, 'Plugins': {'allure-pytest': '2.8.16', 'base-url': '1.4.2', 'forked': '1.2.0', 'html': '2.1.1', 'metadata': '1.10.0', 'rerunfailures': '9.0', 'selenium': '1.17.0', 'variables': '1.9.0', 'xdist': '1.32.0', 'ordering': '0.6'}, 'Base URL': '', 'Driver': None, 'Capabilities': {}}
# sensitiveurl: .*
# rootdir: C:UserszypPycharmProjectsuntitledzixue, inifile: pytest.ini
# plugins: allure-pytest-2.8.16, base-url-1.4.2, forked-1.2.0, html-2.1.1, metadata-1.10.0, rerunfailures-9.0, selenium-1.17.0, variables-1.9.0, xdist-1.32.0, ordering-0.6
# [gw0] win32 Python 3.7.2 cwd: C:UserszypPycharmProjectsuntitledzixue
# [gw1] win32 Python 3.7.2 cwd: C:UserszypPycharmProjectsuntitledzixue
# [gw2] win32 Python 3.7.2 cwd: C:UserszypPycharmProjectsuntitledzixue
# [gw3] win32 Python 3.7.2 cwd: C:UserszypPycharmProjectsuntitledzixue
# [gw4] win32 Python 3.7.2 cwd: C:UserszypPycharmProjectsuntitledzixue
# [gw5] win32 Python 3.7.2 cwd: C:UserszypPycharmProjectsuntitledzixue
# [gw6] win32 Python 3.7.2 cwd: C:UserszypPycharmProjectsuntitledzixue
# [gw7] win32 Python 3.7.2 cwd: C:UserszypPycharmProjectsuntitledzixue
# [gw0] Python 3.7.2 (tags/v3.7.2:9a3ffc0492, Dec 23 2018, 23:09:28) [MSC v.1916 64 bit (AMD64)]
# [gw1] Python 3.7.2 (tags/v3.7.2:9a3ffc0492, Dec 23 2018, 23:09:28) [MSC v.1916 64 bit (AMD64)]
# [gw2] Python 3.7.2 (tags/v3.7.2:9a3ffc0492, Dec 23 2018, 23:09:28) [MSC v.1916 64 bit (AMD64)]
# [gw3] Python 3.7.2 (tags/v3.7.2:9a3ffc0492, Dec 23 2018, 23:09:28) [MSC v.1916 64 bit (AMD64)]
# [gw4] Python 3.7.2 (tags/v3.7.2:9a3ffc0492, Dec 23 2018, 23:09:28) [MSC v.1916 64 bit (AMD64)]
# [gw5] Python 3.7.2 (tags/v3.7.2:9a3ffc0492, Dec 23 2018, 23:09:28) [MSC v.1916 64 bit (AMD64)]
# [gw6] Python 3.7.2 (tags/v3.7.2:9a3ffc0492, Dec 23 2018, 23:09:28) [MSC v.1916 64 bit (AMD64)]
# [gw7] Python 3.7.2 (tags/v3.7.2:9a3ffc0492, Dec 23 2018, 23:09:28) [MSC v.1916 64 bit (AMD64)]
# gw0 [4] / gw1 [4] / gw2 [4] / gw3 [4] / gw4 [4] / gw5 [4] / gw6 [4] / gw7 [4]
# scheduling tests via LoadScheduling
#
# scripts/test_case_zxpytest.py::test_case02
# scripts/test_case_zxpytest.py::TestCaseClass::test_case_03
# scripts/test_case_zxpytest.py::test_case01
# scripts/test_case_zxpytest.py::TestCaseClass::test_case_04
# [gw3] SKIPPED scripts/test_case_zxpytest.py::test_case02
# [gw2] PASSED scripts/test_case_zxpytest.py::test_case01
# [gw0] PASSED scripts/test_case_zxpytest.py::TestCaseClass::test_case_03
# [gw1] PASSED scripts/test_case_zxpytest.py::TestCaseClass::test_case_04
#
# - generated html file: file://C:UserszypPycharmProjectsuntitledzixue
eport
eport.html -
# ======================== 3 passed, 1 skipped in 1.69s ==================
pytest-sugar
pytest-sugar 改变了 pytest 的默认外观,添加了一个进度条,并立即显示失败的测试。它不需要配置,只需 下载插件即可,用 pytest 运行测试,来享受更漂亮、更有用的输出。
下载
pip install pytest-sugar
其他照旧执行用例即可。
pytest-cov
pytest-cov 在 pytest 中增加了覆盖率支持,来显示哪些代码行已经测试过,哪些还没有。它还将包括项目的测试覆盖率
下载
pip install pytest-cov
使用
在配置文件中:
也就是配置--cov=./scripts,这样,它就会统计所有scripts目录下所有符合规则的脚本的测试覆盖率。
执行的话,就照常执行就行。
结果:
C:UserszypPycharmProjectsuntitledzixue>pytest
Test session starts (platform: win32, Python 3.7.2, pytest 5.4.3, pytest-sugar 0.9.4)
cachedir: .pytest_cache
metadata: {'Python': '3.7.2', 'Platform': 'Windows-10-10.0.18362-SP0', 'Packages': {'pytest': '5.4.3', 'py': '1.9.0', 'pluggy': '0.13.1'}, 'Plugins': {'allure-pytest': '2.8.16', 'base-url': '1.4.2', 'forked': '1.2.0', 'html': '2.1.1', 'metadata': '1.10.0', 'rerunfailures': '9.0', 'selenium': '1.17.0', 'variables': '1.9.0', 'xdist': '1.32.0', 'cov': '2.10.0', 'ordering': '0.6', 'sugar': '0.9.4'}, 'Base URL': '', 'Driver': None, 'Capabilities': {}}
sensitiveurl: .*
rootdir: C:UserszypPycharmProjectsuntitledzixue, inifile: pytest.ini, testpaths: ./scripts
plugins: allure-pytest-2.8.16, base-url-1.4.2, forked-1.2.0, html-2.1.1, metadata-1.10.0, rerunfailures-9.0, selenium-1.17.0, variables-1.9.0, xdist-1.32.0, cov-2.10.0, ordering-0.6, sugar-0.9.4
[gw0] win32 Python 3.7.2 cwd: C:UserszypPycharmProjectsuntitledzixue
[gw1] win32 Python 3.7.2 cwd: C:UserszypPycharmProjectsuntitledzixue
[gw2] win32 Python 3.7.2 cwd: C:UserszypPycharmProjectsuntitledzixue
[gw3] win32 Python 3.7.2 cwd: C:UserszypPycharmProjectsuntitledzixue
[gw4] win32 Python 3.7.2 cwd: C:UserszypPycharmProjectsuntitledzixue
[gw5] win32 Python 3.7.2 cwd: C:UserszypPycharmProjectsuntitledzixue
[gw6] win32 Python 3.7.2 cwd: C:UserszypPycharmProjectsuntitledzixue
[gw7] win32 Python 3.7.2 cwd: C:UserszypPycharmProjectsuntitledzixue
[gw0] Python 3.7.2 (tags/v3.7.2:9a3ffc0492, Dec 23 2018, 23:09:28) [MSC v.1916 64 bit (AMD64)]
[gw1] Python 3.7.2 (tags/v3.7.2:9a3ffc0492, Dec 23 2018, 23:09:28) [MSC v.1916 64 bit (AMD64)]
[gw2] Python 3.7.2 (tags/v3.7.2:9a3ffc0492, Dec 23 2018, 23:09:28) [MSC v.1916 64 bit (AMD64)]
[gw3] Python 3.7.2 (tags/v3.7.2:9a3ffc0492, Dec 23 2018, 23:09:28) [MSC v.1916 64 bit (AMD64)]
[gw4] Python 3.7.2 (tags/v3.7.2:9a3ffc0492, Dec 23 2018, 23:09:28) [MSC v.1916 64 bit (AMD64)]
[gw5] Python 3.7.2 (tags/v3.7.2:9a3ffc0492, Dec 23 2018, 23:09:28) [MSC v.1916 64 bit (AMD64)]
[gw6] Python 3.7.2 (tags/v3.7.2:9a3ffc0492, Dec 23 2018, 23:09:28) [MSC v.1916 64 bit (AMD64)]
[gw7] Python 3.7.2 (tags/v3.7.2:9a3ffc0492, Dec 23 2018, 23:09:28) [MSC v.1916 64 bit (AMD64)]
gw0 [4] / gw1 [4] / gw2 [4] / gw3 [4] / gw4 [4] / gw5 [4] / gw6 [4] / gw7 [4]
scheduling tests via LoadScheduling

 scripts	est_case_zxpytest.py::test_case02 s                                      25% ██▌       3] SKIPPED scripts/test_case_zxpytest.py

 scripts	est_case_zxpytest.py::TestCaseClass.test_case_03 ✓                       50% █████      PASSED scripts/test_case_zxpytest.py

 scripts	est_case_zxpytest.py::TestCaseClass.test_case_04 ✓                       75% ███████▌


――――――――――――――――――――――――――――――――――――――――― test_case01 ――――――――――――――――――――――――――――――――――――――――――
[gw2] win32 -- Python 3.7.2 c:userszypappdatalocalprogramspythonpython37python.exe

    def test_case01():
        print('执行用例01.......')
>       assert 0  # 断言成功
E       assert 0

scripts	est_case_zxpytest.py:246: AssertionError

 scripts	est_case_zxpytest.py::test_case01 ⨯                                     100% ██████████ED scripts/test_case_zxpytest.py


-- generated html file: file://C:UserszypPycharmProjectsuntitledzixue
eport
eport.html --

----------- coverage: platform win32, python 3.7.2-final-0 -----------
Name                                    Stmts   Miss  Cover
-----------------------------------------------------------
scripts__init__.py                         0      0   100%
scriptsaaa.py                              2      2     0%
scripts	est_case_01.py                    10     10     0%
scripts	est_case_dir1__init__.py          0      0   100%
scripts	est_case_dir1	est_case02.py       5      5     0%
scripts	est_case_zxpytest.py              14      2    86%
-----------------------------------------------------------
TOTAL                                      31     19    39%

=================================== short test summary info ====================================
FAILED scripts/test_case_zxpytest.py::test_case01 - assert 0

Results (2.48s):
       2 passed
       1 failed
         - scripts/test_case_zxpytest.py:244 test_case01
       1 skipped
更多插件参考:https://zhuanlan.zhihu.com/p/50317866
setup和teardownsetup
setup和teardown可以在每个用例前后执行,也可以在所有的用例集执行前后执行。那么在pytest中,有以下几种情况:
模块级别,也就是在整个测试脚本文件中的用例集开始前后,对应的是:
setup_module
teardown_module
类级别,在类中的所有用例集执行前后,对应的是:
setup_class
teardown_class
在类中呢,也可以在进一步划分,在每一个方法执行前后,对应:
setup_method
teardown_methd
函数级别,在用例函数之前后,对应:
setup_function
teardown_function
模块级别
# 模块级别
def setup_module():
    '模块级别的,在该脚本内所有用例集执行前触发'
    print('模块级别的setup')
def test_a():
    print('-----test_a')
    assert 1
def test_b():
    print('------test_b')
    assert 0
def teardown_module():
    '模块级别的teardown,在该脚本内所有用例执行后触发'
    print('模块级别的teardown')
if __name__ == '__main__':
    pytest.main(['-s','aaa.py'])

# aaa.py 模块级别的setup
# -----test_a
# .------test_b
# F模块级别的teardown
类级别
class TestCase():
    def setup_class(self):
        '类级别的,在该脚本内所有用例集执行前触发'
        print('类级别的setup')
    def teardown_class(self):
        '类级别级别的teardown,在该脚本内所有用例执行后触发'
        print('类级别的teardown')
    def test_a(self):
        print('-----test_a')
        assert 1
    def test_b(self):
        print('------test_b')
        assert 0
if __name__ == '__main__':
    pytest.main(['-s','aaa.py'])

# aaa.py 类级别的setup
# -----test_a
# .------test_b
# F类级别的teardown
方法
class TestCase():
    def setup_method(self):
        '类中方法级别的 setup,在该类中内每个用例执行之前触发执行'
        print('类中方法级别的 setup')
    def teardown_method(self):
        '类中方法级别的 teardown,在该类中内每个用例执行之后触发执行'
        print('类中方法级别的 teardown')
    def test_a(self):
        print('-----test_a')
        assert 1
    def test_b(self):
        print('------test_b')
        assert 0
if __name__ == '__main__':
    pytest.main(['-s','aaa.py'])

# aaa.py 类中方法级别的 setup
# -----test_a
# .类中方法级别的 teardown
# 类中方法级别的 setup
# ------test_b
# F类中方法级别的 teardown
函数级别的
def setup_function():
    """ 函数级别的 setup,在该脚本内每个用例函数执行之前触发执行 """
    print('函数级别的 setup.....')

def test_case01():
    print('执行用例01.......')
    assert 0  # 断言失败

def test_case02():
    print('执行用例02.......')
    assert 1  # 断言成功

def teardown_function():
    """ 函数级别的 teardown,在该脚本内每个用例函数执行之后触发执行 """
    print('函数级别的 teardown.....')
if __name__ == '__main__':
    pytest.main(['-s','aaa.py'])

# aaa.py 函数级别的 setup.....
# 执行用例01.......
# F函数级别的 teardown.....
# 函数级别的 setup.....
# 执行用例02.......
# .函数级别的 teardown.....
配置文件
该脚本有多种运行方式,例如通过pytest,main()直接点运行,或者cmd下输入命令,当然也可以使用配置文件运行
在项目根目录下,建立一个pytest.ini文件,在这个文件中我们可以实现相关的配置
[pytest]
addopts = -s -v
testpaths = ./scripts
python_files = test_*.py
python_classes = Test*
python_functions = test_*
注:配置文件中不能有中文
其他的参数:
-
addopts可以搭配相关的参数,比如-s。多个参数以空格分割,其他参数后续用到再说。-s,在运行测试脚本时,为了调试或打印一些内容,我们会在代码中加一些print内容,但是在运行pytest时,这些内容不会显示出来。如果带上-s,就可以显示了。-v,使输出结果更加详细。
-
testpaths配置测试用例的目录,- 因为我们用例可能分布在不同的目录或文件中,那么这个
scripts就是我们所有文件或者目录的顶层目录。其内的子文件或者子目录都要以test_开头,pytest才能识别到。 - 另外,上面这么写,是从一个总目录下寻找所有的符合条件的文件或者脚本,那么我们想要在这个总目录下执行其中某个具体的脚本文件怎么办?
- 因为我们用例可能分布在不同的目录或文件中,那么这个
[pytest]
testpaths = ./scripts/
python_files = test_case_01.py
这么写就是执行scripts目录下面的test_case_01.py这个文件。
-
python_classes则是说明脚本内的所有用例类名必须是以Test开头,当然,你也可以自定义为以Test_开头,而类中的用例方法则当然是以test_开头。 -
python_functions则是说脚本内的所有用例函数以test_开头才能识别。
更多可以详细学下配置文件
pytestconfig
pytestconfig
使用pytestconfig可以方便的读取命令行参数和配置文件
下面示例演示命令行参数解析,首先在conftest.py中使用函数pytest_addoption(特定的hookfunction)