一、介绍
之前我们都是通过MySQL自带的命令行客户端工具mysql来操作数据库,那如何在python程序中操作数据库呢?
这就用到了pymysql模块,该模块本质就是一个套接字客户端软件,使用前需要事先安装。
pip install -i http://mirrors.aliyun.com/pypi/simple --trusted-host mirrors.aliyun.com pymysql
二、链接、执行SQL、关闭链接
import pymysql


# 建立链接
conn = pymysql.connect(host="localhost", user="root", password="20001001", database="db", charset="utf8")

# 初始化游标
cursor = conn.cursor()

# 执行SQL语句
name = input("Please input name: ").strip()
sql = 'select * from employee where name = "%s";' % name
print("sql: ", sql)
res = cursor.execute(sql)
print("res: ", res)

cursor.close()
conn.close()
执行结果为:
Please input name: alex
sql:  select * from employee where name = "alex"
res:  1
三、execute()之sql注入
SQL语句的注释符号为:–
因此注释之后的所有语句都不会执行。
#1、sql注入之:用户存在,绕过密码
alex' -- 任意字符

#2、sql注入之:用户不存在,绕过用户与密码
xxx' or 1=1 -- 任意字符
pymysql其实已经帮我们做好了这方面的防护,使用execute帮助我们拼接SQL语句更加安全。
sql="select * from userinfo where name=%s and password=%s" 	# 注意%s需要去掉引号,因为pymysql会自动为我们加上
res=cursor.execute(sql,[user,pwd]) 	# pymysql模块自动帮我们解决sql注入的问题,只要我们按照pymysql的规矩来。
四、pymysql增删改查
import pymysql


conn = pymysql.connect(host="localhost", user="root", password="20001001", database="db")
cursor = conn.cursor()

# 增
sql1 = 'insert into employee (name, sex, age, dep_id) values(%s, %s, %s, %s);'
res1 = cursor.execute(sql1, ("Alex", "male", 19, 200))
print("res1: ", res1)

res2 = cursor.executemany(sql1, [("Coco", "female", 19, 201), ("Bei", "female", 5, 202)])
print("res2: ", res2)
print(cursor.lastrowid)     # 获取插入的最后一条数据的自增ID

# 删
sql2 = "delete from employee where name = %s;"
res2 = cursor.execute(sql2, "alex")
print("res3: ", res2)

# 改
sql3 = "update employee set age = 2 where name = %s;"
res3 = cursor.execute(sql3, "Bei")
print("res3: ", res3)

# 查
sql4 = "select * from employee;"
res4 = cursor.execute(sql4)
print("res41: ", cursor.fetchone(), end="

")
print("res42: ", cursor.fetchmany(2), end="

")
print("res43: ", cursor.fetchall(), end="

")

conn.commit()   # 提交后才发现表中插入记录成功

cursor.close()
conn.close()
执行结果为:
res1:  1
res2:  2
8
res3:  2
res3:  1
res41:  (1, 'egon', 'male', 18, 200)
res42:  ((3, 'wupeiqi', 'male', 38, 201), (4, 'yuanhao', 'female', 28, 202))
res43:  ((5, 'liwenzhou', 'male', 18, 200), (6, 'jingliyang', 'female', 18, 204), (8, 'Coco', 'female', 19, 201), (9, 'Bei', 'female', 2, 202))
Process finished with exit code 0
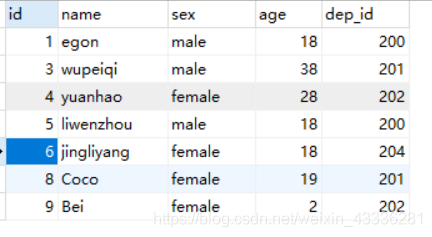
数据库结果: