效率
变通实现微服务的per request以提高IO效率中提到的同一请求过程中对于同一个方法的多次读取只实际调用一次,其余的读取均从第一次读取的结果缓存中获取,以提高读取的效率。实现方案是引入了Context对象,可以理解成上下文的一个环境变量,业务方法在获取数据时先从Context中取,如果取不到从数据库中加载并将结果写入Context中,而Context是通过ThreadLocal来存储。但实现有点复杂需要寻找优化方案。
Context方案的缺点
- 复杂度增强,因为需要引入Context的特殊概念
- 复用性比较低。需要在Context中为每种数据维护一个属性。比如存储用户,产品,价格等。当然也可以利用Map,这样会导致复杂度会更加强,在缓存清除的时候也会随着数据存储结构的复杂度提升而提升:之前是为每种数据定义一个ThreadLocal。
private ThreadLocal<CiaUserInfo> ciaUserInfoThreadLocal=new ThreadLocal<>();
- 需要在业务方法中嵌入操作Context的方法,具备比较强的代码侵入性。下面代码中的getCiauserInfoFromCache就嵌入在业务代码中。
public CiaUserInfo getTokenInfo(String token) throws Exception {

        CiaUserInfo result = this.productContext.getCiaUserInfoFromCache(token);
        if(null!=result){
            return result;
        }
        else {
            result=new CiaUserInfo();
        }

        //...get user from db
        this.productContext.setCiaUserInfoToCache(result);
        return result;
    }
- 需要自己实现缓存KEY生成器,如果是多参数,复杂对象会导致编写KEY的难度成倍提升
基于Spring Cache来实现
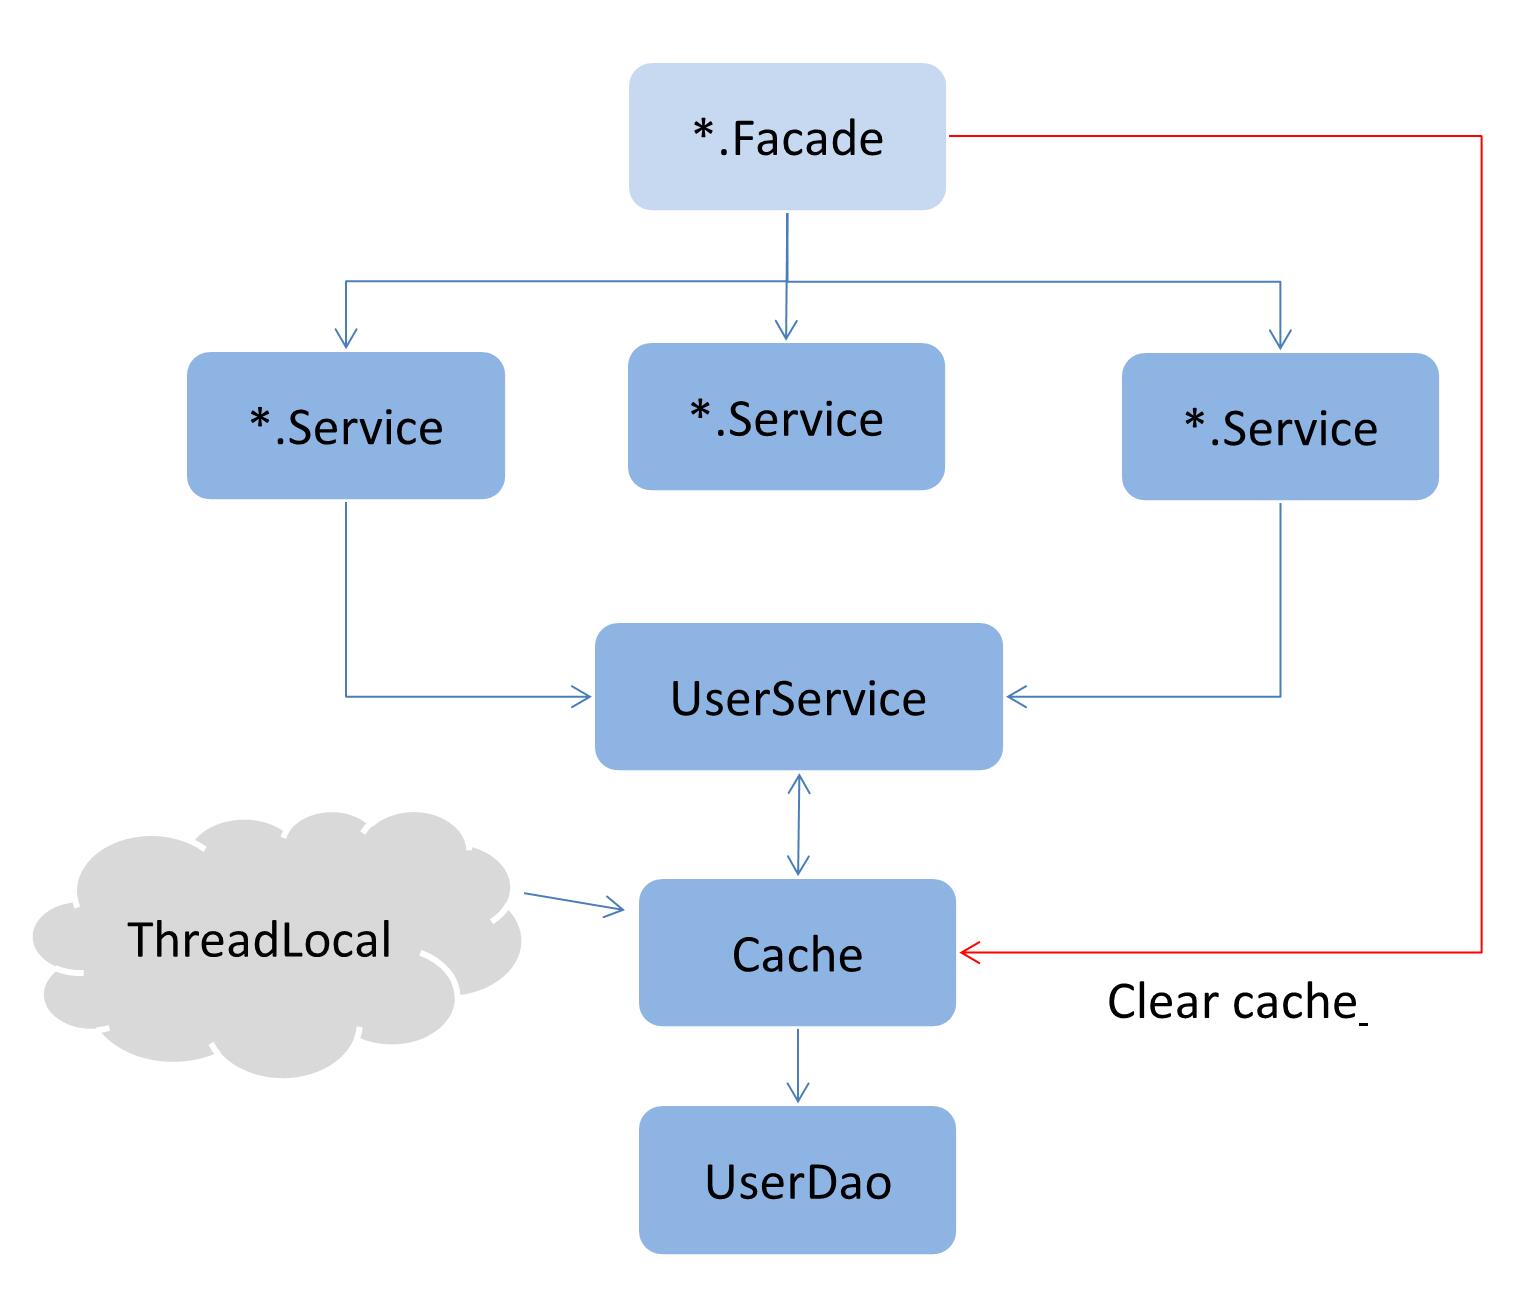
创建Context的目的无非就是将数据存储在ThreadLocal中充当请求级别的缓存,如果缓存是基于Spring Cache,那么上面的缺点就会不攻自破。
我找了下并没有找到基于ThreadLocal实现的缓存,大家如果有找到的可以发给我。
由于我们只关心存储(过期策略本文暂时还是延用上一篇的利用注解拦截形式去手工释放),所以实现难度并不大,因为我们完全可以参考Spring Cache的默认提供的内存级别的缓存ConcurrentMapCacheManager,整体效果如下图所示。

创建ThreadLocalCacheManager
只需要实现CacheManager这个接口即可,所有的缓存都放在一个Map中管理。
- getCache,这个方法非常重要,用来获取缓存对象,如果容器中不存在则自动创建并更新到容器中。
这个方法中展现了并发情况下的操作,面试时这种题经常会被问到,看看Spring Cache的实现还是很有帮助的。
- 构建函数支持无参也支持可以传入缓存名称的有参函数。有参的作用时提前初始化缓存,无参就只能等到真正调用缓存时才会创建。
- getCacheNames,返回容器中所有缓存的名称,这点在释放整个缓存容器的缓存时非常重要。
public class ThreadLocalCacheManager implements CacheManager {

    private final ConcurrentMap<String, Cache> cacheMap = new ConcurrentHashMap<String, Cache>(16);

    public ThreadLocalCacheManager(){

    }

    public ThreadLocalCacheManager(String... cacheNames) {
        setCacheNames(Arrays.asList(cacheNames));
    }

    protected Cache createConcurrentMapCache(String name) {
        return new ThreadLocalCache(name);
    }

    public void setCacheNames(Collection<String> cacheNames) {
        if (cacheNames != null) {
            for (String name : cacheNames) {
                this.cacheMap.put(name, createConcurrentMapCache(name));
            }
        }
    }

    @Override
    public Cache getCache(String name) {
        Cache cache = this.cacheMap.get(name);
        if (cache == null) {
            synchronized (this.cacheMap) {
                cache = this.cacheMap.get(name);
                if (cache == null) {
                    cache = createConcurrentMapCache(name);
                    this.cacheMap.put(name, cache);
                }
            }
        }
        return cache;
    }

    @Override
    public Collection<String> getCacheNames() {
        return Collections.unmodifiableSet(this.cacheMap.keySet());
    }
}
创建ThreadLocalCache
这个类是真正的缓存实现,继承AbstractValueAdaptingCache这个抽象类即可。相比内存缓存实现主要的区别就是存储的介质由ConcurrentMap变更为ThreadLocal,目的是每个线程单独一份缓存。
- init,这是个协助函数,主要是将一个Map对象存入ThreadLocal中
- lookup,根据key从缓存中取得对象,但不是很理解这个方法为什么叫lookup,看着别扭
- getName,获取当前缓存的名称,一般在设置缓存名称时我的习惯时类名+方法名
- getNativeCache,返回缓存的具体实现
- put,就是更新或者插入缓存对象
- putIfAbsent,put操作时先判断是否存在,如果存在返回缓存中的值,如果不存在就插入
- evict,移除某个KEY
- clear,清除缓存中的所有内容
public class ThreadLocalCache extends AbstractValueAdaptingCache {

    private final String name;

    private final ThreadLocal<ConcurrentMap> storeThreaLocal=new ThreadLocal<>();

    private void init(){
        if(null==this.storeThreaLocal.get()){
            this.storeThreaLocal.set(new ConcurrentHashMap());
        }
    }

    public ThreadLocalCache(String name){
        this(name,true);
    }

    protected ThreadLocalCache(String name,boolean allowNullValues) {
        super(allowNullValues);
        this.name=name;

        this.init();

    }

    @Override
    protected Object lookup(Object key) {
        return this.storeThreaLocal.get().get(key);
    }

    @Override
    public String getName() {
        return this.name;
    }

    @Override
    public Object getNativeCache() {
        return this.storeThreaLocal.get();
    }

    @Override
    public void put(Object key, Object value) {
        this.storeThreaLocal.get().put(key,value);

    }

    @Override
    public ValueWrapper putIfAbsent(Object key, Object value) {
        Object existing = this.storeThreaLocal.get().putIfAbsent(key, toStoreValue(value));
        return toValueWrapper(existing);
    }

    @Override
    public void evict(Object key) {
        this.storeThreaLocal.get().remove(key);
    }

    @Override
    public void clear() {
        this.storeThreaLocal.get().clear();
    }
}
配置缓存
配置非常简单,启动缓存注解,指定缓存容器。
    <cache:annotation-driven cache-manager="cacheManager"/>

    <bean id="cacheManager" class="core.cache.ThreadLocalCacheManager">

    </bean>
代码中增加Cache注解
增加@Cacheable注解,指定缓存名称以及缓存容器名称即可。相比Context方案就解决了缓存代码侵入性的问题,而且可以利用SpringCache的众多优点,比如缓存条件,缓存KEY的生成规则等等。
    @Cacheable(value = "CiaService.getCiaUserInfo",cacheManager = "cacheManager")
    @Override
    public CiaUserInfo getCiaUserInfo(String token) {
       //...
    }
释放缓存
由于有线程池的存在,所以如果不手动清除存储于ThreadLocal中的缓存数据,那么会影响我们最初的需求:请求级缓存。暂时还是通过特殊的注解来完成。通过cacheManager获取所有的缓存,然后依次执行释放操作。
 @Autowired
 private CacheManager cacheManager;
 @After("pointCut()")
    public void after(JoinPoint joinPoint) throws ProductServiceException {
        MethodSignature methodSignature = (MethodSignature) joinPoint.getSignature();
        Method targetMethod = methodSignature.getMethod();

        LocalCacheContext localCacheContext= targetMethod.getAnnotation(LocalCacheContext.class);
        if(null!=localCacheContext){
            Collection<String> cacheNames= this.cacheManager.getCacheNames();
            if(null!=cacheNames) {
                for(String cacheName :cacheNames) {
                    this.cacheManager.getCache(cacheName).clear();
                }
            }
        }
    }
如何优雅的释放缓存
上面的缓存释放是通过注解来完成的,这个注解只能加在入口函数上,是有一定限制的,如果加错了缓存就有可能在请求的中途被错误的清除。像Web容器就有非常多的方案,比如HandleInterceptor是请求级别的,可以非常方便的在请求前请求后增加一些自定义的功能。由于我这边的微服务是dubbo实现,所以可以在dubbo提供的方案中找一找,也许会有收获。
