如题。
我这里使用的是腾讯云短信平台,理由是,首次开通赠送100条短信
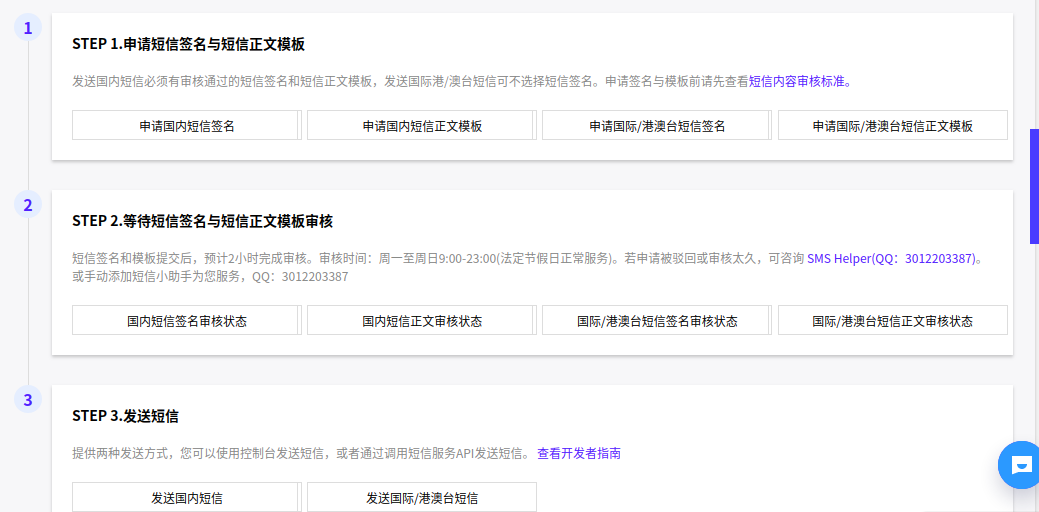
在个人实名认证之后,进入https://cloud.tencent.com/act/free

根据步骤,进行模板的填写和申请
接下来创建API秘钥https://console.cloud.tencent.com/cam/capi

点击继续使用,点击 新建秘钥
获取代码(以下是我修改后的代码,你只需要修改第17行和第27行的内容)
 1 package top.bigking.backstage.utils;
 2
 3 import com.tencentcloudapi.common.Credential;
 4 import com.tencentcloudapi.common.profile.ClientProfile;
 5 import com.tencentcloudapi.common.profile.HttpProfile;
 6 import com.tencentcloudapi.common.exception.TencentCloudSDKException;
 7
 8 import com.tencentcloudapi.sms.v20190711.SmsClient;
 9
10 import com.tencentcloudapi.sms.v20190711.models.SendSmsRequest;
11 import com.tencentcloudapi.sms.v20190711.models.SendSmsResponse;
12
13 public class TencentSendSms {
14     public static void sendSms(String phoneNum, String code) {
15         try {
16
17             Credential cred = new Credential("【SecreId】", "【secreKey】");
18
19             HttpProfile httpProfile = new HttpProfile();
20             httpProfile.setEndpoint("sms.tencentcloudapi.com");
21
22             ClientProfile clientProfile = new ClientProfile();
23             clientProfile.setHttpProfile(httpProfile);
24
25             SmsClient client = new SmsClient(cred, "ap-beijing", clientProfile);
26
27             String params = "{"PhoneNumberSet":["+86" + phoneNum + ""],"TemplateID":"【TemplateID】", "Sign":"【Sign】", "TemplateParamSet":[""+ code +""],"SmsSdkAppid":"【SmsSdkAppid】"}";
28             SendSmsRequest req = SendSmsRequest.fromJsonString(params, SendSmsRequest.class);
29
30             SendSmsResponse resp = client.SendSms(req);
31
32             System.out.println(SendSmsRequest.toJsonString(resp));
33         } catch (TencentCloudSDKException e) {
34             System.out.println(e.toString());
35         }
36
37     }
38 }
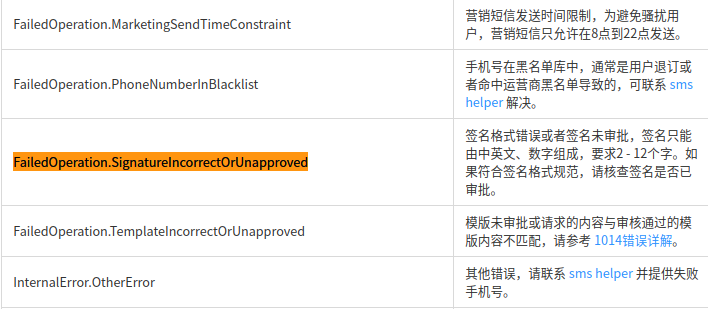
这里其实是有坑的,比如Sign项,它是选填项,可是却必须要填。具体出现的其他问题,建议你通过返回的错误码进行排查。
该页面的第六项即为错误码:https://cloud.tencent.com/document/product/382/38778
部分截图如下:
然后你会发现红色报错,这时需要添加pom依赖:
1         <dependency>
2             <groupId>com.tencentcloudapi</groupId>
3             <artifactId>tencentcloud-sdk-java</artifactId>
4             <version>3.1.27</version><!-- 注:这里只是示例版本号,请到 https://mvnrepository.com/artifact/com.tencentcloudapi/tencentcloud-sdk-java 获取最新版本号 -->
5         </dependency>
然后你就可以使用啦。
---------------------------------
建议放入工具package中,传入手机号和验证码,方法设置为静态。
Spring Boot结合Redis使用验证码接口的代码为:
 1 package top.bigking.backstage.service.impl;
 2
 3 import org.springframework.data.redis.core.RedisTemplate;
 4 import org.springframework.data.redis.serializer.StringRedisSerializer;
 5 import org.springframework.stereotype.Service;
 6 import top.bigking.backstage.service.VerifyCodeService;
 7 import top.bigking.backstage.utils.SendSms;
 8
 9 import javax.annotation.Resource;
10 import java.util.Random;
11 import java.util.concurrent.TimeUnit;
12
13 /**
14  * @Author ABKing
15  * @since 2020/4/2 下午5:41
16  **/
17 @Service
18 public class VerifyCodeServiceImpl implements VerifyCodeService {
19     @Resource
20     private RedisTemplate<String, String> redisTemplate;
21
22     @Override
23     public Boolean setVerifyCode(String phoneNum) {
24         redisTemplate.setKeySerializer(new StringRedisSerializer());
25         redisTemplate.setValueSerializer(new StringRedisSerializer());
26         String codeKey = "Verify_code:" + phoneNum + ":code";
27         String codeCount = "Verify_code:" + phoneNum + ":count";
28         String code = getCode(6);
29         SendSms.sendSms(phoneNum, code);
30         //一个号码一天最多发送三次验证码
31         String count = redisTemplate.opsForValue().get(codeCount);
32         if(count == null) {
33             redisTemplate.opsForValue().set(codeCount, "1", 1, TimeUnit.DAYS);
34             //验证码60秒过期
35             redisTemplate.opsForValue().set(codeKey, code, 60, TimeUnit.SECONDS);
36             return true;
37         }else if(Integer.parseInt(count) <= 2){
38             redisTemplate.opsForValue().set(codeCount, String.valueOf(Integer.parseInt(count) + 1), 1, TimeUnit.DAYS);
39             //验证码60秒过期
40             redisTemplate.opsForValue().set(codeKey, code, 60, TimeUnit.SECONDS);
41             return true;
42         }
43         return false;
44     }
45     private String getCode(Integer length){
46         String code = "";
47         Random random = new Random();
48         for (int i = 0; i < length; i++) {
49             //设置了bound参数后,取值范围为[0, bound),如果不写参数,则取值为int范围,-2^31 ~ 2^31-1
50             code += random.nextInt(10);
51         }
52         return code;
53     }
54
55     @Override
56     public String getVerifyCode(String phoneNum) {
57         redisTemplate.setKeySerializer(new StringRedisSerializer());
58         redisTemplate.setValueSerializer(new StringRedisSerializer());
59         String codeKey = "Verify_code:" + phoneNum + ":code";
60         return redisTemplate.opsForValue().get(codeKey);
61     }
62
63 }