在Silverlight4版本中,RichTextBox这个控件算是很受期待的控件了,希望通过这篇文章让你对该控件有所了解。
在Sl中,有TextBox,TextBlock,RichTextBox这3个核心的文本控件,从表面上看,RichTextBox看起来和一个普通的TextBox并
没有太多的区别,实际上它提供了诸如格式化文本,段落,超链接,内联图像这些功能,它甚至可以显示任何UIElement,比如DataGrid。
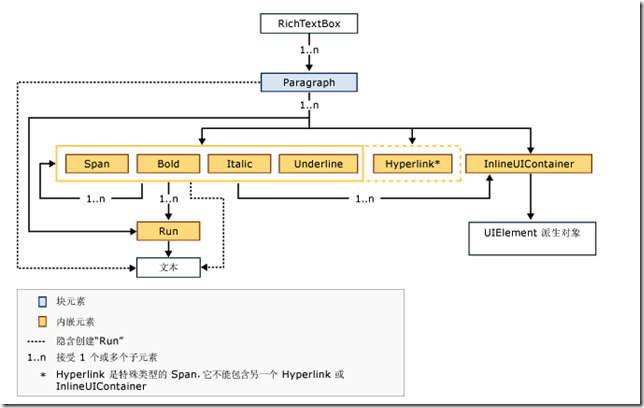
MSDN有关于RichTextBox内容模型的一个关系图
RichTextBox的内容属性是Blocks,这是一个Paragraph的集合,这些Paragraph可以包含Inline元素派生的元素。 比如Run,
Span,Bold,Italic,Hyperlink,InlineUIContainer,其实从图中你可能会注意到Hyperlink比较特殊,它不能包含其它Inline类型的元素。
下面熟悉RichTextBox中一些简单的属性:
添加RichTextBox:
<RichTextBox AcceptsReturn="True"x:Name="rbtMyRichTextBox">
RichTextBox常用的属性包括AcceptReturn和IsReadOnly属性,只有在只读模式下,UI元素才是可用的。
添加元素:
前面已经提到,RichTextBox包含了Paragraph集合,所以我们可以轻易添加任何内联元素,那么这里我们看一看在一个Paragraph
中添加多个元素的Code
Paragraph prgParagraph = new Paragraph();Run rnMyText = new Run();rnMyText.Text = "This is some example text with a ";prgParagraph.Inlines.Add(rnMyText);Hyperlink lnkSSLink = new Hyperlink();lnkSSLink.Inlines.Add("link to Silverlight Show");lnkSSLink.NavigateUri = new Uri("http://www.cnblogs.com");prgParagraph.Inlines.Add(lnkSSLink);rbtMyRichTextBox.Blocks.Add(prgParagraph);
上面的代码中,添加了一些文本和一个超链接,那么首先要做的是实例化一个Paragraph,在这个Paragraph中,我们添加了文本和
超链接,这些对象被添加到该Paragraph中的Inlines集合中,最后将这个Paragraph添加到了RichTextBox中
格式文本对象:
Run元素只能包含非格式化的文本,如果想要对文本进行格式化,那么可以采用变通的方式,即将Run元素包含在内联的格式元素中
Paragraph prgParagraph = new Paragraph();Bold bldText = new Bold();bldText.Inlines.Add(new Run() { Text = "This is some example text in bold" });Italic itlText = new Italic();itlText.Inlines.Add(new Run() { Text = "This is some example text in italics" });Underline unText = new Underline();unText.Inlines.Add(new Run() { Text = "This is some example text, underlined" });Bold bldTextWithItalic = new Bold();bldTextWithItalic.Inlines.Add(new Italic() { Inlines = { new Run(){ Text = "This is some example text, bold and italic" } } });prgParagraph.Inlines.Add(bldText);prgParagraph.Inlines.Add(new LineBreak());prgParagraph.Inlines.Add(itlText);prgParagraph.Inlines.Add(new LineBreak());prgParagraph.Inlines.Add(unText);prgParagraph.Inlines.Add(new LineBreak());prgParagraph.Inlines.Add(bldTextWithItalic);rbtMyRichTextBox.Blocks.Add(prgParagraph);上面的代码分别实现了文本的加粗,倾斜,下滑线功能,和添加元素的代码没有太大区别
添加InlineUIContainer:
顾名思义,这个元素就是UI元素的容器,当我们想要在内容中添加Image,DataGrid这些元素的时候,它非常的方便,步骤也是和其它内联元素一样的
先创建一个InlineUIContainer,然后在容器中添加UIElement,把这个容器添加到Paragraph中
InlineUIContainer iuicContainer = new InlineUIContainer();DataGrid dtgGrid = new DataGrid();dtgGrid.AutoGenerateColumns = true;dtgGrid.Width = 400;dtgGrid.Height = 200;dtgGrid.ItemsSource = ...iuicContainer.Child = dtgGrid;Paragraph prgParagraph = new Paragraph();prgParagraph.Inlines.Add(iuicContainer);rbtMyRichTextBox.Blocks.Add(prgParagraph);上面的CODE如果改成XAML声明:
<RichTextBox AcceptsReturn="True"Margin="5"x:Name="rbtMyRichTextBox"><Paragraph><InlineUIContainer><Image Source="Assets/logo.png" Width="100"></Image></InlineUIContainer></Paragraph></RichTextBox>通过上面的内容已经对RichTextBox有了基本的了解,其实之前我们都是通过编程的方式加入这些元素,但是更为常见的场景是
用户可以通过选择某些文本,并对选中的文本进行加粗等操作,RichTextBox提供了一个类型为TextSelection的Selection属性,
它包含了当前被选择的文本,然后我们可以通过GetPropertyValue和ApplyPropertyValue方法对选择的文本进行操作
操作Selection:
if (rbtMyRichTextBox != null && rbtMyRichTextBox.Selection.Text.Length > 0){if (rbtMyRichTextBox.Selection.GetPropertyValue(Run.FontWeightProperty) is FontWeight&& ((FontWeight)rbtMyRichTextBox.Selection.GetPropertyValue(Run.FontWeightProperty)) == FontWeights.Normal){rbtMyRichTextBox.Selection.ApplyPropertyValue(Run.FontWeightProperty, FontWeights.Bold);}else{rbtMyRichTextBox.Selection.ApplyPropertyValue(Run.FontWeightProperty, FontWeights.Normal);}}if (rbtMyRichTextBox != null){rbtMyRichTextBox.Focus();}上面的代码中,我们获取了选中文本的FontWeight属性,通过检查它是Normal还是Bold改变其值,这里的逻辑也可以用在FontSize等其它的属性上。简单的复制,剪切,粘贴功能:Sl4支持Clipboard功能,所以通过访问Clipboard我们可以很容易实现剪切,复制功能
private void Copy_Click(object sender, RoutedEventArgs e){Clipboard.SetText(rbtMyRichTextBox.Selection.Text);rbtMyRichTextBox.Focus();}private void Cut_Click(object sender, RoutedEventArgs e){Clipboard.SetText(rbtMyRichTextBox.Selection.Text);rbtMyRichTextBox.Selection.Text = "";rbtMyRichTextBox.Focus();}上面的代码分别演示如何对RichTextBox中被选中的文本进行复制,剪切
private void Paste_Click(object sender, RoutedEventArgs e){rbtMyRichTextBox.Selection.Text = Clipboard.GetText();rbtMyRichTextBox.Focus();}
复制的时候,如果RichTextBox没有选择任何元素,那么剪切板上的文本将显示在鼠标的当前位置上。注意的是,Cilpboard只能保护简单
的文本,所以当粘贴,复制的时候会丢失之前格式化的信息。
保存内容为文件:
RichTextBox提供了一个名为Xaml的属性,通过这个属性可以很方便的将内容保存为文件
private void Save_Click(object sender, RoutedEventArgs e){var uiElements = from block in rbtMyRichTextBox.Blocksfrom inline in (block as Paragraph).Inlineswhere inline.GetType() == typeof(InlineUIContainer)select inline;if (uiElements.Count() != 0){MessageBox.Show("UIElements cannot be saved");return;}SaveFileDialog sfdSaveXaml = new SaveFileDialog();sfdSaveXaml.DefaultExt = ".sav";sfdSaveXaml.Filter = "Saved rtb files|*.rtb";if (sfdSaveXaml.ShowDialog().Value){using (FileStream fs = (FileStream)sfdSaveXaml.OpenFile()){System.Text.UTF8Encoding enc = new System.Text.UTF8Encoding();byte[] buffer = enc.GetBytes(rbtMyRichTextBox.Xaml);fs.Write(buffer, 0, buffer.Length);fs.Close();}}}
因为RichTextBox不支持保存InlineUIContainer的元素,所以上面的代码中先将其排除,然后通过FileStream保存
打开文件:
这个与保存文件过程是相反的,只要将RichTextBox的Xaml属性设置为读出的XAML
private void Open_Click(object sender, RoutedEventArgs e){OpenFileDialog ofdOpenXaml = new OpenFileDialog();ofdOpenXaml.Multiselect = false;ofdOpenXaml.Filter = "Saved rtb files|*.rtb";if (ofdOpenXaml.ShowDialog().Value){FileInfo fiXamlFile = ofdOpenXaml.File;StreamReader sr = fiXamlFile.OpenText();rbtMyRichTextBox.Xaml = sr.ReadToEnd();sr.Close();}}
上面的保存,读取的文件只支持rtb格式的,其实可以使用其它的格式,当然肯定需要额外的编码,比如你打开一个文本文件,那么
首先需要你创建所必须的Run标记。总之,你需要将内容转换成Xaml格式。
对于保存文件,可以看看CodePlex上一个开眼项目:WordToXaml
这篇文章是参考的国外这篇RichTextBox,文中的源码可以在其中找到。
快到年底了,也许这是2010年写下的最后一篇博文了,11年Silverlight5就出来了,作为一个专注于Silverlight技术的开发者,我对未来
越来越充满期待。
