17.6.1 GDI路径
(1)路径的创建
BeginPath(hdc);
//1、使用任何绘制线的函数在DC上绘制,被存在GDI内部,但不显示出来。
//2、可以在当前路径中创建一个新的子路径,其中每个子路径都是一系列互相连接的线。
//3、每个子路径可以是闭合的,也可以是开放的。要闭合子路径时,可以用CloseFigure将子路径闭合,必要时会自动添加一条直线以达到些目的。其后用任何画线函数创建的都是新的子路径。
EndPath(hdc);
(2)五个与路径有关的函数(注意:下面的函数在用完之后,都会删除被定义的路径!)
①StokePath(hdc):用当前画笔来绘制出路径出来。
②FillPath(hdc):用当前画刷,根据当前的多边形填充模式填充,会先闭合开放的路径。
③StrokeAndFillPath(hdc):一次性完成StrokePath和FillPath的功能。
④hRgn = PathToRegion(hdc);将路径转换成区域,会先闭合开放的路径。
⑤SelectClipPath(hdc,iCombine): 选择当前的路径作为设备环境的一个裁剪区域。
其中的iCombine指明的路径与当前的裁剪区域如何合并。
(3)路径:对填充与裁剪来说,路径比区域更灵活,因为区域只能由矩形、椭圆和多组合组合来定义,但路径可用包括贝塞尔曲线或弧线定义。
(4)在GDI中,路径和区域的存储截然不同,路径是由一个直线和曲线定义的集合,而区域是一个扫描线的集合。
17.6.2 扩展画笔:hPen = ExtCreatePen(dwStyle, dwWidth,&lplb,0,NULL);
|
参数 |
含义 |
|
DWORD dwStyle |
画笔的类型。与CreatePen函数的画笔类型一样,此外,还可以使用 1、画笔类型:PS_GEOMETRIC、PS_COSMETIC等类型。 2、线端点样式: ①PS_ENDCAP_ROUND:圆形 ②PS_ENDCAP_SQUARE:方形,线的长度向外延伸了出宽度的一半。 ③PS_ENDCAP_FLAT:平面样式 3、线与线连接点的样式 ①PS_JOIN_ROUND:圆形 ②PS_JOIN_BEVEL:斜截,将连接点的末端切断 ③PS_JOIN_MITER:斜接,连接点是个尖端。 |
|
DWORD dwWidth |
画笔的宽度。PS_COSMETIC宽度必须是1。 |
|
LOGBRUSH* lplb |
画笔的属性。在CreatePen中,该参数是颜色。但扩展画笔函数中,这个参数是画刷,可能为PS_GEOMETRIC样式的内部着色。这个画笔甚至可以是点阵位图。 |
|
DWORD dwStyleCount |
自定义样式数组的元素个数 |
|
DWORD *lpStyle |
自定义的样式数组 |
【EndJoin程序】

第一个V:端点、连接点都为圆形;
第二个V:端点方形、连接点斜截 ;
第三个V:端点平面、连接点斜接;
/*------------------------------------------------------------
ENDJOIN.C -- Ends and Joins Demo
(c) Charles Petzold, 1998
------------------------------------------------------------*/
#include <windows.h>
LRESULT CALLBACK WndProc(HWND, UINT, WPARAM, LPARAM);
int WINAPI WinMain(HINSTANCE hInstance, HINSTANCE hPrevInstance,
                   PSTR szCmdLine, int iCmdShow)
{
    static TCHAR szAppName[] = TEXT("EndJoin");
    HWND         hwnd;
    MSG          msg;
    WNDCLASSEX     wndclass;
    wndclass.style = CS_HREDRAW | CS_VREDRAW;
    wndclass.cbSize = sizeof(WNDCLASSEX);
    wndclass.lpfnWndProc = WndProc;
    wndclass.cbClsExtra = 0;
    wndclass.cbWndExtra = 0;
    wndclass.hInstance = hInstance;
    wndclass.hIcon = LoadIcon(hInstance, szAppName);
    wndclass.hIconSm = LoadIcon(hInstance, szAppName);
    wndclass.hCursor = LoadCursor(NULL, IDC_ARROW);
    wndclass.hbrBackground = (HBRUSH)GetStockObject(WHITE_BRUSH);
    wndclass.lpszMenuName = NULL;
    wndclass.lpszClassName = szAppName;
    if (!RegisterClassEx(&wndclass))
    {
        MessageBox(NULL, TEXT("This program requires Windows NT!"),
                   szAppName, MB_ICONERROR);
        return 0;
    }

    hwnd = CreateWindow(szAppName,                  // window class name
                        TEXT("Ends and Joins Demo"), // window caption
                        WS_OVERLAPPEDWINDOW,        // window style
                        CW_USEDEFAULT,              // initial x position
                        CW_USEDEFAULT,              // initial y position
                        CW_USEDEFAULT,              // initial x size
                        CW_USEDEFAULT,              // initial y size
                        NULL,                       // parent window handle
                        NULL,                       // window menu handle
                        hInstance,                  // program instance handle
                        NULL);                     // creation parameters

    ShowWindow(hwnd, iCmdShow);
    UpdateWindow(hwnd);

    while (GetMessage(&msg, NULL, 0, 0))
    {
        TranslateMessage(&msg);
        DispatchMessage(&msg);
    }
    return msg.wParam;
}
LRESULT CALLBACK WndProc(HWND hwnd, UINT message, WPARAM wParam, LPARAM lParam)
{
    static int iEnd[] = { PS_ENDCAP_ROUND, PS_ENDCAP_SQUARE, PS_ENDCAP_FLAT };
    static int iJoin[] = { PS_JOIN_ROUND, PS_JOIN_BEVEL, PS_JOIN_MITER };
    static int cxClient, cyClient;
    HDC         hdc;
    PAINTSTRUCT ps;
    static LOGBRUSH    lb;

    switch (message)
    {
    case WM_CREATE:
        lb.lbStyle = BS_SOLID;
        lb.lbColor = RGB(128, 128, 128);
        lb.lbHatch = 0;
        return 0;
    case WM_SIZE:
        cxClient = LOWORD(lParam);
        cyClient = LOWORD(lParam);
        return 0;
    case WM_PAINT:
        hdc = BeginPaint(hwnd, &ps);

        SetMapMode(hdc, MM_ANISOTROPIC);
        SetWindowExtEx(hdc, 100, 100, NULL);
        SetViewportExtEx(hdc, cxClient, cyClient, NULL);
        for (int i = 0; i < 3; i++)
        {
            SelectObject(hdc, ExtCreatePen(PS_SOLID | PS_GEOMETRIC |
                iEnd[i] | iJoin[i], 10, &lb, 0, NULL));
            BeginPath(hdc);
            //用扩展画笔画出来。
            MoveToEx(hdc, 10 + 30 * i, 25, NULL);
            LineTo(hdc, 20 + 30 * i, 75);
            LineTo(hdc, 30 + 30 * i, 25);
            EndPath(hdc);
            StrokePath(hdc);
            DeleteObject(SelectObject(hdc, GetStockObject(BLACK_PEN)));

            //写宽度为1为画笔写出3个V
            MoveToEx(hdc, 10 + 30 * i, 25, NULL);
            LineTo(hdc, 20 + 30 * i, 75);
            LineTo(hdc, 30 + 30 * i, 25);

        }

        EndPaint(hwnd, &ps);
        return 0;

    case WM_DESTROY:
        PostQuitMessage(0);
        return 0;
    }
    return DefWindowProc(hwnd, message, wParam, lParam);
}
17.6.3 四个范例程序
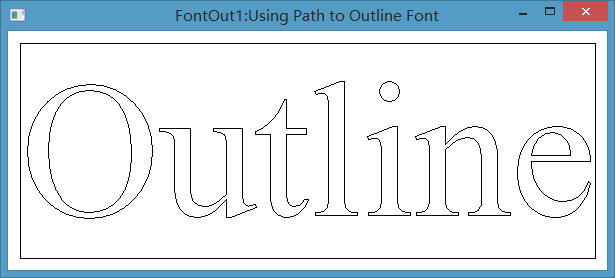
(1)FontOut1程序
①定义路径:
BeginPath(hdc);
TextOut(…); //此处是在定义的路径,并不会在GDI中立即显示出来
EndPath(hdc)
②StrokePath(hdc); //用当前画笔描边路径
③默认的文本背景模式是OPAQUE,所以文本框和字符轮廓都是路径的一部分。
【FontOut1程序】

/*------------------------------------------------
FONTOUT1 —— Using Path to Outline Font
(c) Charles Petzold,1998
-------------------------------------------------*/
#include <windows.h>
#include "EzFont.h"
TCHAR szAppName[] = TEXT("FontOut1");
TCHAR szTitle[] = TEXT("FontOut1:Using Path to Outline Font");
void PaintRoutine(HWND hwnd, HDC hdc, int cxArea, int cyArea)
{
    static TCHAR szString[] = TEXT("Outline");
    HFONT  hFont;
    SIZE  size;
    //创建144磅的字体
    hFont = EzCreateFont(hdc, TEXT("Times New Roman"), 1440, 0, 0, TRUE);
    SelectObject(hdc, hFont);

    GetTextExtentPoint32(hdc, szString, lstrlen(szString), &size);
    //开始绘制路径,但保存在GDI内部,并不在DC上显示出来
    BeginPath(hdc);

    //在中间位置显示出来
    //注意:输出文本包含两个部分,1个是文本框,一个是字符部分,所有在默认的SetBkMode(OPAQUE)模式
    //下,文本框的边框也会被当成一条路径来画,因此该示例用画笔描边路径后会有一个边框,也就是
    //文本框的轮廓也得了路径的一部分。
    TextOut(hdc, (cxArea - size.cx) / 2, (cyArea - size.cy) / 2, szString, lstrlen(szString));
    EndPath(hdc);
    StrokePath(hdc);  //用当前画笔描边路径
    SelectObject(hdc, GetStockObject(SYSTEM_FONT));
    DeleteObject(hFont);
}
//FontTest.c
/*------------------------------------------------------------
FONTTEST.C -- Test of FONT
(c) Charles Petzold, 1998
------------------------------------------------------------*/
#include <windows.h>
#include "EzFont.h"
LRESULT CALLBACK WndProc(HWND, UINT, WPARAM, LPARAM);
extern TCHAR szAppName[];
extern TCHAR szTitle[];
void PaintRoutine(HWND hwnd, HDC hdc, int cxArea, int cyArea);
int WINAPI WinMain(HINSTANCE hInstance, HINSTANCE hPrevInstance,
                   PSTR szCmdLine, int iCmdShow)
{
    HWND         hwnd;
    MSG          msg;
    WNDCLASSEX     wndclass;
    wndclass.style = CS_HREDRAW | CS_VREDRAW;
    wndclass.cbSize = sizeof(WNDCLASSEX);
    wndclass.lpfnWndProc = WndProc;
    wndclass.cbClsExtra = 0;
    wndclass.cbWndExtra = 0;
    wndclass.hInstance = hInstance;
    wndclass.hIcon = LoadIcon(hInstance, szAppName);
    wndclass.hIconSm = LoadIcon(hInstance, szAppName);
    wndclass.hCursor = LoadCursor(NULL, IDC_ARROW);
    wndclass.hbrBackground = (HBRUSH)GetStockObject(WHITE_BRUSH);
    wndclass.lpszMenuName = NULL;
    wndclass.lpszClassName = szAppName;
    if (!RegisterClassEx(&wndclass))
    {
        MessageBox(NULL, TEXT("This program requires Windows NT!"),
                   szAppName, MB_ICONERROR);
        return 0;
    }

    hwnd = CreateWindow(szAppName,                  // window class name
                        szTitle, // window caption
                        WS_OVERLAPPEDWINDOW,        // window style
                        CW_USEDEFAULT,              // initial x position
                        CW_USEDEFAULT,              // initial y position
                        CW_USEDEFAULT,              // initial x size
                        CW_USEDEFAULT,              // initial y size
                        NULL,                       // parent window handle
                        NULL,                       // window menu handle
                        hInstance,                  // program instance handle
                        NULL);                     // creation parameters

    ShowWindow(hwnd, iCmdShow);
    UpdateWindow(hwnd);

    while (GetMessage(&msg, NULL, 0, 0))
    {
        TranslateMessage(&msg);
        DispatchMessage(&msg);
    }
    return msg.wParam;
}
LRESULT CALLBACK WndProc(HWND hwnd, UINT message, WPARAM wParam, LPARAM lParam)
{
    HDC         hdc;
    PAINTSTRUCT ps;
    static int cxClient, cyClient;

    switch (message)
    {
    case WM_SIZE:
        cxClient = LOWORD(lParam);
        cyClient = HIWORD(lParam);
        return 0;
    case WM_PAINT:
        hdc = BeginPaint(hwnd, &ps);

        PaintRoutine(hwnd, hdc, cxClient, cyClient);
        EndPaint(hwnd, &ps);
        return 0;

    case WM_DESTROY:
        PostQuitMessage(0);
        return 0;
    }
    return DefWindowProc(hwnd, message, wParam, lParam);
}
//EzFont.h
/*----------------------------------------------------------
EZFONT.H  header file
------------------------------------------------------------*/
#pragma  once
#include <windows.h>
//iDeciPtHeight:字体高度:(单位1/10磅)如,12磅字体时,iDeciPtHeight=120
//iDecPtWidth:字体宽度(与上面单位一样)
//iAttributes:字体属性,如粗、斜、下划线、删除线等
//fLogRes:是否使用逻辑分辨率
HFONT EzCreateFont(HDC hdc, TCHAR* szFaceName, int iDeciPtHeight,
                   int iDeciPtWidth, int iAttributes, BOOL fLogRes);
#define EZ_ATTR_BOLD        1
#define EZ_ATTR_ITATIC      2
#define EZ_ATTR_UNDERLINE   4
#define Ez_ATTR_STRIKEOUT   8
//EzFont.c
/*-------------------------------------------------------------
EZFONT.C -- Easy Font Creation
(c) Charles Petzold, 1998
-------------------------------------------------------------*/
#include <windows.h>
#include <math.h>
#include "EzFont.h"
HFONT EzCreateFont(HDC hdc, TCHAR* szFaceName, int iDeciPtHeight,
                   int iDeciPtWidth, int iAttributes, BOOL fLogRes)
{
    HFONT hFont;
    LOGFONT lf;
    TEXTMETRIC tm;
    FLOAT  cxDpi, cyDpi;
    POINT pt;
    SaveDC(hdc);
    //设置高级图形模式,此模式下可以通过矩阵实现逻辑坐标到设备坐标的转换。
    SetGraphicsMode(hdc, GM_ADVANCED);
    ModifyWorldTransform(hdc, NULL, MWT_IDENTITY); //恢复变换到初始状态
    SetViewportOrgEx(hdc, 0, 0, NULL);
    SetWindowOrgEx(hdc, 0, 0, NULL);
    if (fLogRes)
    {
        //使用逻辑分辨率(单位:像素/英寸)
        cxDpi = (FLOAT)GetDeviceCaps(hdc, LOGPIXELSX);
        cyDpi = (FLOAT)GetDeviceCaps(hdc, LOGPIXELSY);
    } else
    {
        //实际的分辨率(单位:像素/英寸)
        cxDpi = (FLOAT)(25.4 * GetDeviceCaps(hdc, HORZRES) /
                        GetDeviceCaps(hdc, HORZSIZE));
        cyDpi = (FLOAT)(25.4 * GetDeviceCaps(hdc, VERTRES) /
                        GetDeviceCaps(hdc, VERTSIZE));  //vertsize单位为mm
    }
    //求出指定磅值的字体,需要多少像素点
    pt.x = (int)(iDeciPtWidth* cxDpi / 72);  //像素大小(设备单位)
    pt.y = (int)(iDeciPtHeight* cyDpi / 72); //像素大小(设备单位)
    DPtoLP(hdc, &pt, 1); //将像素大小由设备单位转为逻辑单位,也就是字体在逻辑坐标系中的大小
    lf.lfHeight = -(int)(fabs(pt.y) / 10.0 + 0.5); //加0.5是为了向上取整
    lf.lfWidth = 0; //注意这里要先设0,因为系统根据lfHeight匹配字体,会得到其固有的width
    //而iDeciPtWidth会因高级图形模式允许对字体进行拉伸和缩放。
    lf.lfEscapement = 0;
    lf.lfOrientation = 0;
    lf.lfWeight = iAttributes & EZ_ATTR_BOLD ? 700 : 0;
    lf.lfItalic = iAttributes & EZ_ATTR_ITATIC ? 1 : 0;
    lf.lfUnderline = iAttributes& EZ_ATTR_UNDERLINE ? 1 : 0;
    lf.lfStrikeOut = iAttributes& Ez_ATTR_STRIKEOUT ? 1 : 0;
    lf.lfCharSet = DEFAULT_CHARSET; //默认字符集
    lf.lfOutPrecision = 0;
    lf.lfClipPrecision = 0;
    lf.lfQuality = 0;
    lf.lfPitchAndFamily = 0;

    lstrcpy(lf.lfFaceName, szFaceName);
    hFont = CreateFontIndirect(&lf);
    if (iDeciPtWidth != 0)
    {
        hFont = (HFONT)SelectObject(hdc, hFont); //选入,并返回旧字体
        GetTextMetrics(hdc, &tm); //获取新字体信息
        DeleteObject(SelectObject(hdc, hFont));//将旧的选入,交并删除新的字体
        //字体的被左右拉伸,能这样实现的前提是设为高级图形模式,即SetGraphicsMode(hdc, GM_ADVANCED);
        lf.lfWidth = (int)(tm.tmAveCharWidth*fabs(pt.x) / fabs(pt.y) + 0.5);
        hFont = CreateFontIndirect(&lf);
    }
    RestoreDC(hdc, -1);
    return hFont;
}
(2)FontOut2程序
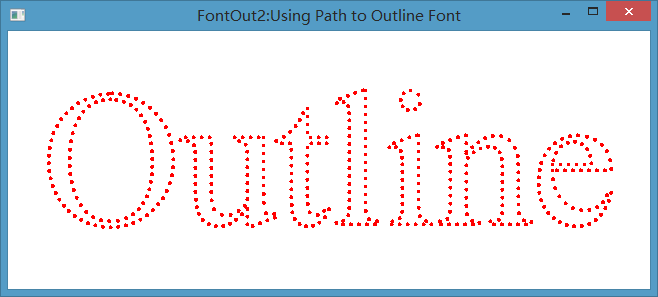
①使用ExCreatePen创建的画笔,而不是默认的画笔来描边路径
②本例创建一个宽3 个像素(1/24英寸)的红色虚线画笔
③也可以给路径填充颜色或图案(用FillPath或StrokeAndFillPath函数)
【FontOut2程序】

/*------------------------------------------------
FONTOUT2 —— Using Path to Outline Font
(c) Charles Petzold,1998
-------------------------------------------------*/
#include <windows.h>
#include "..\FontOut1\EzFont.h"
TCHAR szAppName[] = TEXT("FontOut2");
TCHAR szTitle[] = TEXT("FontOut2:Using Path to Outline Font");
void PaintRoutine(HWND hwnd, HDC hdc, int cxArea, int cyArea)
{
    static TCHAR szString[] = TEXT("Outline");
    HFONT  hFont;
    SIZE  size;
    LOGBRUSH lb;
    //创建144磅的字体
    hFont = EzCreateFont(hdc, TEXT("Times New Roman"), 1440, 0, 0, TRUE);
    SelectObject(hdc, hFont);
    SetBkMode(hdc, TRANSPARENT);  //设置为透明背景,则文本框(含轮廓线将不被创建)
    GetTextExtentPoint32(hdc, szString, lstrlen(szString), &size);
    //开始绘制路径,但保存在GDI内部,并不在DC上显示出来
    BeginPath(hdc);

    //在中间位置显示出来
    //注意:本例SetBkMode(hdc,TRANSPARENT)为透明模式,所以只有字符的轮廓,而没有文本框的轮廓
    TextOut(hdc, (cxArea - size.cx) / 2, (cyArea - size.cy) / 2, szString, lstrlen(szString));
    EndPath(hdc);
    lb.lbColor = RGB(255, 0, 0);
    lb.lbStyle = BS_SOLID;
    lb.lbHatch = 0;
    SelectObject(hdc, ExtCreatePen(PS_GEOMETRIC | PS_DOT,
        GetDeviceCaps(hdc, LOGPIXELSY) / 24, &lb, 0, NULL));  //创建3像素的点线
    StrokePath(hdc);  //用当前画笔描边路径
    DeleteObject(SelectObject(hdc, GetStockObject(BLACK_PEN)));
    SelectObject(hdc, GetStockObject(SYSTEM_FONT));
    DeleteObject(hFont);
}
//EzFont.h、EzFont.c、FontTest.c与本节中的FontOut1程序相同。
(3)FillFont程序
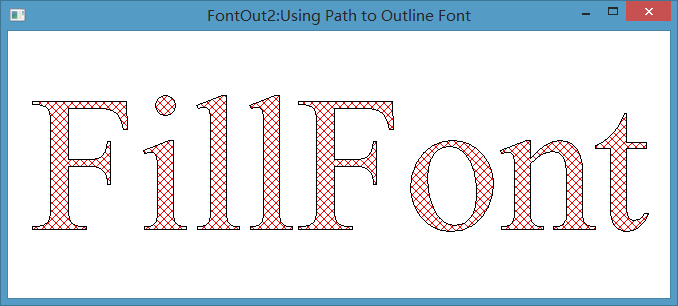
①使用默认画笔绘制路径轮廓,用HS_DIAGCROSS样式创建红色阴影线填充
②创建路径时,设置背影为TRANSPARENT。即路径只保存字符的轮廓,不保留文本框的轮廓。
③描边并填充路径时,使用OPAQUE模式,因为路径内部的区域,其要用阴影线填充。
④注意:当路径转为区域时,会根据将路径包围的范围,划分成若干个区域。如本例中当绘制路径并设置为OPAQUE里,整个文本框内部并被文字划分成若干个区域,若干个区域的并集就是文本框的大小。所以当本例中第1个SetBkMode被注释掉,也就是默认的OPAQUE时,则填充区域视多边形的填充模式而定,如果设为WINDING模式,则填充整个文本框,若设为ALTERNATE,则填充文本框内部除去字符以外的部分。
【FillFont程序】

/*------------------------------------------------
FONTFILL —— Using Path to Fill Font
(c) Charles Petzold,1998
-------------------------------------------------*/
#include <windows.h>
#include "..\FontOut1\EzFont.h"

TCHAR szAppName[] = TEXT("FontOut2");
TCHAR szTitle[] = TEXT("FontOut2:Using Path to Outline Font");
void PaintRoutine(HWND hwnd, HDC hdc, int cxArea, int cyArea)
{
    static TCHAR szString[] = TEXT("FillFont");
    HFONT  hFont;
    SIZE  size;
    //创建144磅的字体
    hFont = EzCreateFont(hdc, TEXT("Times New Roman"), 1440, 0, 0, TRUE);
    SelectObject(hdc, hFont);
    //设置为透明背景,则文本框(含轮廓线将不被创建)
    SetBkMode(hdc, TRANSPARENT);  //如果该句被注释掉,则路径中包含文本框和字符轮廓
    GetTextExtentPoint32(hdc, szString, lstrlen(szString), &size);
    //开始绘制路径,但保存在GDI内部,并不在DC上显示出来
    BeginPath(hdc);

    //在中间位置显示出来
    //注意:本例SetBkMode(hdc,TRANSPARENT)为透明模式,所以只有字符的轮廓,而没有文本框的轮廓
    TextOut(hdc, (cxArea - size.cx) / 2, (cyArea - size.cy) / 2, szString, lstrlen(szString));
    EndPath(hdc);
    //创建带阴影线的画刷
    SelectObject(hdc, CreateHatchBrush(HS_DIAGCROSS, RGB(255, 0, 0)));
    SetBkMode(hdc, OPAQUE);
    //SetPolyFillMode(hdc, WINDING);  //默认的填充模式为ALTERNATE(交替)填充
    //当第1个SetBkMode为OPAQUE,而此处为WINDING
    //时,会填充整个文本框(含字符内部),如果
    //为ALTERNATE,则填充文本框内部除(字符的部分)
    //当第1个SetBkMode为TRANSPARENT时,不管此处为
    //WINDING还是ALTERNATE,则只填充字体内部区域。
    StrokeAndFillPath(hdc);  //用默认画笔描边,并用刚创建的画刷填充路径。
    DeleteObject(SelectObject(hdc, GetStockObject(WHITE_BRUSH)));
    SelectObject(hdc, GetStockObject(SYSTEM_FONT));
    DeleteObject(hFont);
}
(4)FontClip程序
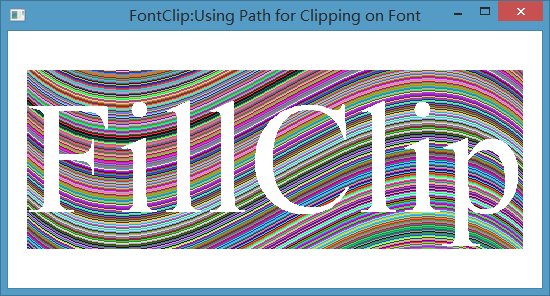
①先用TextOut画出路径,再将路径通过SelectClipPath设为裁剪区域
②如果绘制路径时,将SetBkMode设为TRANSPARENT,则区域为字体轮廓的内部。如果设为OPAQUE,则区域为整个文本框。
【FontClip程序】

/*------------------------------------------------
FONTCLIP —— Using Path for Clipping on Font
(c) Charles Petzold,1998
-------------------------------------------------*/
#include <windows.h>
#include "..\FontOut1\EzFont.h"

TCHAR szAppName[] = TEXT("FontClip");
TCHAR szTitle[] = TEXT("FontClip:Using Path for Clipping on Font");
void PaintRoutine(HWND hwnd, HDC hdc, int cxArea, int cyArea)
{
    static TCHAR szString[] = TEXT("FillClip");
    HFONT  hFont;
    SIZE  size;
    int y, iOffset;
    POINT pt[4];
    //创建120磅的字体
    hFont = EzCreateFont(hdc, TEXT("Times New Roman"), 1200, 0, 0, TRUE);
    SelectObject(hdc, hFont);
    //设置为透明背景,则文本框(含轮廓线将不被创建)
    //SetBkMode(hdc,TRANSPARENT);  //如果该句被注释掉,则路径中包含文本框和字符轮廓
    GetTextExtentPoint32(hdc, szString, lstrlen(szString), &size);
    //开始绘制路径,但保存在GDI内部,并不在DC上显示出来
    BeginPath(hdc);

    //在中间位置显示出来
    //注意:本例SetBkMode(hdc,TRANSPARENT)为透明模式,所以只有字符的轮廓,而没有文本框的轮廓
    TextOut(hdc, (cxArea - size.cx) / 2, (cyArea - size.cy) / 2, szString, lstrlen(szString));
    EndPath(hdc);
    //将路径设为裁剪区域
    //SetPolyFillMode(hdc, WINDING);
    SelectClipPath(hdc, RGN_COPY);  //1、如果SetBkMode(OPAQUE),当WINDING模式时,则整个文本框为裁剪区域
    //设为ALTERNATE时,则文本框除文字部分以外的区域为裁剪区域
    //2、如果SetBkMode(TRANSPARENT),不管是ALTERNATE或WINDING模式,
    //裁剪区域均为字符内部的区域。(与上面FontFill程序的原理是一样的。)
    //绘制Bezier样条线
    iOffset = (cxArea + cyArea) / 4;
    for (y = -iOffset; y < cyArea + iOffset; y++)
    {
        pt[0].x = 0;
        pt[0].y = y;
        pt[1].x = cxArea / 3;
        pt[1].y = y + iOffset;
        pt[2].x = 2 * cxArea / 3;
        pt[2].y = y - iOffset;
        pt[3].x = cxArea;
        pt[3].y = y;
        SelectObject(hdc, CreatePen(PS_SOLID, 1, RGB(rand() % 256, rand() % 256, rand() % 256)));
        PolyBezier(hdc, pt, 4);
        DeleteObject(SelectObject(hdc, GetStockObject(BLACK_PEN)));
    }
    SelectObject(hdc, GetStockObject(SYSTEM_FONT));
    DeleteObject(hFont);
}
//EzFont.h、EzFont.c、FontTest.c与本节中的FontOut1程序相同。