简介
通过上一节我们已经通过docker-compose在swarm中部署了有三个实例的高可用eureka服务注册中心,本节我们讨论一下,怎么在创建一个spring cloud生产者,并用docker部署,注册到上一节的eureka集群中。
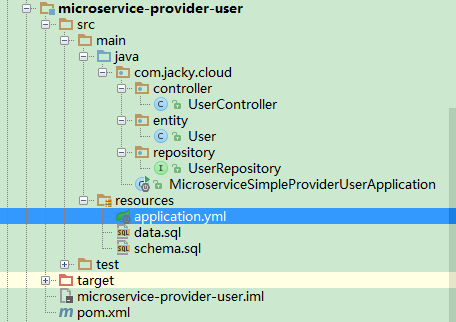
一、创建服务提供者模块(microservice-provider-user)
代码结构如下:
二、pom.xml文件
<?xml version="1.0" encoding="UTF-8"?>
<project xmlns="http://maven.apache.org/POM/4.0.0"
         xmlns:xsi="http://www.w3.org/2001/XMLSchema-instance"
         xsi:schemaLocation="http://maven.apache.org/POM/4.0.0 http://maven.apache.org/xsd/maven-4.0.0.xsd">
    <parent>
        <artifactId>microservice-consumer-movie</artifactId>
        <groupId>com.jacky</groupId>
        <version>1.0-SNAPSHOT</version>
        <relativePath>../microservice-consumer-movie/pom.xml</relativePath>
    </parent>
    <modelVersion>4.0.0</modelVersion>

    <artifactId>microservice-provider-user</artifactId>
    <packaging>jar</packaging>

    <properties>
        <project.build.sourceEncoding>UTF-8</project.build.sourceEncoding>
        <project.reporting.outputEncoding>UTF-8</project.reporting.outputEncoding>
        <java.version>1.8</java.version>
    </properties>

    <dependencies>
        <!--spring boot使用jpa需要引入的包-->
        <dependency>
            <groupId>org.springframework.boot</groupId>
            <artifactId>spring-boot-starter-data-jpa</artifactId>
        </dependency>
        <dependency>
            <groupId>mysql</groupId>
            <artifactId>mysql-connector-java</artifactId>
        </dependency>
        <dependency>
            <groupId>org.springframework.boot</groupId>
            <artifactId>spring-boot-starter-web</artifactId>
        </dependency>
        <dependency>
            <groupId>com.h2database</groupId>
            <artifactId>h2</artifactId>
            <scope>runtime</scope>
        </dependency>

        <dependency>
            <groupId>org.springframework.cloud</groupId>
            <artifactId>spring-cloud-starter-eureka</artifactId>
        </dependency>

        <dependency>
            <groupId>org.springframework.boot</groupId>
            <artifactId>spring-boot-starter-actuator</artifactId>
        </dependency>
        <!--<dependency>
            <groupId>org.springframework.cloud</groupId>
            <artifactId>spring-cloud-starter-zipkin</artifactId>
        </dependency>-->
    </dependencies>

    <build>
        <plugins>
            <plugin>
                <groupId>com.spotify</groupId>
                <artifactId>docker-maven-plugin</artifactId>
                <executions>
                    <!--设置在执行maven 的install时构建镜像-->
                    <execution>
                        <id>build-image</id>
                        <phase>install</phase>
                        <goals>
                            <goal>build</goal>
                        </goals>
                    </execution>
                </executions>
                <configuration>
                    <!--安装了docker的主机,并且打开了api remote接口设置-->
                    <dockerHost>http://192.168.6.130:5678</dockerHost>
                    <pushImage>true</pushImage><!--设置上传镜像到私有仓库,需要docker设置指定私有仓库地址-->
                    <!--镜像名称-->
                    <imageName>${docker.repostory}/${docker.image.prefix}/${project.artifactId}:${project.version}</imageName>
                    <!--镜像的基础版本-->
                    <baseImage>java:openjdk-8-jdk-alpine</baseImage>
                    <!--镜像启动参数-->
                    <entryPoint>["java", "-jar", "/${project.build.finalName}.jar"]</entryPoint>
                    <resources>
                        <resource>
                            <targetPath>/</targetPath>
                            <directory>${project.build.directory}</directory>
                            <include>${project.build.finalName}.jar</include>
                        </resource>
                    </resources>
                </configuration>
            </plugin>
        </plugins>
    </build>
</project>
三、配置文件:application.yml
server:
  port: 7900
spring:
  datasource:
    url: jdbc:mysql://192.168.6.131:53306/sping-cloud-demo?useUnicode=true&characterEncoding=UTF-8
    username: root
    password: admin
    schema: classpath:schema.sql
    data: classpath:data.sql
  jpa:
      hibernate:
        ddl-auto: none #每次启动时不根据实体自动构建数据库结构
        naming:
          strategy: org.hibernate.cfg.ImprovedNamingStrategy #实体和表的映射策略
      properties:
        hibernate:
          dialect: org.hibernate.dialect.MySQL5Dialect  #数据库方言
      show-sql: true
  application:
    name: microservice-provider-user           #虚拟IP名称 virtual Ip
  #zipkin:
    #base-url: http://127.0.0.1:7788
#日志配置开始
logging:
  level:
    root: INFO
    org.hibernate: INFO
    org.hibernate.type.descriptor.sql.BasicBinder: TRACE
    org.hibernate.type.descriptor.sql.BasicExtractor: TRACE
    com.itmuch: DEBUG
#日志配置结束
#eureka配置开始
eureka:
  client:
    healthcheck:
      enabled: true            # 开启健康检查(需要spring-boot-starter-actuator依赖)
    serviceUrl:
      defaultZone: http://jacky:admin@peer1:8761/eureka/,http://jacky:admin@peer2:8762/eureka/,http://jacky:admin@peer3:8763/eureka/
  instance:
    prefer-ip-address: true                   # 开启健康检查(需要spring-boot-starter-actuator依赖)
    lease-expiration-duration-in-seconds: 90  #续约到期时间(单位 S)默认是90S
    lease-renewal-interval-in-seconds: 30     # 续约更新时间间隔(默认30秒)
    instance-id: ${spring.application.name}:${spring.cloud.client.ipAddress}:${spring.application.instance_id:${server.port}}
    metadata-map:
      zone: ABC      # eureka可以理解的元数据
      lilizhou: BBC  # 不会影响客户端行为
#eureka配置结束
四、用户建表语句(schema.sql)
DROP TABLE IF EXISTS user;
create table user(
 id INT NOT NULL AUTO_INCREMENT,
 username varchar(40),
 name varchar(20),
 age int(3),
 balance decimal(10,2),
 primary key(id)
);
五、测试数据(data.sql)
insert into user(id,username, name, age, balance) values(1,'user1', '张三', 20, 100.00);
insert into user(id,username, name, age, balance) values(2,'user2', '李四', 20, 100.00);
insert into user(id,username, name, age, balance) values(3,'user3', '王五', 20, 100.00);
insert into user(id,username, name, age, balance) values(4,'user4', '马六', 20, 100.00);
六、实体类(User.java)
package com.jacky.cloud.entity;

import java.math.BigDecimal;

import javax.persistence.Column;
import javax.persistence.Entity;
import javax.persistence.GeneratedValue;
import javax.persistence.GenerationType;
import javax.persistence.Id;

@Entity
public class User {

  public User(Long id, String username) {
    super();
    this.id = id;
    this.username = username;
  }

  public User() {
    super();
  }

  @Id
  @GeneratedValue(strategy = GenerationType.AUTO)
  private Long id;

  @Column
  private String username;

  @Column
  private String name;

  @Column
  private Short age;

  @Column
  private BigDecimal balance;

  public Long getId() {
    return this.id;
  }

  public void setId(Long id) {
    this.id = id;
  }

  public String getUsername() {
    return this.username;
  }

  public void setUsername(String username) {
    this.username = username;
  }

  public String getName() {
    return this.name;
  }

  public void setName(String name) {
    this.name = name;
  }

  public Short getAge() {
    return this.age;
  }

  public void setAge(Short age) {
    this.age = age;
  }

  public BigDecimal getBalance() {
    return this.balance;
  }

  public void setBalance(BigDecimal balance) {
    this.balance = balance;
  }
}
七、jpa-Repository类
package com.jacky.cloud.repository;

import com.jacky.cloud.entity.User;
import org.springframework.data.jpa.repository.JpaRepository;
import org.springframework.stereotype.Repository;


@Repository
public interface UserRepository extends JpaRepository<User, Long> {

}
八、编写UserController.java
package com.jacky.cloud.controller;

import java.util.ArrayList;
import java.util.List;

import com.jacky.cloud.entity.User;
import com.jacky.cloud.repository.UserRepository;
import org.springframework.beans.factory.annotation.Autowired;
import org.springframework.cloud.client.ServiceInstance;
import org.springframework.cloud.client.discovery.DiscoveryClient;
import org.springframework.web.bind.annotation.GetMapping;
import org.springframework.web.bind.annotation.PathVariable;
import org.springframework.web.bind.annotation.PostMapping;
import org.springframework.web.bind.annotation.RequestBody;
import org.springframework.web.bind.annotation.RestController;

import com.google.common.collect.Lists;


import com.netflix.appinfo.InstanceInfo;
import com.netflix.discovery.EurekaClient;

@RestController
public class UserController {

  @Autowired
  private UserRepository userRepository;

  @Autowired
  private EurekaClient eurekaClient;

  @Autowired
  private DiscoveryClient discoveryClient;

  @GetMapping("/simple/{id}")
  public User findById(@PathVariable Long id) {
    return this.userRepository.findOne(id);
  }

  @GetMapping("/eureka-instance")
  public String serviceUrl() {
    InstanceInfo instance = this.eurekaClient.getNextServerFromEureka("MICROSERVICE-PROVIDER-USER", false);
    return instance.getHomePageUrl();
  }

  @GetMapping("/instance-info")
  public ServiceInstance showInfo() {
    ServiceInstance localServiceInstance = this.discoveryClient.getLocalServiceInstance();
    return localServiceInstance;
  }

  @PostMapping("/user")
  public User postUser(@RequestBody User user) {
    return user;
  }

  // 该请求不会成功
  @GetMapping("/get-user")
  public User getUser(User user) {
    return user;
  }

  @GetMapping("list-all")
  public List<User> listAll() {
    ArrayList<User> list = Lists.newArrayList();
    User user = new User(1L, "zhangsan");
    User user2 = new User(2L, "zhangsan");
    User user3 = new User(3L, "zhangsan");
    list.add(user);
    list.add(user2);
    list.add(user3);
    return list;
  }
}
九、修改docker-compose.yml文件
version: "3"
services:
  peer1:      # 默认情况下,其他服务可以使用服务名称连接到该服务。因此,对于eurekaService1的节点,它需要连接http://eurekaService2/3:951X/eureka/,因此需要配置该服务的名称是eurekaService1。
    image: 192.168.6.132:5000/jacky/microservice-discovery-eureka-ha:1.0-SNAPSHOT
    deploy:
      replicas: 1   #定义 replicated 模式的服务的复本数量
      update_config:
        parallelism: 1    #每次更新复本数量
        delay: 2s       #每次更新间隔
      restart_policy:
        condition: on-failure     #定义服务的重启条件
    networks:
      - eureka-net
    ports:
      - "8761:8761"
    environment:
      - spring.profiles.active=peer1
  peer2:    # 高可用eureka注册节点2
    image: 192.168.6.132:5000/jacky/microservice-discovery-eureka-ha:1.0-SNAPSHOT
    deploy:
      replicas: 1   #定义 replicated 模式的服务的复本数量
      update_config:
        parallelism: 1    #每次更新复本数量
        delay: 2s       #每次更新间隔
      restart_policy:
        condition: on-failure     #定义服务的重启条件
    networks:
      - eureka-net
    ports:
      - "8762:8762"
    environment:
      - spring.profiles.active=peer2
  peer3:    # 高可用eureka注册节点3
    image: 192.168.6.132:5000/jacky/microservice-discovery-eureka-ha:1.0-SNAPSHOT
    deploy:
      replicas: 1   #定义 replicated 模式的服务的复本数量
      update_config:
        parallelism: 1    #每次更新复本数量
        delay: 2s       #每次更新间隔
      restart_policy:
        condition: on-failure     #定义服务的重启条件
    networks:
      - eureka-net
    ports:
      - "8763:8763"
    environment:
      - spring.profiles.active=peer3
  userService:
    image: 192.168.6.132:5000/jacky/microservice-provider-user:1.0-SNAPSHOT
    deploy:
       replicas: 1   #定义 replicated 模式的服务的复本数量
       update_config:
          parallelism: 1    #每次更新复本数量
          delay: 2s       #每次更新间隔
       restart_policy:
          condition: on-failure     #如果某个实例失败,立即重启容器
    networks:
       - eureka-net
    ports:
       - "7900:7900"
networks:
  eureka-net:            #网络名称
    driver: overlay
十、父项目引入microservice-provider-user模块
十一、启动类(MicroserviceSimpleProviderUserApplication.java)
package com.jacky.cloud;

import org.springframework.boot.SpringApplication;
import org.springframework.boot.autoconfigure.SpringBootApplication;
import org.springframework.cloud.netflix.eureka.EnableEurekaClient;

@SpringBootApplication
@EnableEurekaClient
public class MicroserviceSimpleProviderUserApplication {

  public static void main(String[] args) {
    SpringApplication.run(MicroserviceSimpleProviderUserApplication.class, args);
  }
}
十二、打包

然后在docker中就可以看到打包成功的镜像

十三、利用docker-compose启动服务提供者镜像
把docker-compose.yml上传到linux中,然后
[root@node1 docker-compose]# docker stack deploy -c docker-compose.yml eureka
注意:这样执行不会影响到原来运行的eureka集群服务,觉得这点docker做的很人性化
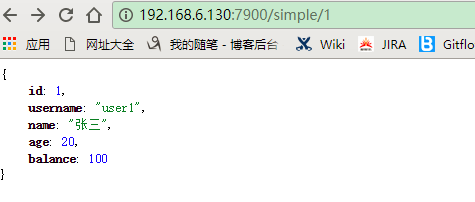
十四、测试

喜欢本文的朋友,欢迎关注,本人的微信公众号,“咖啡牧羊人”